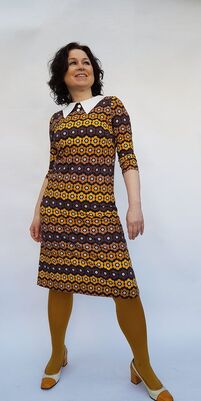
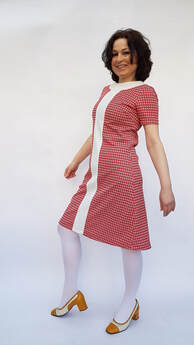
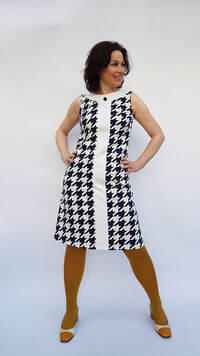
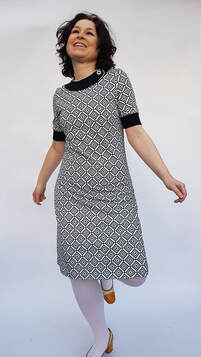
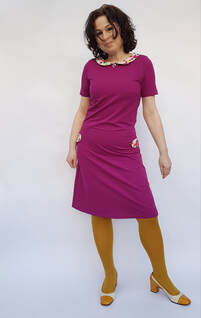
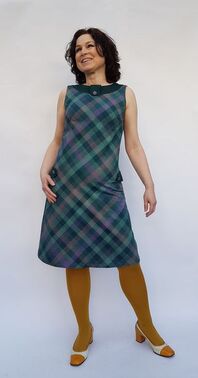
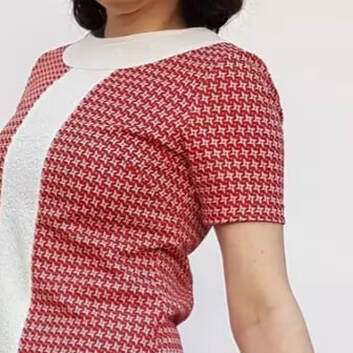
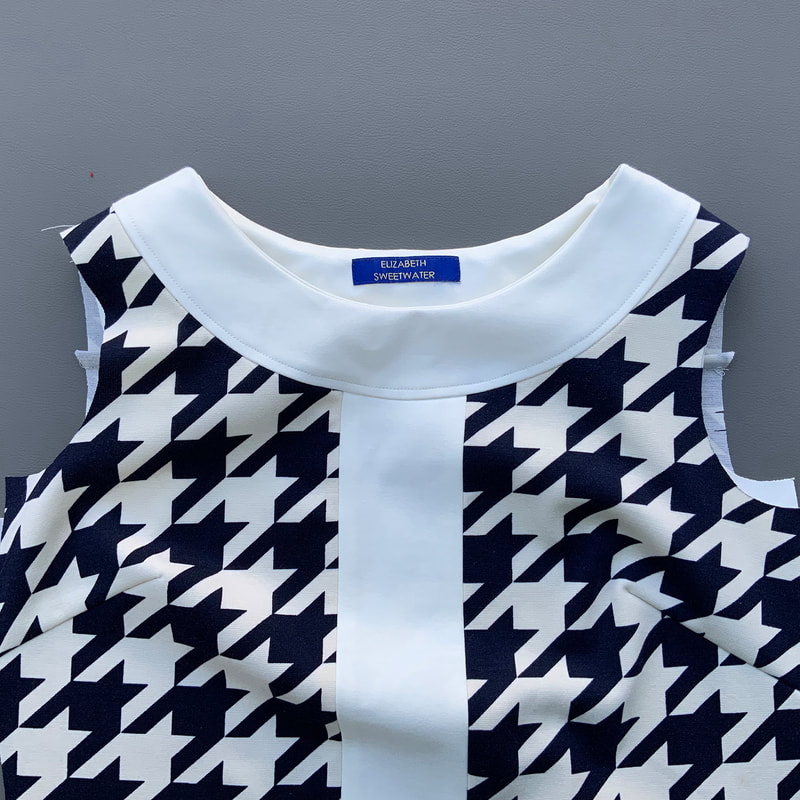
Elizabeth Sweetwater
  • Tutorials
  • Movies
  • Happy Sewers
  • About

A-line Shift Dress

4/7/2022

 
A-line Shift Jurk
Picture
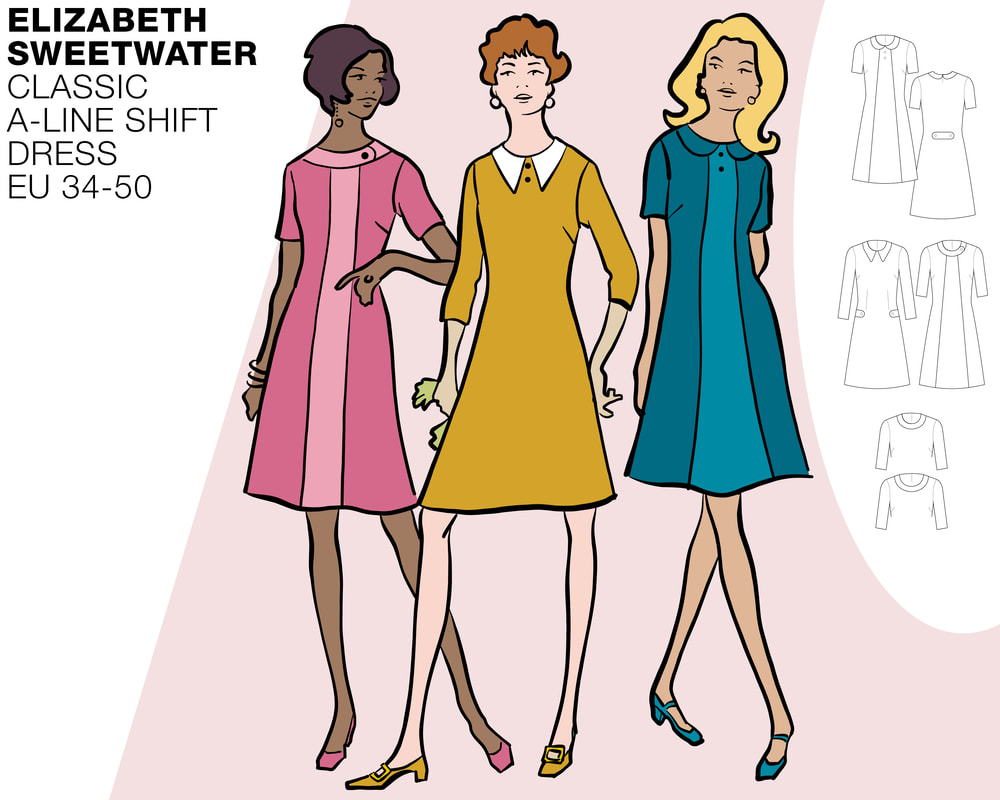
Introductie
Deze a-lijn jurk met kraagje is een absolute retro klassieker met z'n oorsprong in de jaren '60 en mocht niet ontbreken in onze patronen collectie. Zoals altijd zijn er veel verschillende jurkjes te maken met alle toegevoegde details. Je kunt de jurk maken met een colourblock effect of in een print. Je kunt kiezen uit verschillende mouwlengtes en halsvariaties. De jurk heeft een wat uitlopende a-lijn met bustenaden. Het patroon is geschikt voor diverse soorten jersey zoals een Punta, single jersey, french terry of jacquard jersey. Dit te gekke jurkje ga je vaak maken en dragen! Zoals vermeld in de tekst kun je kiezen voor de optie hoge hals of een wat lagere hals.
Alle jurken in deze tutorial zijn ingekort tot 100 cm lengte gemeten vanaf de schouder. Het model heeft een lengte van 158cm en draagt ​​maat 36. Alle samples zijn gemaakt met de regular waist optie.

Introduction
This a-line dress with a collar is an absolute retro classic with its origins in the 1960s and could not be missed in our pattern collection. As always, there are many different dresses to make with all the added details. You can make the dress with a color block effect or in a print. You can choose from different sleeve lengths and neck variations. The dress has a slightly flared A-line with bust seams. The pattern is suitable for various types of jersey such as a Punta, single jersey, French terry or jacquard jersey. You will often make and wear this awesome dress! As mentioned in the text you can choose for a high neck option or a low neck option.
All dresses in this tutorial are shortened to 100cm length measured from shoulder. The model has a height of 158cm and wears size 36. All samples are made with the regular waist option.
Picture
Picture
Picture
Picture
Picture
Picture

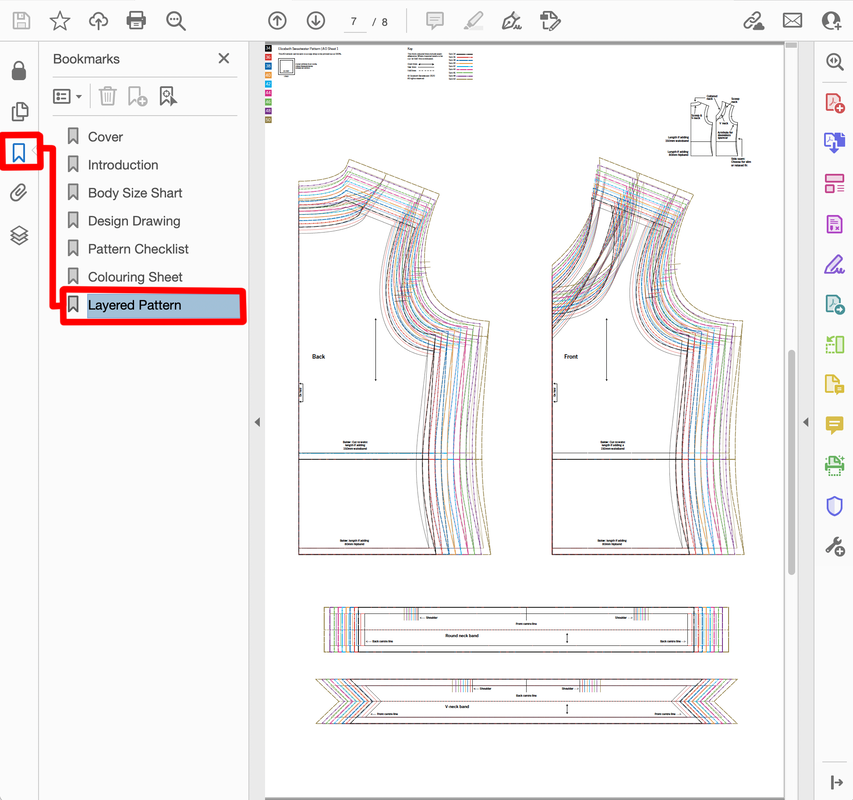
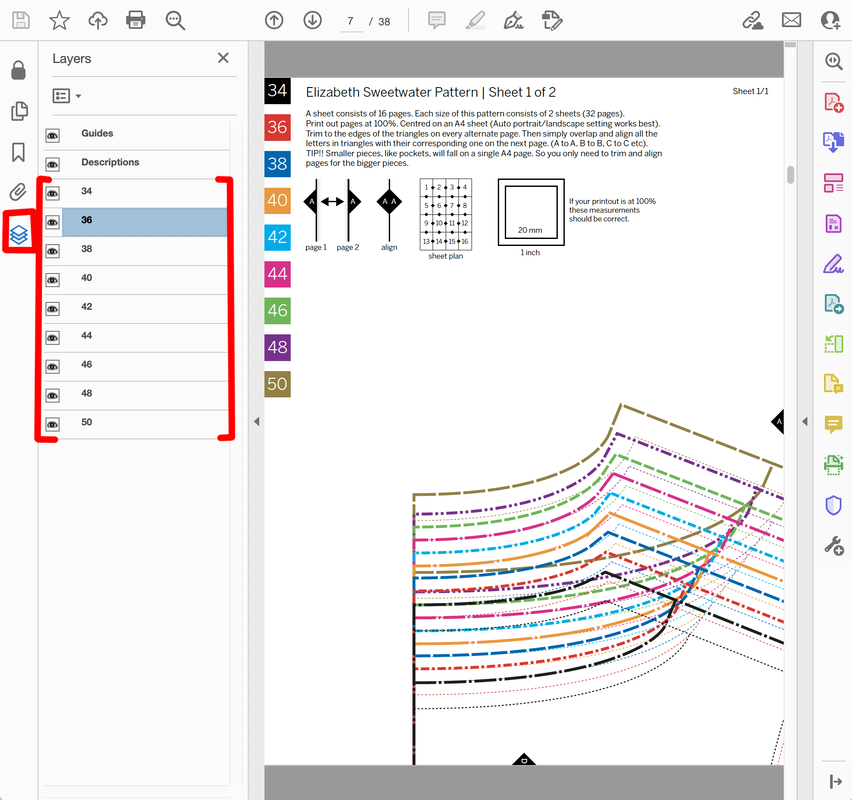
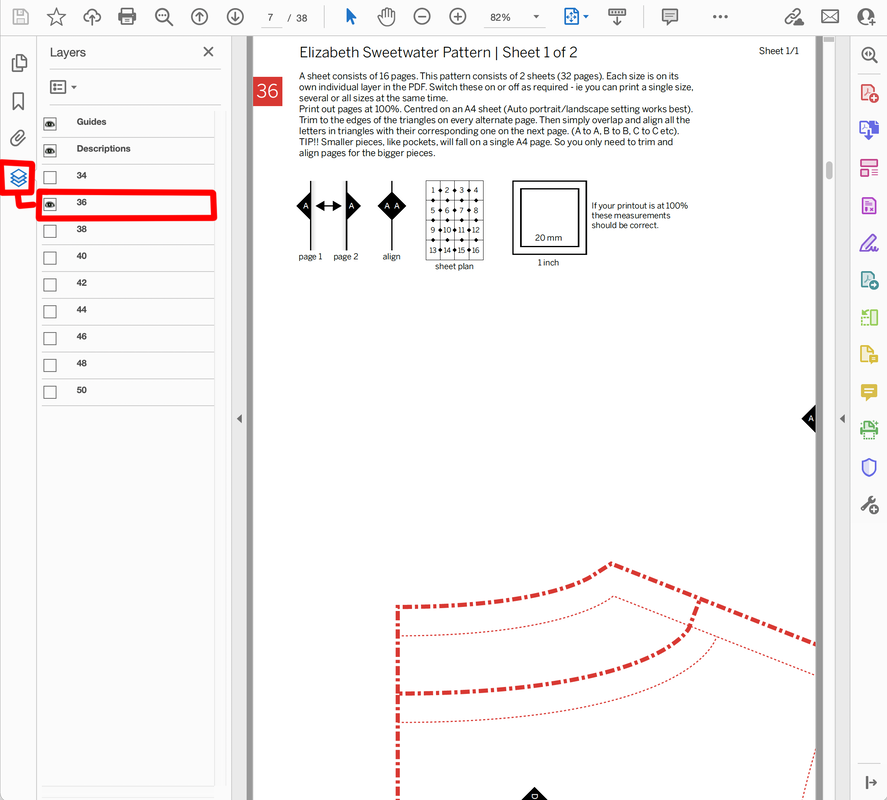
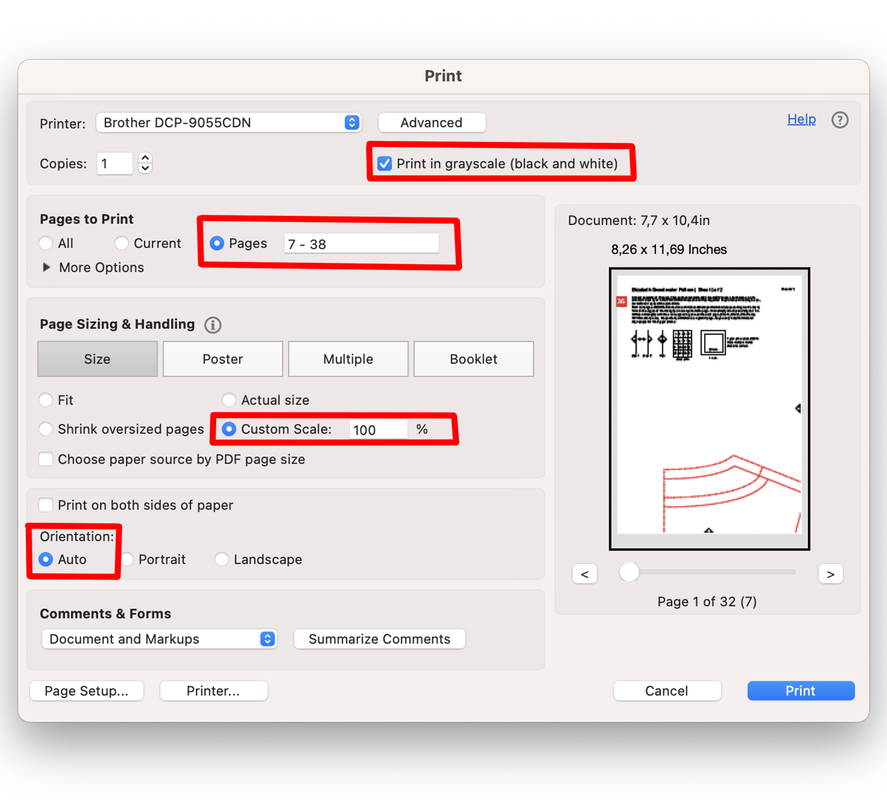
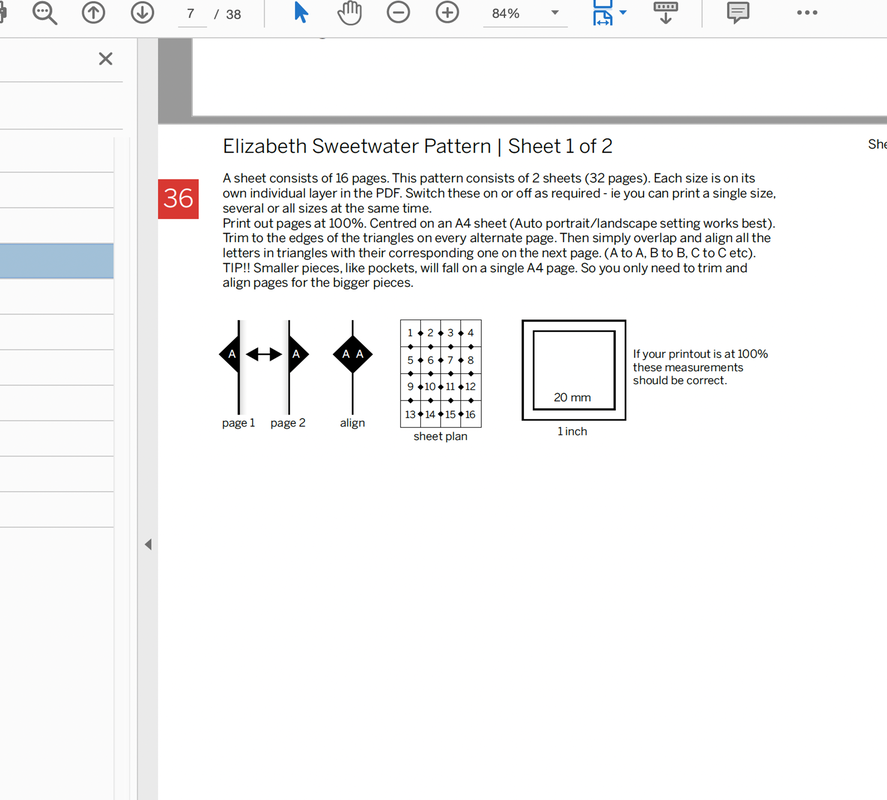
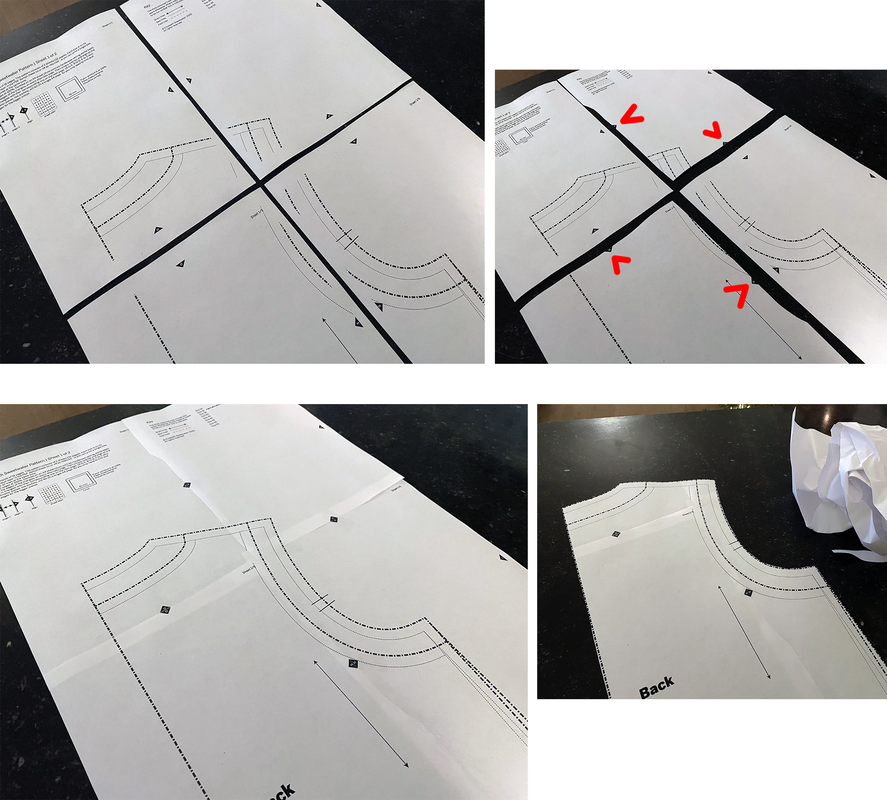
1.
Voorbereiding
Preparation

Bij aankoop van een van onze patronen ontvangt u 3 PDF-bestanden: een voor thuisprinters om op A4-papier af te drukken, een tweede voor A0-gebruikers om af te drukken in een printshop en een derde is voor mensen die een overheadprojector gebruiken. De volgende algemene introductietekst geeft een overzicht van hoe onze patroon-pdf's zijn opgezet en legt uit hoe je de A4-versie kunt afdrukken en hoe je de pagina's aan elkaar kunt plakken. A0-gebruikers kunnen bij hun printshop aangeven welke pagina's ze nodig hebben. Op de projector bestanden staan alle panden in dezelfde richting.
On purchasing any of our patterns you will receive 3 PDF files: one for home printers to print on A4 paper, a second at A0 is for printshop users and a third is for sewers who use an overhead projector. The following general introduction text provides an overview of how our pattern pdfs are set up and explains how to print out the A4 version and how to stick the pages together. A0 users should simply instruct their printshop which pages they require. Projector users will note that all pieces have the grain direction facing the same way.
Picture
1a.
Al onze patronen volgen dezelfde opzet zoals hier uitgelegd. Elk patroon begint met een voorblad, een inleiding, een lichaamsmatentabel, een ontwerptekening, een patroonchecklist en een kleurplaat. Het patroon is te vinden op de laatste lijst onder het tabblad Bladwijzers. 
All of our patterns follow the same set up as explained here. Each pattern starts with a cover page, an introduction, a body size chart, a design drawing, a pattern checklist and a colouring sheet.The pattern can be found on the last listing under the bookmarks tab.
Picture
1b.
After locating the pattern click on the layers icon. Here you can see the full range of sizes. They are all layered on top of one another. You can click on the eye icon by each individual size to turn it on or off.
After locating the pattern click on the layers icon. Here you can see the full range of sizes. They are all layered on top of one another. You can click on the eye icon by each individual size to turn it on or off.
Picture
1c.
Je kunt vervolgens de maat of maten selecteren die je wilt afdrukken.
You can then select the size or sizes you wish to print out.
Picture
1d.
Als je thuis print op een A4-printer, drukt u op het afdrukpictogram in het bovenste menu van de PDF. Uw afdrukdialoogvenster kan hiervan verschillen  (rechts in het midden weergegeven), maar ik heb een paar knoppen gemarkeerd om het te verduidelijken. Om inkt te besparen kun je instellen dat het patroon in grijstinten wordt afgedrukt. Selecteer de pagina's die je wilt afdrukken, over het algemeen vanaf pagina 7 tot de laatste pagina. Zorg ervoor dat de schaal is ingesteld op 'ware grootte' of '100%' - NOOIT op 'passend op pagina'. Het werkelijke paginaformaat van de PDF is kleiner dan A4. Stel de oriëntatie in op Auto, ik vind dat dit het beste werkt omdat het dan de pdf op een A4-blad centreert.
If printing at home on an A4 printer press the print icon in the top menu of the PDF. Your print dialogue box may vary to this one (shown middle right), but I have highlighted a few buttons to take note of. To save ink you can set to print the pattern in greyscale. Select the pages to print which will usually be from page 7 until the final page. Make sure the scale is set to 'actual size' or ‘100%' - NEVER to 'fit to page’. The actual page size of the PDF is smaller than A4. Set the orientation to Auto, I find this works best as it will then centre the pdf on an A4 sheet.
Picture
1e.
Rond elke pagina zie je kleine zwarte driehoekjes met letters erin. Met een schaar en doorzichtig plakband bij de hand, kun je vervolgens om elke pagina uitknippen tot aan de driehoeken en vervolgens de letters in de zwarte driehoeken uitlijnen met de overeenkomende op de volgende pagina (A naar A, B naar B, enz.). Vervolgens kunt u het blad aan elkaar plakken. Een vel kan uit 16 of 20 pagina's bestaan, afhankelijk van het gekochte patroon. Sommige patronen bestaan ​​uit één volledig vel (bijv. rokken met 16 pagina's), sommige uit twee vellen (bijv. jurken met 32 ​​pagina’s).
Around each page you will see small black triangles with letters inside. With scissors and clear sticky tape at hand, you can then cut out every alternate page to the triangles and then align the letters in the black triangles with the matching ones on the following page (A to A, B to B, etc). You can then proceed to stick the sheet together. One sheet can consist of 16 or 20 pages depending on the pattern purchased. Some patterns consist of one full sheet (eg. skirts with 16 pages), some of two sheets (eg. dresses with 32 pages).
Picture
1f.
Nadat je je pagina's hebt afgedrukt, leg je ze op een plat oppervlak. Knip de pagina's om en om uit tot aan de driehoekjes. Plak vervolgens met doorzichtig plakband de driehoeken met dezelfde letter aan elkaar. Knip vervolgens je patroondeel uit tot aan de stippellijnen. Deze stippellijnen bevatten de benodigde naadtoeslag voor elk stuk. De dunnere stippellijnen geven de uiteindelijke maat aan. Voor het gemak zijn alle namen van de stukken, samen met de draadrichting en handige instructies in de afzonderlijke patroondelen geplaatst, zodat u het overtollige papier veilig kunt weggooien (recycle). Let op dat sommige patronen ook een verklarend diagram kunnen bevatten op een van de pagina's die bewaard moeten worden. Als je de  patroondelen op patroonpapier wilt overtrekken, moet je er aan denken alle markeringen te kopiëren (bijv. draadrichting, knipjes etc.).
Once you have printed out your pages lay them out on a flat surface (top left). Cut out to the triangle edge on alternate pages (top right). Then with clear sticky tape connect the triangles that correspond to each other (bottom left). Then cut out your pattern piece to the dashed lines (bottom right). These dashed lines include the necessary seam allowance for each piece. The thinner dotted lines indicate the finished size. For convenience all names of pieces, along with grain direction and helpful instructions have been placed inside individual pattern pieces, so you can safely throw away (please recycle) the excess paper. Note some patterns may also include an explanatory diagram on one of the pages that should also be kept. 
To continue trace all the pattern pieces onto pattern paper, remembering to copy all the markings (eg. darts, piece to piece alignment lines etc).
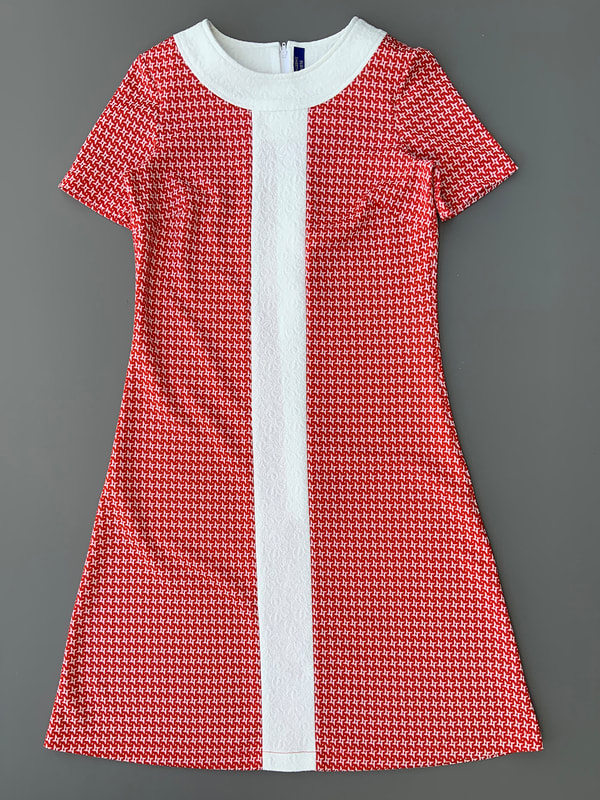
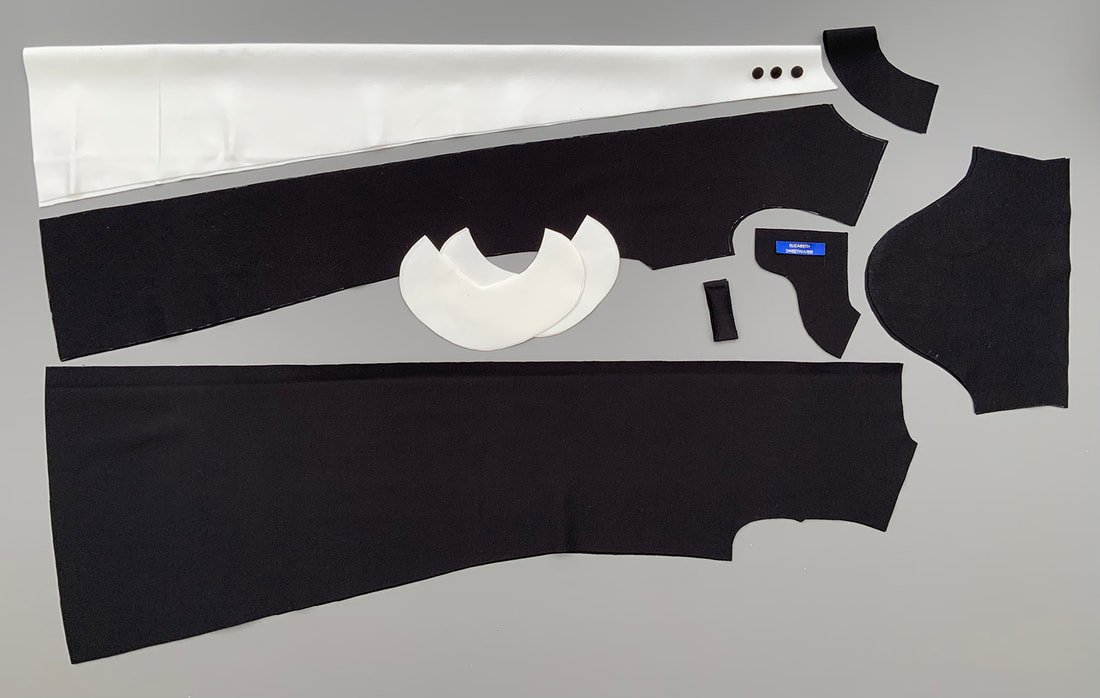
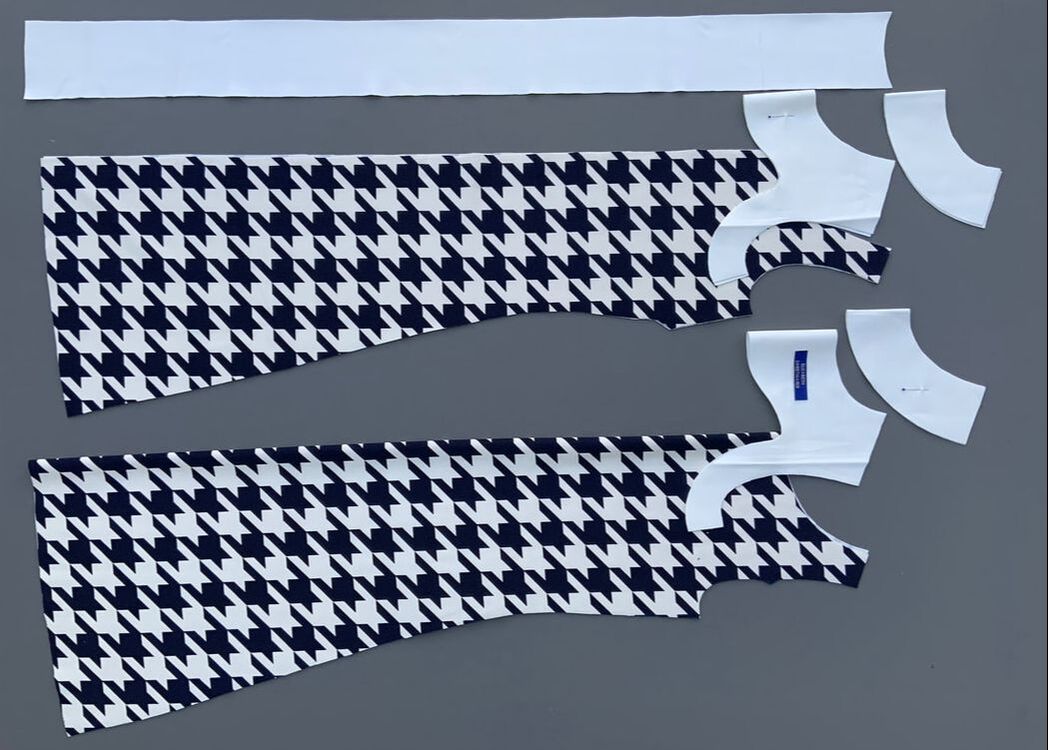
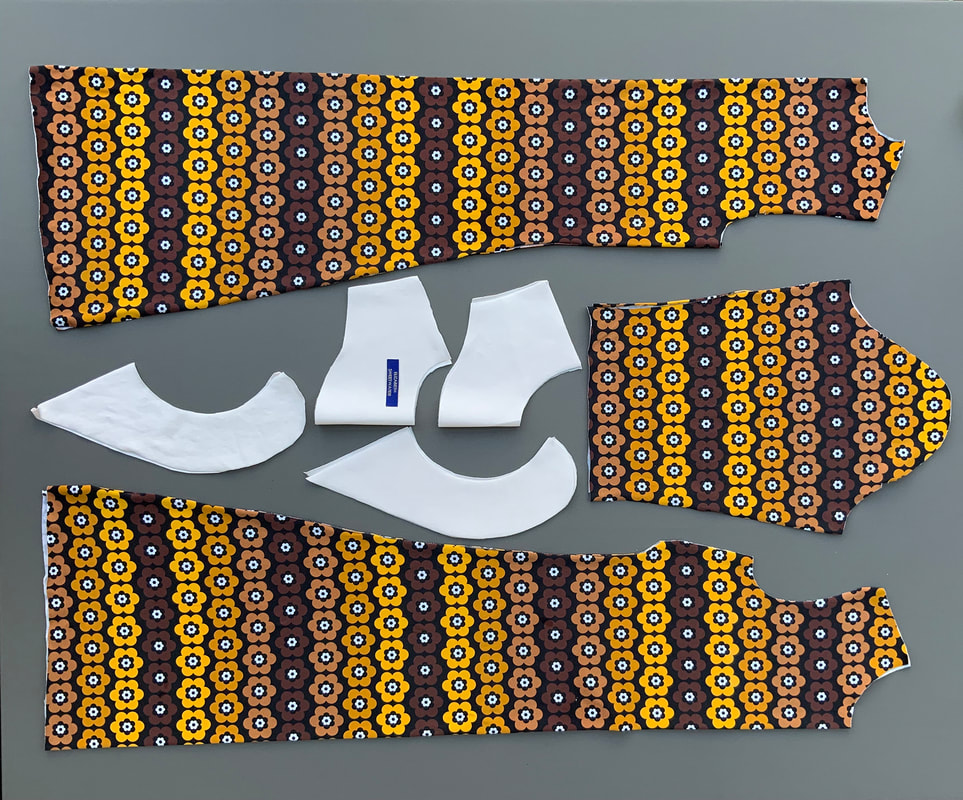
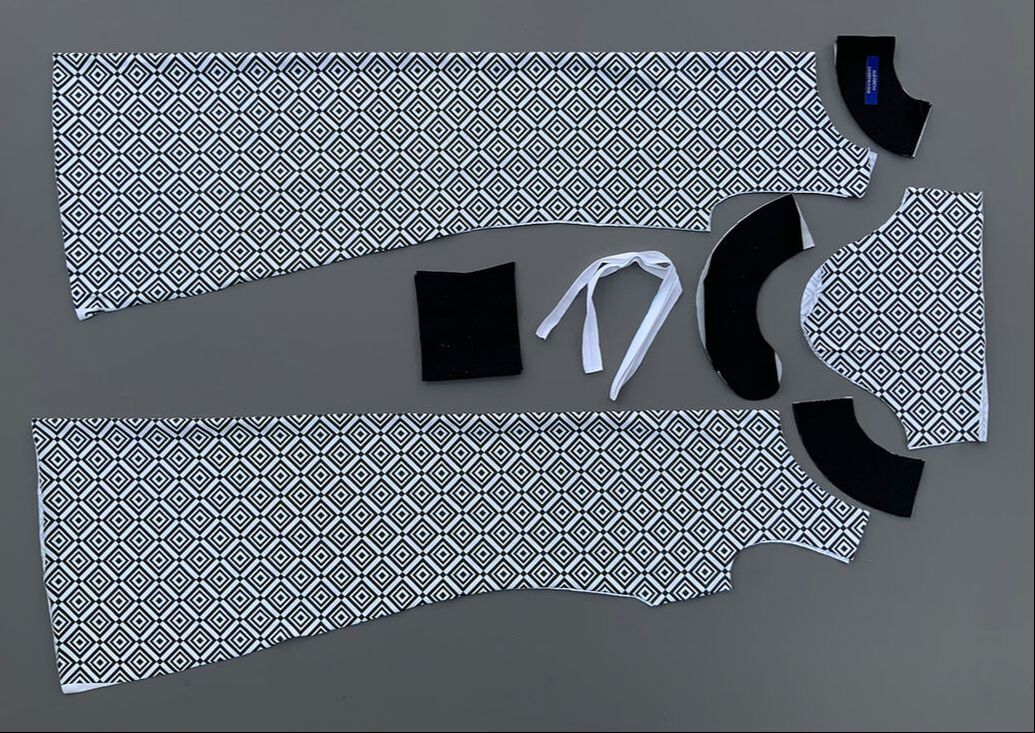
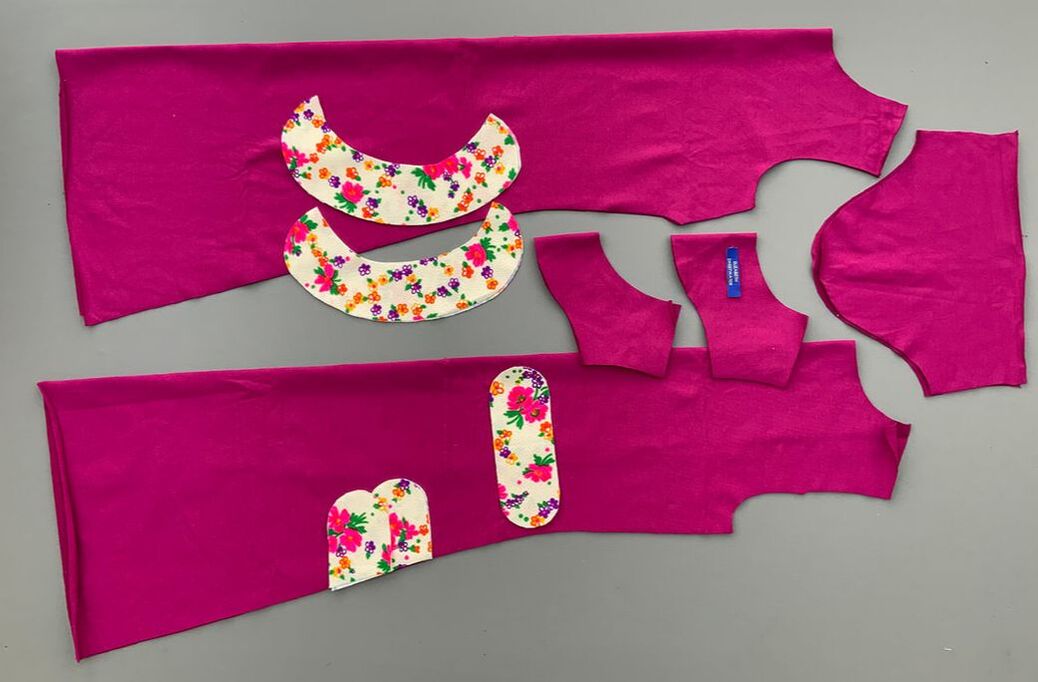
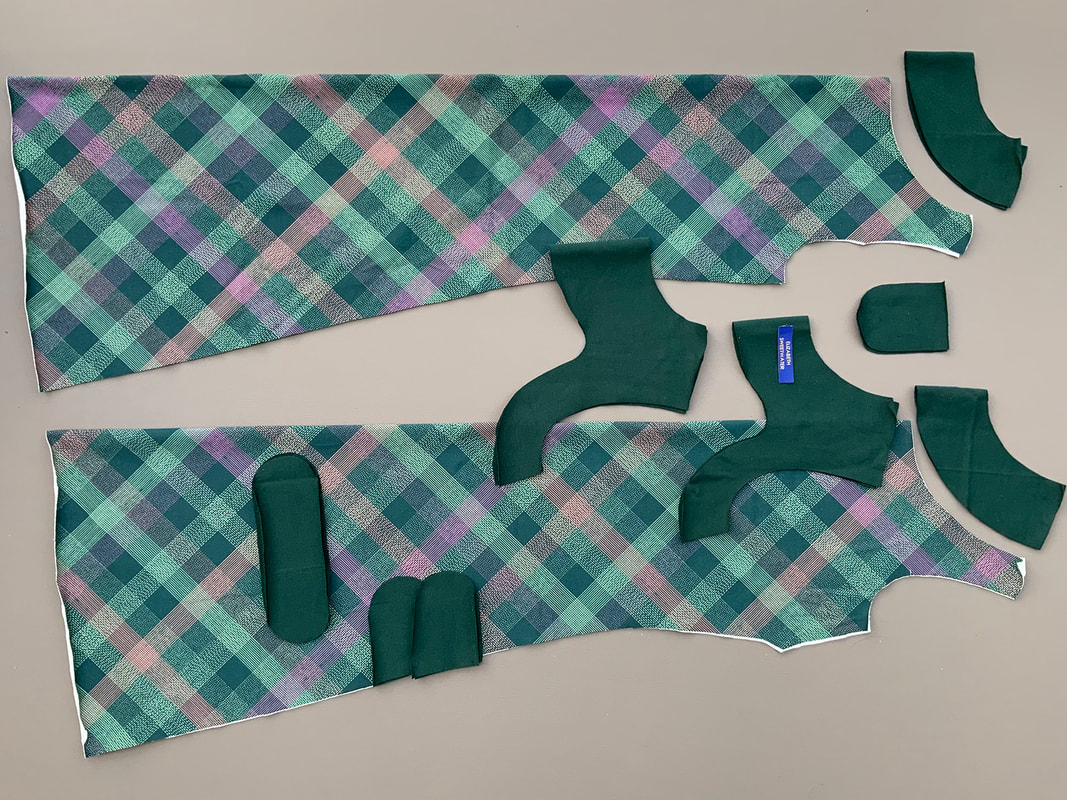
1g.
Raadpleeg het onderstaande overzicht van alle modellen om je voor te bereiden op het uitknippen van de door jou gekozen stof.
Consult the overview of all styles below to prepare yourself for the next stage of cutting out the pieces from your chosen material.
Er zijn veel variaties mogelijk maar de basis van de jurk is voor alle modellen gelijk. Voor elke van de stylen die hier beneden zijn ga naar secties 3 en 4 om te beginnen.
There are lots of variations possible but the base of the dress is for all styles the same. For all of the style options commence with sections 3 and 4 of this tutorial.


Style A
A-line colourblock jurk met Peter Pan kraag, splitje achter en korte mouw
A-line colourblock dress with Peter Pan collar, opening in back and short sleeves

Volg stappen/follow steps 2-5a/b, 5.1, 6.2, 7.2

Picture
Picture
Patroondelen:
- Middenstuk voor knip1x aan vouw.
- Zijpanden voor knip 2x.
- Achterpand knip 2x.
- Mouwen knip 2x.
- Kraag knip 4x.
- Voorhalsbeleg knip 1x aan vouw.
- Achterhalsbeleg knip 2x.
Pattern Pieces:
- Middle front piece cut 1x on fold.
-Side pieces cut 2x.
- Back piece cut 2x.
- Sleeves cut 2x.
- Collar cut 4x.
- Front neck facing cut 1x on fold.
- Back neck facing cut 2x.


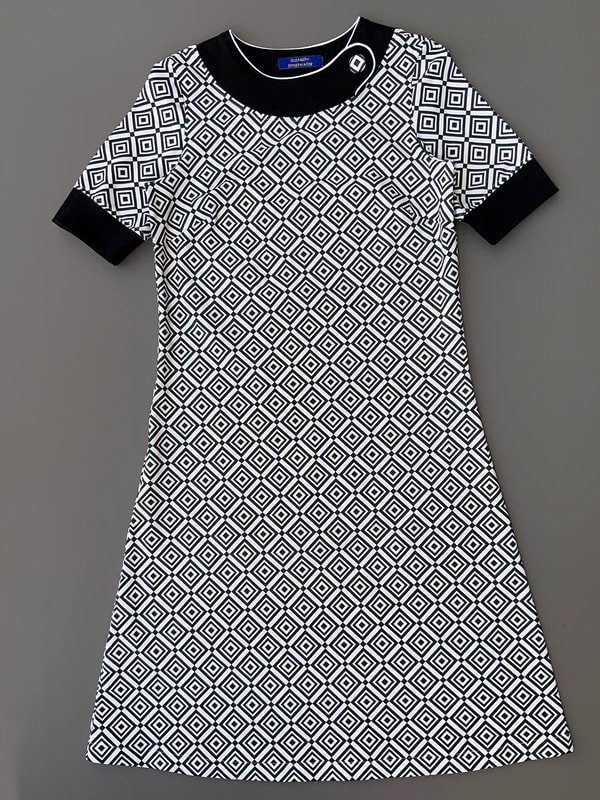
Style B
A-line colourblock jurk met halsbies, rits achter en korte mouw
A-line colourblock dress with neckband, zipper in back and short sleeves


Volg stappen/follow steps 2-5a/b, 5.3, 6.1, 7.2

Picture
Picture
Patroondelen:
- Middenstuk voor knip1x aan vouw.
- Zijpanden voor knip 2x.
- Achterpand knip 2x.
- Mouwen knip 2x.
- Halsbies voor knip 1x aan vouw.
- Halsbies achter knip 2x.
- Voorhalsbeleg knip 1x aan vouw.
- Achterhalsbeleg knip 2x.
Pattern Pieces:
- Middle front piece cut 1x on fold.
- Side pieces cut 2x.
- Back piece cut 2x.
- Sleeves cut 2x.
- Neckband front cut 1x on fold.
- Neckband back cut 2x.
- Front neck facing cut 1x on fold.
- Back neck facing cut 2x.


Style C
A-line colourblock mouwloze jurk met halsbies, geen sluiting achter
A-line colourblock sleeveless dress with neckband, no closure in back

Volg stappen/follow steps 2-5a/b, 5.3, 6.3, 7.1
Picture
Picture
Patroondelen:
- Middenstuk voor knip1x aan vouw.
- Zijpanden voor knip 2x.
- Achterpand knip 1x aan vouw (zonder naadtoeslag!).
- Halsbies voor  knip 1x aan vouw.
- Halsbies achter knip 1x aan vouw (zonder naadtoeslag!).
- Voorhalsbeleg knip 1x aan vouw.
- Achterhalsbeleg knip 1x aan vouw (zonder naadtoeslag!).
!Let op voor het achterhals beleg voor de mouwloze jurk moet  eerst het coupenaadje in het beleg weggevouwen worden zie 2e.
Pattern Pieces:
- Middle front piece cut 1x on fold.
- Side pieces cut 2x.
- Back piece cut 1x on fold (without seam allowance!).
- Neckband front cut 1x on fold.
- Neckband back cut 1x on fold.
- Front neck facing cut 1x on fold.
- Back neck facing cut 1x on fold (without seam allowance!).
!Note for the back neck facing for the sleeveless dress, the dart in the facing must first be folded away, see 2e.


Style D
A-line jurk met punt kraag, zonder sluiting achter en 3/4 mouw
A-line dress with pointy collar, no closure in back and 3/4 sleeves

Volg stappen/follow steps 2-5a/b, 5.2, 6.3, 7.2
Picture
Picture
Patroondelen:
- Voorpand knip1x aan vouw.
- Achterpand knip 1x aan vouw (zonder naadtoeslag!).
- Mouwen knip 2x.
- Kraag knip 4x.
- Voorhalsbeleg knip 1x aan vouw.
- Achterhalsbeleg knip 1x aan vouw. (zonder naadtoeslag!)
Pattern Pieces:
- Front piece cut 1x on fold.
- Back piece cut 1x on fold (without seam allowance!).
- Sleeves cut 2x.
- Collar cut 4x.
- Front neck facing cut 1x on fold.
- Back neck facing cut 1x on fold (without seam allowance!)


Style E
A-line jurk, halsbies met knoop, zonder sluiting achter en korte mouw met manchet
A-line dress, neckband with button, no closure in back and short sleeves with cuffs


Volg stappen/follow steps 2-5a/b, 5.5, 6.3, 7.2, 7.3
Picture
Picture
Patroondelen:
- Voorpand knip 1x aan vouw.
- Achterpand knip 1x aan vouw (zonder naadtoeslag!).
- Mouwen knip 2x.
- Manchettten knip 2x aan vouw.
(Hier zijn geen patroondelen voor deze maak je zelf zie 2d)
- Halsbies voor knip 2x, halsbies voor met ronding knip 2x
- Halsbies achter knip 2x aan vouw (zonder naadtoeslag!).
Pattern Pieces:
- Middle front piece cut 1x on fold.
- Back piece cut 1x on fold (without seam allowance!).
- Sleeves cut 2x.

- Cuffs cut 2x on fold. (There are no patternpieces for cuffs, you make these yourself see 2d).
- Front neck band cut 2x
- Front neck band with rounded edge cut 2x.
- Back neck band cut 2x on fold (without seam allowance!).


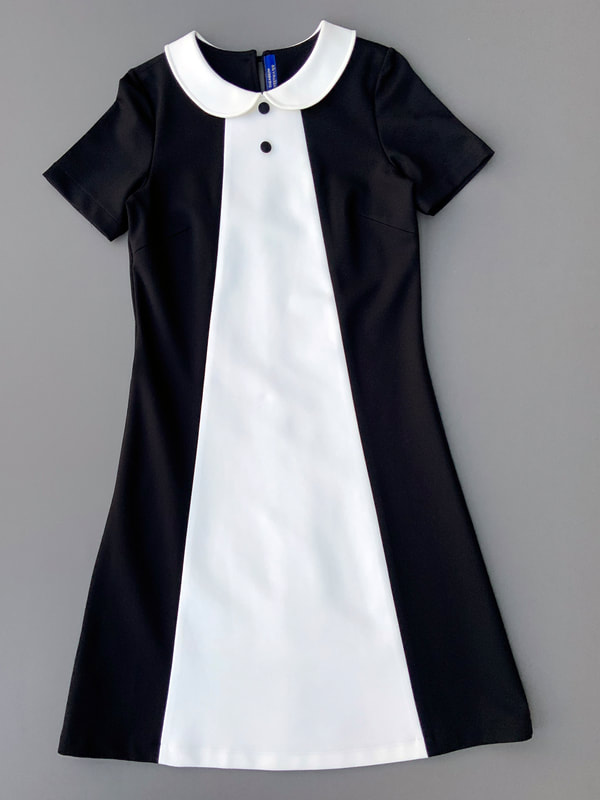
Style F
A-line jurk met Peter Pan kraag, zonder sluiting achter en korte mouw
A-line dress with Peter Pan collar, no closure in back and short sleeves


Volg stappen/follow steps 2-5a/b, 5.1, 6.3, 7.2, 7.3
Picture
Picture
Patroondelen:
- Voorpand knip1x aan vouw.
- Achterpand knip 1x aan vouw (zonder naadtoeslag!).
- Mouwen knip 2x.
- Kraag knip 4x.
- Voorhalsbeleg knip 1x aan vouw.
- Achterhalsbeleg knip 1x aan vouw  (zonder naadtoeslag!).
- Rug detail knip 2x.
- Zijlussen knip 4x.
Pattern Pieces:
- Front piece cut 1x on fold.
- Back piece cut 1x on fold (without seam allowance!).
- Sleeves cut 2x.
- Collar cut 4x.
- Front neck facing cut 1x on fold.
- Back neck facing cut 1x on fold (without seam allowance!).
- Back detail cut 2x.
- Side loops cut 4x.


Style G
A-line mouwloze jurk met halsbies, geen sluiting achter
A-line sleeveless dress with neckband, no closure in back

Volg stappen/follow steps 2-5a/b, 5.4, 6.3, 7.1, 7.3

Picture
Picture
Patroondelen:
- Middenstuk voor knip1x aan vouw.
- Zijpanden voor knip 2x.
- Achterpand knip 1x aan vouw  (zonder naadtoeslag!).
- Halsbies voor  knip 1x aan vouw.
- Halsbies achter knip 1x aan vouw.
- Voorhalsbeleg knip 1x aan vouw.
- Achterhalsbeleg knip 1x aan vouw (zonder naadtoeslag!).
!Let op voor het achterhals beleg voor de mouwloze jurk moet  eerst het coupenaadje in het beleg weggevouwen worden zie 2e.
- Halslus voor knip 2x.
- Rug detail knip 2x.
- Zijlussen knip 4x.
Pattern Pieces:
- Middle front piece cut 1x on fold.
- Side pieces cut 2x.
- Back piece cut 1x on fold (without seam allowance!).
- Neckband front cut 1x on fold.
- Neckband back cut 1x on fold.
- Front neck facing cut 1x on fold.
- Back neck facing cut 1x on fold (without seam allowance!).
!Note for the back neck facing for the sleeveless dress, the dart in the facing must first be folded away, see 2e.
- Neck loop cut 2x.
- Back detail cut 2x.
- Side loops cut 4x.


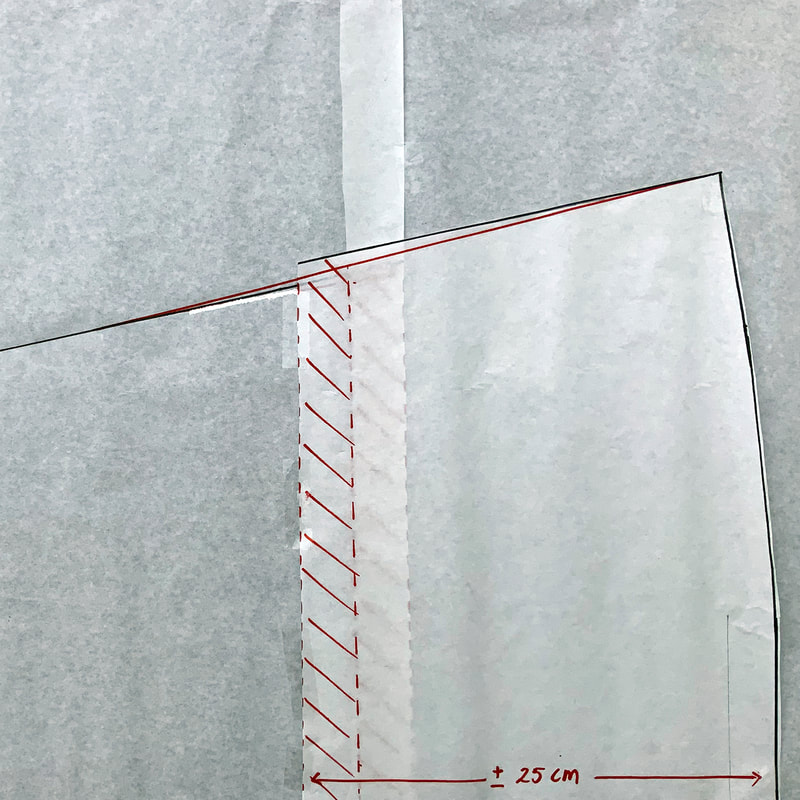
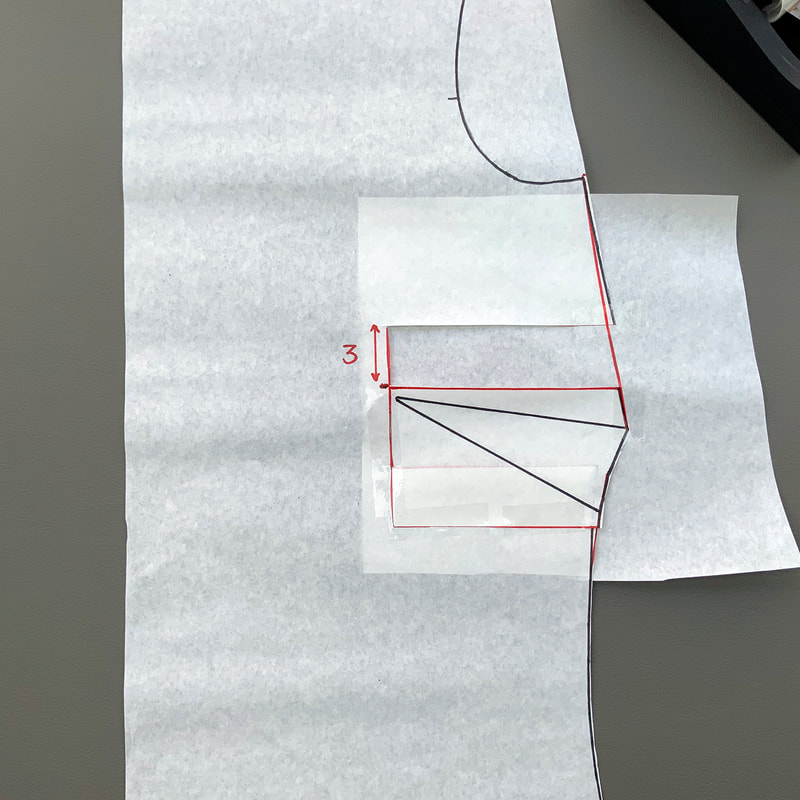
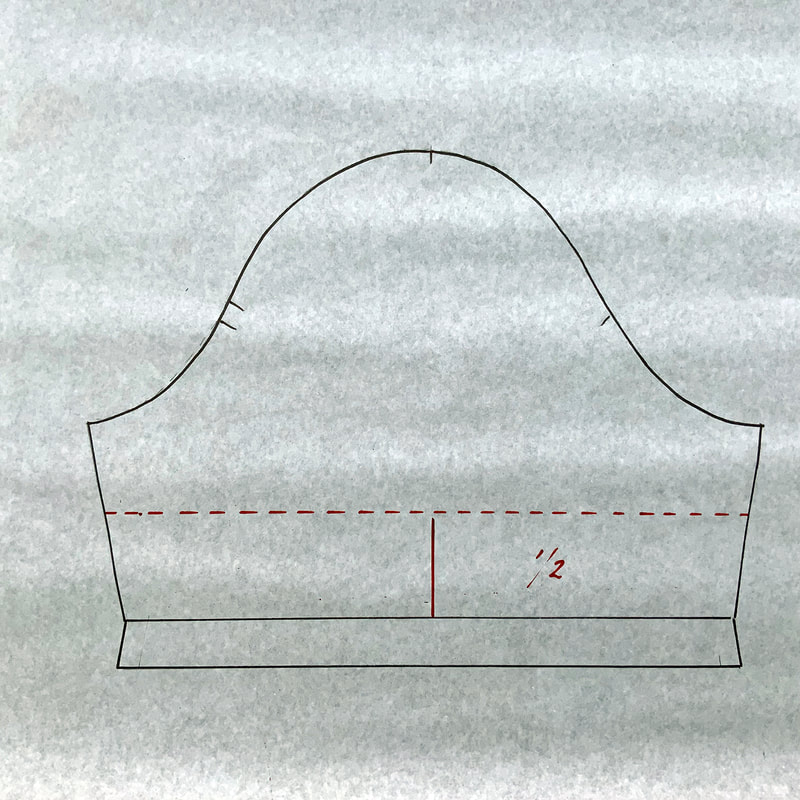
2.
Opmerkingen en algemene Aanpassingen
Remarks and common Adjustments

Tips

Ik adviseer altijd om eerst een proefmodel te maken voor je in een dure stof knipt.
I always recommend making a test model before cutting in expensive fabric.

Ga altijd uit van je bovenwijdte, de taille en heupwijdte zijn eenvoudig aan te passen door in de zijnaden iets weg te nemen of toe te voegen.
Always choose your size based on the bust measurement, the waist and hip width are easy to adjust by removing or adding width in the side seams.

Zoals je misschien hebt opgemerkt zitten de taille coupenaden nog in het patroon. De rede hiervoor is is dat je als je dit zou willen toch de jurk kunt tailleren. Ook is het mogelijk om dit patroon te combineren met andere patronen. Je kunt dan bijvoorbeeld het rokdeel van de flare dress aan het bovenlijf van dit patroon zetten.
As you may have noticed, the waist darts are still in the pattern. The reason for this is that you can tailor the dress if you wish. It is also possible to combine this pattern with other patterns. You can, for example, attach the skirt part of the flare dress to the upper body of this pattern.
2a
Het verlengen en verkorten van de jurk
Lengthening and shortening the dress

Picture
Om de lengte van de jurk aan te passen knip je het voor-en achterpand door op ongeveer 25 cm vanaf de onderkant.
To adjust the length of the dress, cut the front and back pieces about 25cm from the bottom.
Picture
Om te verlengen plak je hier een stuk (patroon)papier tussen. Teken de zijnaden opnieuw volgens de afbeelding.
To extend, stick a piece of (pattern)paper in between. Draw the side seams again according to the image.
Picture
Om te verkorten verdeel je de te verkorten afstand over de delen en plak je ze over elkaar.
To shorten, divide the distance to be shortened over the two parts and stick them over each other.
Picture
Teken de zijnaden opnieuw in volgens de afbeelding.
Draw the side seams again according to the picture.
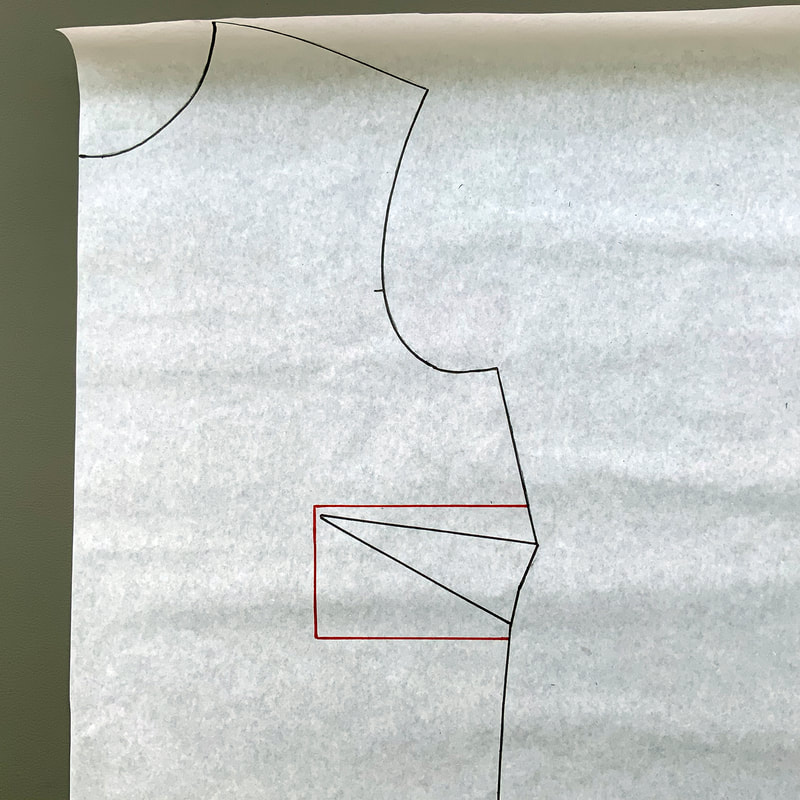
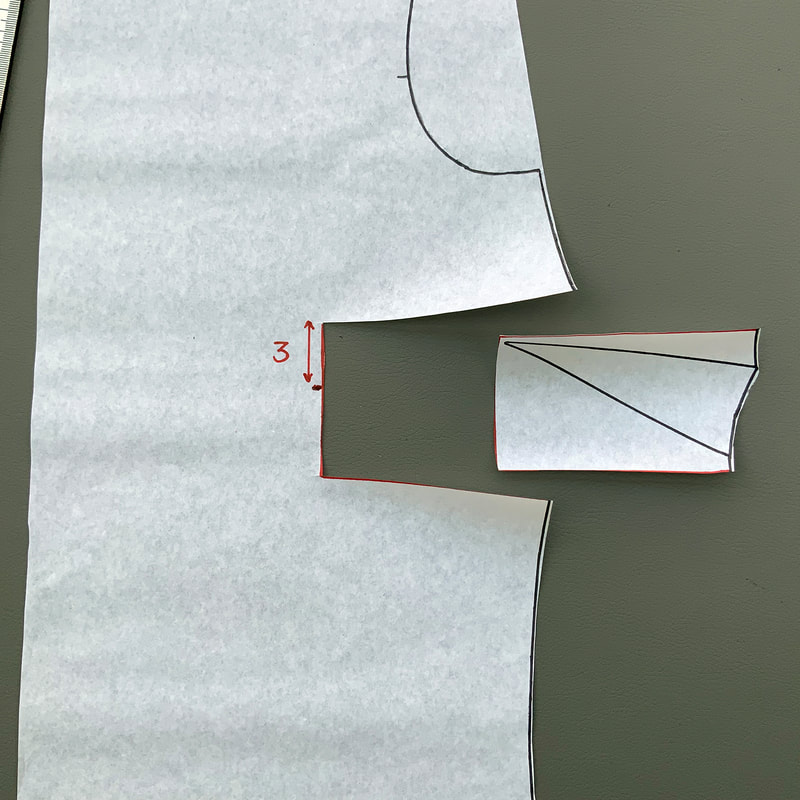
2b
Het verlagen van de bustenaad
The lowering of the bustdart

Picture
Op de afbeelding zie je waar de bustnaad zich bevindt. Zit de bustenaad bij jou te hoog dan kun je deze verlagen.
On the image you can see where the bustdart is placed. If the bustdart sits too high you can lower it on the pattern.
Picture
Teken een vierkant rond de figuurnaad op het papieren patroon.
Draw a box around the entire bust dart on your pattern piece.
Picture
Knip het vierkant uit die je zojuist hebt getekend.
Cut out the box that you just drew.
Picture
Schuif het vierkant het aantal cm die je de coupnaad wilt verlagen naar beneden en plak deze vast. Teken de zijnaad bij.
Slide the square down the number of cm that you want to lower the dart and stick it. Redraw the sideseams.
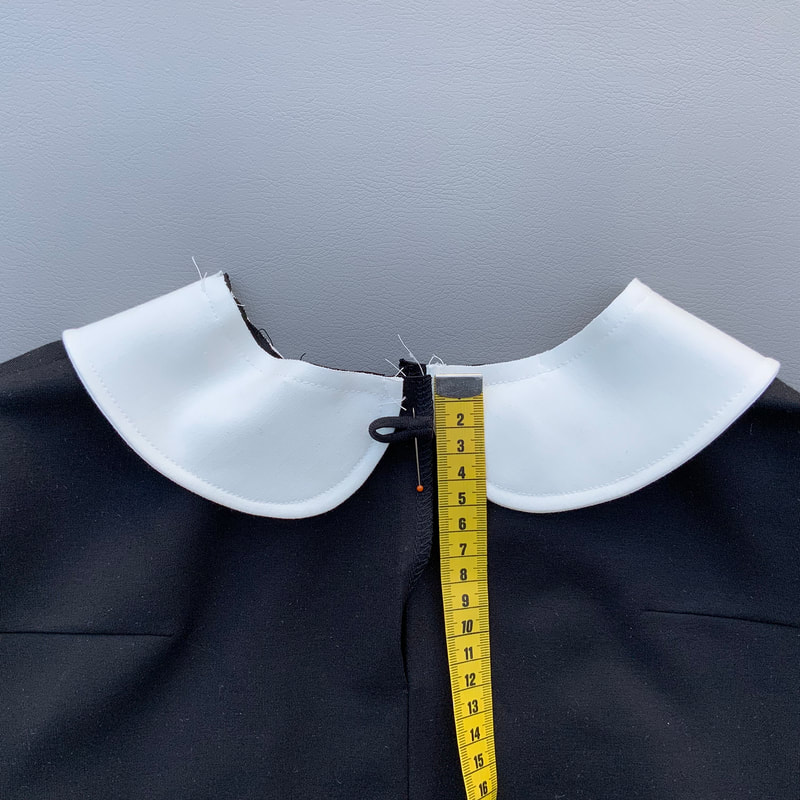
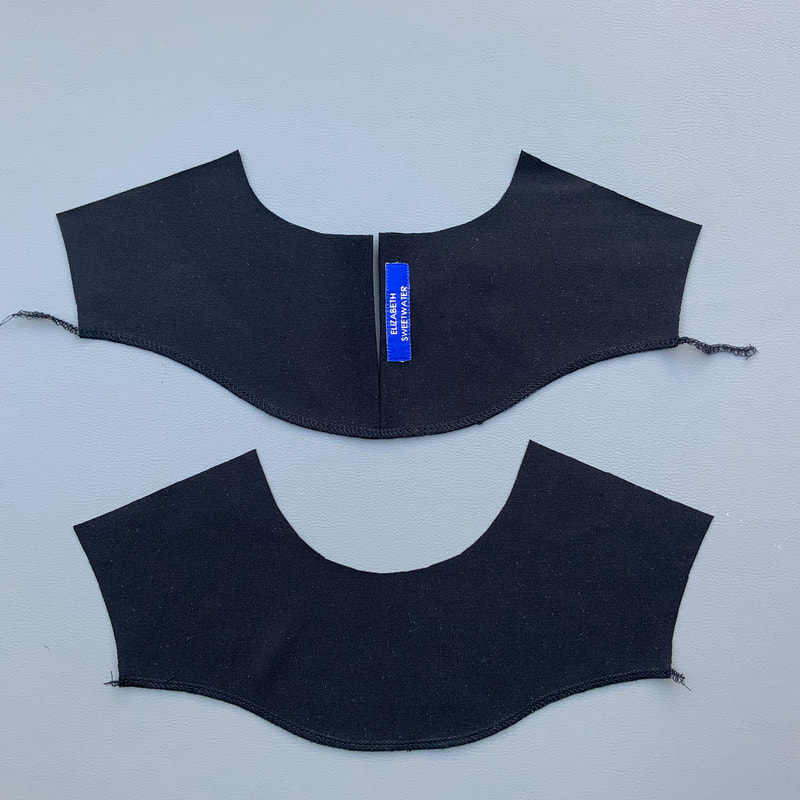
2c
Achter halsband aanpassing
Backneck adjustments

Picture
Maak je de variatie met de halsbies dan is het mogelijk daarmee de hals wat meer te laten aansluiten als deze achter wat af staat.
Meet op de hals van het achterhals bies deel op ongeveer 5 cm van de schouder het aantal mm wat je wilt wegnemen en trek 2 lijnen naar de onderkant van het belegdeel in een spie vorm.
If you make the variation with the neckband, it is possible to improve the fit of the neck when it is a bit too wide. Measure the number of mm you want to remove on the neck of the back neck band at about 5cm from the shoulder and draw 2 lines to the bottom of the facing part in a gusset shape.
Picture
Knip een van de lijnen in en leg deze tegen de andere. Maak je de variatie zonder halsbies dan kun je er eventueel voor kiezen een klein coupenaadje te stikken in de hals achter.
Ook kun je wat ruimte wegnemen door de schoudernaad wat rechter te tekenen.
Cut one of the lines and place it against the other. If you make the variation without neckband, you can choose to sew a small dart in the neckline at the back. You can also remove some space by drawing the shoulder seam a bit straighter.
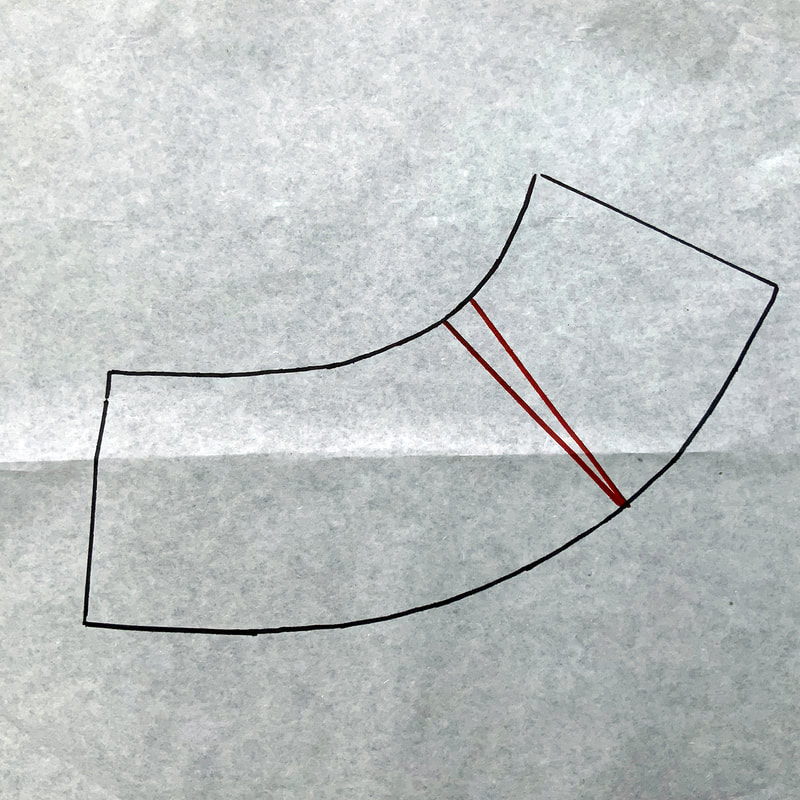
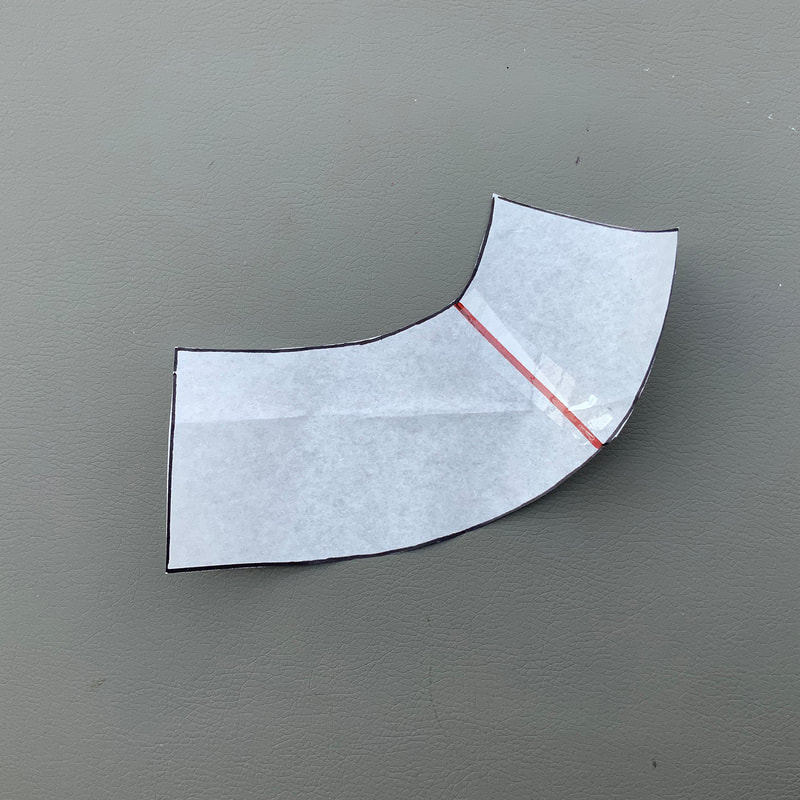
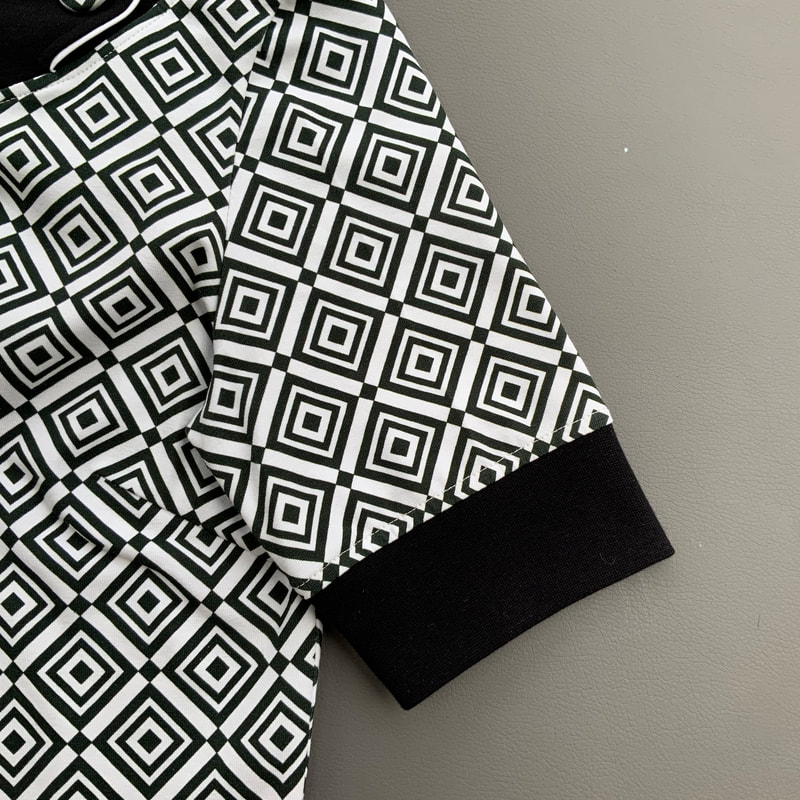
2d
Het tekenen van een mouwboord
Drafting a cuff

Picture
Meet op het mouwpatroon de hoogte van het mouwboord vanaf de onderkant (zonder zoomtoeslag). Deel deze in de breedte doormidden.
On the sleeve pattern, measure the height of the cuff from the bottom (without seam allowance). Divide it in half widthwise.
Picture
Kopieer vanaf de middenlijn het mouwboord en spiegel deze door het papier om te vouwen langs de onderrand en over te trekken. De vertikale lijn wordt bij het uitknippen in de stof aan de stofvouw gelegd.
Copy the cuff from the center line and mirror it by folding the paper over the bottom edge and tracing it. The vertical line is cut on the fabric fold when cutting in fabric.
Picture
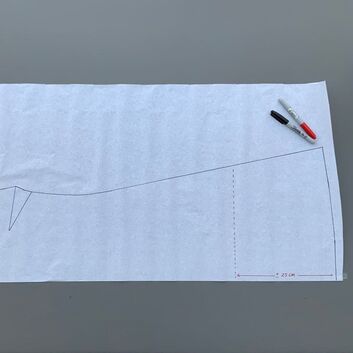
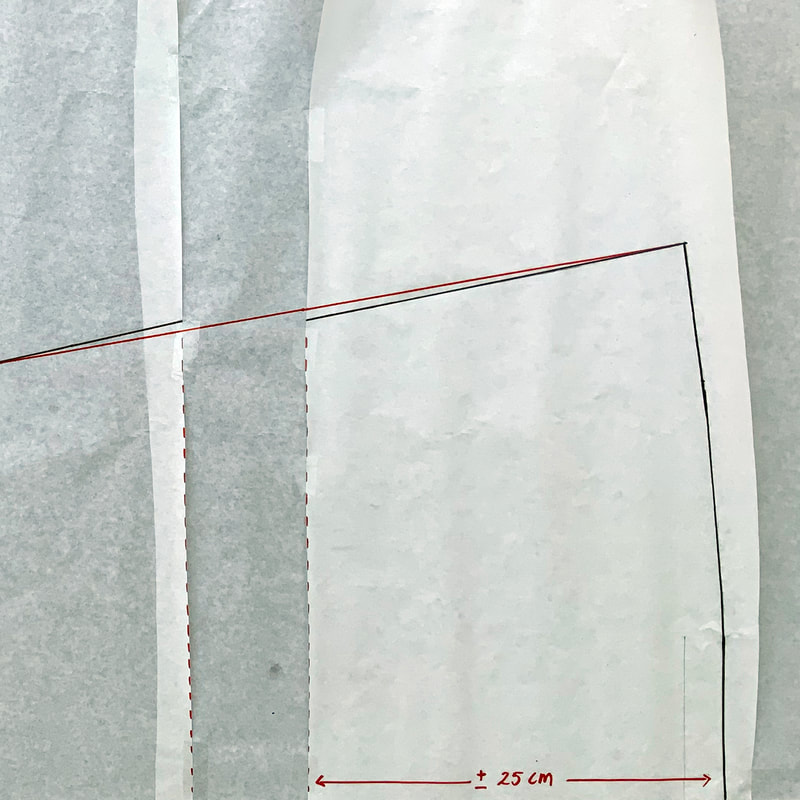
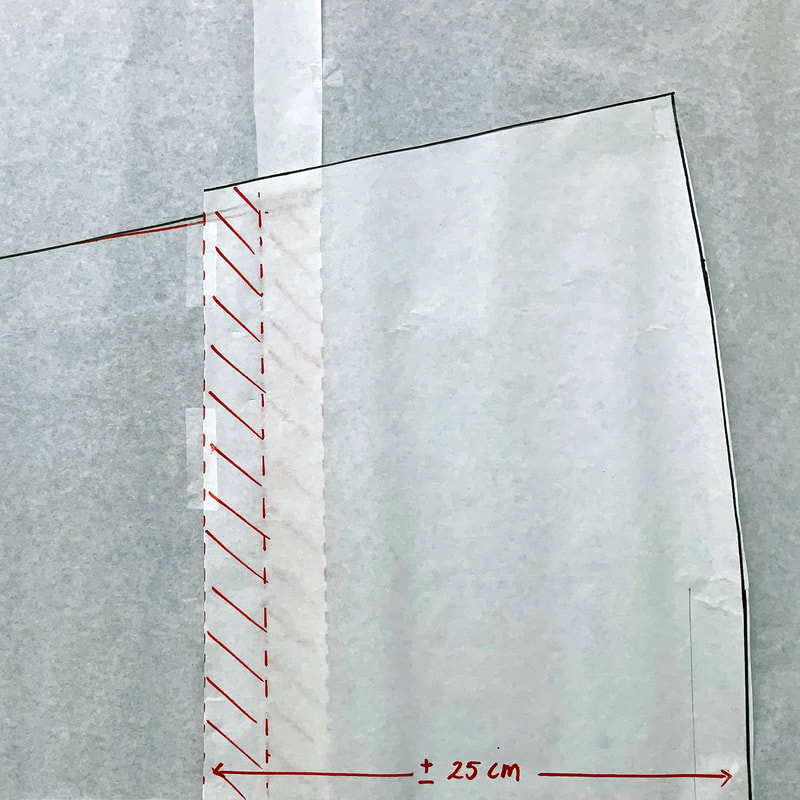
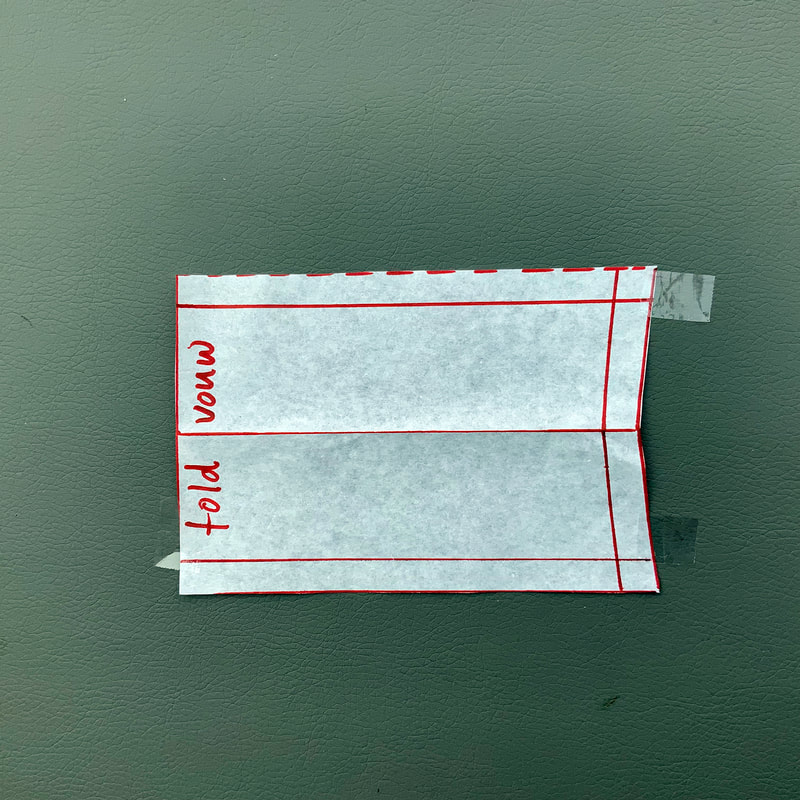
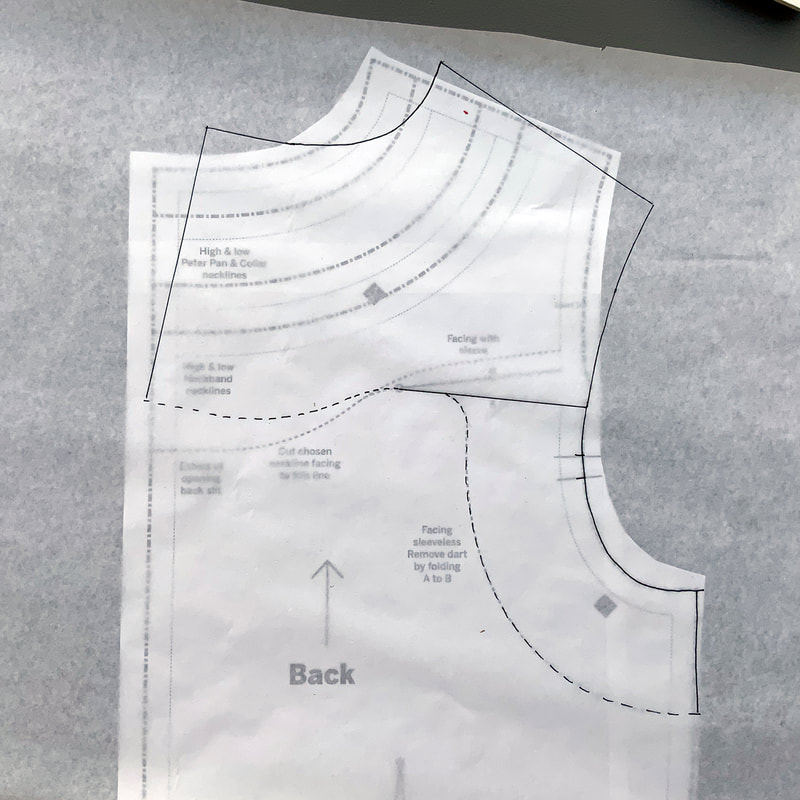
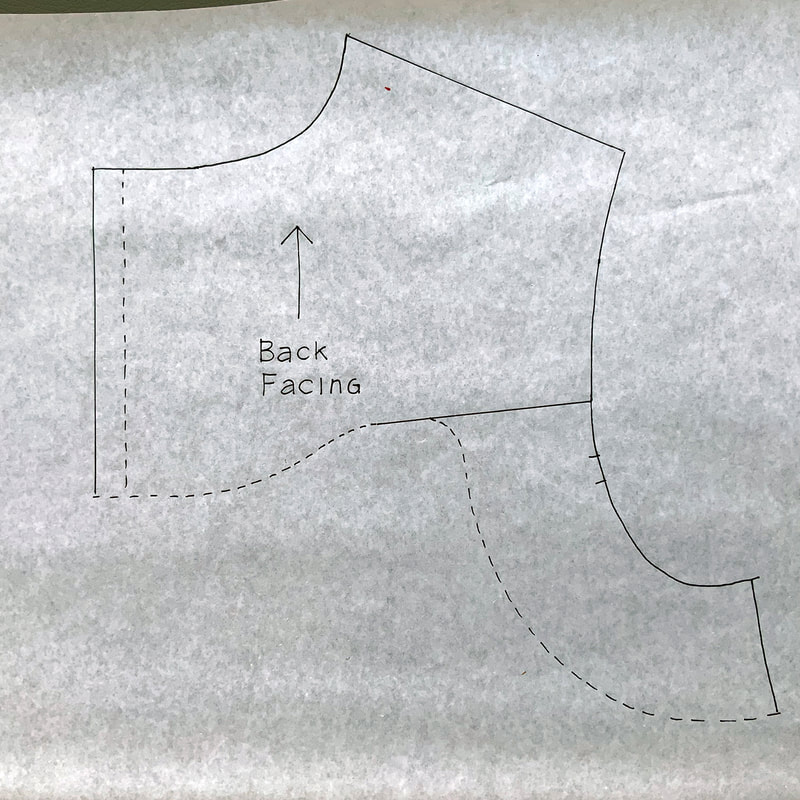
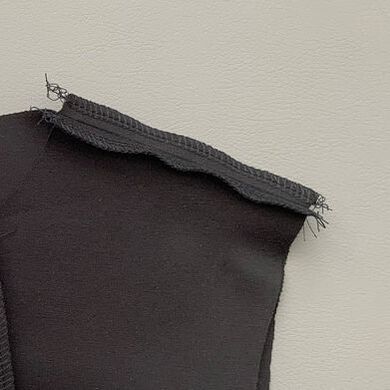
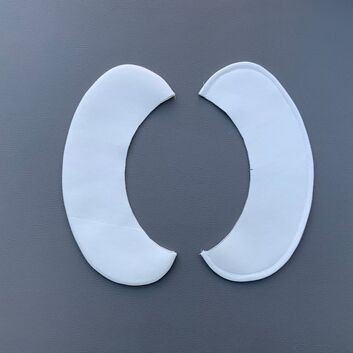
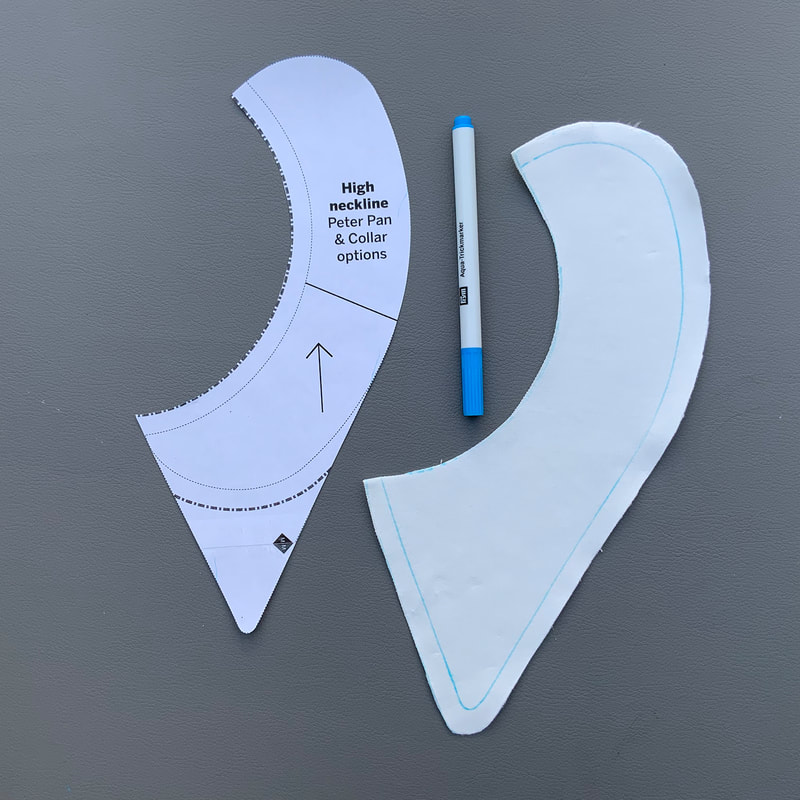
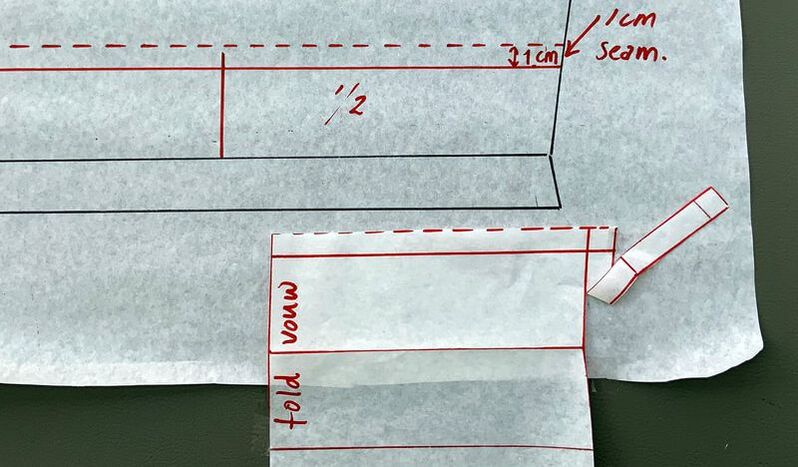
Knip de naadtoeslag van het mouwboord. Deze moet net iets strakker zijn dan de mouw om mooi aan te sluiten. Als je de mouw gaat knippen om te verwerken met een mouwboord vergeet dan niet 1 cm naadtoeslag aan de onderkant van de mouw aan te tekenen. (Zie afbeelding).
Trim the seam allowance of the sleeve cuff. It should be just a little tighter than the sleeve to fit nicely. If you are going to cut the sleeve to finish with a cuff, don't forget to add 1 cm seam allowance to the bottom of the sleeve (See image).
2e
Het overnemen van het hals/armsgat belegdeel voor de mouwloze jurk
Adapting the neck/armhole facing part for the sleeveless dress

Picture
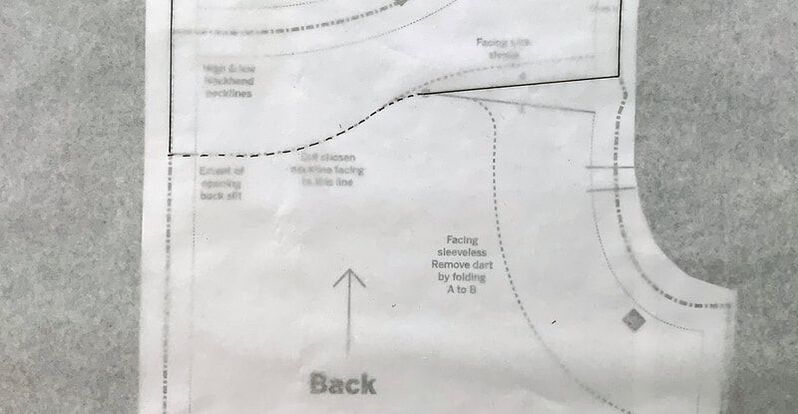
Trek de lijn van het belegdeel over tot de lijn b op patroontekenpapier.
Copy the outline of the facingpart up to line b of the dart on patternpaper.
Picture
Roteer het patroondeel zodanig dat lijn b aansluit op lijn a van de figuurnaad.
Rotate the pattern piece so that line b connects to line a of the dart.
Picture
Het achter belegdeel inclusief armsgat beleg.
Het voor belegdeel kan gewoon overgenomen worden van het patroon, deze heeft geen coupenaad.
The back facing including armhole facing. The front facing can simply be copied from the pattern, it does not have a dart.

3.
Checklijst
Checklist

Variaties met colourblock

Geschikte stoffen: French terry (dunne sweat, ongebrushed), jaquardtricot, punta di Roma (gladde stevige stof meestal polyester/viscose of punta di Milano (wat zwaardere, stevige stof viscose/polyamide).

Hoeveelheid stof nodig:
Tricot/jersey in hoofdkleur (hier zwart):
150cm breed:
Voor mouwloze en korte mouw jurk maat 34 t/m 42: 110 à 120cm
Voor 3/4 en lange mouw jurk maat 34 t/m 42: 140 à 160cm
Maat 44 t/m 50: 225cm voor alle modellen

Tricot/jersey in de accentkleur (hier wit) 150cm breed: 110 cm.

Patroon delen:
Zij-voorpanden, voorpand, achterpand(en),
Kraag of halsbies delen, belegdelen, mouwen, lusdetails.

Variaties zonder colourblock

Geschikte stoffen: single jersey katoen (geen viscose!) met print (kies een stof met een gewicht van ong.200 gram). French terry (dunne sweat, ongebrushed) met of zonder print,  jaquardtricot, punta di Roma (gladde stevige stof meestal polyester/viscose of punta di Milano (wat zwaardere, stevige stof viscose/polyamide).

Hoeveelheid stof nodig:
Tricot/jersey in hoofdkleur 150cm breed
Voor mouwloze en korte mouw jurk:
maat 34 t/m 42: 110 à 120cm
Voor 3/4 en lange mouw jurk:
maat 34 t/m 42: 140 à 160cm
Maat 44 t/m 50: 225cm Voor alle modellen.

Patroon delen:
- Voorpand
- Achterpand(en),
- Kraag of halsbies delen, belegdelen, mouwen, lusdetails.

BELANGRIJK
De stofafmeting is een schatting en is afhankelijk van het soort model wat je maakt, maat, aanpassingen, stofbreedte, print etc.
Ik adviseer om de patroondelen eerst in te leggen op een tafel waar je de juiste stofbreedte hebt afgemeten alvorens de stof te bestellen/kopen. Zo koop je nooit teveel/te weinig.

Fournituren:
- Eventueel een geweven label.
- Een stukje stretch plakvlieseline om kraag en beleg mee te verstevigen. Gebruik je heel zware/dikke stof als een zware punta dan is dit niet nodig.
- Stof knoopjes (pakketje met gereedschap om zelf te maken) formaat 15mm (klein) of 20mm (groot).
Variations with colourblock

Suitable fabrics: French terry (lightweight sweat, unbrushed), jacquard jersey, punta di Roma (smooth , firm jersey usually polyester/ viscose) or punta di Milano (a heavier, firm jersey usually viscose/polyamide).

Amount of fabric needed:
Tricot/jersey in main colour (here black):
150cm wide:
For sleeveless and short sleeve dress size 34-42: 110-120cm
For 3/4 and longsleeve dress size 34-42: 140-160cm
Size 44-50: 225cm for all styles

Tricot/jersey accent colour (here white) 150cm breed: 110 cm.

Patternparts:
- Front pieces
- Back pieces

- Collar or neckband pieces, facing, sleeves, details.

Variations without colourblock

Suitable fabrics: single jersey cotton (no viscose and not too lightweight) French terry (lightweight sweat, unbrushed) with or without print, jacquard jersey, punta di Roma (smooth , firm jersey usually polyester/ viscose) or punta di Milano (a heavier, firm jersey usually viscose/polyamide).

Amount of fabric needed:
Tricot/jersey as main colour 150cm wide
For sleeveless and short sleeve dress
size 34-42: 110 à 120cm
For 3/4 and longsleeve dress:
size 34-42: 140 à 160cm
Size 44-50: 225cm for all styles.


Patternparts:
- Front
- Back parts,

- Collar or neckband pieces, facing, sleeves, details.

IMPORTANT
The amount of fabric needed is an estimate and depends on the type of dress you make, size, adjustments, fabric width, print etc. I recommend placing the pattern pieces on a table where you have measured the correct fabric width before ordering/buying the fabric. That way you never buy too much/too little.

Haberdashery:
- A woven label (optionally)
- A piece of stretch iron on interlining to reinforce the collar and facing. If you use very heavy/thick fabric such as a heavy punta, this is not necessary.
- Fabric buttons (package with tools to make yourself) size 15mm (small) or 20mm (large).


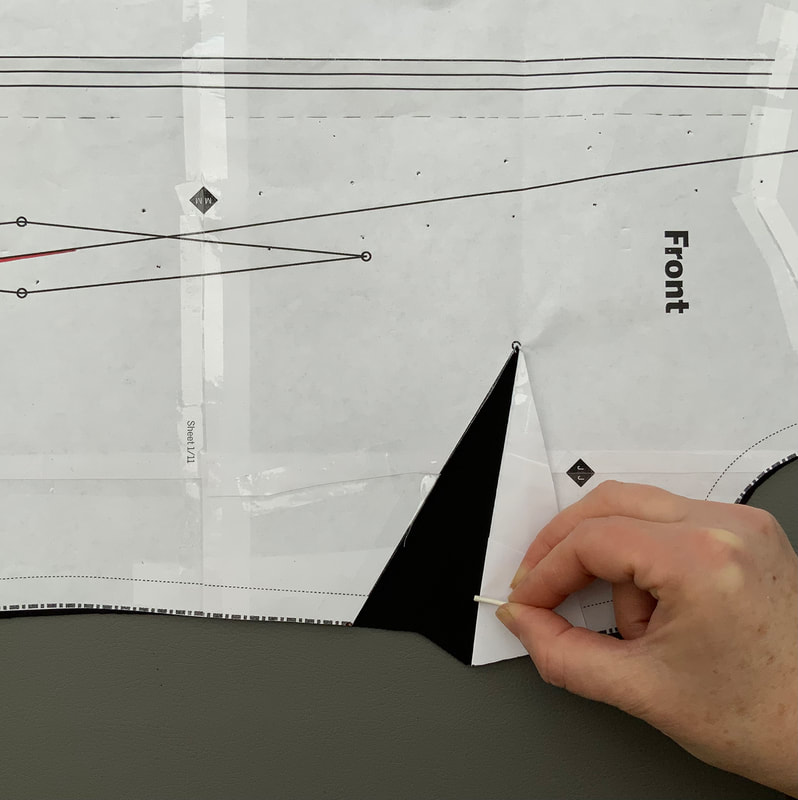
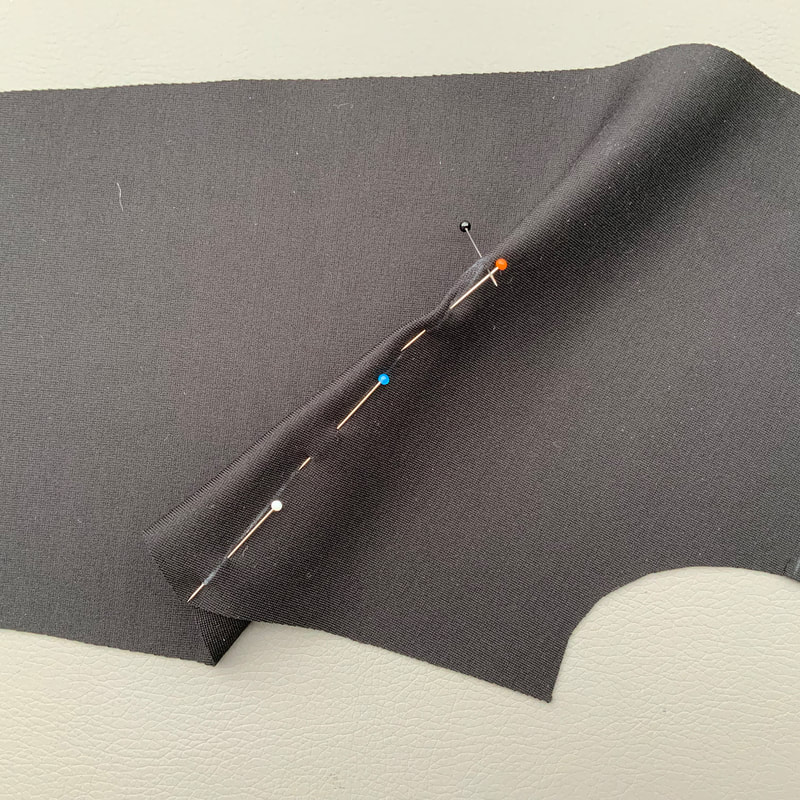
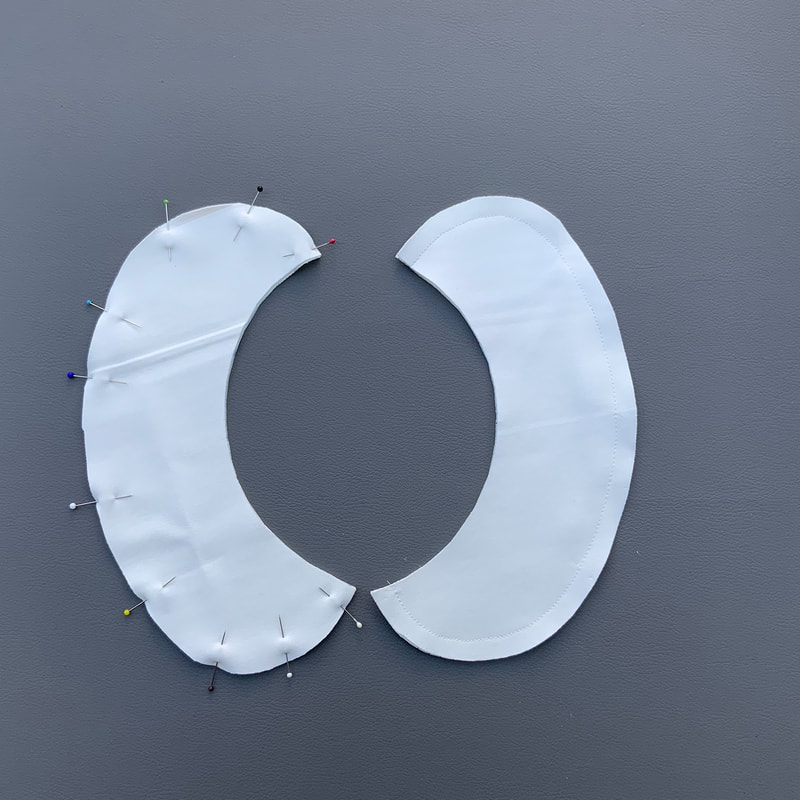
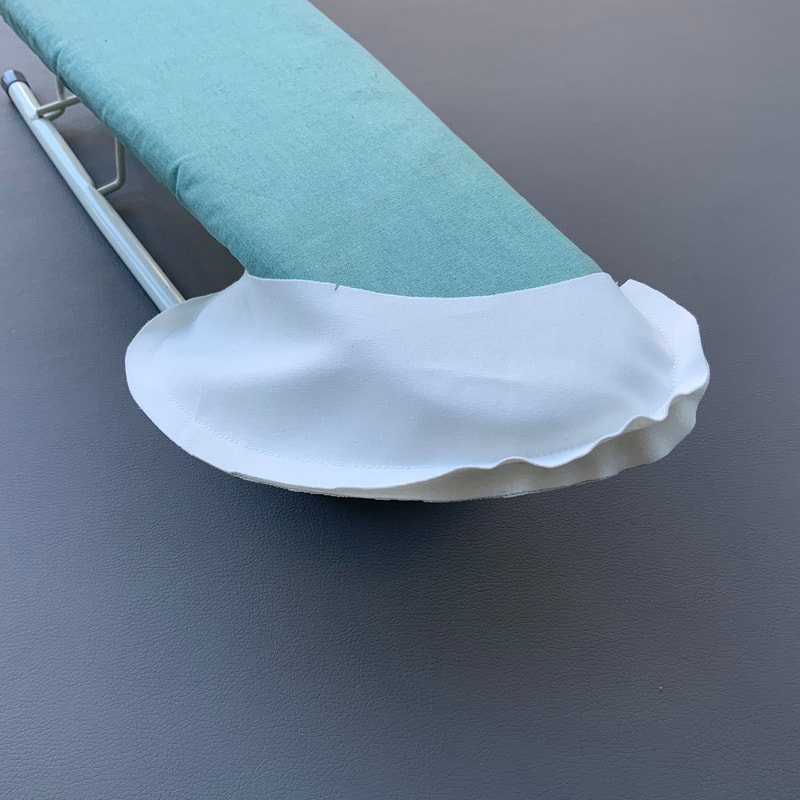
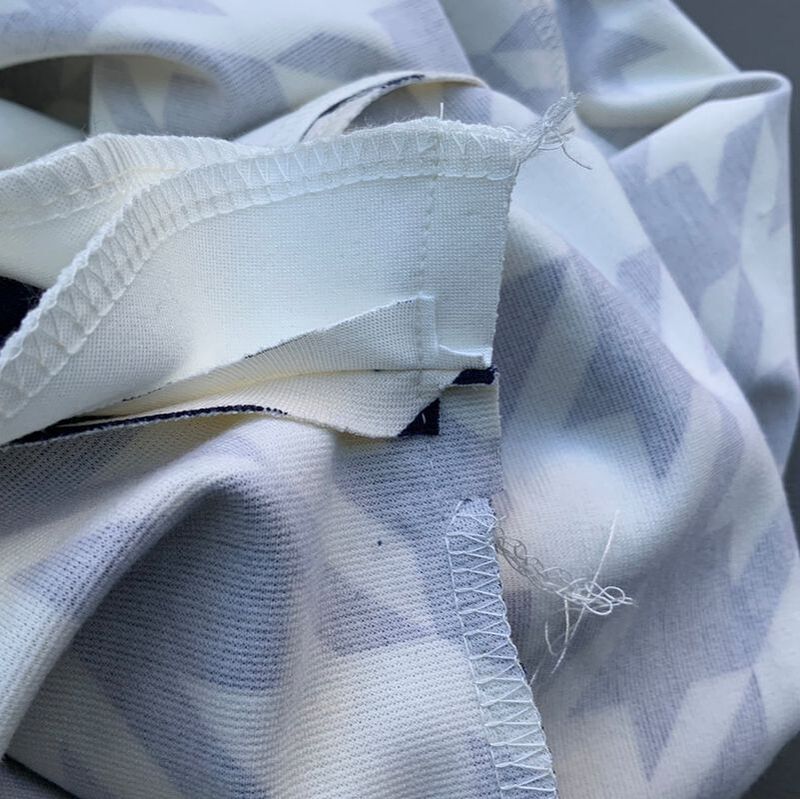
Goed om te weten
Ik ga in deze werkbeschrijving uit van het gebruik van een overlock machine. Mocht je daar niet over beschikken dan kun je een zig-zag steek gebruiken op een gewone naaimachine. Ik raad dan wel aan om er altijd een stretch stiksel naast te plaatsen. De naadtoeslag van de patronen is 1cm. Check wat de breedte instelling van je naad is op je lockmachine is. Is het 0,7cm dan kun je tijdens het stikken 3mm wegsnijden. De stretchnaden stik je met een stretchsteek instelling op de gewone naaimachine.
Behalve een stretchsteek setting op je naaimachine kun je ook voor stretch garen kiezen, bijvoorbeeld seraflex van mettler. Zet de garen spanning in een zo laag mogelijke instelling als je werkt met stretch garen. De naden werk je af met een overlockmachine (of een zigzag steek op een reguliere machine).

​Good to know
For this tutorial an overlock machine was being used for sewing most of the garment. However, it is possible to use a regular sewing machine and sew with a zigzag stitch. I do recommend sewing an extra stretch stitch next to it to create clean lines. The seam allowance of the patterns is 1cm. Check the seam width setting of your overlock machine. If it is 0.7cm you can cut away 3mm while sewing. The stretch seams can be sewn using the stretch setting on a regular sewing machine.
Apart from using a stretchstitch setting on your sewing machine ypu can also choose stretch yarn (seraflex by Mettler). Adjust the tension to the lowest possible setting when using stretch yarn. Finish seams with an overlock machine or zigzag on a regular machine.


4.
Markering en coupenaden
Marking pieces and darts

Er zijn veel variaties mogelijk maar de basis van de jurk is voor alle modellen gelijk.
Voor alle variaties: Kopieer alle coupenaden en pastekentjes op de achterkant van de stof. Je kunt hier carbon papier (speciaal voor dit doel) en een radeerwieltje voor gebruiken of zoals hier de coupenaden en pastekens op het papieren patroon inknippen en omvouwen. 
There are lots of variations possible but the base of the dress is for all styles the same.
For all variations: Copy all the darts and marks on the backside of the fabric. You can use a tracing wheel or like as shown in the picture cut the dartlines and notches and fold them over.

Picture
4a.
Neem alle coupenaden en kniptekens over op de achterkant van de stof.
Copy all the darts and marks on the back of fabric.
Picture
4b.
Vouw de coupenaden (voor en achter) doormidden. Zet een speldje overdwars in de punt vand de coupenaad. Speld nu de lijnen op elkaar, de speldjes wijzen met de kop naar de punt. Een (snelle) methode om een coupe naadje te stikken vind je hier: stap 4d-4h van de funky retro shirt werkbeschrijving.
Fold the darts (front and back) in half. Insert a pin across the point of the dart. Now pin the lines together, the pins point with the head to the point. A different (fast) method to sew a dart you can find here: step 4d-4h of the funky retro shirt tutorial.
Picture
4c.
Stik de coupenaden van boven tot de punt. Eventueel kun je als je bijna bij de punt bent de steekgrootte verkleinen. Als je bij de punt bent ga dan niet een paar steken heen en weer maar laat het draadje loshangen.
Sew the darts from top to tip. You can decrease the stitch size if you are almost at the point. When you get to the point, don't go back and forth a few stitches, but let the thread hang loose.
Picture
4d.
Knoop vervolgens de onderdraad en de bovendraad die vanaf de punt loshangen samen.
Then tie the bottom  thread and the upper thread hanging loose from the tip together.
Picture
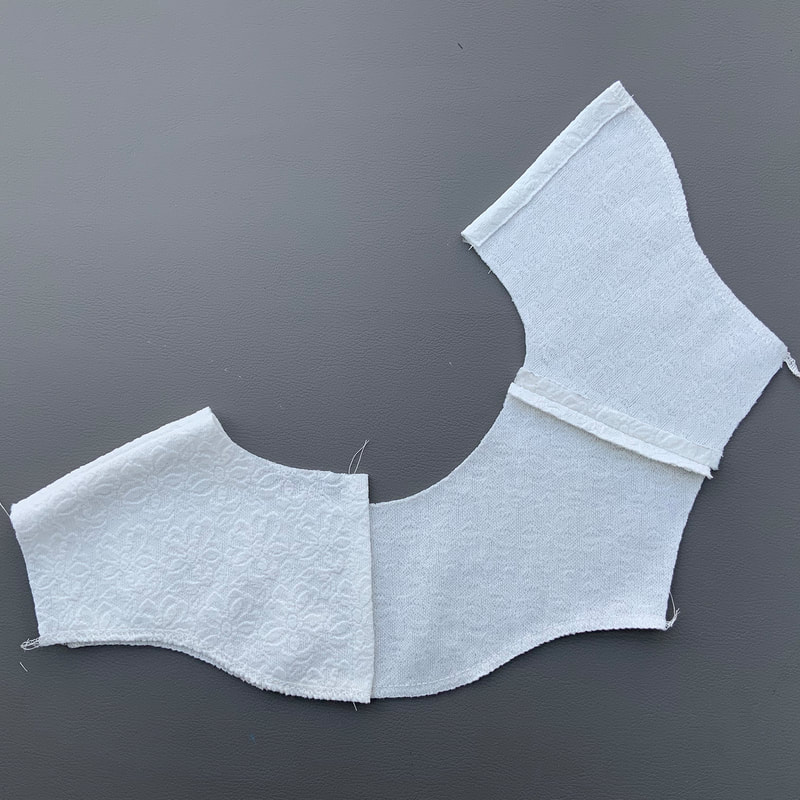
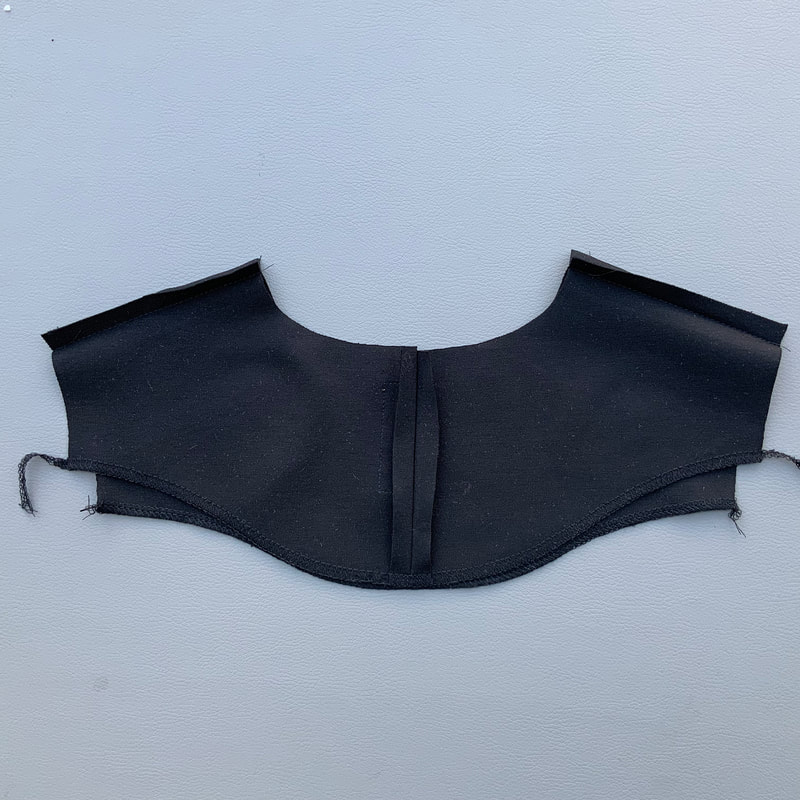
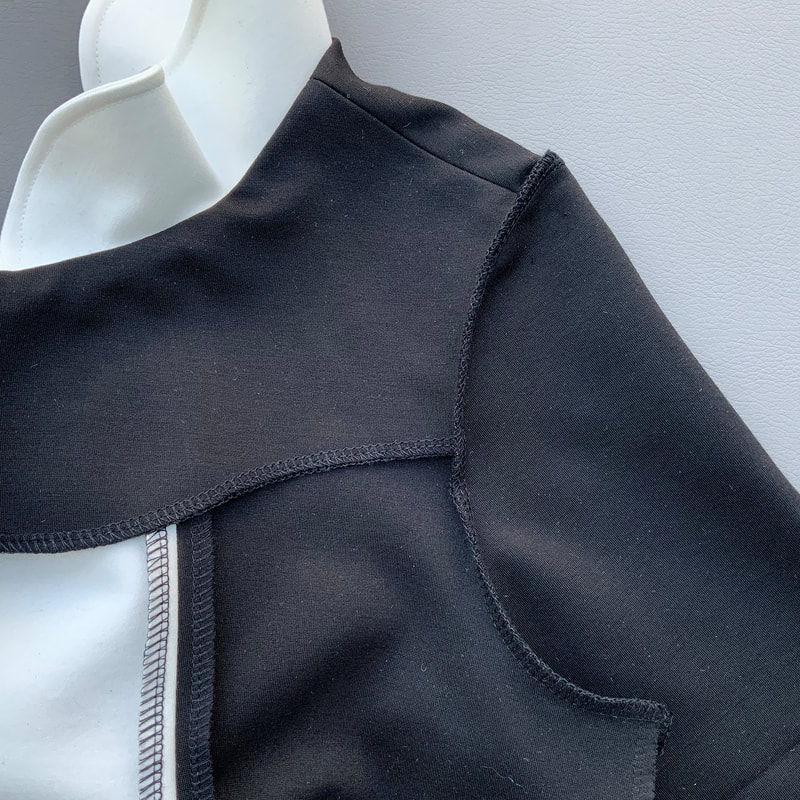
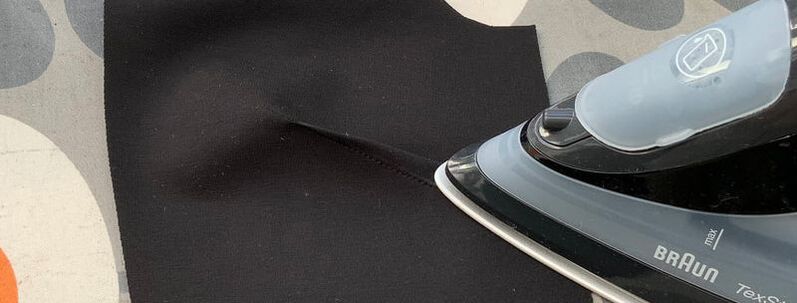
4e.
Strijk zowel de voor- als de achter coupenaden omhoog.
Iron both front and back darts upwards.

5.
Deelnaden, schouders, hals
Seams, shoulders, neck

Alle versies van de jurk zijn in de basis gelijk, alleen de details verschillen. In deze stappen staan alle colourblock-en halsvariaties.
All versions of the dress are basically the same, only the details differ. All color block and neck variations are listed in these steps.
Picture
5a.
Maak je de jurk zonder colourblock, ga verder naar stap 5b.
Maak je de COLOURBLOCK jurk (met rechte of uitlopende baan in het midden) werk dan de zijkanten af van het voorpandje en de buitenrand van de zijpanden met een overlockmachine. Stik deze met de goede kanten tegen elkaar en strijk de naden open.
Werk de rechte randen van de achterpanden af. Stik de achterpanden met de goede kanten tegen elkaar tot het split teken of de lengte van de rits en strijk de naad open.
Voor de jurk met RITS of SPLIT achter gebruik je het achterpanddeel met naadtoeslag.
Heb je achter geen opening of sluiting, dan knip je het achterpand ZONDER naadtoeslag aan de vouw.
If you are making the dress without colourblock go to step 5b.
If you are making the COLOURBLOCK dress (with a straight or flared strip in the middle), finish the sides of the front piece and the outer edge of the side pieces with an overlock stitch. Sew these right sides together and press the seams open.
Finish the straight edges of the back pieces. Sew the back pieces right sides together to the split mark or the length of the zipper and press the seam open.
For the dress with a ZIPPER or SPLIT at the back, use the pattern piece with seam allowance. If you don't have an opening or closing at the back, cut the back piece WITHOUT seam allowance on fold.

Picture
5b.
Leg het voorpand en het achterpand met de goede kanten op elkaar en stik de schouders.
Strijk de schoudernaden open. (Op de foto zie je dat de randen van de schouders zijn afgewerkt. Dit is alleen nodig als de rand erg omrolt.)
Place the front and back pieces right sides together and sew the shoulders. Iron the shoulder seams open. (You can see in the photo that the edges of the shoulders are finished. This is only necessary if the edge curls up a lot.)
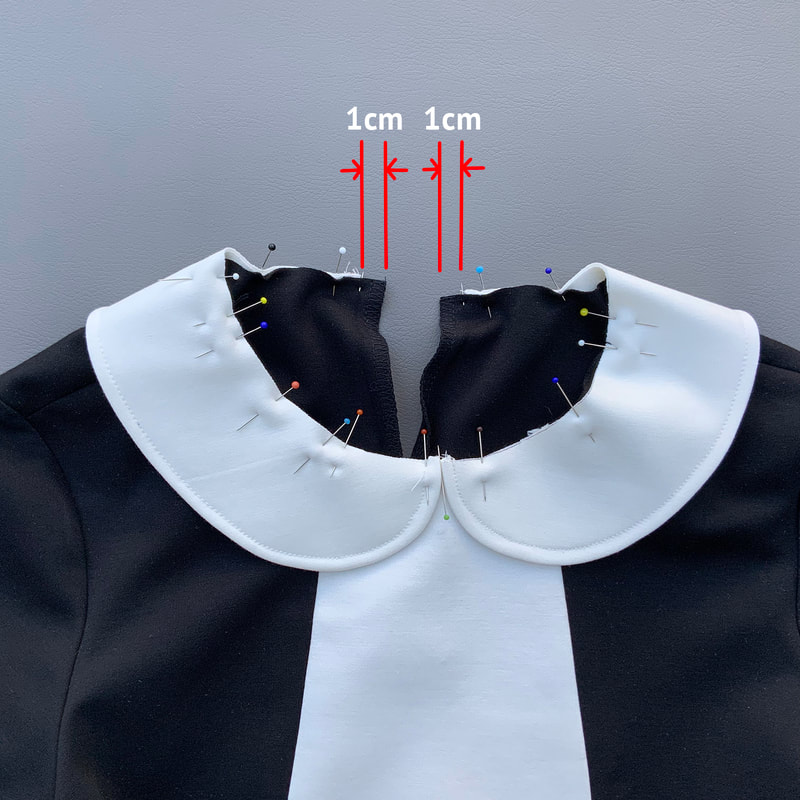
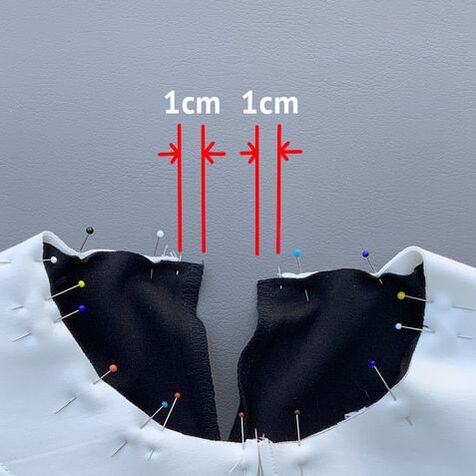
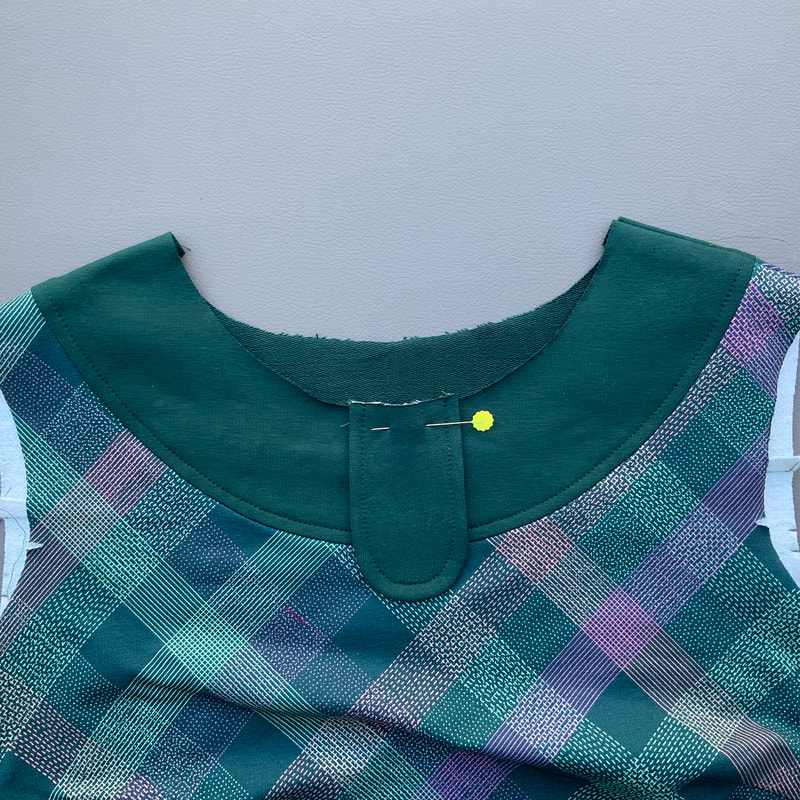
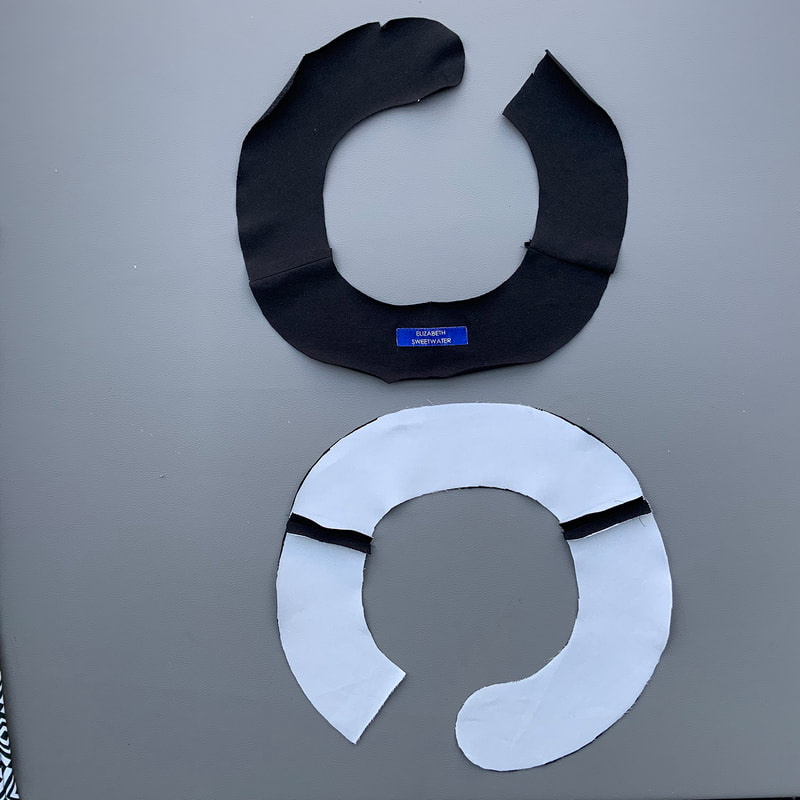
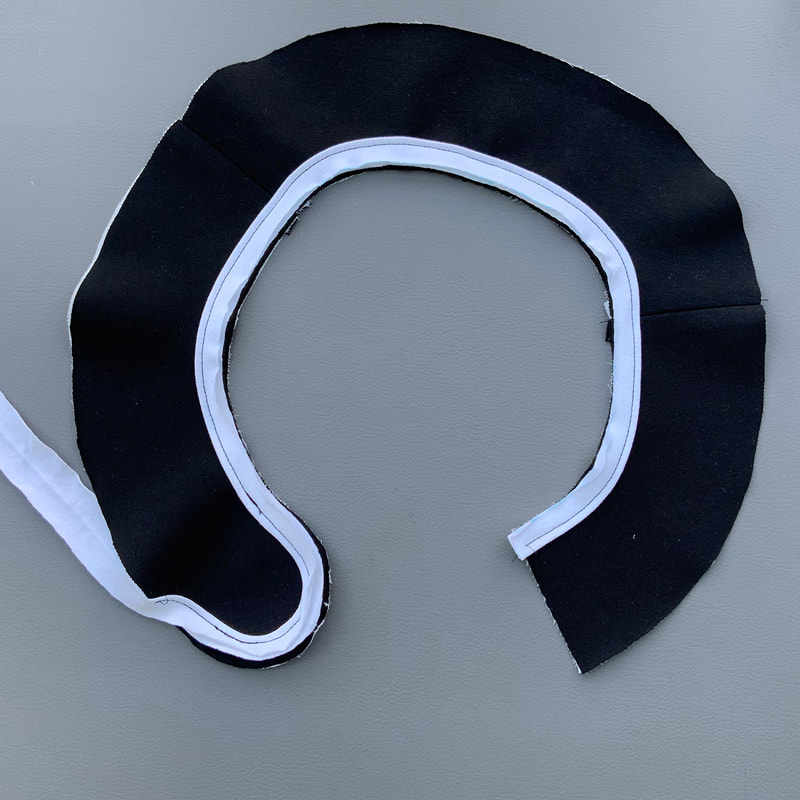
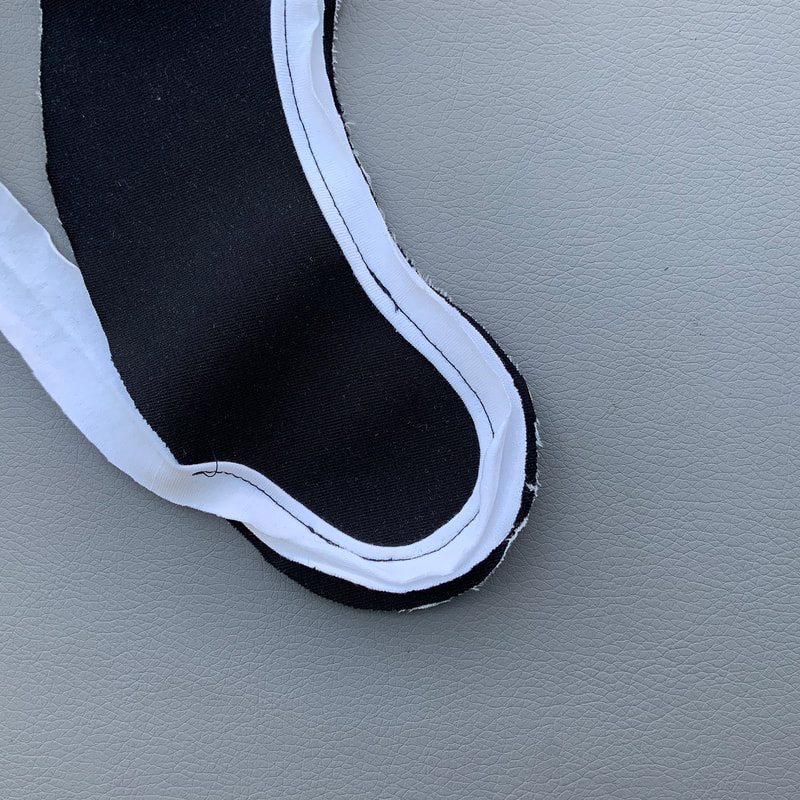
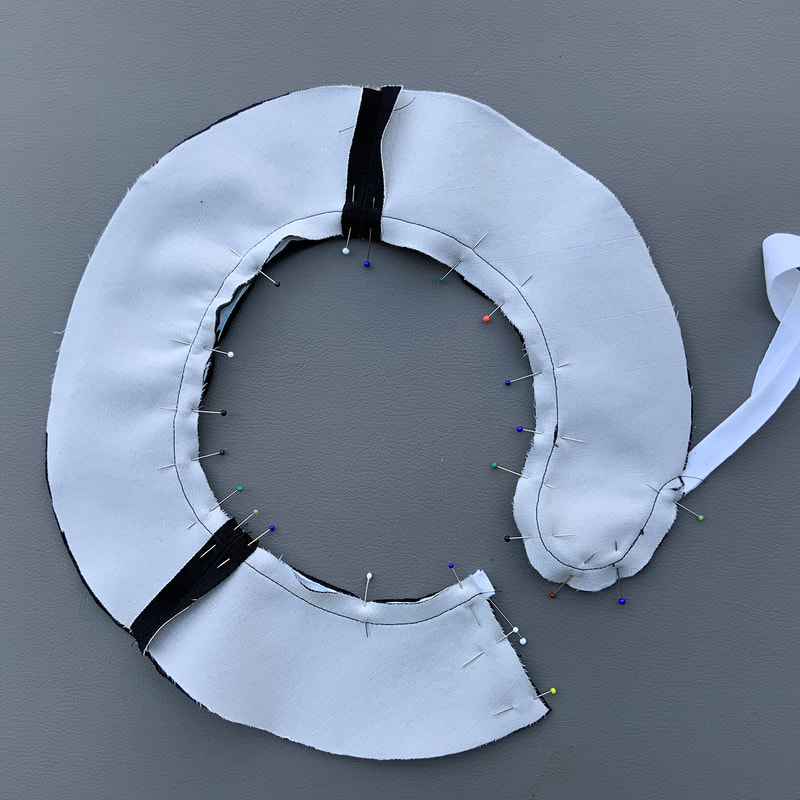
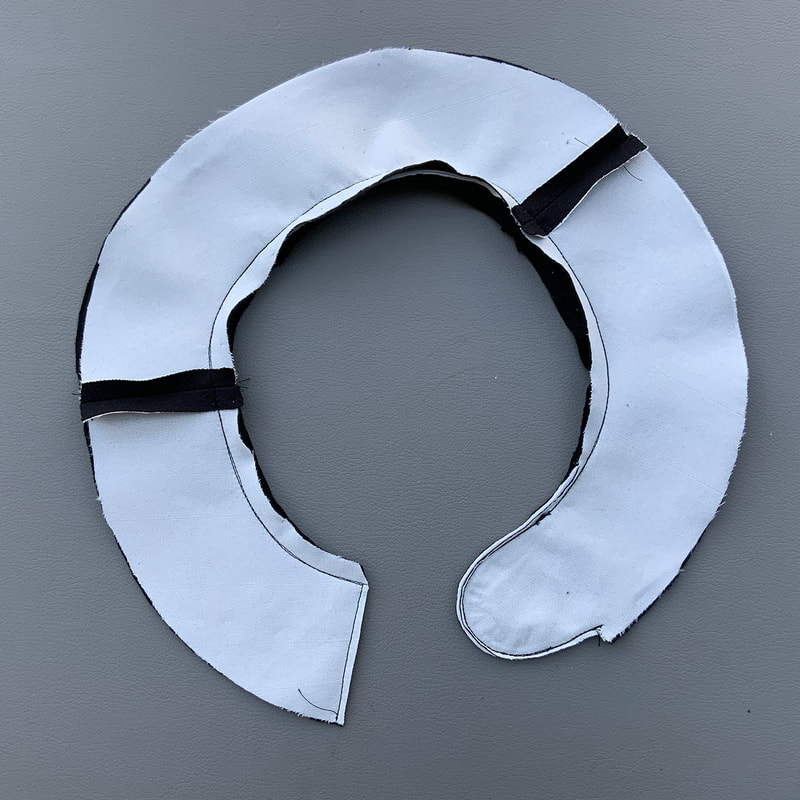
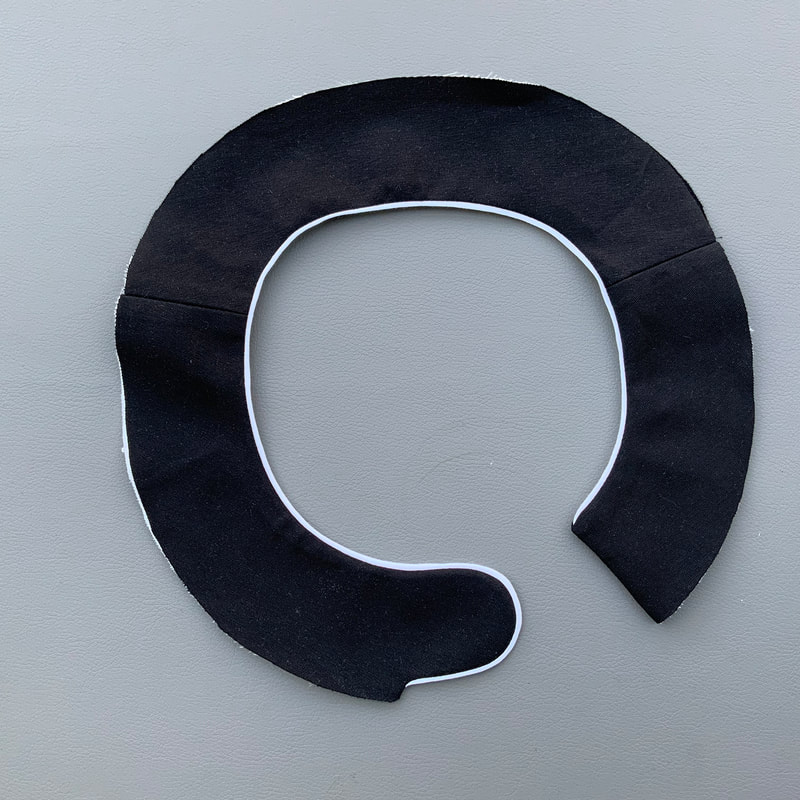
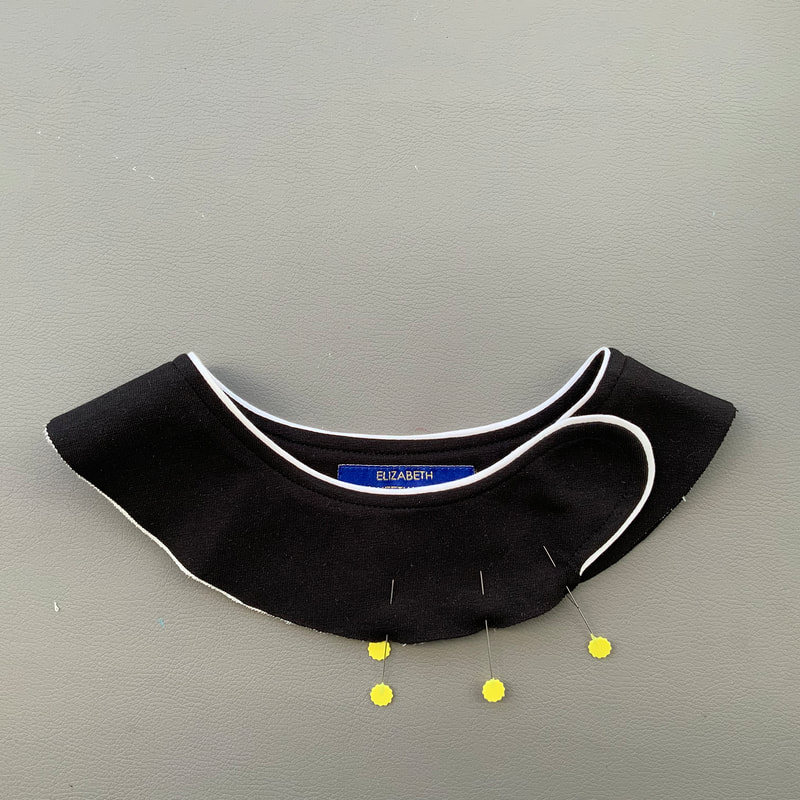
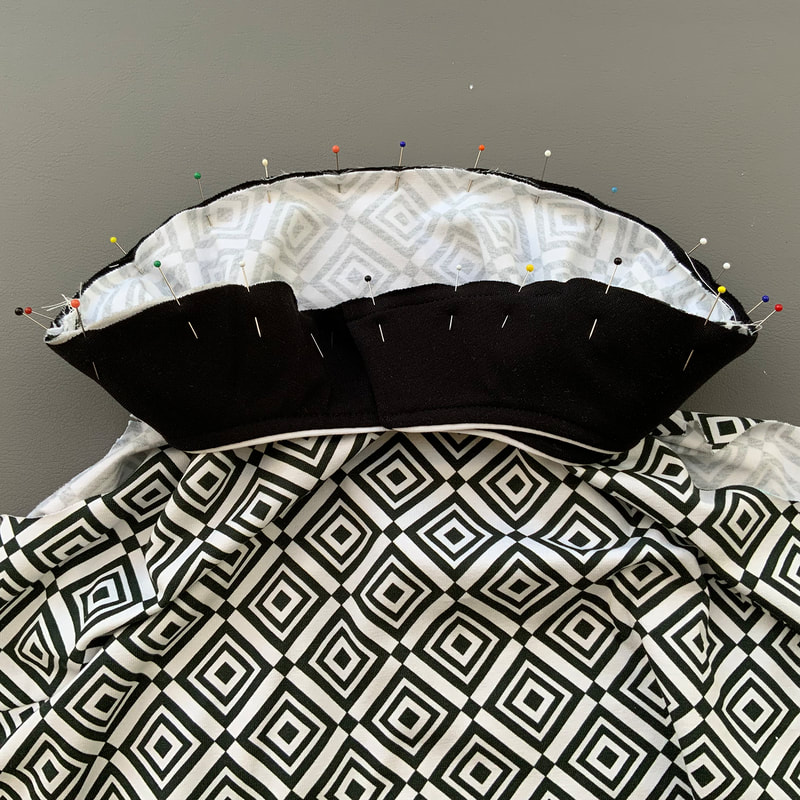
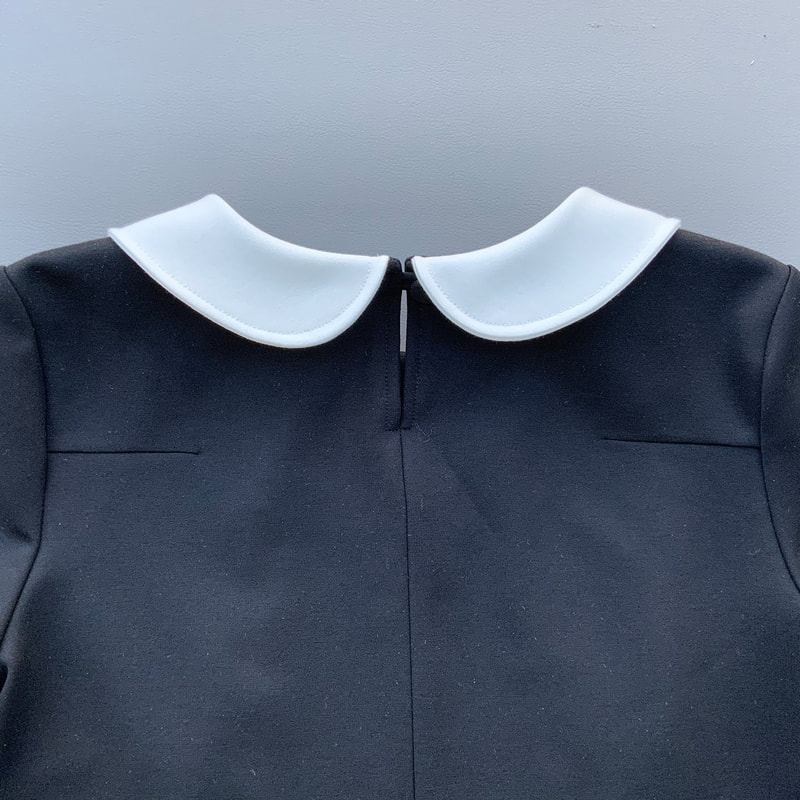
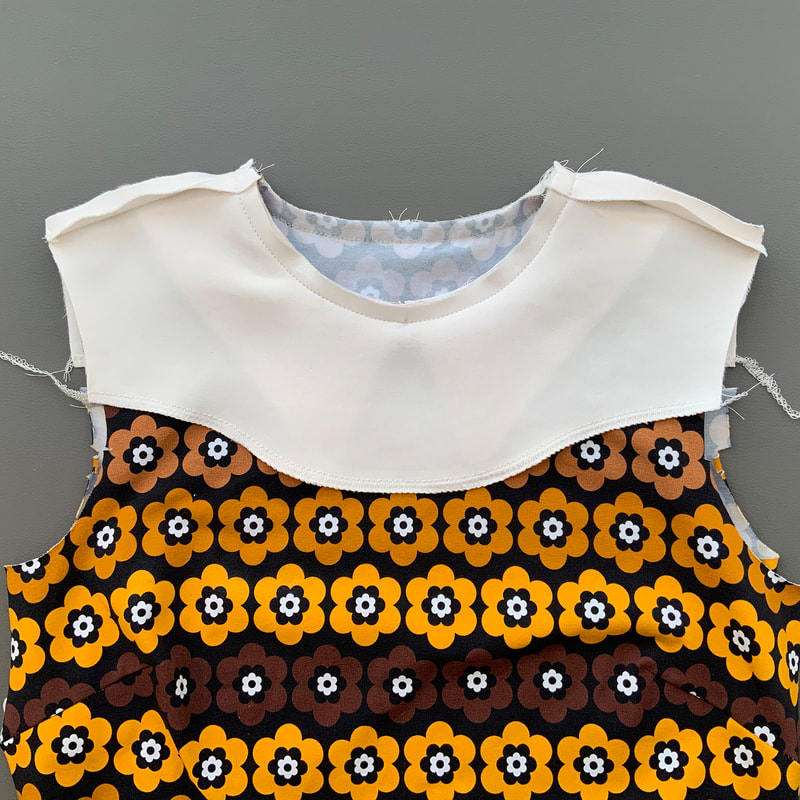
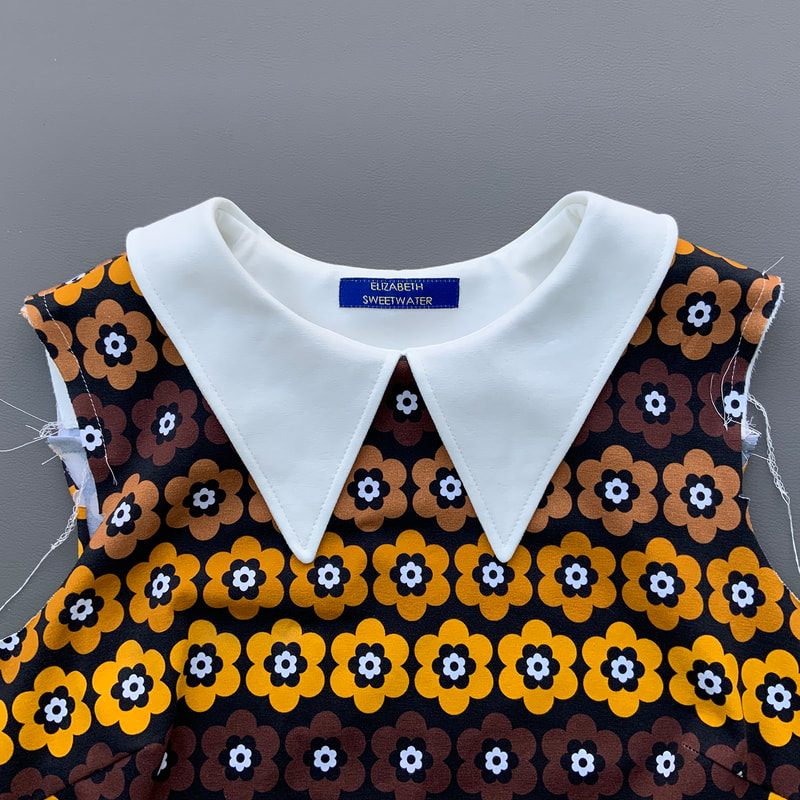
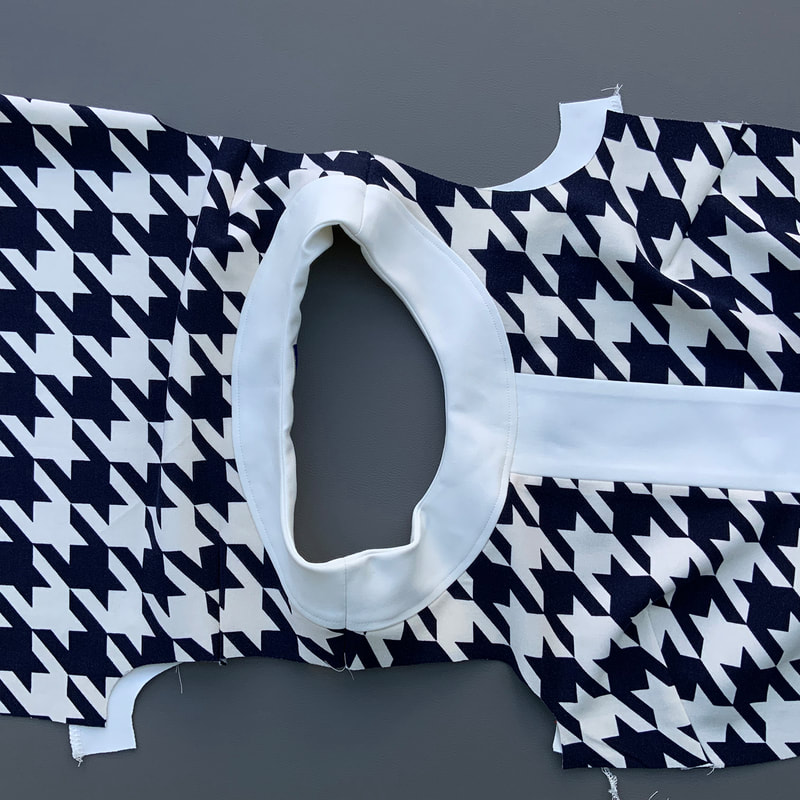
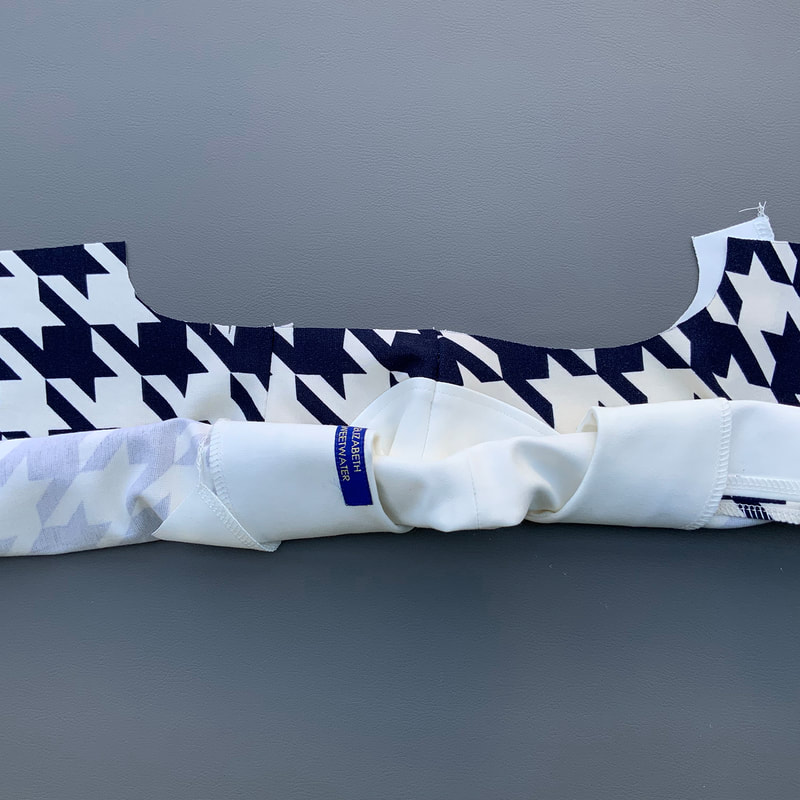
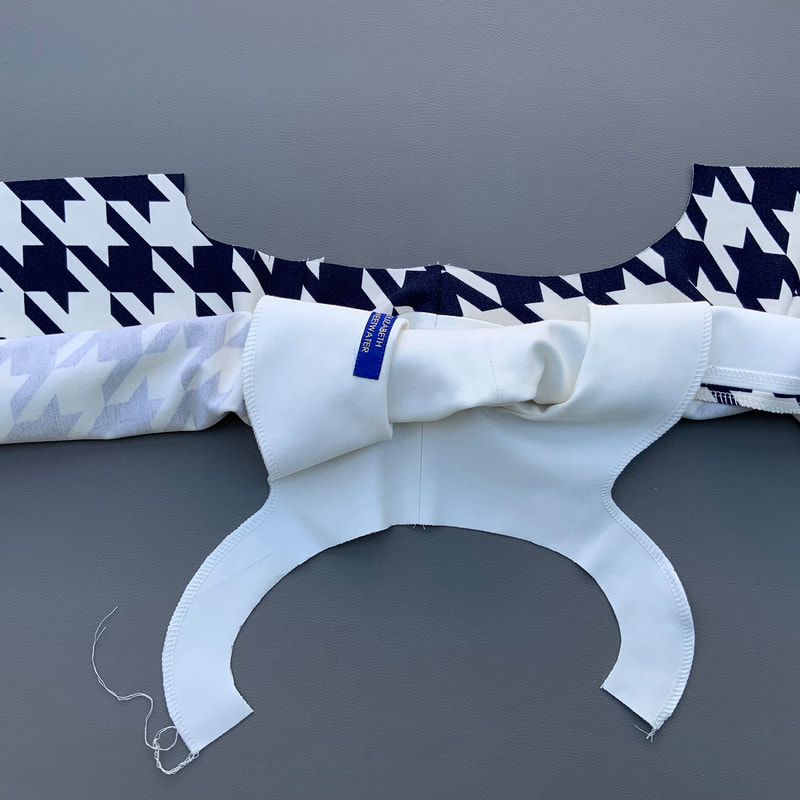
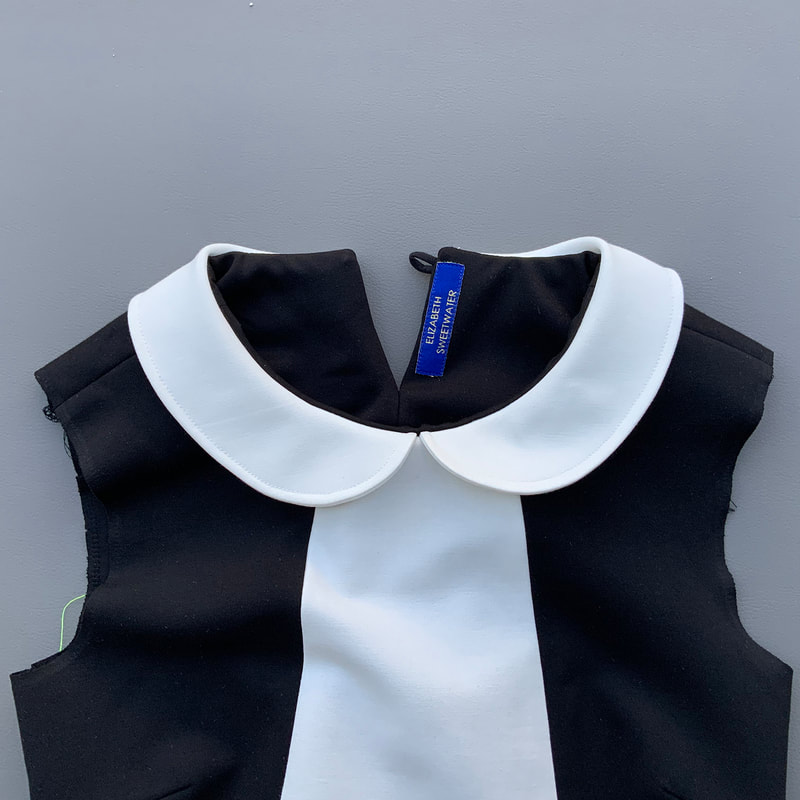
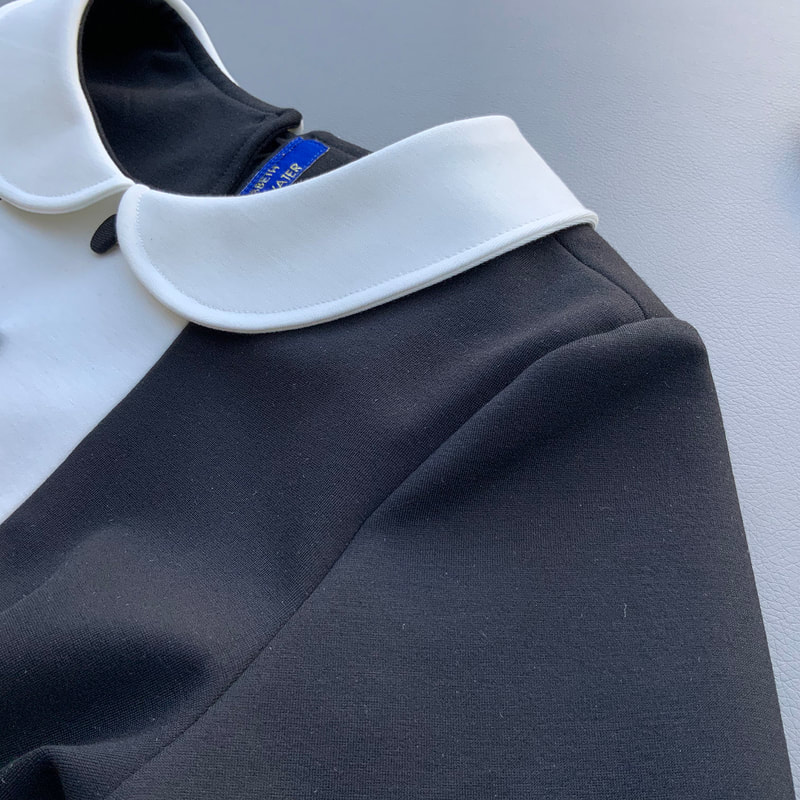
5.1
De Peter Pan kraag
The Peter Pan collar

Picture
5.1a
Verstevig 2 van de 4 kraagdelen met rekbare plakvlieseline. Gebruik je een zware kwaliteit punta dan is verstevigen niet nodig. Speld en stik de kraagdelen met de goede kanten op elkaar.
Reinforce 2 of the 4 collar parts with stretch fusible interlining. If you use a heavy quality punta, reinforcement is not necessary. Pin and stitch the collar pieces right sides together.
Picture
5.1b
Strijk de naad van de kraag open, dit werkt het best op de punt van een mouwplank. Zorg dat de naad goed open is geperst om een strak resultaat te krijgen.
Iron the seam of the collar open, this works best on the tip of a sleeve board. Make sure the seam is well pressed open to get the best result.
Picture
5.1c
Knip vervolgens de naad kort af. (Het is makkelijker om de naad open te persen vóór het afknippen).
Then trim the seam short. (It is easier to press the seam open before cutting).
Picture
5.1d
Keer de kraag en pers plat. Stik de rand door op 0,5cm. Ga verder vanaf stap 5k.
Turn the collar and press flat. Topstitch the edge on 0,5cm. Continue to step 5k.
Picture
5.1e
Speld de kraag langs de hals, gebruik hiervoor het halskniptekentje. Voor de versie met het SPLITJE laat je achter 1cm naadtoeslag open.
For both collar versions:
Pin the collar around the neck, use the neck cutting marks. For the version with an OPENING in the back, leave 1cm seam allowance at the back.
Picture
5.1f
Stik of rijg de kraag langs de hals op iets minder dan 1cm. Dit is een tijdelijk stiksel om de kraag op zijn plaats te houden.
Stitch or baste the collar around the neck at just under 1cm. This is a temporary stitch to hold the collar in place.
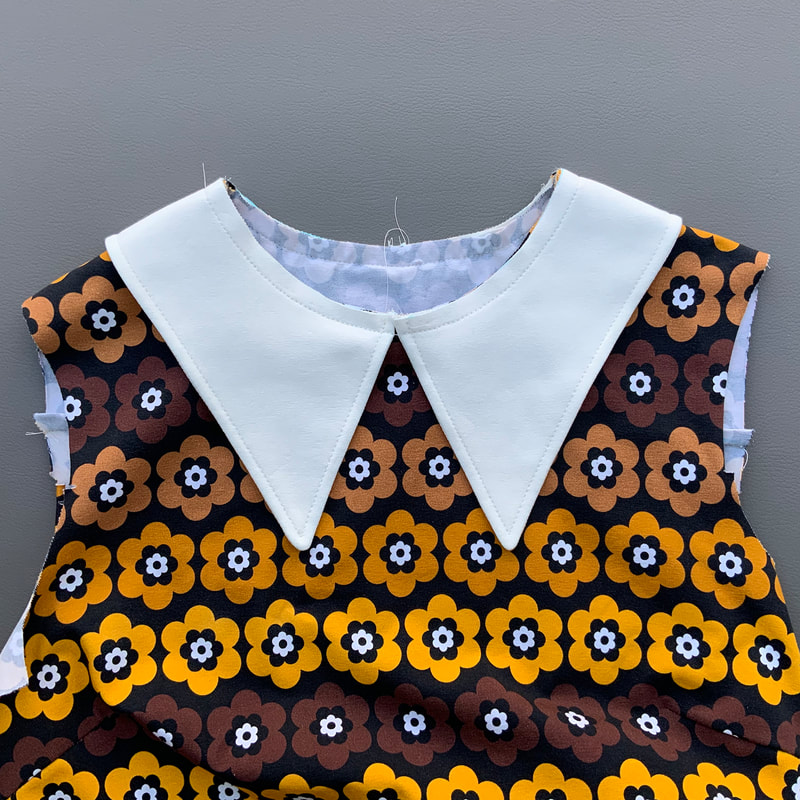
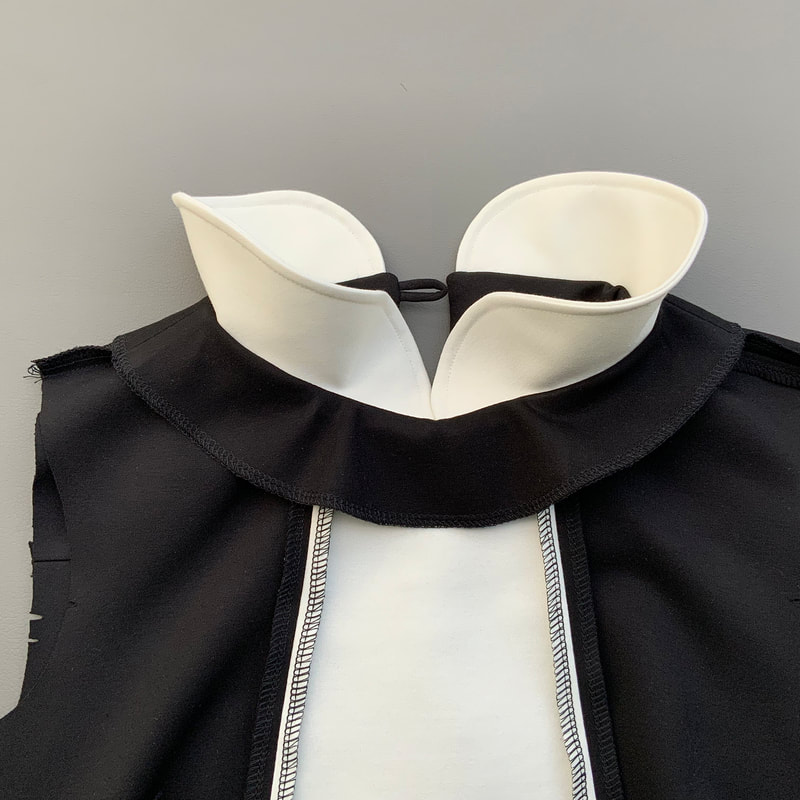
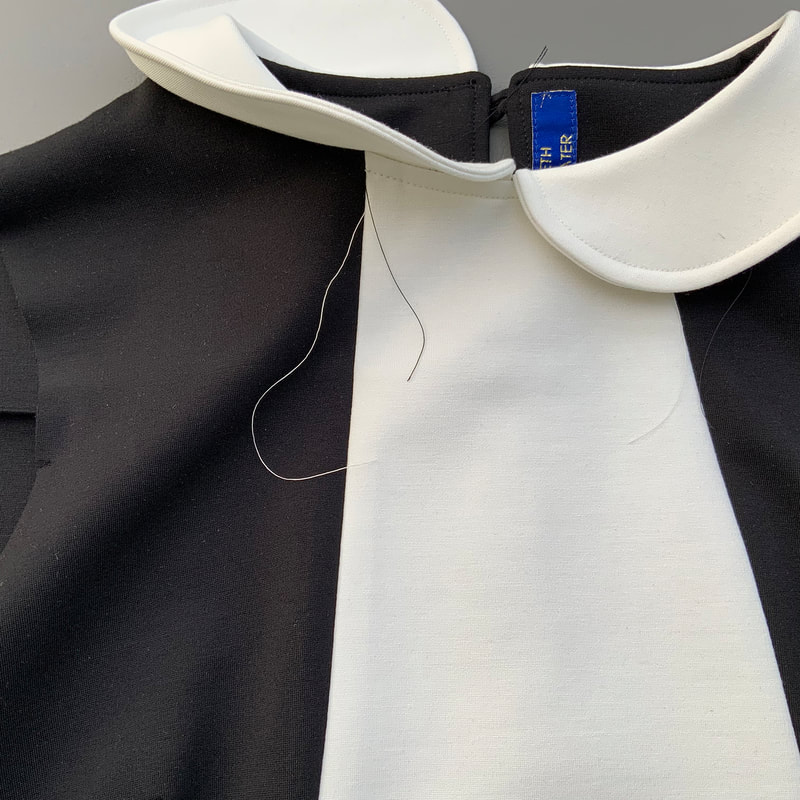
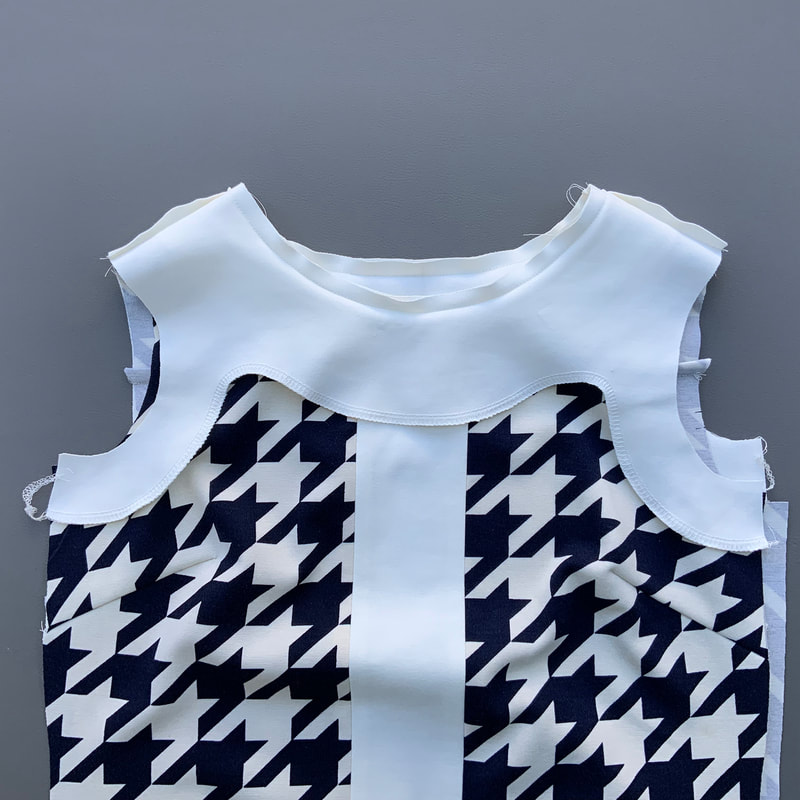
5.2
De Puntkraag
The Pointed Collar

Picture
5.2a
Deze maak je op dezelfde manier als de Peter pan kraag, je kunt dus voorgaande stappen volgen.
Tip: Het is handig om het kraagpatroondeel te kopiëren, de naad van het origineel af te knippen en deze te gebruiken als sjabloon om over te trekken op de binnenkant van het kraagdeel. Je kunt dan makkelijk over de lijn heen stikken.
The pointed collar is made in the same way as the Peter pan collar, so you can follow the previous steps.
Tip: It is handy to copy the collar pattern piece, trim the seam from the original, and use it as a template to trace onto the inside of the collar piece. You can then easily stitch over the line.

Picture
5.2b
Om de puntkraag open te strijken, strijk je eerst de ronding achter op de punt van de mouwplank. (Zie stap 5f).
Strijk dan de naden van de korte kant open.
To iron the pointed collar open, first iron the curve at the back on the tip of the sleeve board. (See step 5f). Then iron the seams of the short side open.
Picture
5.2c
En vervolgens de naden van de lange kant. Zorg dat de naad goed open is geperst om een strak resultaat te krijgen. Keer de kraag (gebruik een breinaald o.i.d om de punt goed strak te krijgen) pers plat en stik door op 0,5cm.
And then the seams of the long side. Make sure the seam is well pressed open to get a tight result. Turn the collar (use a knitting needle or something similar to get a nice point) press flat and topstitch at 0.5cm.
Picture
5.2d
Zoals met de Peter Pan kraagvariant, speld de kraag langs de hals, gebruik hiervoor het halskniptekentje. Voor de versie met het SPLITJE laat je achter 1cm naadtoeslag open.
As with the Peter Pan collar, pin the collar around the neck, use the neck cutting marks. For the version with an OPENING in the back, leave 1cm seam allowance at the back.
Picture
5.2e
Zoals met de Peter Pan kraagvariant, stik of rijg de kraag langs de hals op iets minder dan 1cm. Dit is een tijdelijk stiksel om de kraag op zijn plaats te houden.
As with the Peter Pan collar, stitch or baste the collar around the neck at just under 1cm. This is a temporary stitch to hold the collar in place.
Picture
5.2f
De puntkraag als deze gestikt is rond de hals zonder naad achter. Ga nu verder met stap 6t. voor het beleg.
The pointed collar when stitched around the neck without seam at the back. Continue with step 6t. for the facing.
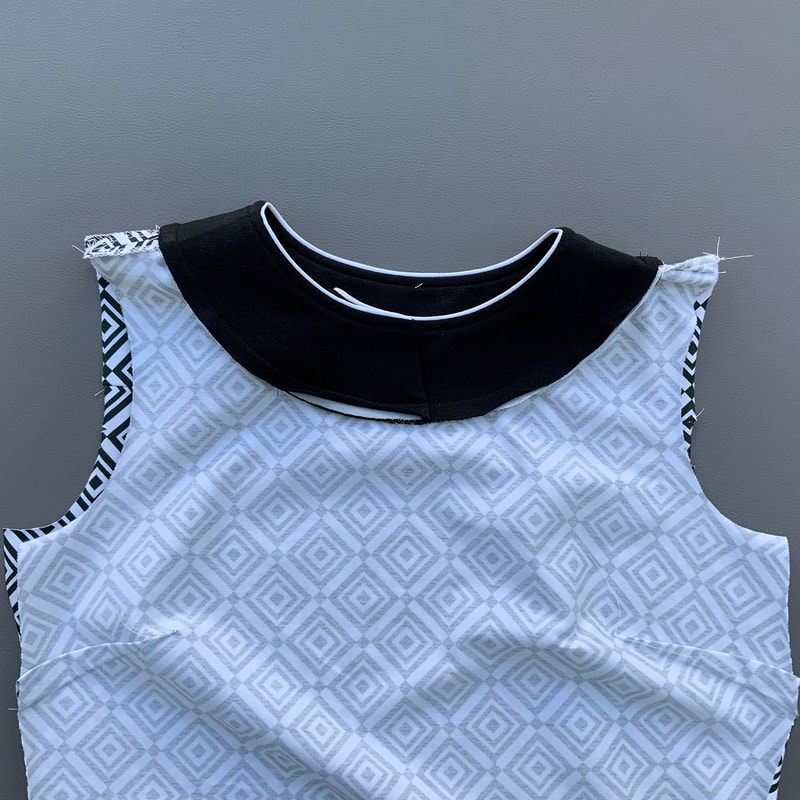
5.3
De halbies variant met beleg
The neck band with facing

Picture
5.3a
Speld en stik met de goede kanten tegen elkaar de halsbiezen tegen de hals.
With right sides together, pin and stitch the neckbands to the neck.
Picture
5.3b
Strijk de naad omhoog en stik deze door op 0,5cm van de rand.
Speld en stik de schoudernaden met de goede kanten tegen elkaar. Let op dat de naden netjes doorlopen. Je kunt ook eerst het stukje naaien waar de naden tegen elkaar komen. Als deze netjes doorlopen, dan pas de hele schouder naaien.
Wil je een lus toevoegen ga dan verder met sectie 5.4
Zonder lus ga dan verder vanaf:
- sectie 6.1 voor het beleg met rits.
- sectie 6.2 voor het beleg met split.
- sectie 6.3 voor het beleg zonder opening.
Iron the seam up and topstitch it 0.5cm from the edge. Pin and stitch the shoulder seams right sides together. Make sure that the seams run neatly. You can also sew the part where the seams meet first. If these go through neatly, then sew the entire shoulder.
If you want to add a loop, continue with section 5.4.
Without loop then continue from:
- section 6.1 for the zipper facing.
- section 6.2 for the facing with opening.
- section 6.3 for the facing without opening.

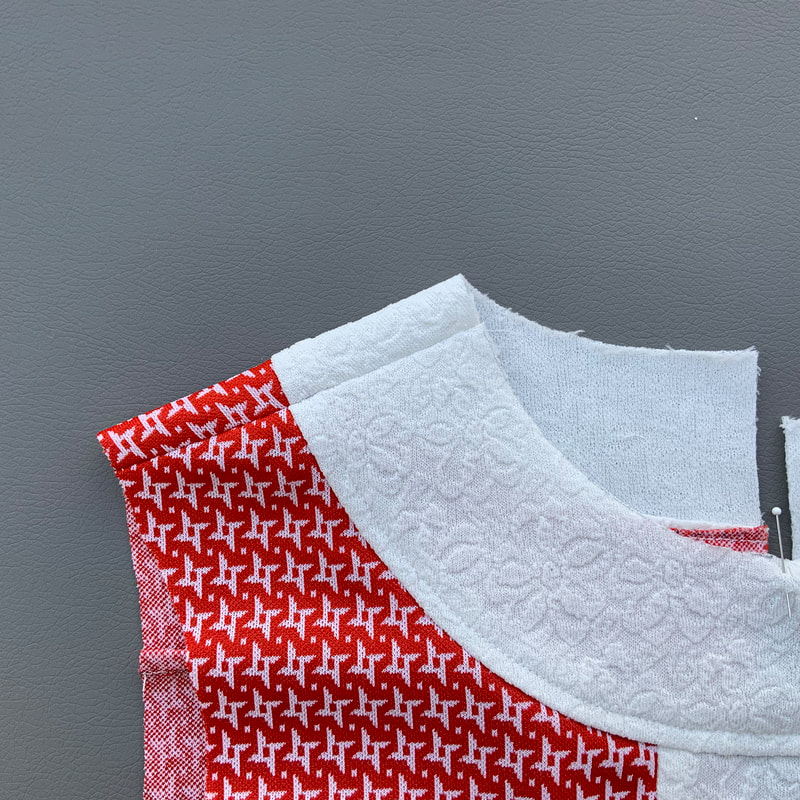
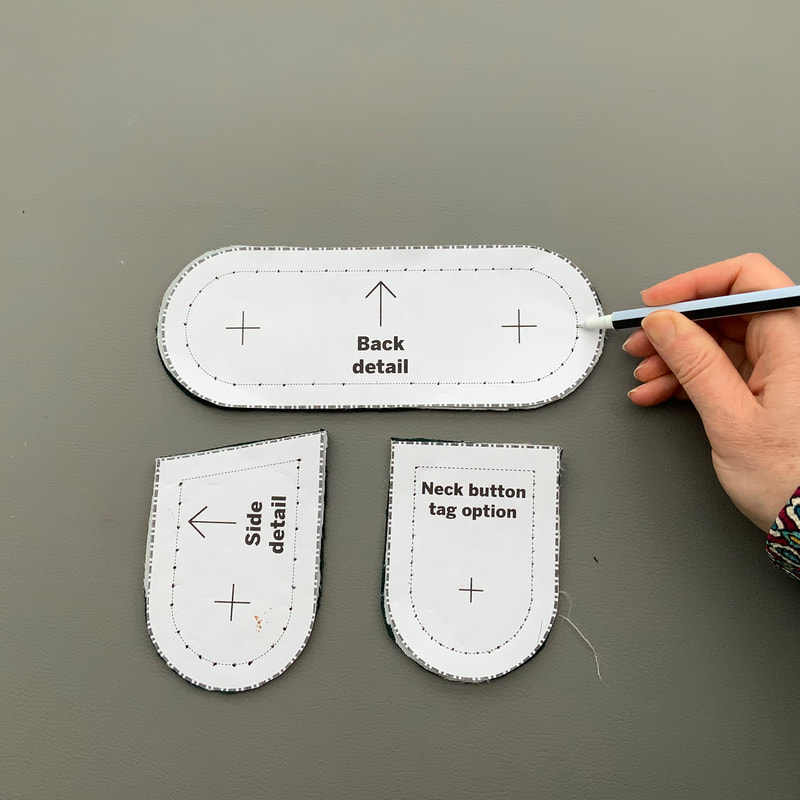
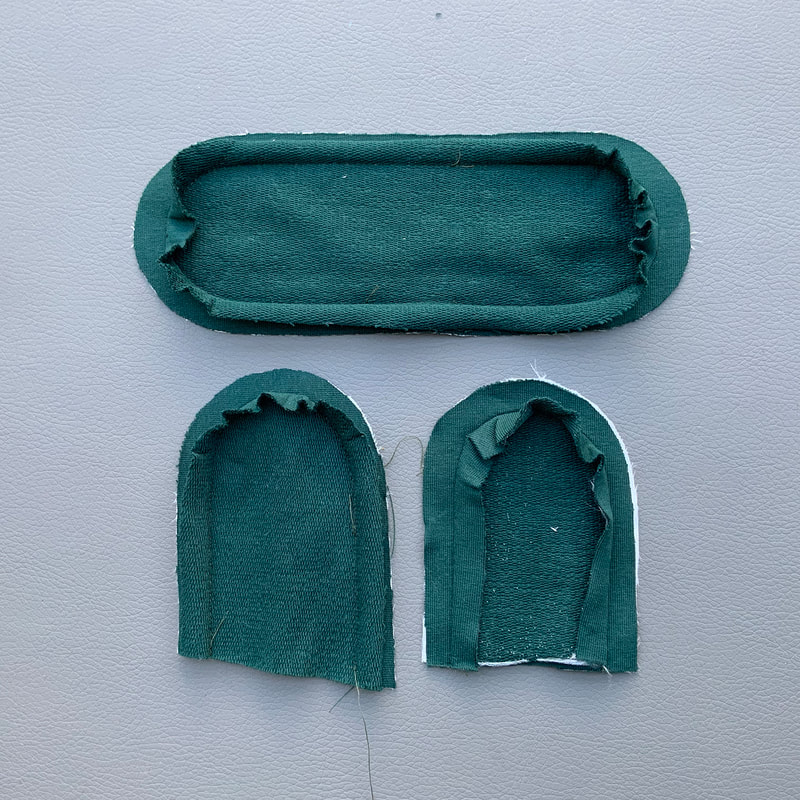
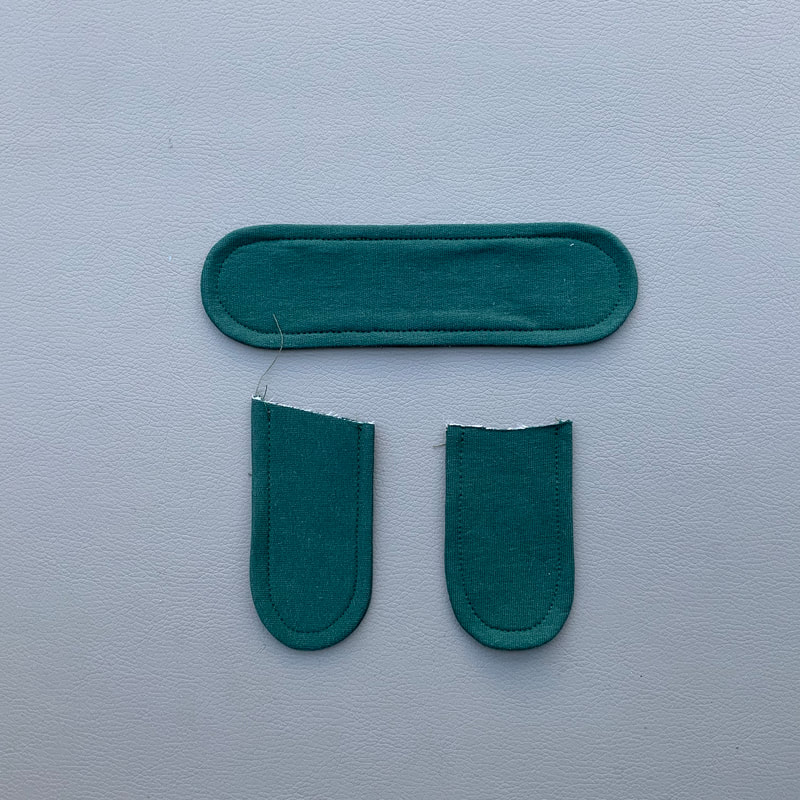
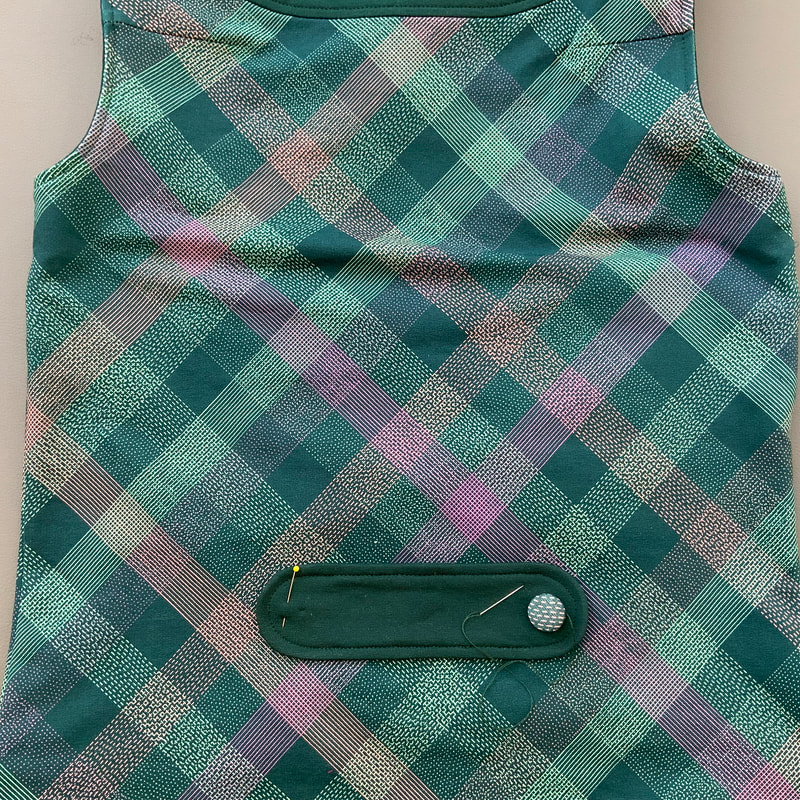
5.4
De halslus, zijnnaad lus en achterdetail
The neckloop, side seam loop and back detail

Picture
5.4a
Gebruik je dunne stoffen zoals single jersey en French Terry dan verstevig je eerst de achterkant van 1 deel met rekbare plakvlieseline. Op de foto zie je ook de zijnnaad lus en achterdetail, het is handig om ze allemaal in 1 keer te maken als je deze wilt verwerken in je jurk.
Tip: door gaatjes door het patroondelen te prikken kun je op de achterkant van 1 van de lusdelen markeren waar je moet stikken.
If you use thin fabrics such as single jersey and French Terry, then first reinforce the back of 1 part with stretchable fusible interlining.
In the photo you can also see the side seam loop and back detail, it is useful to make them all in one go if you want to use it in your dress.
Tip: by poking holes through the pattern pieces you can mark on the back of 1 of the loop pieces where you have to stitch.

Picture
5.4b
Stik de lusdelen met de goede kanten tegen elkaar. Laat de korte kant open van de zijnaad lussen en de halslus en laat van het rugdetail ongeveer 2cm open in het midden van één van de lange kanten. Strijk de naden open van de lusdelen.
Sew the loop pieces right sides together. Leave the short side of the side seam loops and the neck loop open and leave approx. 2cm of the back detail in the middle of one of the long sides. Iron the seams of the loop parts open.
Picture
5.4c
Knip de naden van de lussen kort af zoals op de foto. Voor het rugdetail geef je knipjes waar het stiksel ophoudt en knip je alleen naden van de rondingen kort af.
Trim the seams of the loops as shown in the photo. For the back detail, cut where the stitching ends and trim only the seams of the curves.
Picture
5.4d
Keer de lussen en strijk deze plat. Om de naad mooi strak te krijgen kun je deze tussen tussen je vingers rollen en plat persen met een vochtige doek. Stik ze daarna door op 0,5cm van de rand.
Turn the loops and iron them flat. To get the seam nice and tight, you can roll it between your fingers and press flat with a damp cloth. Then topstitch them at 0.5cm from the edge.
Picture
5.4e
Bepaal de plek waar je lus wilt. Speld en stik deze vast.
Determine the placement of the loop. Pin and sew to the neck.
Picture
5.4f
De lus kan ook meer zijwaarts.
Alternatively you can place the loop more sideways.
Picture
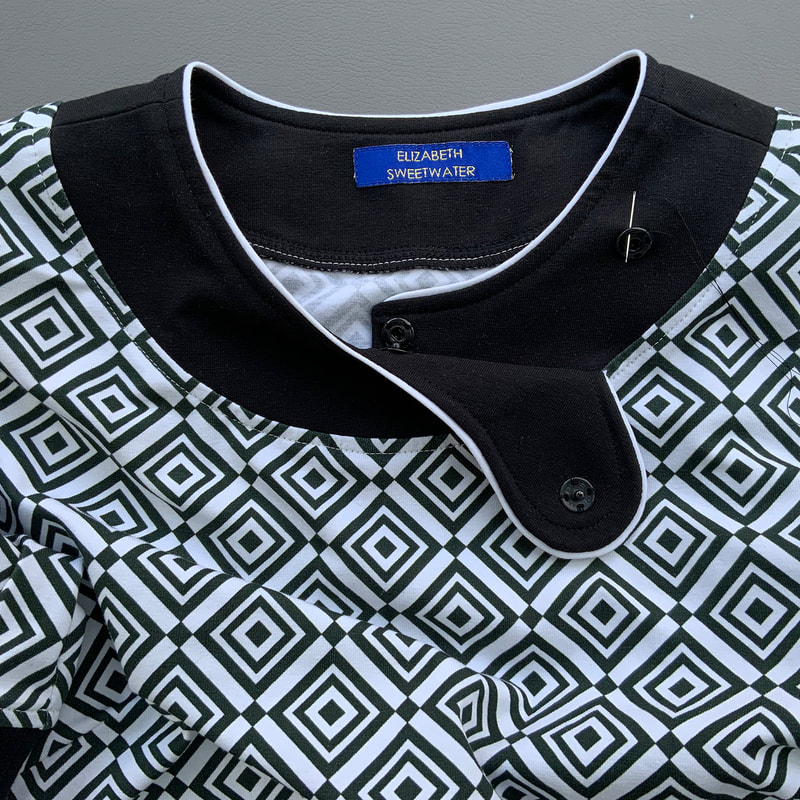
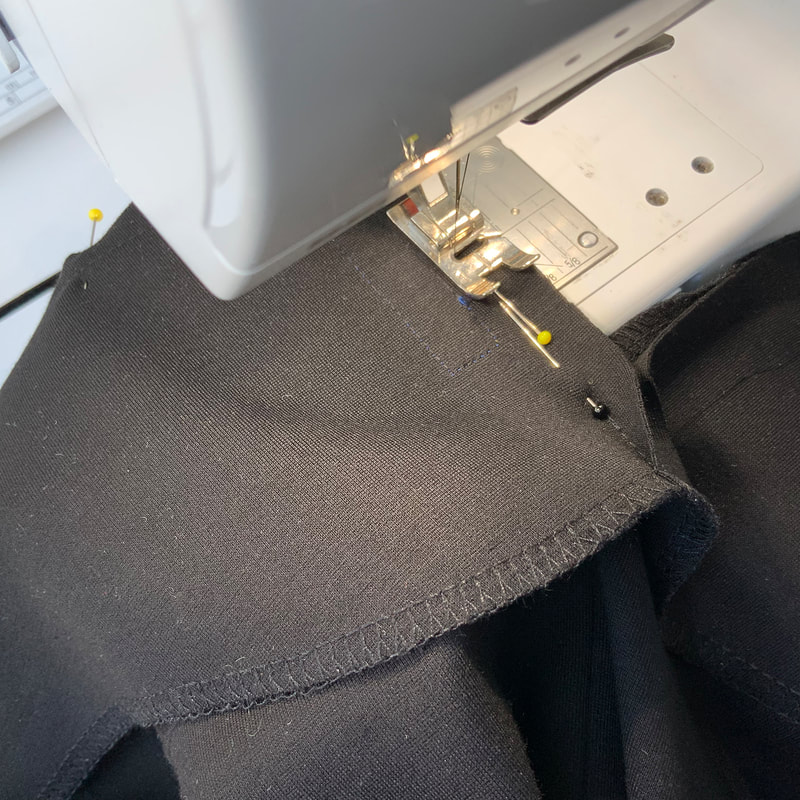
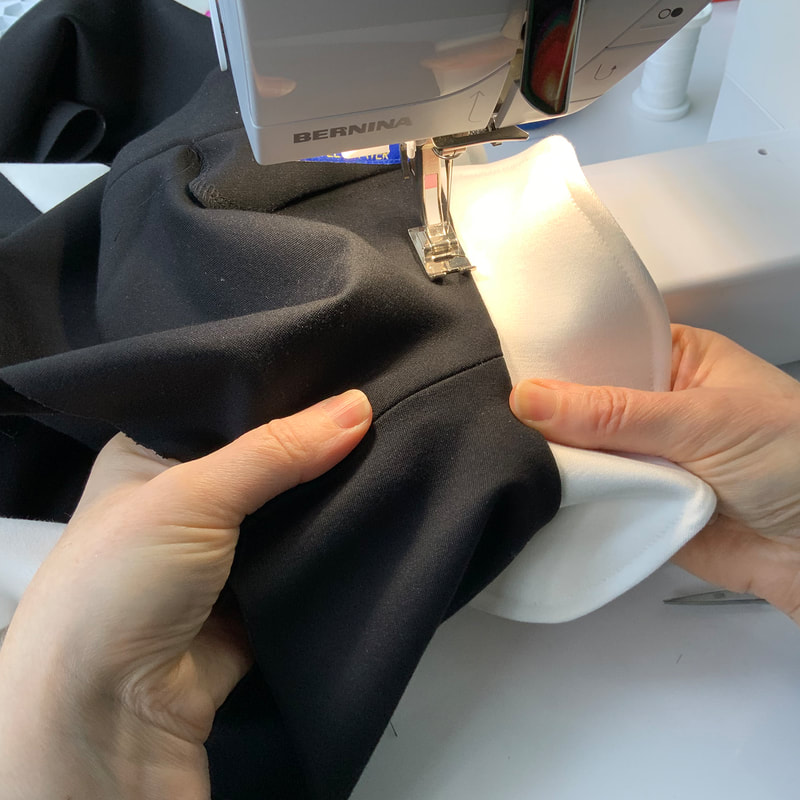
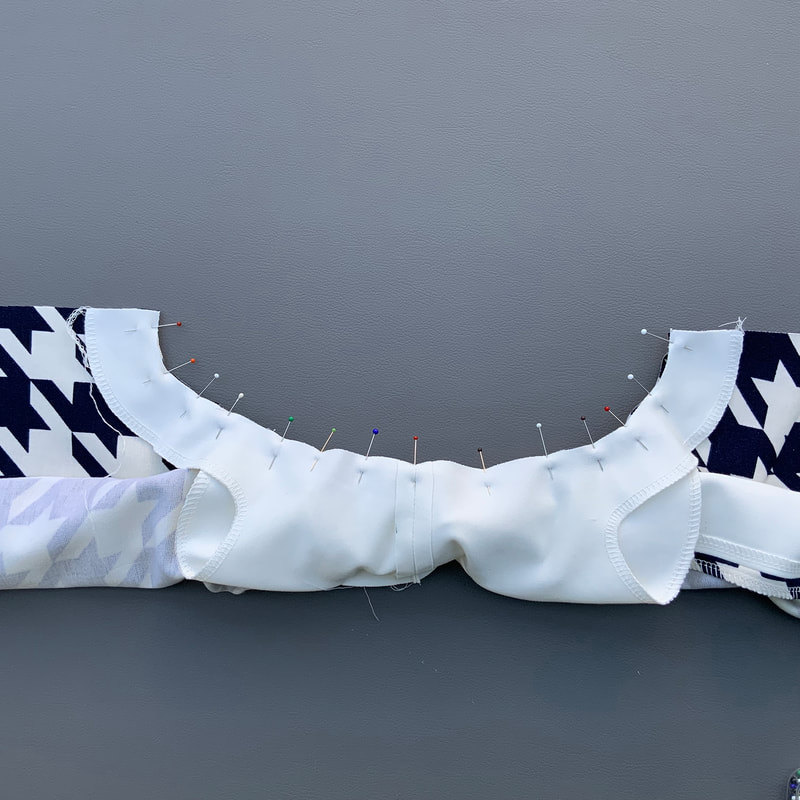
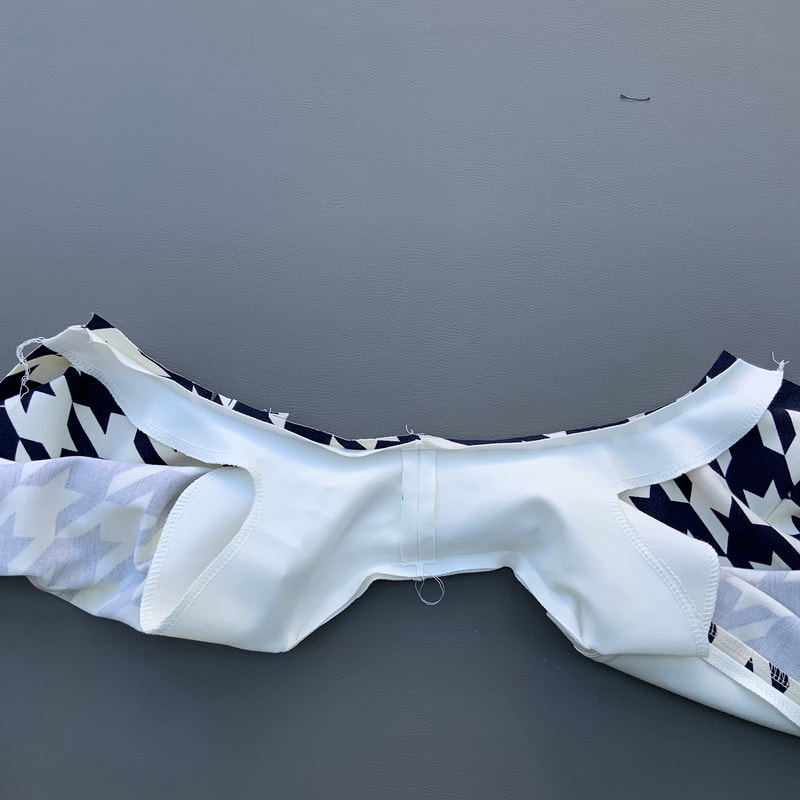
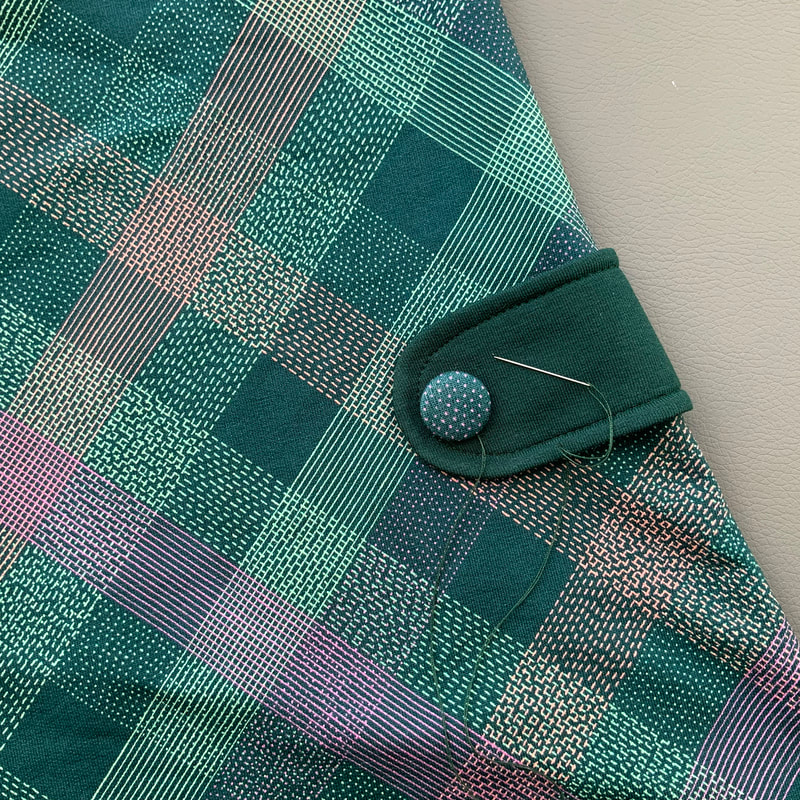
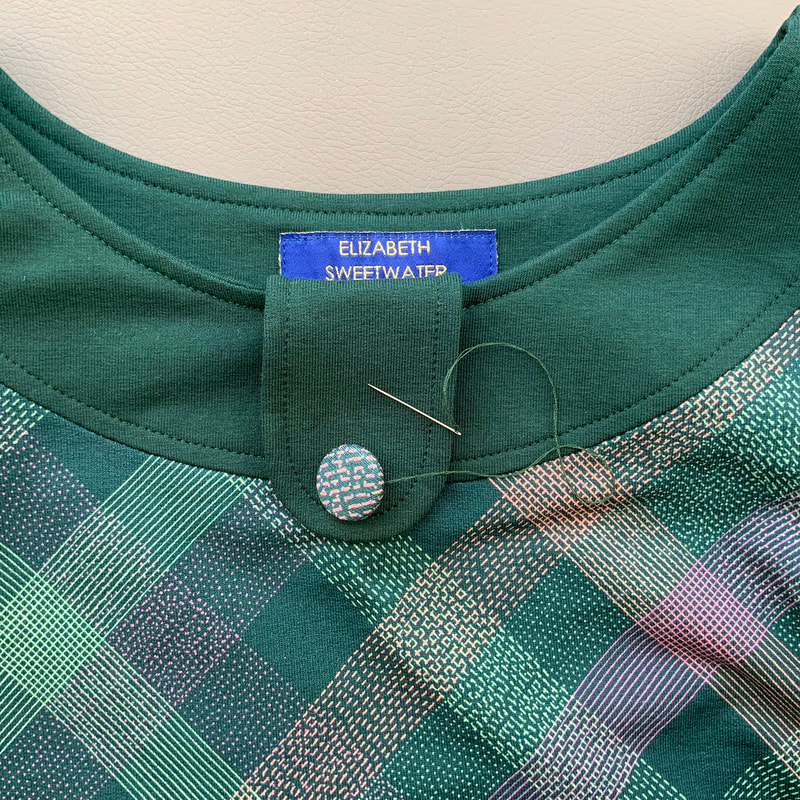
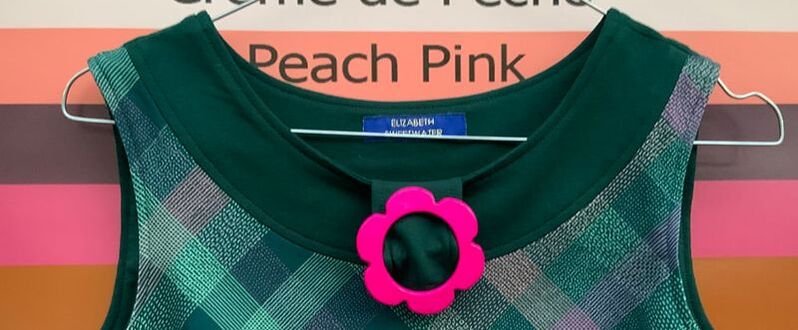
5.4g
Je kunt de lus vastzetten met een knoop maar ook met een gesp.
Vervolg nu:
- sectie 6.1 voor het beleg met rits.
- sectie 6.2 voor het beleg met split.
- sectie 6.3 voor het beleg zonder opening.
The loop can be fastened wit a button but attaching a buckle can also be fun.
Now follow:
- section 6.1 for the zipper facing.
- section 6.2 for the facing with opening.
- section 6.3 for the facing without opening.

5.5
De halsbies met knoop zonder beleg

The neck band with button without a facing

Picture
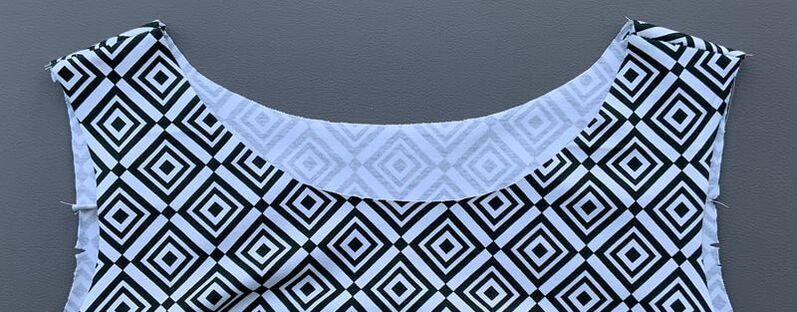
5.5a
Werk de randen van de schouders af met de overlockmachine. Speld en stik de schouders van het voorpand met de goede kanten tegen die van het achterpand.
Finish the edges of the shoulders with the overlock machine. Pin and stitch the shoulders of the front piece right sides against those of the back piece.
Picture
5.5b
Voor de variatie met de overslag en knoop heb je 2 achter delen geknipt aan de vouw nodig, 2 voor delen tot middenvoor plus naadtoeslag en 2 voor delen met ronding.
Gebruik je een halsbies zonder detail en zonder beleg dan heb je 2 achter delen en 2 voor delen nodig geknipt aan de vouw.
Gebruik je dunne stoffen zoals single jersey en French Terry dan verstevig je eerst de achterkant van de hals bies delen met rekbare plakvlieseline.
Speld en stik de schoudernaden van de halsbiesdelen met de goede kanten tegen elkaar.
For the overlap with button variation you will need 2 back pieces cut at the fold, 2 front pieces up to mid front plus seam allowance and 2 front rounded pieces. If you use a neckband without detail and without facing, you will need 2 back parts and 2 front parts cut at the fold.
If you use thin fabrics such as single jersey and French Terry, then first reinforce the back of the neckband parts with stretchable fusible interlining.
Pin and sew the neckband parts right sides together.

Picture
5.5c
Wil je een pipingbiesje  langs de hals, knip dan een strook stof van 2,5cm hoog, strijk deze in de breedte om en stik deze op 1 cm van de rand langs de goede kant van de verstevigde halsbies.
If you want a piping band around the neck, cut a 2.5 cm high strip of fabric, iron it widthwise and sew it 1 cm from the edge along the right side of the reinforced neck trim.
Picture
5.5d
Laat de piping weglopen net voorbij het knipteken.
Sew the piping off gradually just past the cutting mark.
Picture
5.5e
Speld en stik de hals van de halsbiesdelen met de goede kanten tegen elkaar. Heb je een pipingbies opgestikt, speld dan aan de kant waar het stiksel zichtbaar is. Je stikt hier straks precies overheen.
Pin and sew the neck of the neckband pieces right sides together. If you have stitched on a piping trim, pin on the side where the stitching is visible. You can sew over this stichline.
Picture
5.5f
Strijk de halsnaad open. Knip het hoekje van de rechte kant en knip de naad van de ronding kort af.
Iron the neck seam open. Cut the corner of the straight side and trim the seam of the curve.
Picture
5.5g
Keer, strijk de halsbies plat en stik de hals door  op 0,5cm tot het knipje na de ronding.
(Heb je de halsbies gemaakt zonder details dan is het een gesloten cirkel).
Turn, press the neckband flat and topstitch the neck at 0.5cm up to the cut after the curve. (If you have made the neckband without details, it will be a closed circle).
Picture
5.5h
Leg het middenvoor punt van beide voor delen op elkaar en speld de overslag vast aan de onderkant. Stik of rijg eventueel de onderkant zodat deze niet verschuift bij het vastnaaien aan de jurk.
Place the center front point of both front parts together and pin the overlap at the bottom. Topstitch or baste the bottom if necessary so that it does not shift when sewing to the dress.
Picture
5.5i
Speld de gehele halsbies tegen de hals van de jurk. Speld eerst middenvoor en middenachter, dan de schouders en dan de ruimte er tussenin.
Pin the entire neckband against the neckline of the dress. Pin at center front and center back first, then the shoulders and then the space in between.
Picture
5.5j
Ik adviseer om eerst de band aan te naaien met een stretchsteek of stretch garen met de gewone naaimachine en vervolgens de naden af te werken met een overlockmachine. Dit werkt iets nauwkeuriger dan direct te naaien met de overlockmachine.
I recommend sewing on the band first with a stretch stitch or stretch thread with the regular sewing machine and then finish the seams with an overlock machine. This works slightly more accurately than sewing directly with the overlock machine.
Picture
5.5k
Strijk de halsnaad naar beneden en stik deze door op 0,5cm van de rand.
Je kunt nu de overslag gewoon vastnaaien met een paar handsteekjes of (in het geval van de hoge halsversie) in het midden en op de ronde overslag een drukkertje bevestigen.
Iron the neck seam down and topstitch it at 0.5cm from the edge. You can now simply sew the overlap closed with a few hand stitches or (in the case of the high neck version) in the middle and on the curved overlap attach a snapbutton.
Picture
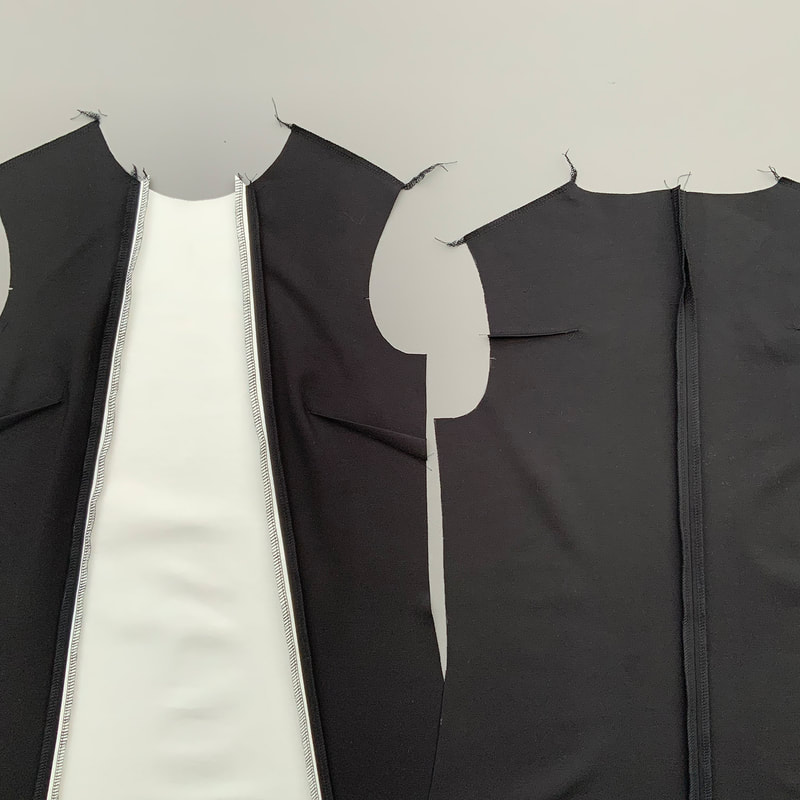
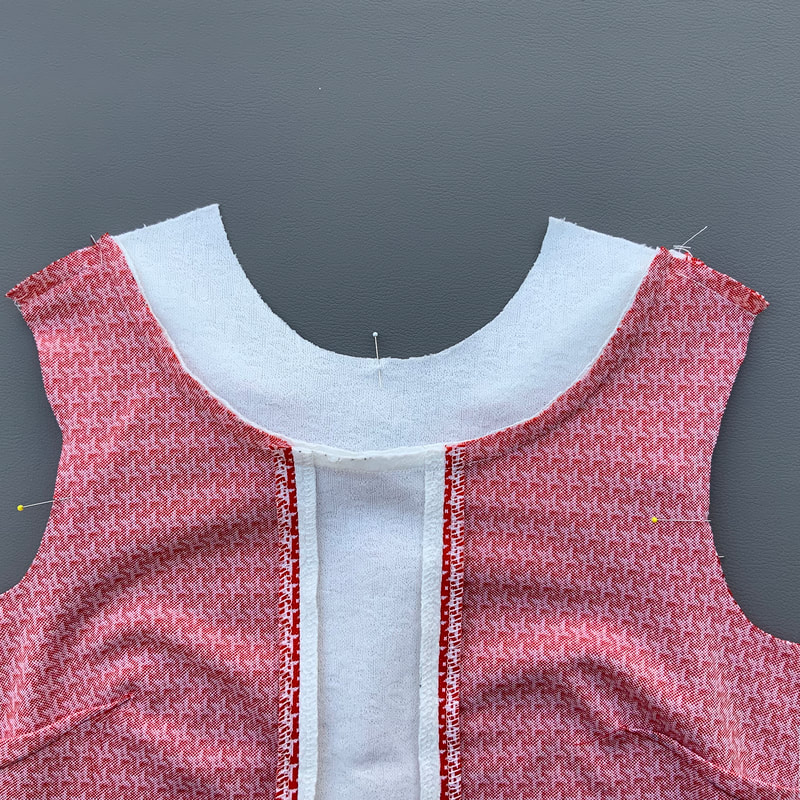
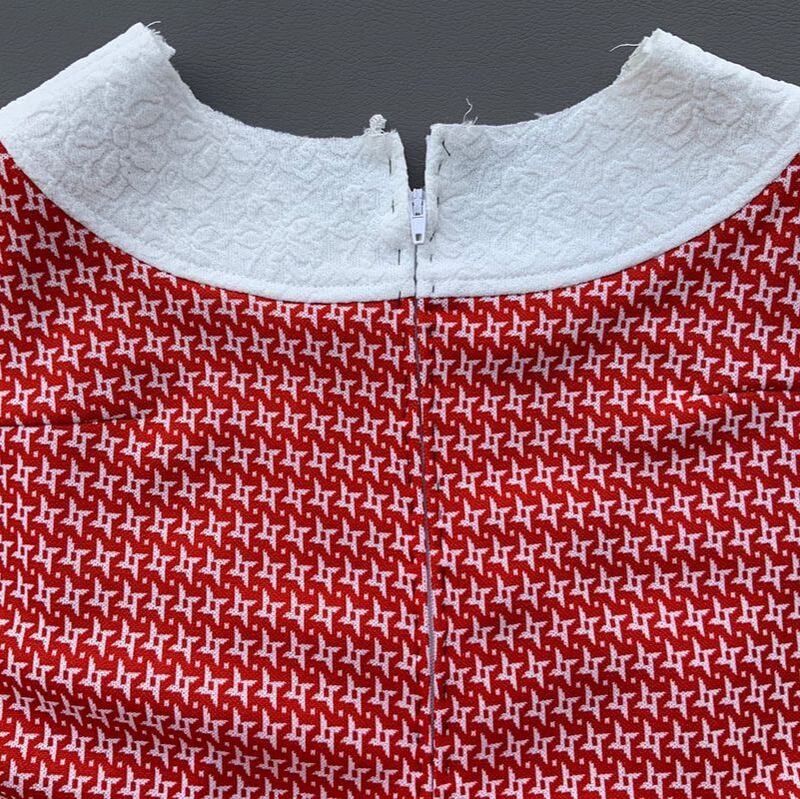
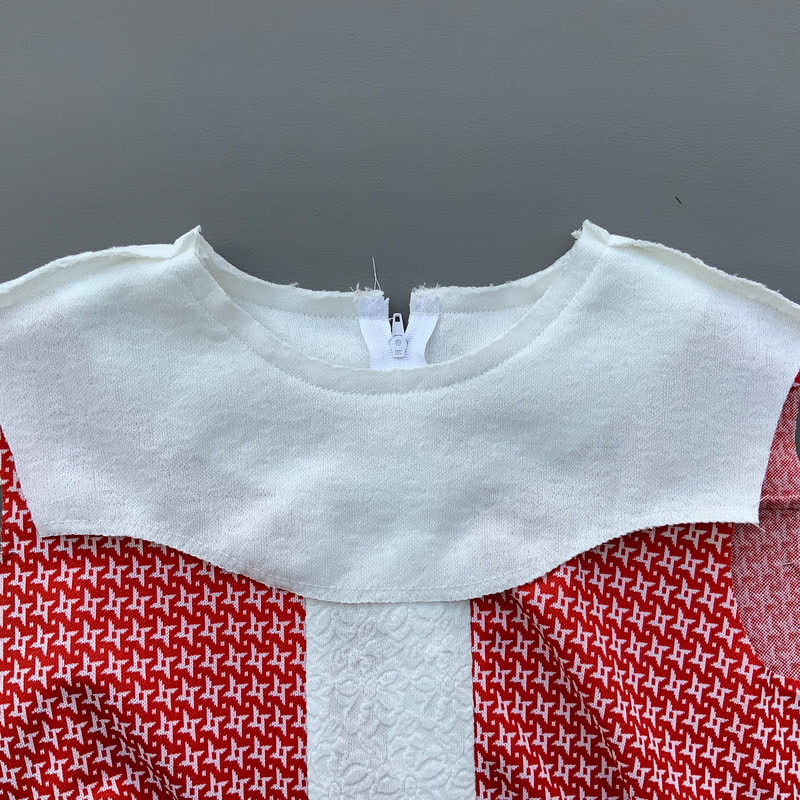
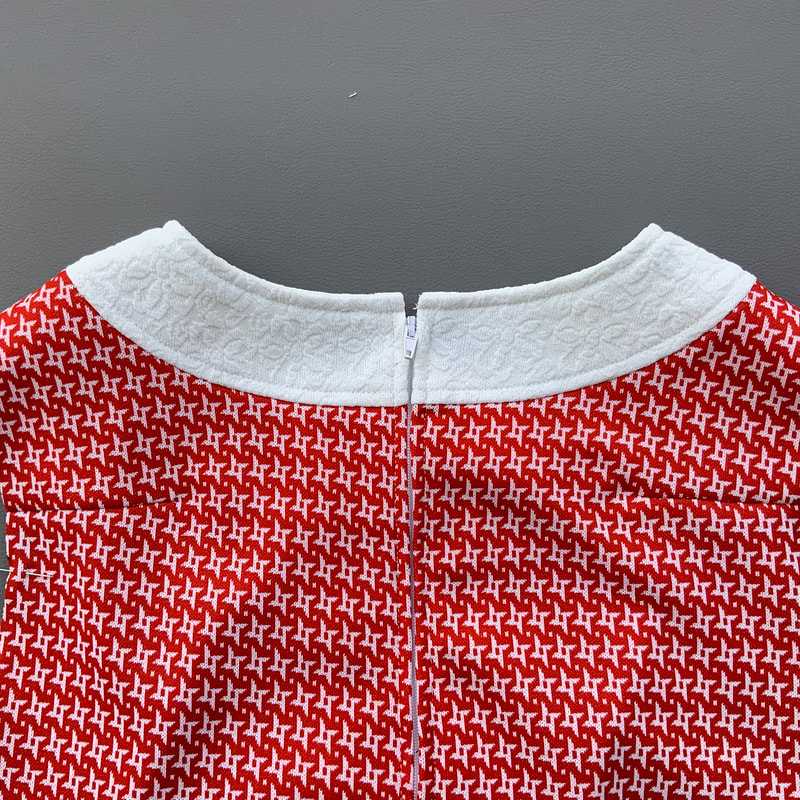
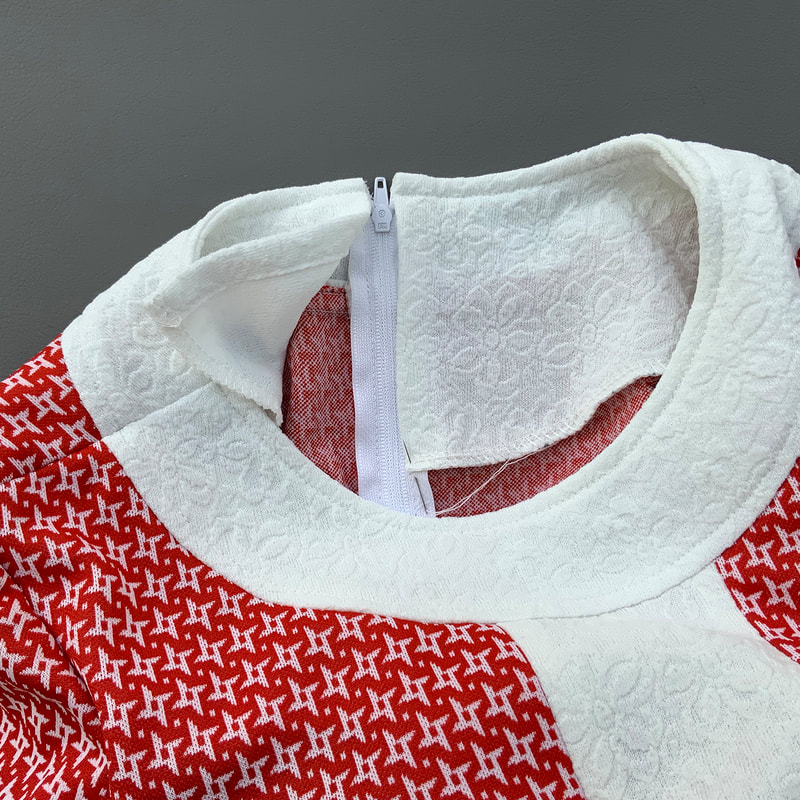
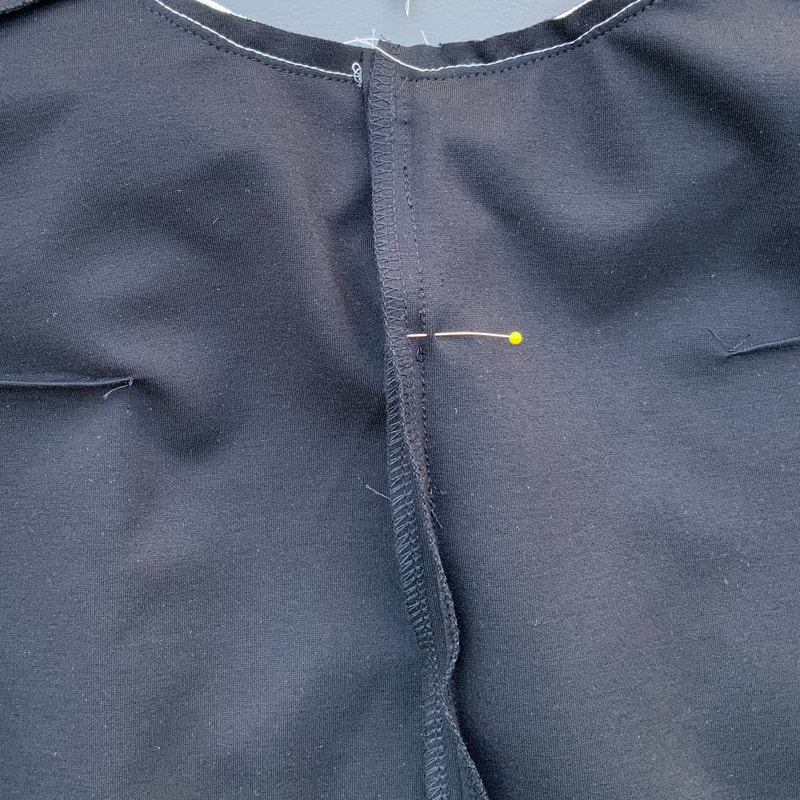
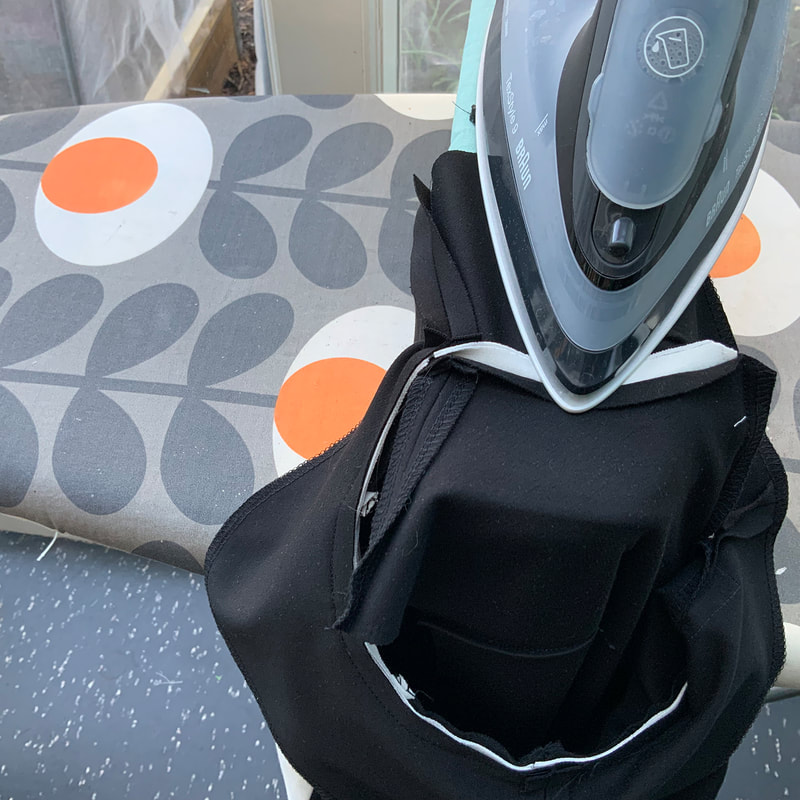
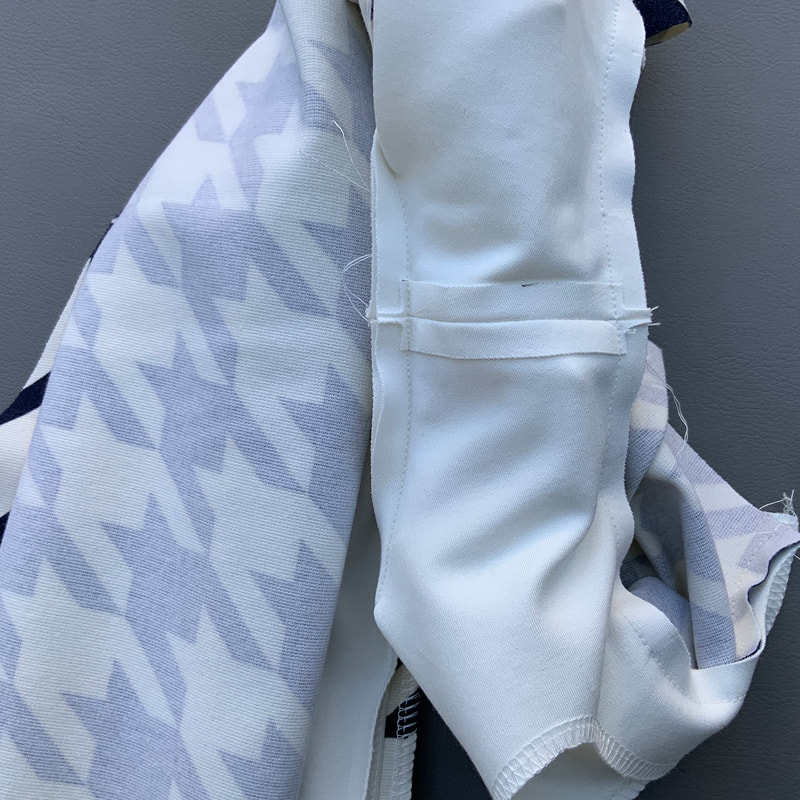
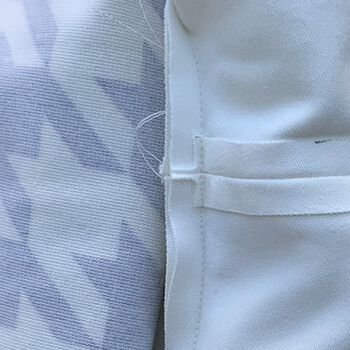
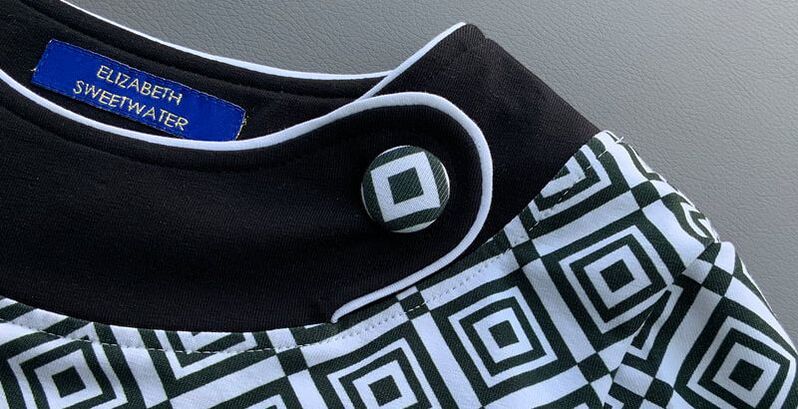
5.5l
Als laatste naai je een knoop op de overslag.
To finish: sew a button on the curved overlap.

6.
Halsbeleg, split achter en rits
Collar facing, neck opening back and zipper

6.1
Rits achter
Back zipper

Picture
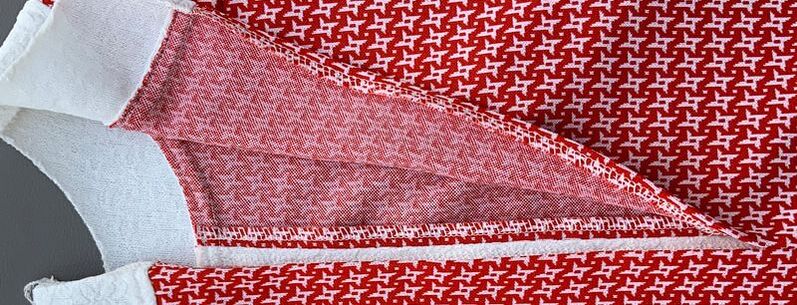
6.1a
Maak je de versie met de RITS, stik dan de achternaad dicht tot de lengte van de rits. Vouw de naadtoeslag naar binnen en strijk plat.
If you are making the ZIP version, stitch the back seam up to the length of the zipper. Fold the seam allowance in and iron flat.
Picture
6.1b
Rijg de rits en stik de rits vast op 0,5cm van de rand. Laat 1cm naadtoeslag open aan de bovenkant.
Baste the zipper and sew the zipper 0.5cm from the edge. Leave 1cm seam allowance open at the top.
Picture
6.1c
Het halsbeleg voor de versie met RITS:
Verstevig de achterkant van de beleg delen met rekbare plakvlieseline. Gebruik je een zware kwaliteit punta dan is verstevigen niet nodig.
Vouw de randen van de achterbelegdelen 1cm naar binnen en stik er een zoompje in. Speld en stik de schoudernaden van het beleg met de goede kanten tegen elkaar en strijk deze open. Werk de onderkant af met de overlockmachine.
The neckfacing for the version with the ZIPPER:
Reinforce the back of the facing parts with stretchable adhesive fleece. If you use a heavy quality punta, reinforcement is not necessary.
Fold the edges of the back facings 1cm inwards and sew a seam. Pin and sew the shoulders of the facingpieces right sides together and iron them open. Finish the edges with the overlockmachine.

Picture
6.1d
Speld en stik het halsbeleg met de goede kant tegen de hals.
Pin and sew the neckfacing to the neck right sides together.
Picture
6.1e
Strijk de halsnaad open en keer het halsbeleg naar binnen.
Iron open the neckseam and turn the neckfacing to the inside.
Picture
6.1f
Stik de hals door op 0,5cm van de rand.
Topstitch on 0,5cm from the edge.
Picture
6.1g
Zet het beleg met een paar steekjes vast aan de rits.
Attach the facing to the zipper with a few handstiches.
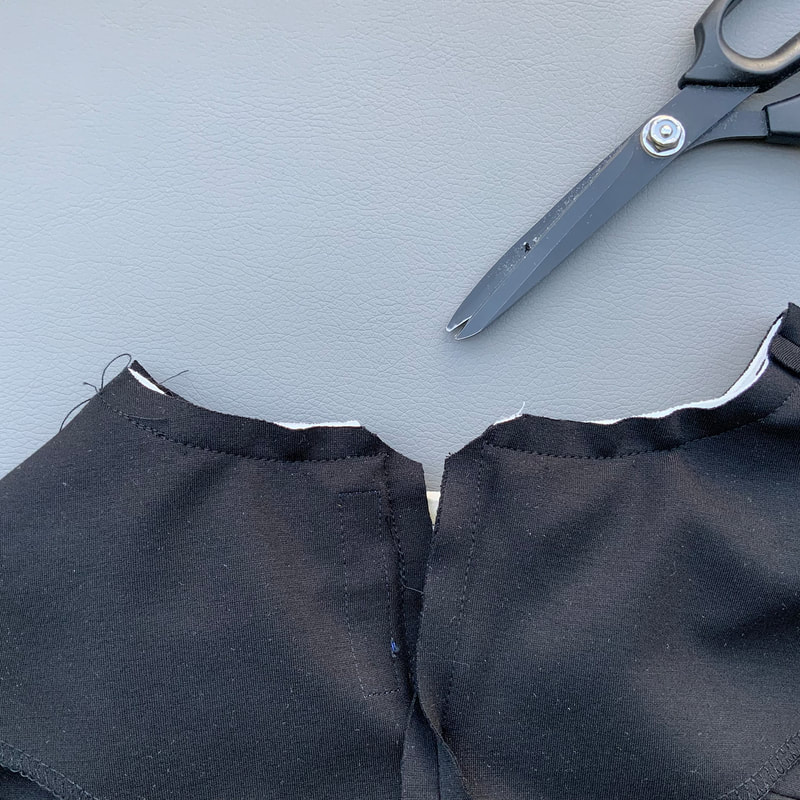
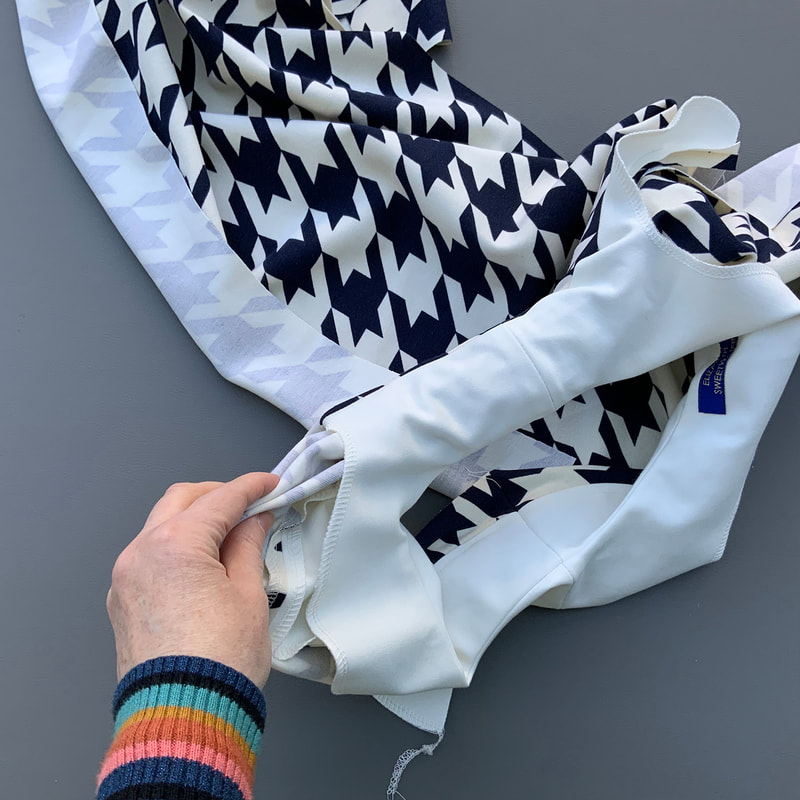
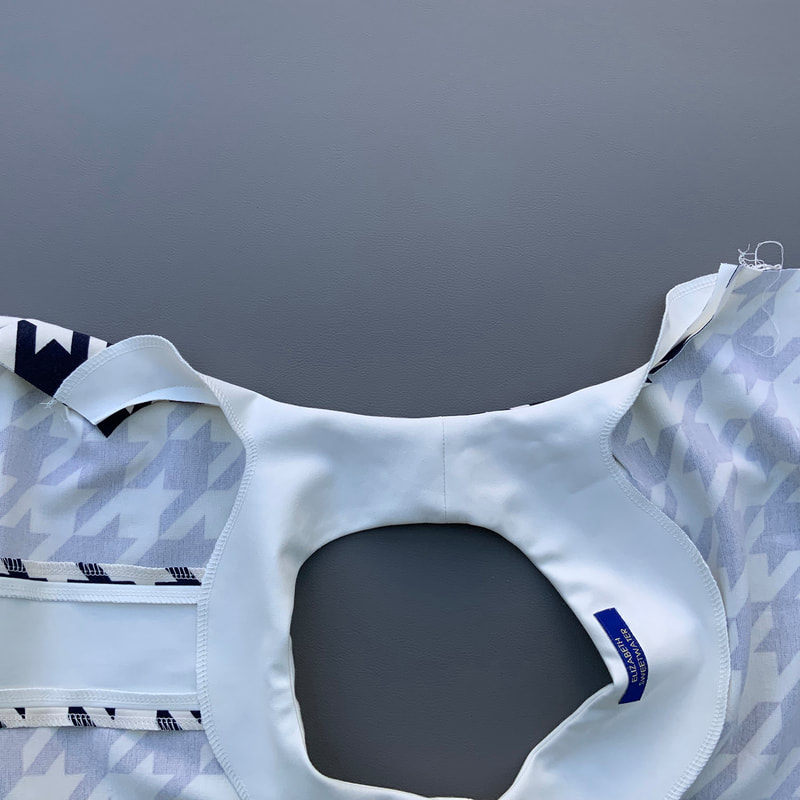
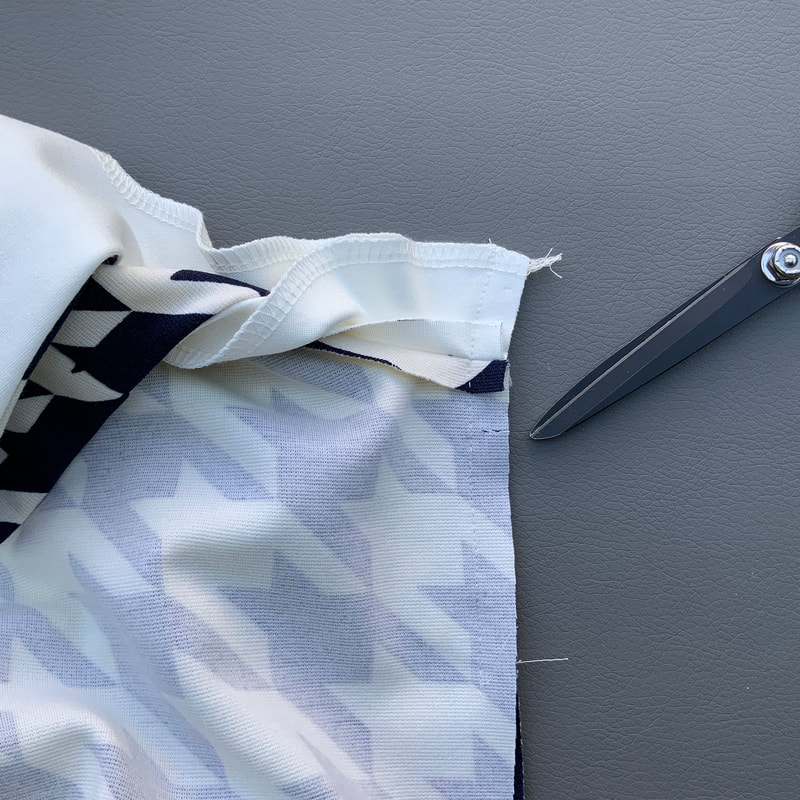
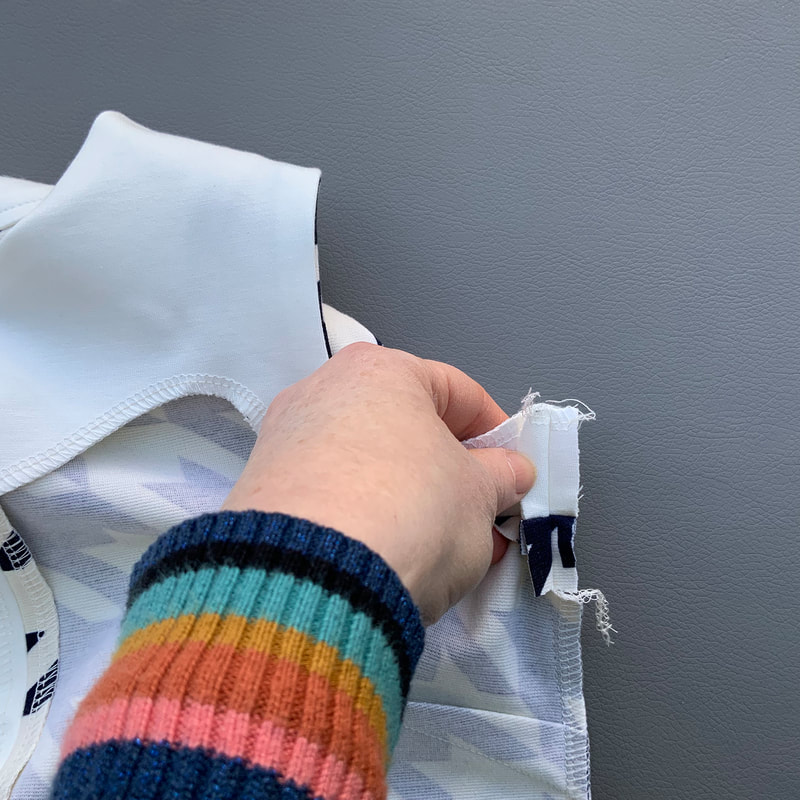
6.2
Split achter
Neck opening back

Picture
6.2a
Lusje voor de jurk met hals SPLITJE achter:
Om het lusje voor de knoopsluiting achter te maken knip je een strookje stof van iets meer dan 5cm breed en 2,5cm hoog. Vouw dit strookje in de breedte dubbel met de goede kanten tegen elkaar. Stik op 1cm van de kant en laat een stukje garen aan het strookje vastzitten. Knip de naad kort af.
Making the loop for the dress with a OPENING in the back: To make the loop for the button closure at the back, cut a strip of fabric just over 5cm wide and 2.5cm high. Fold this strip in half widthwise, right sides together. Stitch 1cm from the edge and leave a piece of yarn attached to the strip. Trim the seam short.
Picture
6.2b
Rijg het stukje garen wat aan het lusje vastzit door het oog van een botte naald en maak er een knoopje in. Rijg de naald  en draad door de lus om deze te keren. Knip het lusje eventueel op maat, deze moet 5cm zijn.
Thread the piece of yarn that is attached to the loop through the eye of a blunt needle and make a knot in it. Thread through the loop to turn it. Cut the loop to size if necessary, it must be 5cm.
Picture
6.2c
Maak je de versie met het SPLITJE achter, speld en stik het lusje vast op 17mm van de bovenkant.
If you make the back SPLIT version, pin and sew the loop 17mm from the top.
Picture
6.2d
Het halsbeleg voor de versie met het SPLITJE achter: Verstevig de achterkant van de beleg delen met rekbare plakvlieseline. Gebruik je een zware kwaliteit punta dan is verstevigen niet nodig. Stik de achterbeleg delen met de goede kanten op elkaar dicht tot het knipteken. Werk de onderkant van de belegdelen af met de overlockmachine.
The neckfacing for the version with the OPENING in the back: Reinforce the back of the facing parts with stretchable adhesive fleece. If you use a heavy quality punta, reinforcement is not necessary. Sew the back facingpieces right sides together up to the mark. Finish the bottom edge of the facing parts with a overlockmachine.
Picture
6.2e
Speld en stik de schoudernaden van het beleg met de goede kanten tegen elkaar en strijk deze open.
Pin and sew the shoulders of the facingpieces right sides together and iron them open. 
Picture
6.2f
Speld en stik de hals en de split randen van het beleg tegen de hals en de split randen van de jurk met de goede kanten tegen elkaar.
Pin and sew the neckline and the split edges of the facing against the neckline and the split edges of the dress, right sides together.
Picture
6.2g
Probeer zo dicht mogelijk bij de stiklijn van de middenachternaad te komen. (Speld is waar het beleg stiksel eindigt, stukje eronder is de stiklijn van de midden achternaad).
Try to get as close to the center back seam as possible. (Pin is where the facing stitching ends, stitchline underneath is center back seam stitching line).
Picture
6.2h
Knip de hoekjes schuin af.
Cut the corners at an angle.
Picture
6.2i
Heb je een kraag vastgezet met een hulpstiksel haal dit dan nu uit. Strijk de halsnaad open en keer het halsbeleg naar binnen.
If you have sewn a collar to the neck with a temporary stitch, remove this stitching first. Iron open the neckseam and turn the neckfacing to the inside.
Picture
6.2j
Strijk de hals plat en stik door op 0.5cm van de  halsnaad.
Iron the neck and topstitch on 0,5cm from the neckseam.
Picture
6.2k
Als je de hals met kraag doorstikt, zorg dan dat zowel de buiten-als de binnenkant glad getrokken wordt tijdens het naaien. (Hand links trekt binnenkant glad).
When topstitching the collared neck, make sure both the outside and the inside are smoothed as you sew. (Hand left smoothes inside).
Picture
6.2l
Stik ook de splitranden door. Voor de MOUWLOZE versie stik je de rand van de hals nog niet door, doe dit in één keer als je de armsgaten gaat doorstikken.
Also topstitch the edges of the opening. For the SLEEVELESS version, don't topstitch the edge of the neck yet, do this in one go when you're going to topstitch the armholes.
Picture
6.2m
Tip! Maak je een jurk met colourblock dan is het heel mooi om door te stikken in de kleur van de verschillende ondergronden. Wil je geen aan-afhechtingen zien dan knip je alleen het draadje af.
Tip ! If you make a dress with color block, it looks very nice to topstitch in the color of the different fabrics. If you don't want to see any knots, just cut the thread.
Picture
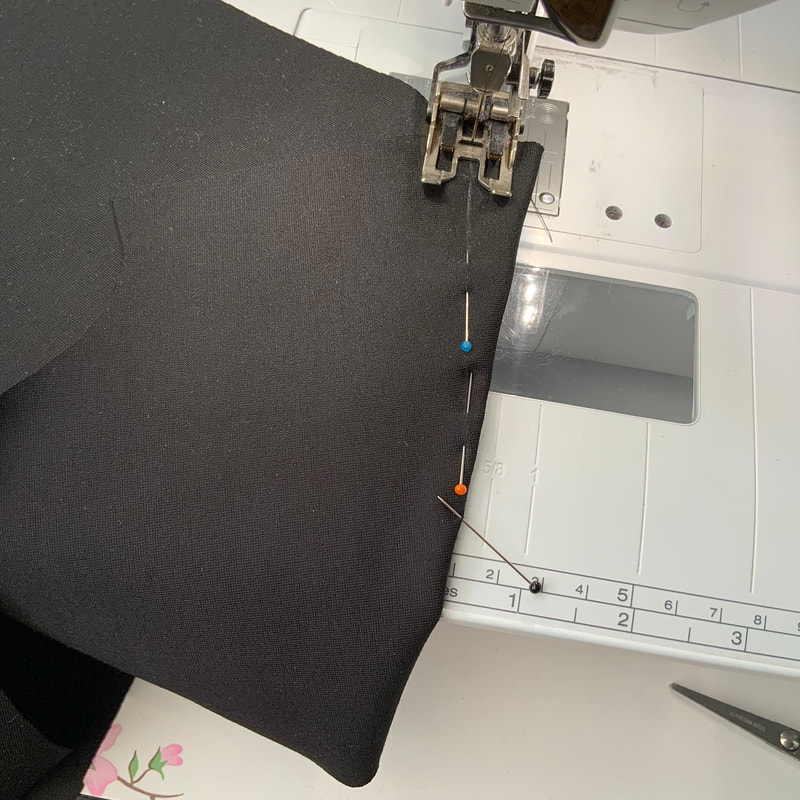
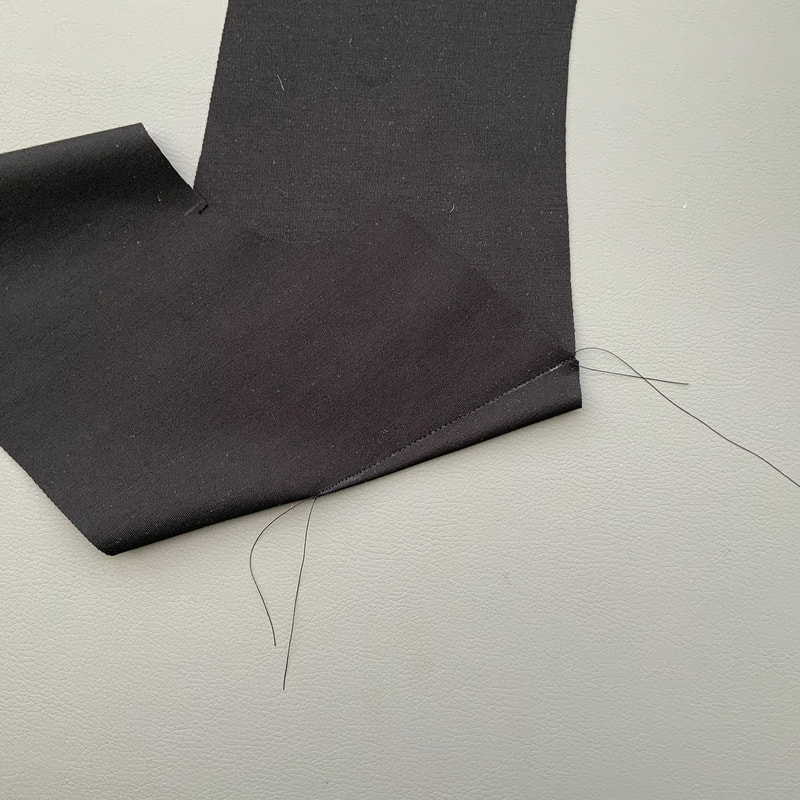
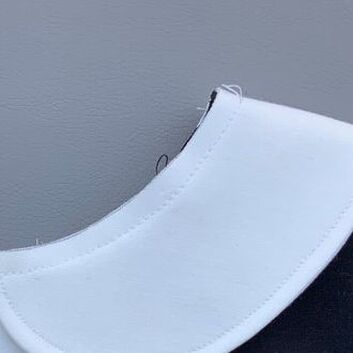
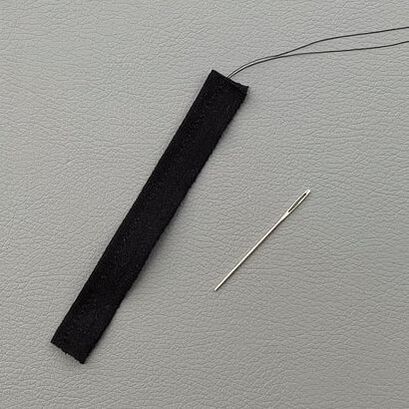
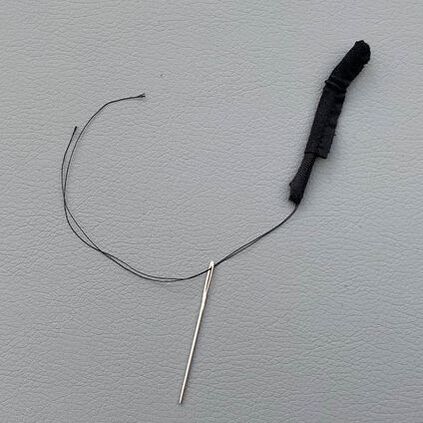
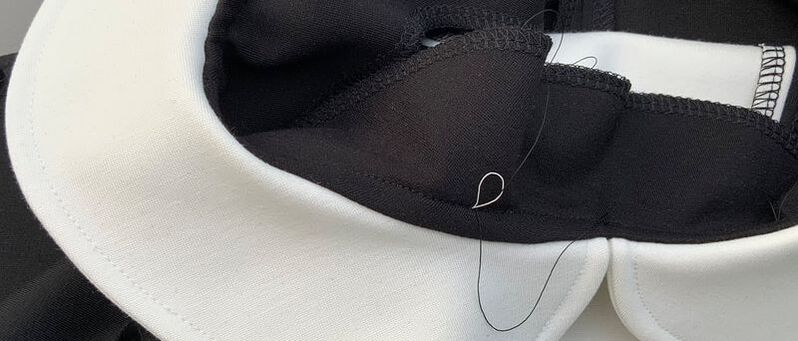
6.2n
Trek dan voorzichtig aan de onderdraad aan de binnenkant tot er een lusje ontstaat. Dit is de bovendraad. Haal deze naar boven (met een speldje bijvoorbeeld) en knoop de 2 draadjes samen aan de binnenkant.
Then gently pull the bobbin thread on the inside until a loop is formed. This is the top thread. Pull it up (with a pin for example) and tie the 2 threads together on the inside.
6.3
Zonder sluiting
Without closure

Picture
6.3a
Beleg voor de versie ZONDER SLUITING achter.
Speld en stik de schoudernaden van de belegdelen. Strijk de naden open, speld en stik de hals van het beleg tegen de hals van de jurk.
Eventueel het hulpstiksel/rijglijn verwijderen.
Facing for the version WITHOUT CLOSURE back. Pin and sew the shoulder seams of the facingparts  Press the seams open, pin and sew the neck of the facing against the neck of the dress. If necessary, remove the temporary stitching/basting line.
Picture
6.3b
Halsnaad open strijken en beleg naar binnen keren. Hals doorstikken op 0,5cm van de rand.
Press the neck seam open and turn the facing inwards. Topstitch the neck 0.5cm from the edge.

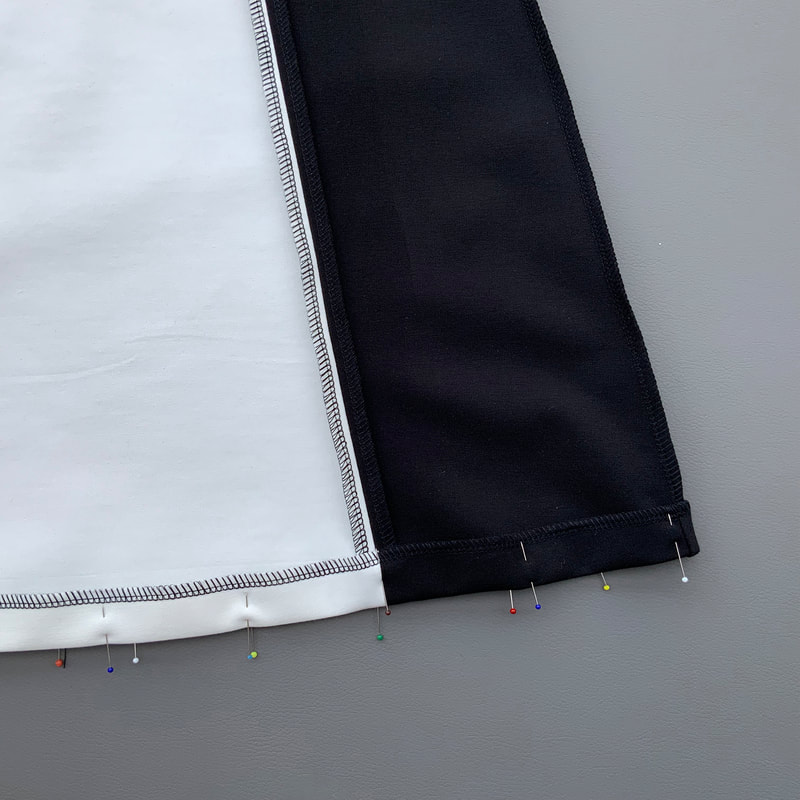
7.
Mouwloze versie, mouwen, manchetten, rugdetail, lussen, zijnaden, zoom
Sleeveless version, sleeves, cuffs, back detail, loops, sideseams, hem

7.1
Mouwloze versie
Sleeveless version
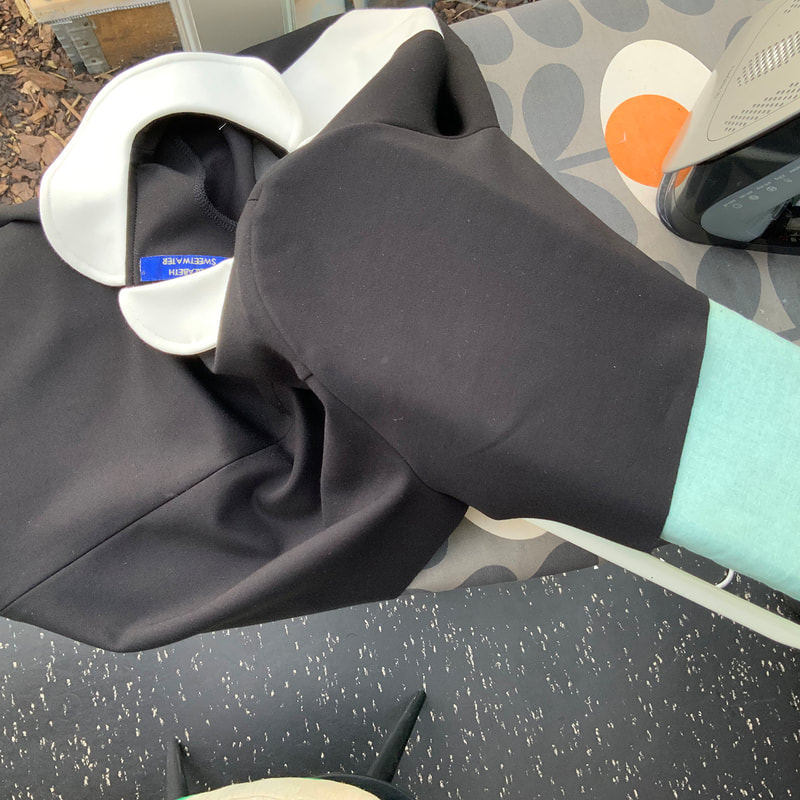
Picture
7.1a
Voor de MOUWLOZE versie werk je ook de armsgaten af met het beleg. Neem eerst de belegdelen over van het patroon zoals beschreven in stap 2e. Net als de voorgaande versies stik je het beleg langs de hals met de goede kanten tegen elkaar. Strijk de halsnaad open en keer het beleg naar binnen.
For the SLEEVELESS version you also use the facing to finish the armholes. First copy the facing patternparts as explained  in step 2e. Just like the previous versions, sew the facing around the neck right sides together. Press the neck seam open and turn the facing inwards.
Picture
7.1b
Strijk de hals plat maar stik deze nog niet door.
Iron flat the neck but don't topstitch it yet.
Picture
7.1c
Om de armsgaten af te werken met het beleg gebruik je de "burrito" methode. Leg de jurk plat op tafel met de goede kant boven.
To finish the armholes with the topping, use the "burrito" method. Lay the dress flat on the table, right side up.
Picture
7.1d
Rol nu de gehele jurk op richting één van de armsgaten.
Now roll the entire  dress in the direction of one of the armholes.
Picture
7.1e
Alleen het armsgat belegdeel rol je niet mee.
Only the armhole facing does not roll along.
Picture
7.1f
Breng de schoudernaad van het armsgat belegdeel  om de rol heen samen met de schoudernaad van de jurk, goede kanten op elkaar. Speld eerst de schoudernaden tegen elkaar en dan de rest van het armsgat tegen het beleg.
Bring the shoulder seam of the armhole facing  around the roll together with the shoulder seam of the dress, right sides together. Pin the shoulder seams together first and then the rest of the armhole against the facing.
Picture
7.1g
Stik het armsgat tegen het beleg met de goede kanten op elkaar.
Sew the armhole to the facing right sides together.
Picture
7.1h
Dun eventueel dikke naden wat uit op de schouder. 
Thin out any thick seams on the shoulder.
Picture
7.1i
Strijk de naad open.
Iron the seam open.
Picture
7.1j
Keer door de jurk via het net gestikte armsgat te trekken.
Turn by pulling the dress through the sewn armhole.
Picture
7.1k
Herhaal de bovenstaande stappen voor het andere armsgat. Pers de armsgaten plat.
Repeat the steps above for the other armhole. Press the armholes flat. 
Picture
7.1l
Om ook de binnenkant van de zijnaad netjes af te werken doe je het volgende:
Speld en stik de zijnaadjes van het beleg goede kanten op elkaar en een stukje zijnaad van de jurk. Geef een knipje op ongeveer 3 à 3,5cm onder de armsgat naad.
To neatly finish the inside of the side seam, do the following: Pin and stitch the side seams of the facing right sides together and a piece of the side seam of the dress. Make a cut about 3 to 3.5cm below the armhole seam.
Picture
7.1m
Vanaf het knipje kun je de zijnaad stikken met de lockmachine. Het naadje erboven strijk je open. Vouw het beleg terug.
From the cut you can stitch the side seam with the overlockmachine. Iron the seam above it open. Fold back the facing.
Picture
7.1n
Je kunt nu zowel de hals als de armsgaten doorstikken op 0,5cm van de rand. De lockdraadjes kun je vastzetten met een paar handsteekjes.
You can now topstitch both the neckline and the armholes at 0.5cm from the edge. You can secure the overlock threads with a few hand stitches.
7.2
Mouwen
Sleeves

Picture
7.2a
Voor alle modellen met MOUWEN: Stik de zijkanten van het halsbeleg in de armsgaten. Zo kunnen ze niet verschuiven als je de mouwen inzet.
For all styles with SLEEVES: Sew the sides of the neck facing into the armholes. This way they can't shift when you insert the sleeves.
Picture
7.2b
Speld en stik de mouwen samen met het halsbeleg in de armsgaten met de overlockmachine. Maak voor het inspelden gebruik van de Kniptekens. Voor het inzetten van mouwen is een smalle steekbreedte (0,5cm) op de overlockmachine  het mooist. Je snijdt dan dus ook 0,5cm naadtoeslag weg.
Pin and sew the sleeves together with the neck facing in the armholes with the overlock machine. Use the marks for pinning. To sew sleeves, a narrow stitch (0,5cm) width on the overlock machine is best. So you also cut away 0,5cm seam allowance.
Picture
7.2c
Strijk het armsgat en mouwkop met behulp van een mouwplankje. Aan de binnenkant wijst de naad richting mouw.
Iron the armhole and sleeve cap using a sleeve board. On the inside the seam points towards the sleeve.
Picture
7.2d
Het strijken van het armsgat en mouwkop is zeker de moeite waard. Hier zie je de nog ongestreken versie. 
Ironing the armhole and sleeve cap is well worth the effort. Here you can see the unironed version.
Picture
7.2e
En als deze gestreken is.
And when it is ironed.
Picture
7.2f
Voeg je de LUSDETAILS toe aan de zijnaden, rijg of stik deze dan eerst tegen de zijnaden. (Hoe je de lussen maakt lees je in stap  5p t/m 5s). Zet de steekbreedte van de overlockmachine weer terug op een brede steek. Speld en stik de zijnaad in een keer van onderkant mouw tot onderkant rok.
If you are adding the SIDESEAM LOOPS, baste or stitch them onto the side seams first. (You can read how to make the loops in steps 5p to 5s). Set the stitch width of the overlock machine back to a wide stitch. Pin and stitch the side seam from bottom of sleeve to bottom of skirt in one go.
Picture
7.2g
Laat de armsgat naad aan het voorpand omhoog wijzen en aan het achterpand omlaag.
Zo krijg je geen dikke naden op elkaar.
Let the armhole seam at the front point up and down at the back. This way you don't get thick seams together.
Picture
7.2h
Werk de onderkant van de mouwen en rok af met de overlockmachine. Speld de zoombreedte af en stik de zoom in zowel de mouwen als de onderrand van de jurk.
Finish the bottom of the sleeves and skirt with the overlock machine. Pin the hemwidth and sew the seam on both the sleeves and bottom edge of the dress.
7.3
Manchet, Rugdetail, lussen
Cuff, back detail, loops

Picture
7.3a
Werk je de mouwen af met een manchet vouw dan eerst de manchet in de lengte doormidden met de goede kanten op elkaar. Stik 1cm naadwaarde af, strijk de naad open en vouw de manchet on in de breedte. Speld de manchet tegen de  onderkant van de mouw en naad deze vast met de overlockmachine. In de werkbeschrijving van o.a. de zipperdress vind je een uitgebreide beschrijving van het manchet. Dit patroon bevat geen manchet patroondelen maar in stap 2d zie je hoe je deze zelf tekent.
When finishing the sleeves with a cuff, first fold the cuff in half lengthwise with the right sides together. Sew off 1 cm seam allowance, iron the seam open and fold the cuff in width. Pin the cuff to the bottom of the sleeve and sew it with the overlock machine. You will find an extensive description of the cuff in the tutorial of the zipper dress. This pattern does not contain cuff pattern parts, but in step 2d you can see how to draw these yourself.
Picture
7.3b
Plaats het rugdetail op de aangegeven hoogte op de rug en speld deze vast. Zet het rugdetail vast met 2 knoopjes. (Hoe je het rugdetail maakt lees je in stap 5p t/m 5s.)
Place the back detail on the back at the indicated height and pin it in place. Fasten the back detail with 2 buttons. (You can read how to make the back detail in steps 5p up to 5s.)
Picture
7.3c
Naai eventueel de knoopjes op de zijnaad lussen.
Optionally sew the buttons on the side seam loops.
Picture
7.3d
Of op de lus voor, onder het kraagje of op de halsbies. Nog een laatste keer strijken en je sixties a-lijn jurk is klaar!
Or on the loop at the front, under the collar or on the neckband. A final ironing and your sixties A-line dress is FINISHED!
    Picture

    For all the latest patterns to buy visit my Etsy shop today.

Powered by Create your own unique website with customizable templates.
  • Tutorials
  • Movies
  • Happy Sewers
  • About