Elizabeth Sweetwater
  • Tutorials
  • Movies
  • Happy Sewers
  • About

Retro Tricot Blazer

3/20/2024

0 Comments

 
Retro Tricot Blazer
Picture
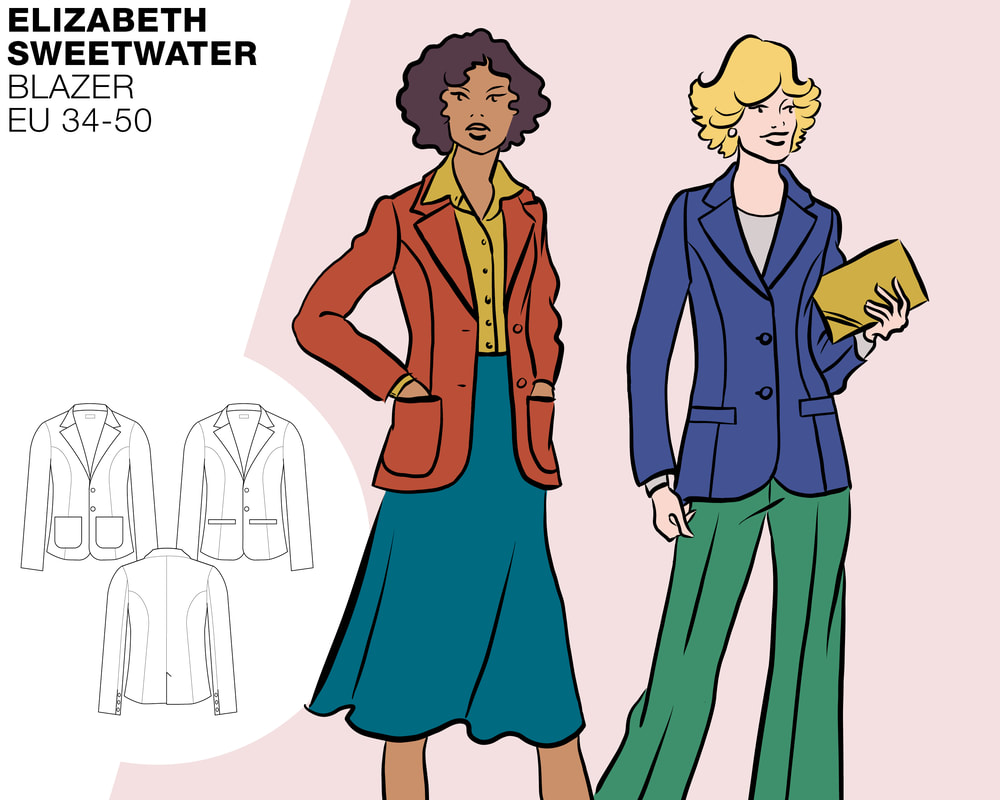
Introductie: Retro Tricot Blazer Werkbeschrijving
Welkom bij onze gedetailleerde werkbeschrijving voor het maken van een retro tricot blazer! Deze tijdloze en stijlvolle blazer is geïnspireerd op een klassiek jasje uit de seventies, maar met een eigentijdse twist. Met dit project zul je stap voor stap leren hoe je een mooie blazer kunt creëren die perfect past bij zowel casual als formele gelegenheden. Of je nu een ervaren naaister bent of net begint, deze handleiding biedt duidelijke instructies en handige tips om je te begeleiden bij het maken van je eigen retro tricot blazer. Laten we beginnen met het verkennen van de benodigde materialen en het patroon, en vervolgens stapsgewijs doorgaan met het naaiproces.

Introduction: Retro Tricot Blazer tutorial.
Welcome to our detailed tutorial for making a retro jersey blazer! This timeless and stylish blazer is inspired by a classic jacket from the seventies, but with a contemporary look. With this project you will learn step by step how to create a beautiful blazer that fits perfectly for both casual and formal occasions.  Whether you're an experienced seamstress or just starting out, this guide provides clear instructions and helpful tips to guide you through making your own retro knit blazer. Let's start by exploring the necessary materials and pattern, and then move on to the sewing process step by step.

Picture
Picture
Picture
Picture
Picture
Picture

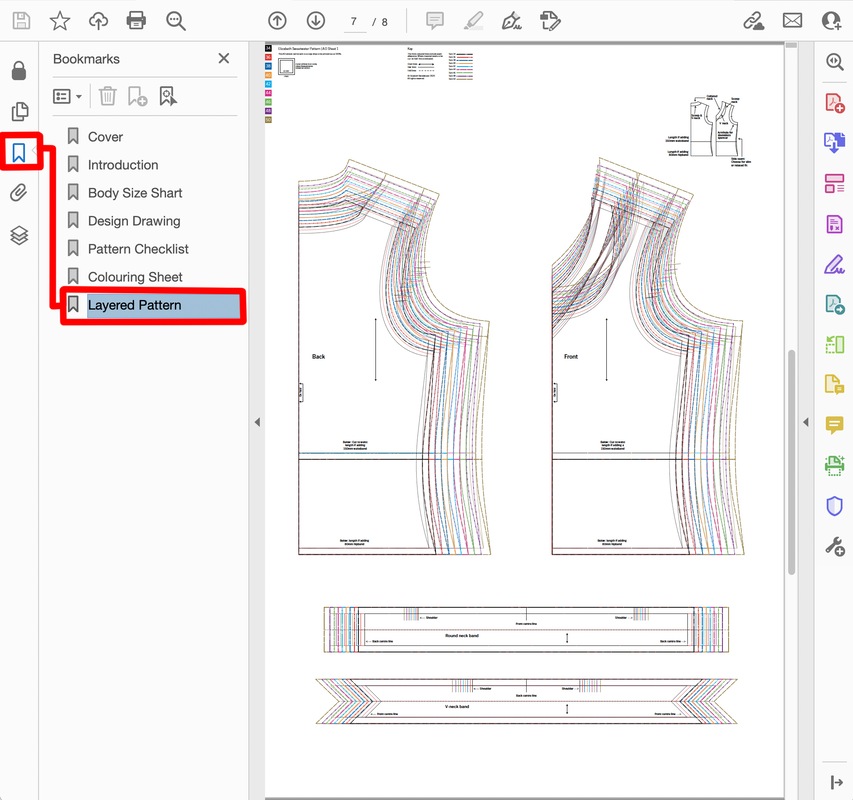
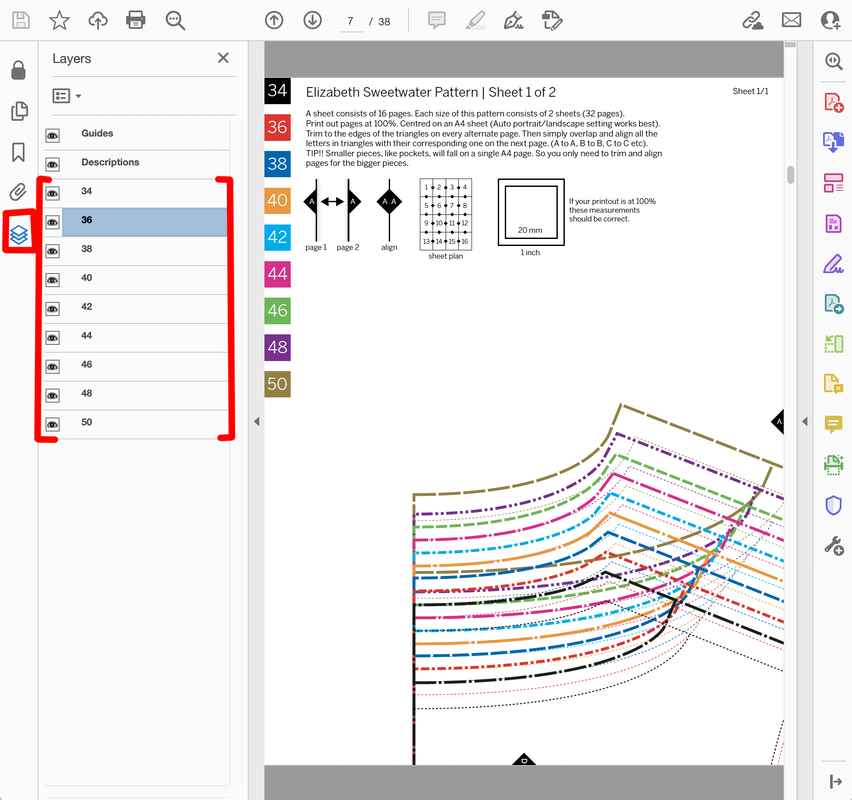
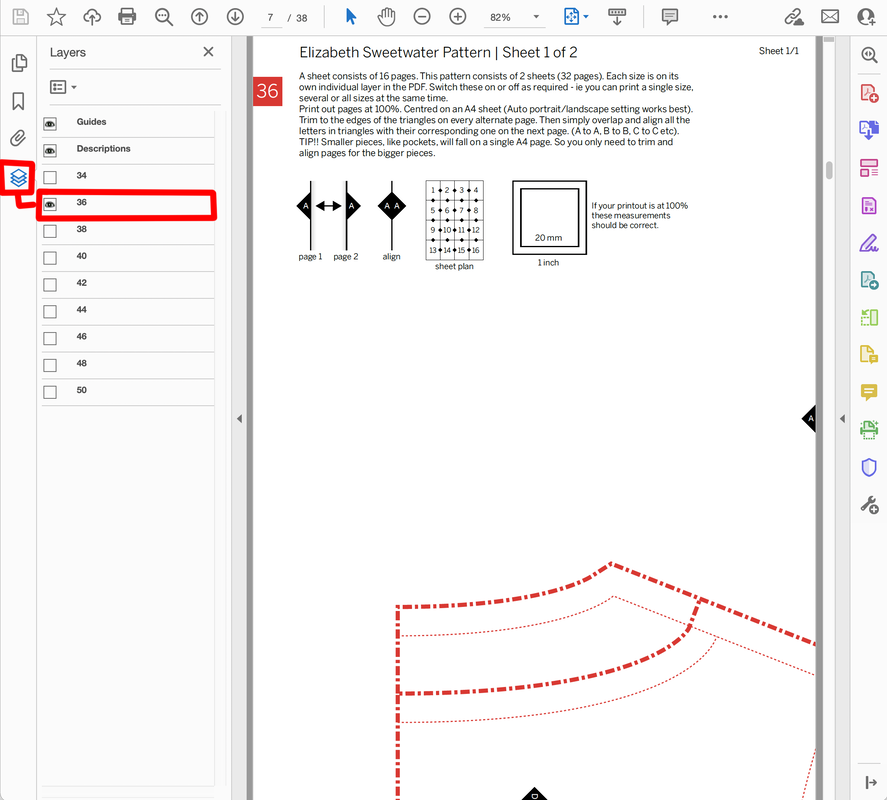
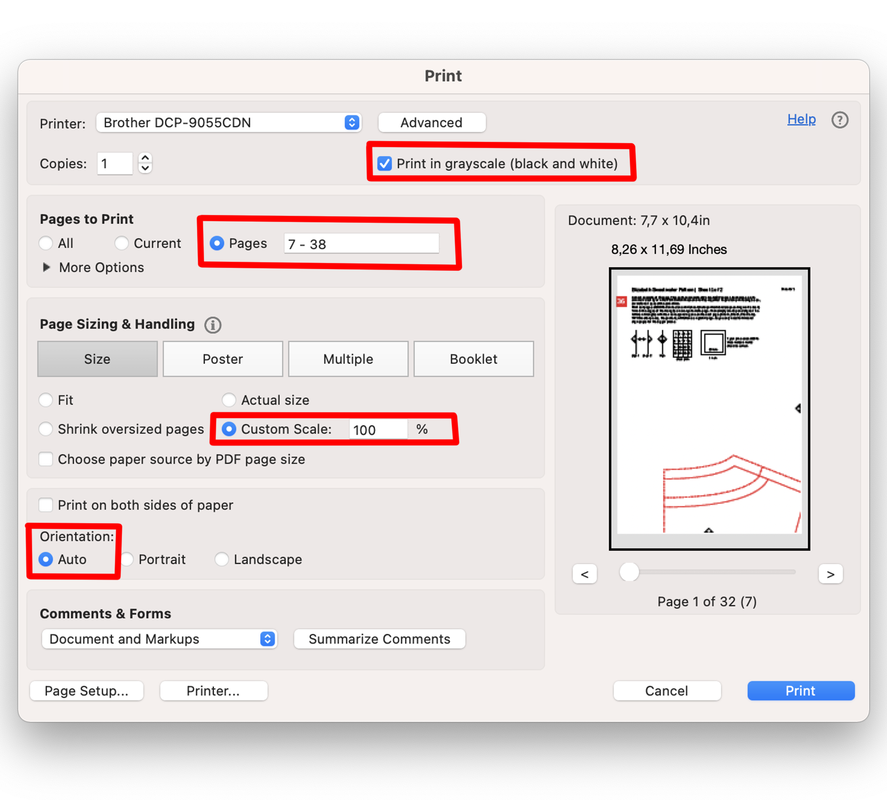
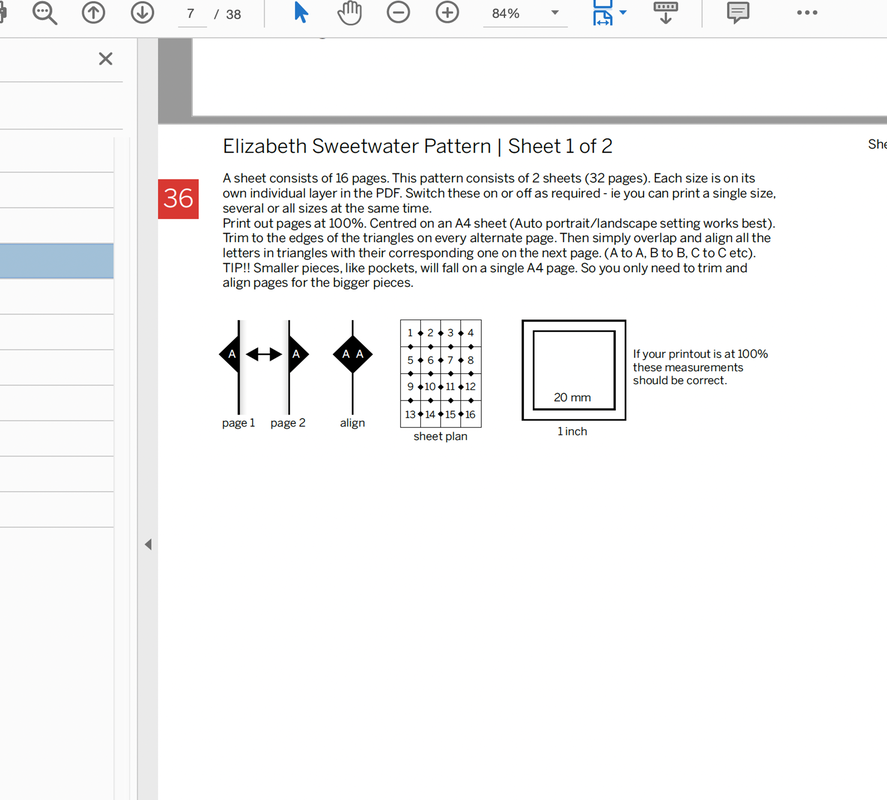
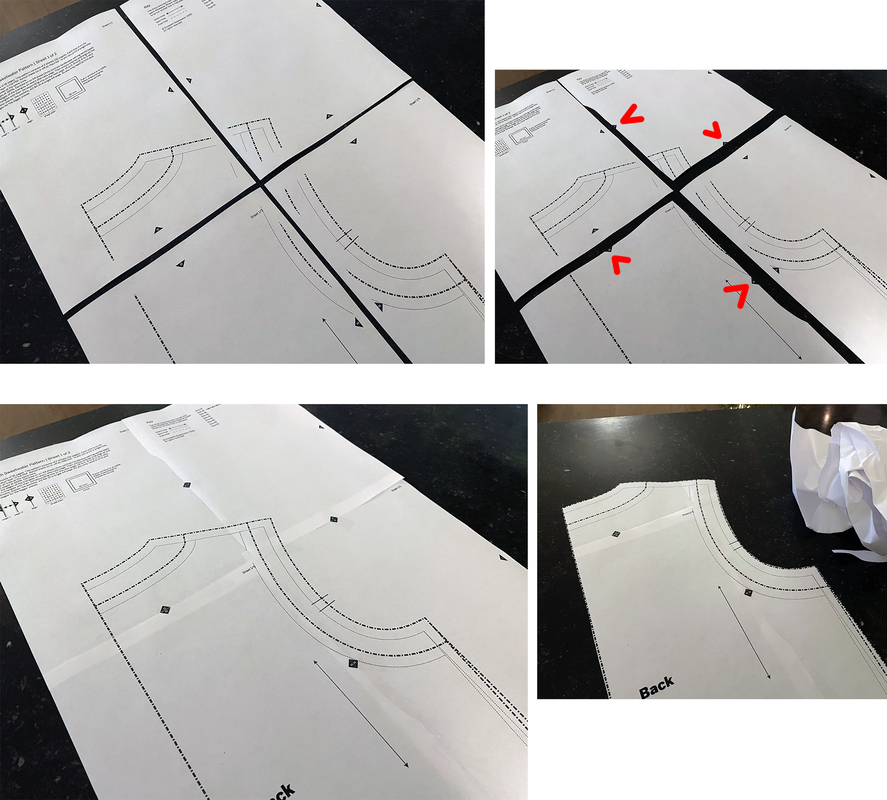
Voorbereiding
Preparation

Bij aankoop van een van onze patronen ontvangt u 3 PDF-bestanden: een voor thuisprinters om op A4-papier af te drukken, een tweede voor A0-gebruikers om af te drukken in een printshop en een derde is voor mensen die een overheadprojector gebruiken. De volgende algemene introductietekst geeft een overzicht van hoe onze patroon-pdf's zijn opgezet en legt uit hoe je de A4-versie kunt afdrukken en hoe je de pagina's aan elkaar kunt plakken. A0-gebruikers kunnen bij hun printshop aangeven welke pagina's ze nodig hebben. Op de projector bestanden staan alle panden in dezelfde richting.
On purchasing any of our patterns you will receive 3 PDF files: one for home printers to print on A4 paper, a second at A0 is for printshop users and a third is for sewers who use an overhead projector. The following general introduction text provides an overview of how our pattern pdfs are set up and explains how to print out the A4 version and how to stick the pages together. A0 users should simply instruct their printshop which pages they require. Projector users will note that all pieces have the grain direction facing the same way.
Picture
a.
Al onze patronen volgen dezelfde opzet zoals hier uitgelegd. Elk patroon begint met een voorblad, een inleiding, een lichaamsmatentabel, een ontwerptekening, een patroonchecklist en een kleurplaat. Het patroon is te vinden op de laatste lijst onder het tabblad Bladwijzers. 
All of our patterns follow the same set up as explained here. Each pattern starts with a cover page, an introduction, a body size chart, a design drawing, a pattern checklist and a colouring sheet.The pattern can be found on the last listing under the bookmarks tab.
Picture
b.
After locating the pattern click on the layers icon. Here you can see the full range of sizes. They are all layered on top of one another. You can click on the eye icon by each individual size to turn it on or off.
After locating the pattern click on the layers icon. Here you can see the full range of sizes. They are all layered on top of one another. You can click on the eye icon by each individual size to turn it on or off.
Picture
c.
Je kunt vervolgens de maat of maten selecteren die je wilt afdrukken.
You can then select the size or sizes you wish to print out.
Picture
d.
Als je thuis print op een A4-printer, drukt u op het afdrukpictogram in het bovenste menu van de PDF. Uw afdrukdialoogvenster kan hiervan verschillen  (rechts in het midden weergegeven), maar ik heb een paar knoppen gemarkeerd om het te verduidelijken. Om inkt te besparen kun je instellen dat het patroon in grijstinten wordt afgedrukt. Selecteer de pagina's die je wilt afdrukken, over het algemeen vanaf pagina 7 tot de laatste pagina. Zorg ervoor dat de schaal is ingesteld op 'ware grootte' of '100%' - NOOIT op 'passend op pagina'. Het werkelijke paginaformaat van de PDF is kleiner dan A4. Stel de oriëntatie in op Auto, ik vind dat dit het beste werkt omdat het dan de pdf op een A4-blad centreert.
If printing at home on an A4 printer press the print icon in the top menu of the PDF. Your print dialogue box may vary to this one (shown middle right), but I have highlighted a few buttons to take note of. To save ink you can set to print the pattern in greyscale. Select the pages to print which will usually be from page 7 until the final page. Make sure the scale is set to 'actual size' or ‘100%' - NEVER to 'fit to page’. The actual page size of the PDF is smaller than A4. Set the orientation to Auto, I find this works best as it will then centre the pdf on an A4 sheet.
Picture
e.
Rond elke pagina zie je kleine zwarte driehoekjes met letters erin. Met een schaar en doorzichtig plakband bij de hand, kun je vervolgens om elke pagina uitknippen tot aan de driehoeken en vervolgens de letters in de zwarte driehoeken uitlijnen met de overeenkomende op de volgende pagina (A naar A, B naar B, enz.). Vervolgens kunt u het blad aan elkaar plakken. Een vel kan uit 16 of 20 pagina's bestaan, afhankelijk van het gekochte patroon. Sommige patronen bestaan ​​uit één volledig vel (bijv. rokken met 16 pagina's), sommige uit twee vellen (bijv. jurken met 32 ​​pagina’s).
Around each page you will see small black triangles with letters inside. With scissors and clear sticky tape at hand, you can then cut out every alternate page to the triangles and then align the letters in the black triangles with the matching ones on the following page (A to A, B to B, etc). You can then proceed to stick the sheet together. One sheet can consist of 16 or 20 pages depending on the pattern purchased. Some patterns consist of one full sheet (eg. skirts with 16 pages), some of two sheets (eg. dresses with 32 pages).
Picture
f.
Nadat je je pagina's hebt afgedrukt, leg je ze op een plat oppervlak. Knip de pagina's om en om uit tot aan de driehoekjes. Plak vervolgens met doorzichtig plakband de driehoeken met dezelfde letter aan elkaar. Knip vervolgens je patroondeel uit tot aan de stippellijnen. Deze stippellijnen bevatten de benodigde naadtoeslag voor elk stuk. De dunnere stippellijnen geven de uiteindelijke maat aan. Voor het gemak zijn alle namen van de stukken, samen met de draadrichting en handige instructies in de afzonderlijke patroondelen geplaatst, zodat u het overtollige papier veilig kunt weggooien (recycle). Let op dat sommige patronen ook een verklarend diagram kunnen bevatten op een van de pagina's die bewaard moeten worden. Als je de  patroondelen op patroonpapier wilt overtrekken, moet je er aan denken alle markeringen te kopiëren (bijv. draadrichting, knipjes etc.).
Once you have printed out your pages lay them out on a flat surface (top left). Cut out to the triangle edge on alternate pages (top right). Then with clear sticky tape connect the triangles that correspond to each other (bottom left). Then cut out your pattern piece to the dashed lines (bottom right). These dashed lines include the necessary seam allowance for each piece. The thinner dotted lines indicate the finished size. For convenience all names of pieces, along with grain direction and helpful instructions have been placed inside individual pattern pieces, so you can safely throw away (please recycle) the excess paper. Note some patterns may also include an explanatory diagram on one of the pages that should also be kept. 
To continue trace all the pattern pieces onto pattern paper, remembering to copy all the markings (eg. darts, piece to piece alignment lines etc).
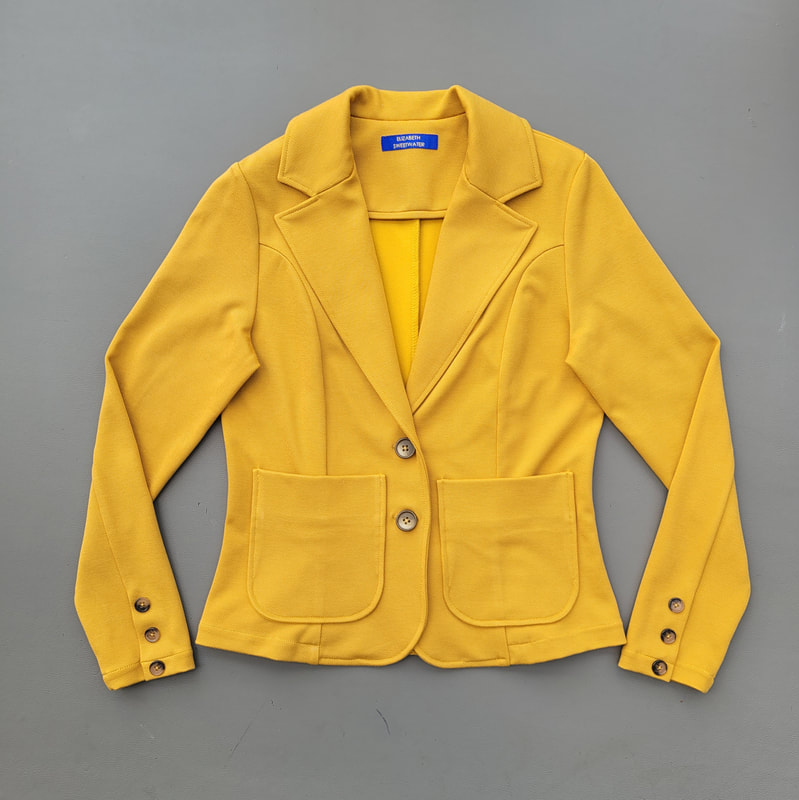
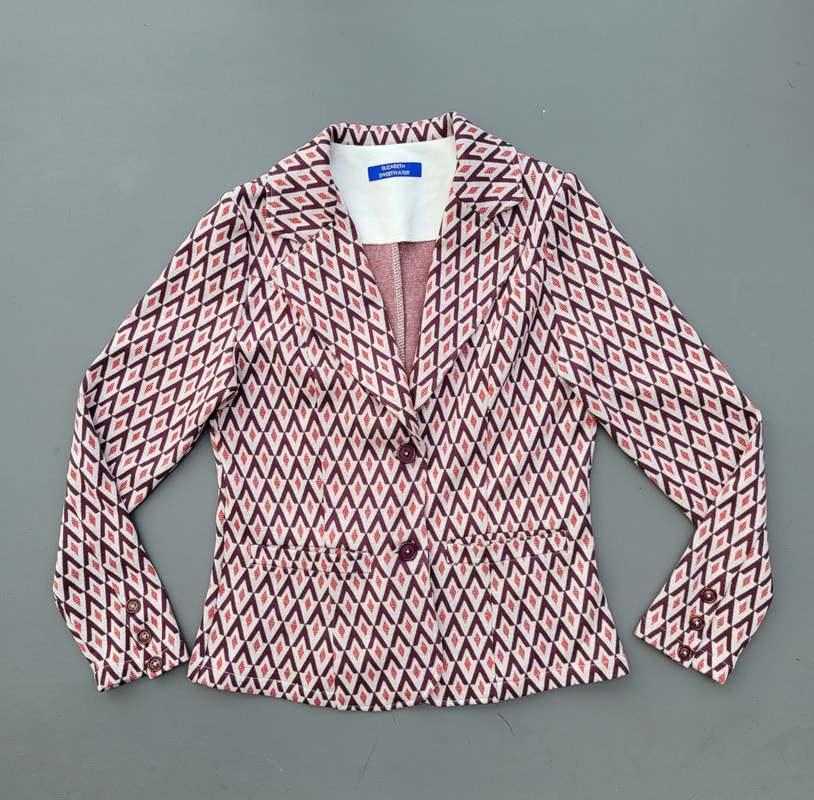
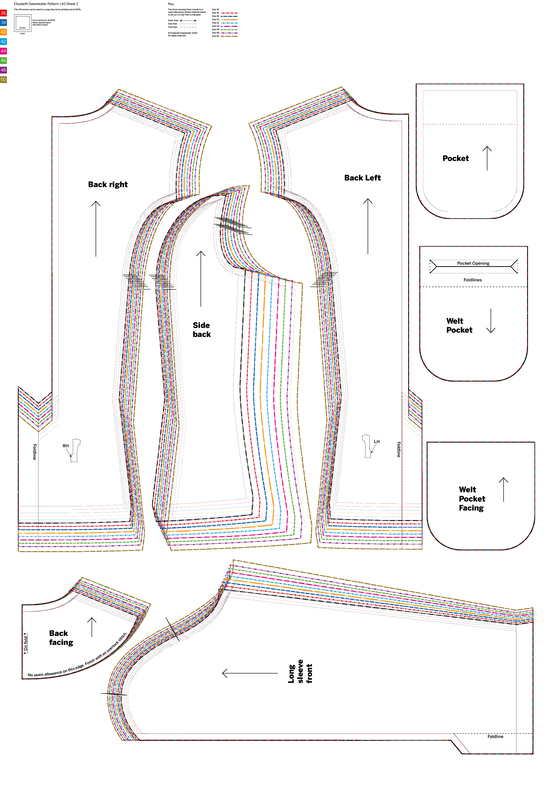
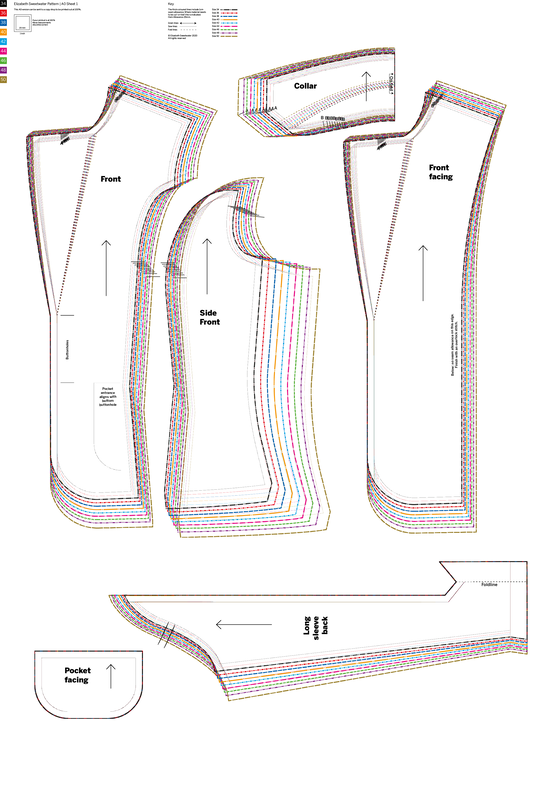
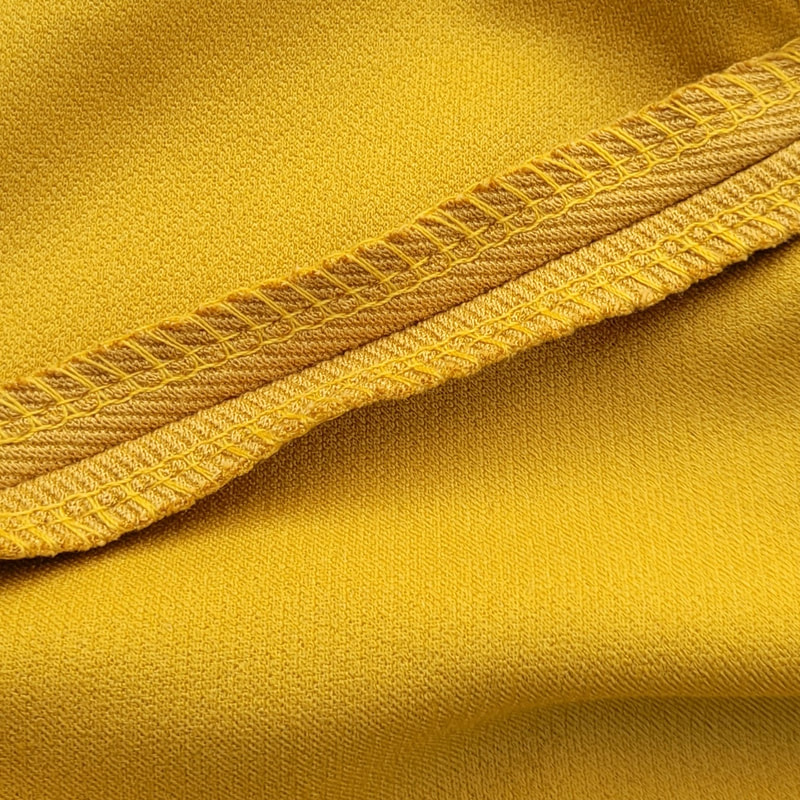
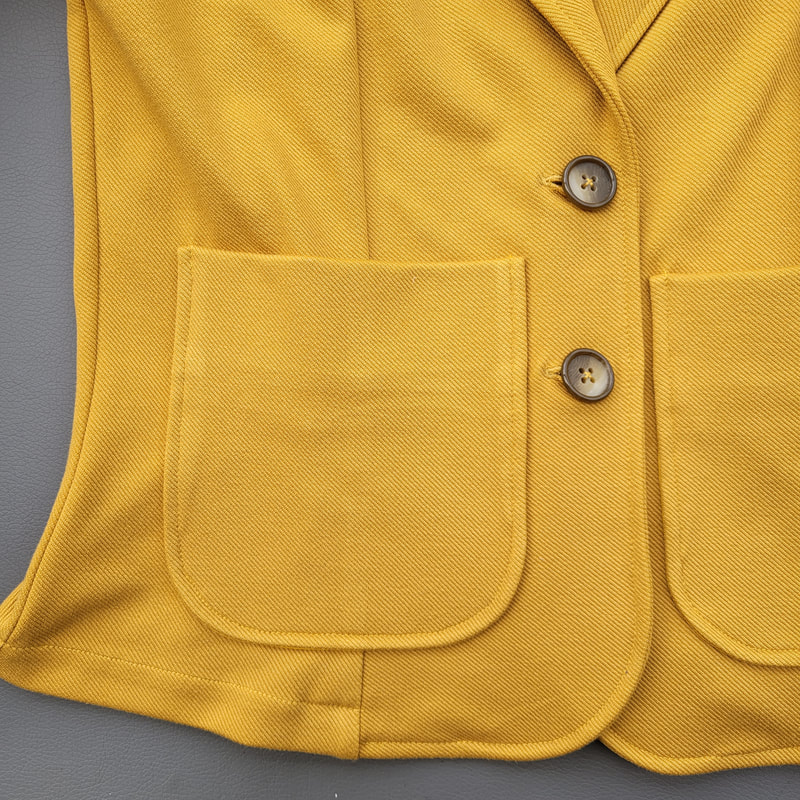
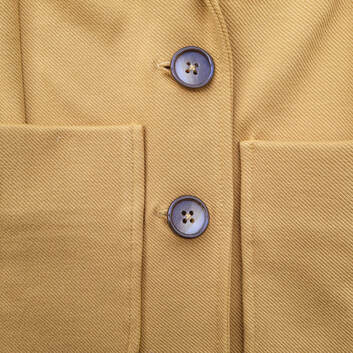
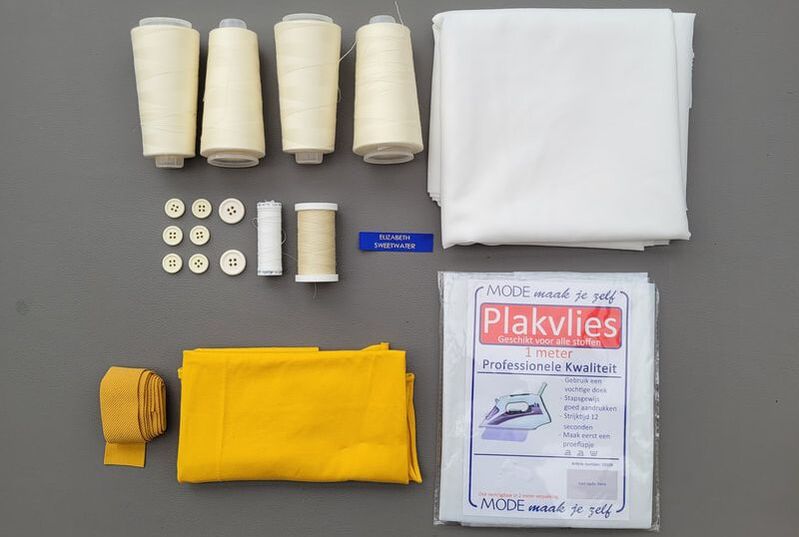
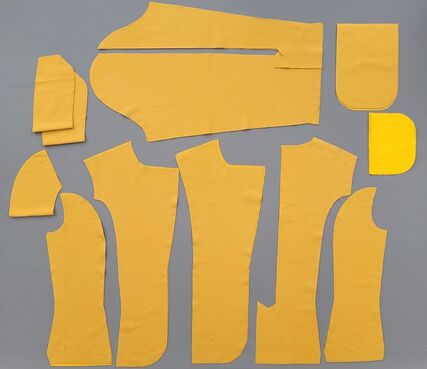
g.
Raadpleeg het onderstaande overzicht van alle modellen om je voor te bereiden op het uitknippen van de door jou gekozen stof.
Consult the overview of all styles below to prepare yourself for the next stage of cutting out the pieces from your chosen material.

1.
Variaties en overzicht

Variations and overview
In deze werkbeschrijving komen twee zakvariaties variaties aan bod, een opgestikte- en een strookzak.
De naaivolgorde en het aantal patroondelen zijn gelijk.
! Deze blazer is gemaakt van tricot en heeft geen voering.
In this tutorial you will find 2 pocketvariations described, a patch- and a welt pocket.The order of the steps and the number of patternpieces are the same.
! This blazer is made from jersey and has no lining.


Geschikte stof/Suitable fabrics
Punta, punty twill (zie gele blazer), jaquard jersey (zie ecru en groene blazer), travelstof en French terry voor een wat sportievere variant.
Punta, punty twill (see yellow blazer), jaquard jersey (see off-white and green blazer) and French terry for a more sporty variety.

Hoeveelheid stof nodig/amount of fabric needed
Alle modellen/All Models:
Tricot/jersey: 150cm breed/width
Maat/size: 34 t/m 38: 150 cm
Maat/size: 40 t/m 50: 180 cm

!De stofafmeting is een schatting en is afhankelijk van het soort model wat je maakt, maat, aanpassingen, stofbreedte, print etc. Ik adviseer om de patroondelen eerst in te leggen op een tafel waar je de juiste stofbreedte hebt afgemeten alvorens de stof te bestellen/kopen. Zo koop je nooit teveel/te weinig.
The amount of fabric needed is an estimate and depends on the type of dress you make, size, adjustments, fabric width, print etc. I recommend placing the pattern pieces on a table where you have measured the correct fabric width before ordering/buying the fabric. That way you never buy too much/too little.
Picture
Picture
Patroondelen checklist alle modellen:
- Voorpand
- Zij- voorpand
- Achterpand
- Zij- achterpand
- Beleg voor
- Beleg achter
- Kraag
- Zakdeel
- Zak voeringdeel
- Mouw
- Zij- mouwdeel
Pattern pieces checklist all styles:
- Front piece
- Side front piece
- Back piece
- Side back piece
- Facing front
- Facing back
- Collar
- Pocket part
- Pocket lining part
- Sleeve
- Side sleeve part

Picture
Fournituren alle variaties:
- Eventueel een geweven label.
- Eventueel rekbaar stikgaren (seraflex van mettler bijvoorbeeld) of gewoon stikgaren in combinatie met een stretchsteek setting op de naaimachine.
- Lockgaren.
- Rekbare plakvlieseline.
- 2 knoopjes van 2cm en 6 knoopjes van 15mm.
-Een stukje stretch voeringstof of restje tricot voor de opgestikte zakken.
- Eventueel tricot bies (kant en klaar of zelf geknipt van tricot).
-Een klein stukje niet rekbare plakvlieseline voor de strookzak variatie.
Haberdasheries all variations:
- Optionally a woven label.
- Optionally stretch yarn (seraflex from mettler for example) or regular yarn in combination with the stretch stitch setting on the sewingmachine.
- Overlock yarn.
- Stretch fusible interlining.
- Optionally some stretch lining fabric or a piece of lightweight jersey for the patch pockets.
- 2 buttons 2cm  and 6 buttons 15mm
- Optionally Jersey band (ready made of cut from jersey fabric).
-Small piece of non stretch fusible interlining for the welt pocket option.

Picture
Knip checklist
Knippen blazer beide variaties:

- Voorpand 2x
- Zij- voorpand 2x
- Achterpand 2x
- Zij- achterpand 2x
- Beleg voor 2x
- Beleg achter 1x aan stofvouw
- Kraag 2x
- Zakdeel voor opgestikte zak of strookzak 2x
! Knip je de strookzak in een print, leg het zakdeel dan ondersteboven op de stof.
- Zak voeringdeel voor opgestikte zak of strookzak  2x
- Mouw 2x
- Zij- mouwdeel 2x
! tip: knip belegdelen en 1 kraagdeel Iets ruimer. Deze delen moeten geplakt worden en kunnen daardoor iets krimpen.
Cutting checklist
Cut blazer both variations:

- Front piece 2x
- Side front piece 2x
- Back piece 2x
- Side back piece 2x
- facing front 2x
- facing back 1x on fold
- Collar 2x
- Patch pocket part or welt pocket part 2x
! If you cut the welt pocket in a print, place it upside down on the fabric.
- Patch pocket lining part  or welt pocket lining part 2x
- Sleeve 2x
- Side sleeve part 2x
! tip: cut facing parts and 1 collar part a little wider. These parts will get a layer of interlining ironed on them and may therefore shrink slightly.


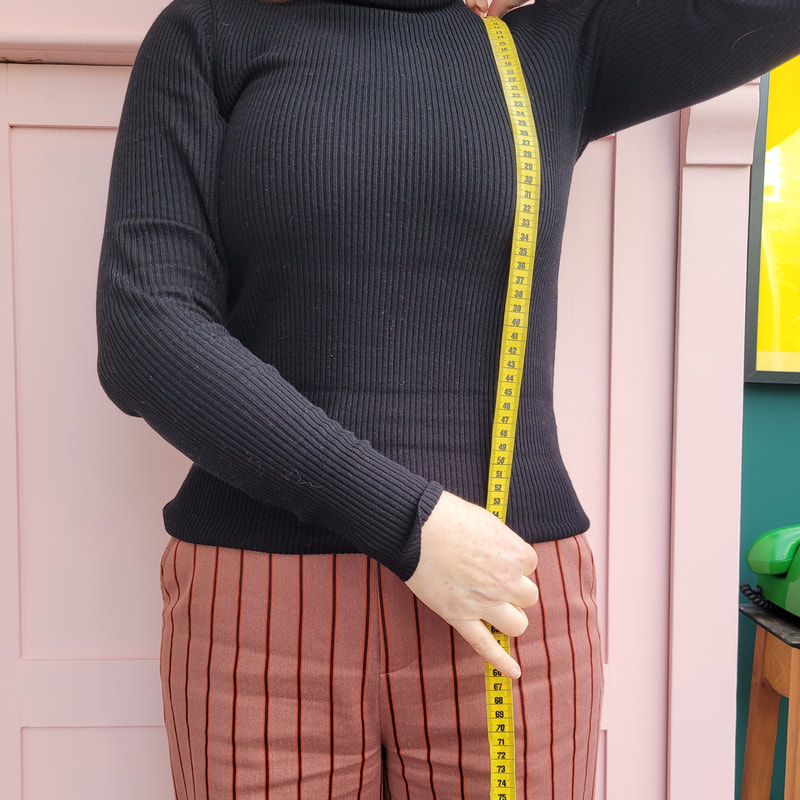
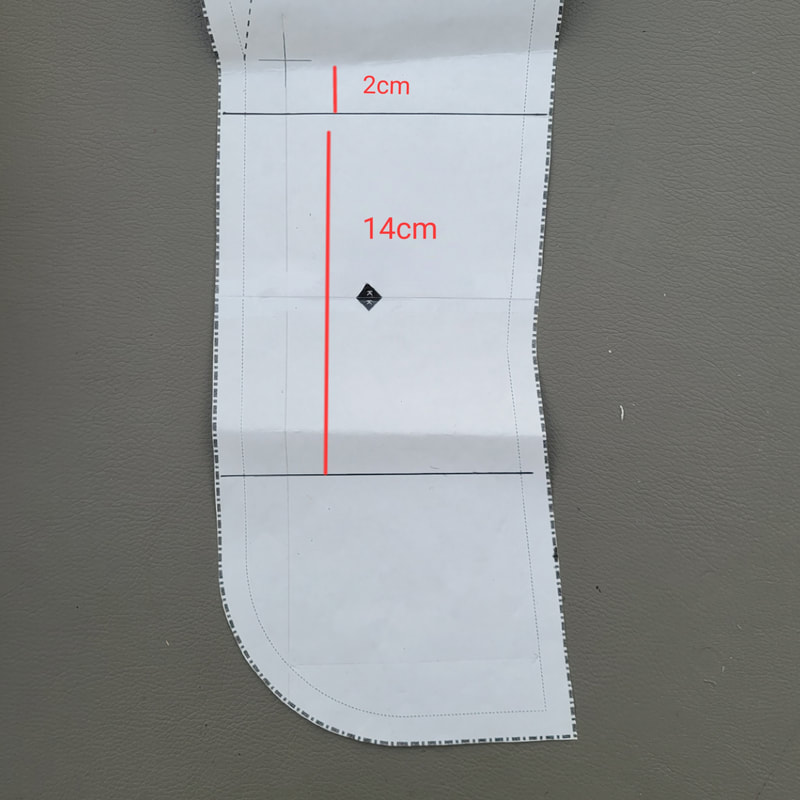
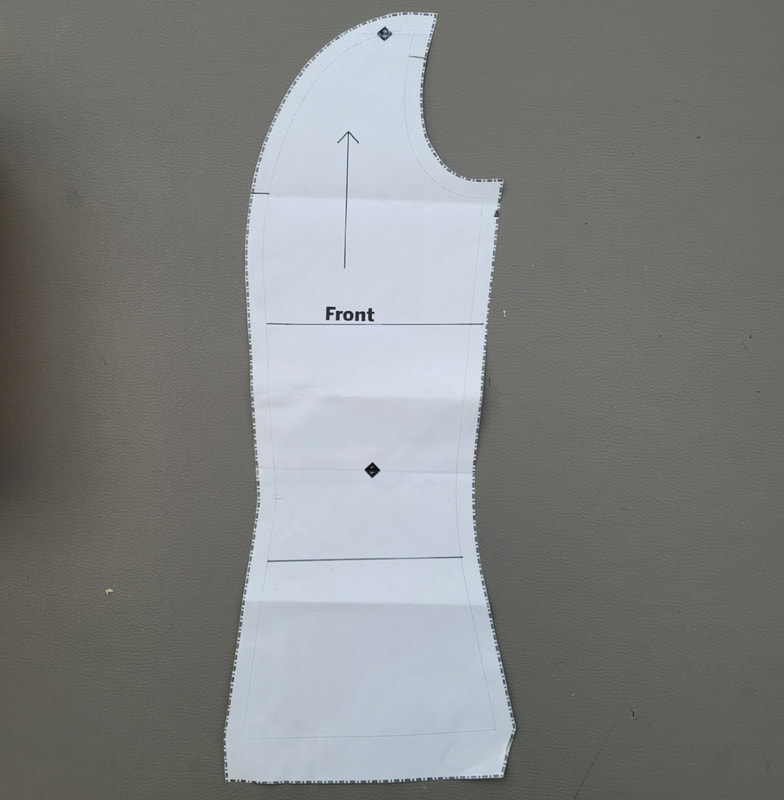
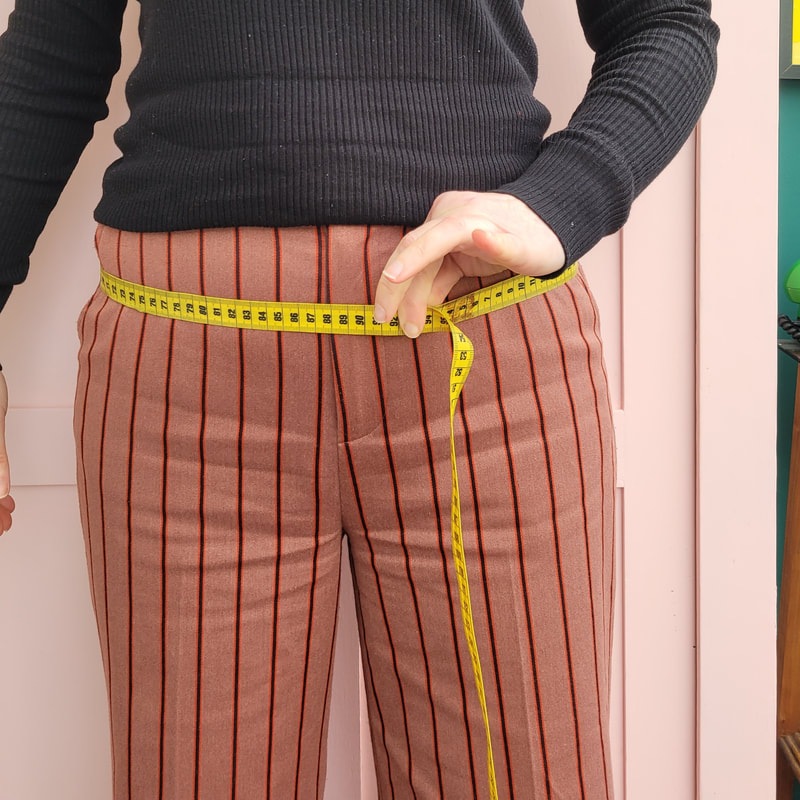
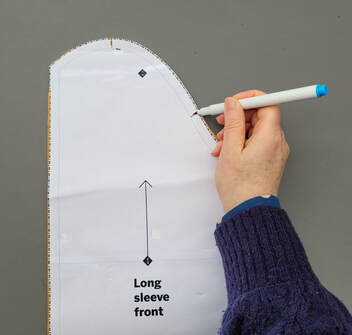
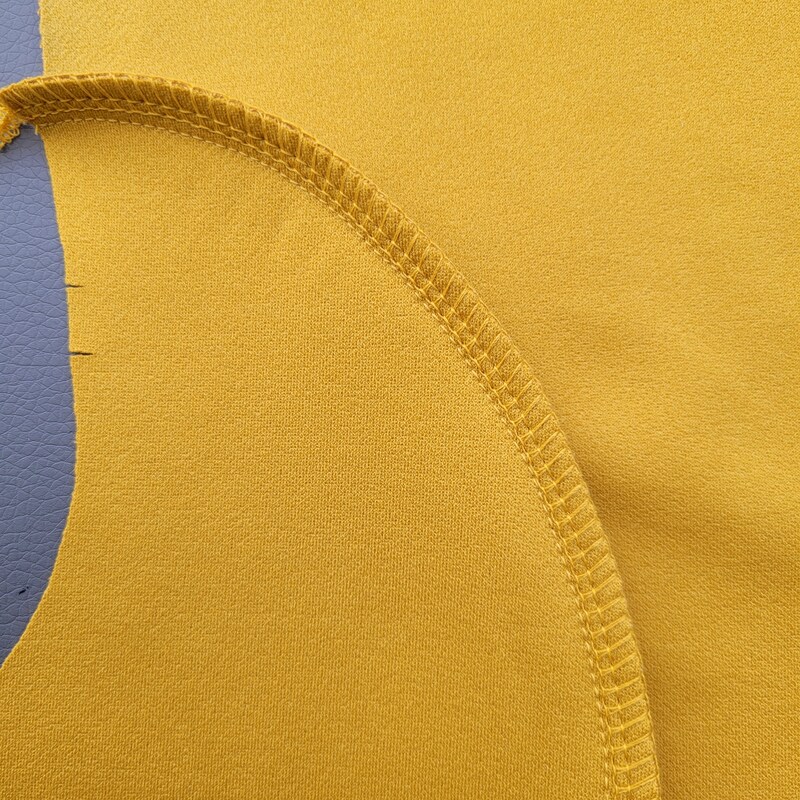
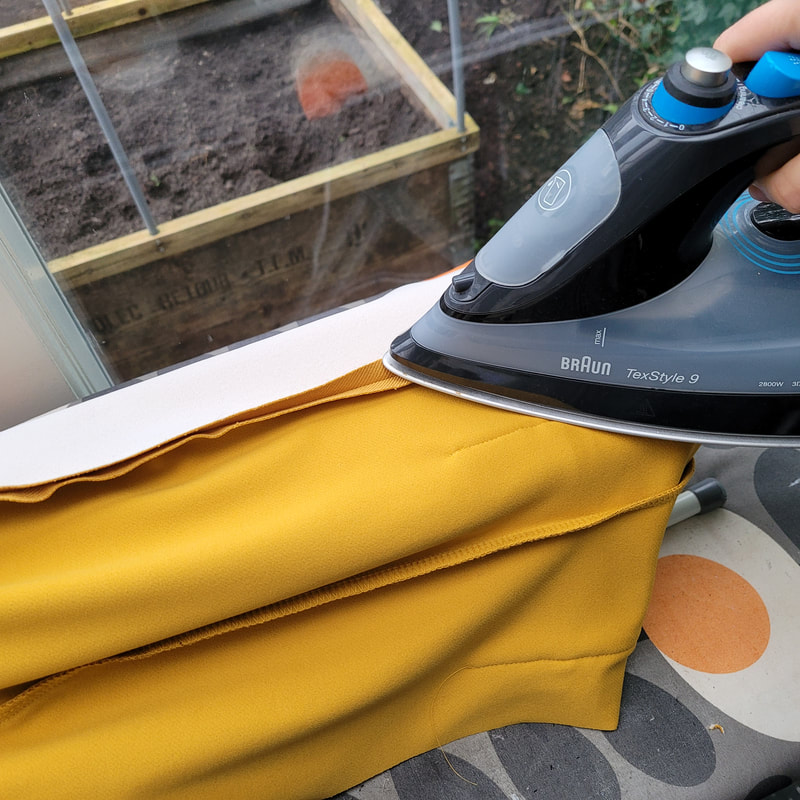
Goed om te weten:
Ik ga in deze werkbeschrijving uit van het gebruik van een overlock machine. Mocht je daar niet over beschikken dan kun je een zig-zag steek gebruiken op een gewone naaimachine. Ik raad dan wel aan om er altijd een stretch stiksel naast te plaatsen. De naadtoeslag van de patronen is 1cm. Check wat de breedte instelling van je naad is op je lockmachine is. Is het 0,7cm dan kun je tijdens het stikken 3mm wegsnijden. De stretchnaden stik je met een stretchsteek instelling op de gewone naaimachine.
Behalve een stretchsteek setting op je naaimachine kun je ook voor stretch garen kiezen, bijvoorbeeld seraflex van mettler. Zet de garen spanning in een zo laag mogelijke instelling als je werkt met stretch garen. De naden werk je af met een overlockmachine (of een zigzag steek op een reguliere machine).

​Good to know
For this tutorial an overlock machine was being used for sewing most of the garment. However, it is possible to use a regular sewing machine and sew with a zigzag stitch. I do recommend sewing an extra stretch stitch next to it to create clean lines. The seam allowance of the patterns is 1cm. Check the seam width setting of your overlock machine. If it is 0.7cm you can cut away 3mm while sewing. The stretch seams can be sewn using the stretch setting on a regular sewing machine. Apart from using a stretchstitch setting on your sewing machine ypu can also choose stretch yarn (seraflex by Mettler). Adjust the tension to the lowest possible setting when using stretch yarn. Finish seams with an overlock machine or zigzag on a regular machine.


2.
​Patroon Aanpassingen
Pattern Adjustments  

Ik adviseer om eerst een proefmodel te maken voor je in een dure stof knipt. Ga voor deze blazer uit van je bovenwijdte, de taille en onderwijdte zijn eenvoudig aan te passen door in de zijnaden iets weg te nemen of toe te voegen.
! Let op dit is een aansluitend model. Draag je de blazer liever wat losser of wil je er in de winter een trui onder overweeg dan een maat groter.
I recommend making a test model before cutting in expensive fabric. For this blazer, choose the size from our size chart with a bust measurement closest to yours. the waist and bottom width are easy to adjust.
! Please note this is a fitted style. If you prefer to wear the blazer a bit looser or would like to wear a sweater underneath in the winter, consider one size larger.


Het verlengen van de blazer
Lengthening the blazer

Picture
2a-1
Meet op het patroon de lengte van de blazer.
Meet vervolgens bij jezelf deze lengte af en beslis of je deze wilt verlengen of niet.
Measure the length of the blazer on the pattern.
Then measure this length on yourself and decide whether you want to extend it or not.

Picture
2a-2
Trek een horizontale lijn op het voor-en achterpand op 2cm onder de eerste knoop en ongeveer 14cm daaronder.
Draw a horizontal line on the front-and backpiece on approx 2cm from the first button and approx.14cm under it.
Picture
2a-3
Meet dezelfde afstand af op de zijpandjes en trek hier ook horizontale lijnen.
Measure the same distance on the side pieces and also draw horizontal lines.
Picture
2a-4
Knip de patroondelen door langs de lijnen.Om te verlengen plak je hier een stuk (patroon)papier tussen. Verdeel de te verlengen afstand tussen de twee lijnen. Teken de zijnaden opnieuw volgens de afbeelding.
Het verlengen van de mouwen doe je op dezelfde manier maar dan is 1 lijn ongeveer halverwege de mouw voldoende.
Cut the pattern parts along the lines. To extend, stick a piece of (pattern) paper in between. Divide the distance to be extended between the two lines. Redraw the side seams according to the picture.
Extending the sleeves works in the same way, but then 1 line approximately halfway up the sleeve is sufficient.


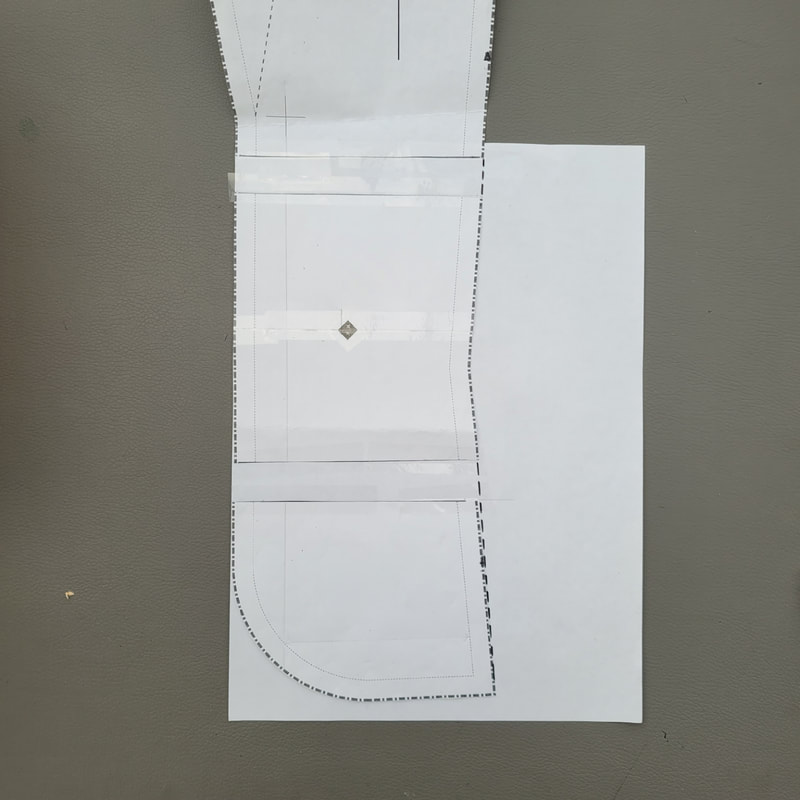
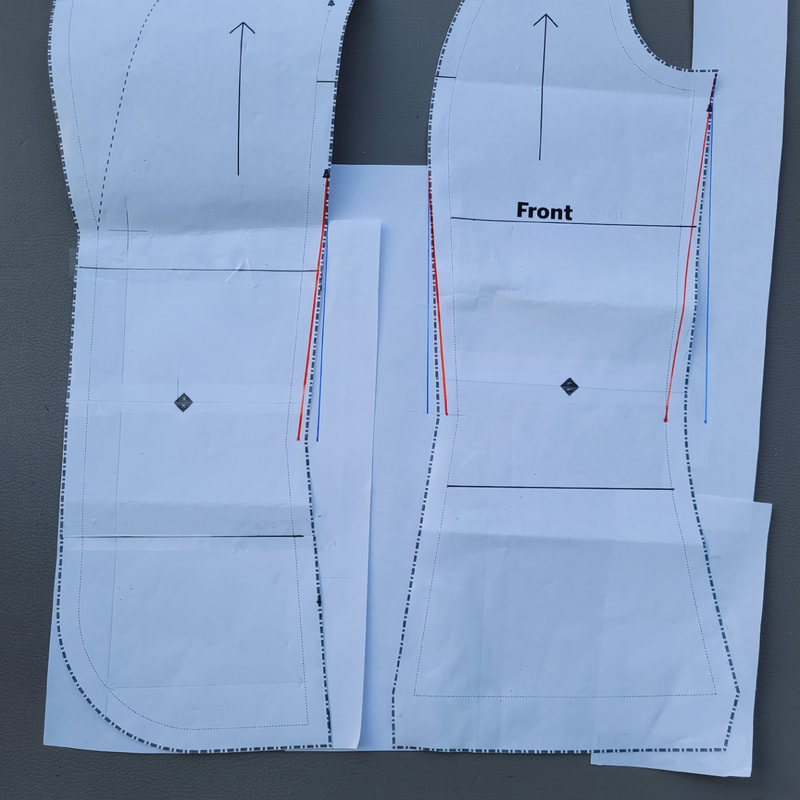
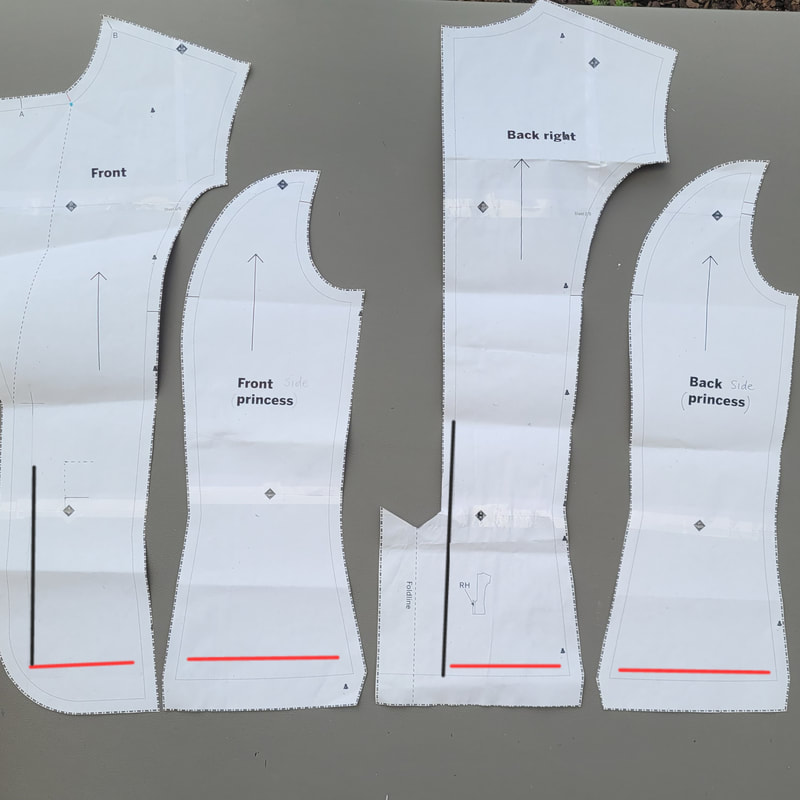
Het aanpassen van taille en/of onderwijdte
Adjusting waist and/or bottom width

Picture
2b-1
Check op de matentabel of de taille afmeting bij de gekozen maat afwijkt van die van jou.
Om de taille te versmallen of the verbreden  kun je 1maat (=1cm) wegnemen of toevoegen uit/aan de zijnaad ter hoogte van de taille (= smalste punt). Verbind het armsgat met het nieuwe taillepunt. Op de foto: blauw is wijder maken taille, rood is strakker maken taille.
Check the size spec whether the waist measurement of the chosen size matches yours.
To narrow or widen the waist you can remove or add 1 size (=1cm) from /to the side seam at waist hight (=narrowest part). Connect armhole to new waistpoint. In the photo: blue is to widen the waist, red is to tighten the waist.

Picture
2b-2
Als de taille 2 maten (of meer) verschilt van de bovenwijdte neem dan 1cm weg/voeg 1cm toe uit/aan de zijnaad en 0,5cm uit/aan de deelnaad van zowel voor-als achterpand.
Vervolgens verbind je de taille met de onderkant.
If the waist differs by 2 sizes (or more) from the bust, take away/add 1cm from/to the side seam and 0.5cm from the dividing seam of the front and backpiece. Then connect the waist with the bottom.
Picture
2b-3
Om te weten of je ook de onderwijdte moet aanpassen doe je het volgende:
Meet eerst je omvang op de hoogte waar het jasje eindigt.
To know whether you also need to adjust the width, do the following: First measure your circumference at the height where the jacket ends.
Picture
2b-4
Meet vervolgens de onderkant op van de patroondelen (let op: het voorpand vanaf de middenvoor lijn en het achterpand vanaf de middenachter lijn (zie rode lijnen op foto).
Tel alles bij elkaar op en vermenigvuldig x2. De wijdte moet iets ruimer (zo'n 4 à 6cm afhankelijk van de maat) zijn dan de lichaams omvang gemeten op dat punt.
Then measure the bottom edge of the pattern pieces (note: the front piece from the center front line and the back piece from the center back line (see red lines on photo).
Add everything together and multiply x2. The width should be slightly wider (about 4 to 6 cm depending on the size) than the body circumference measured at that point.

Picture
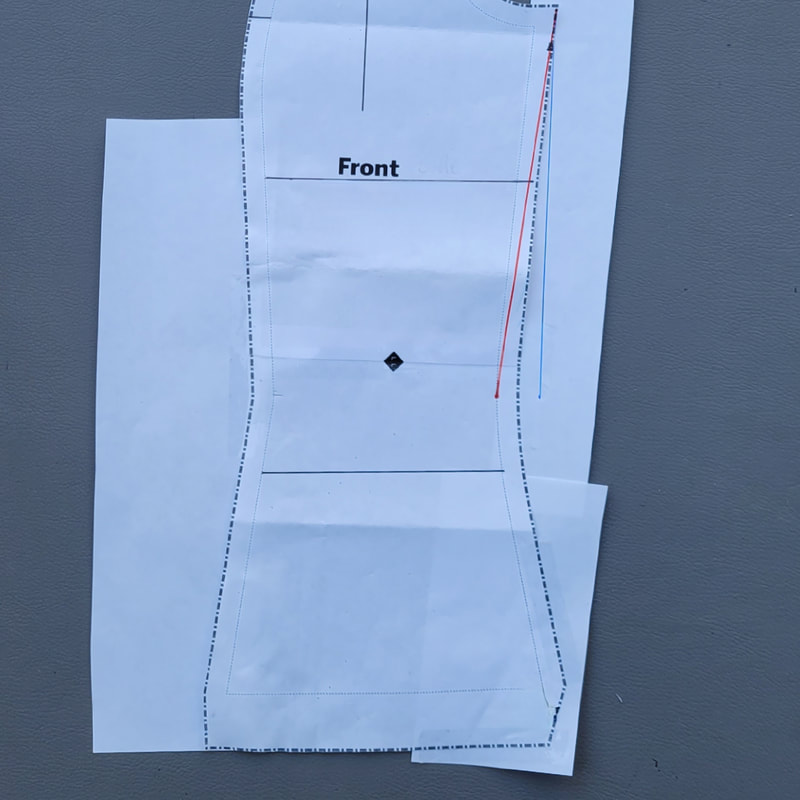
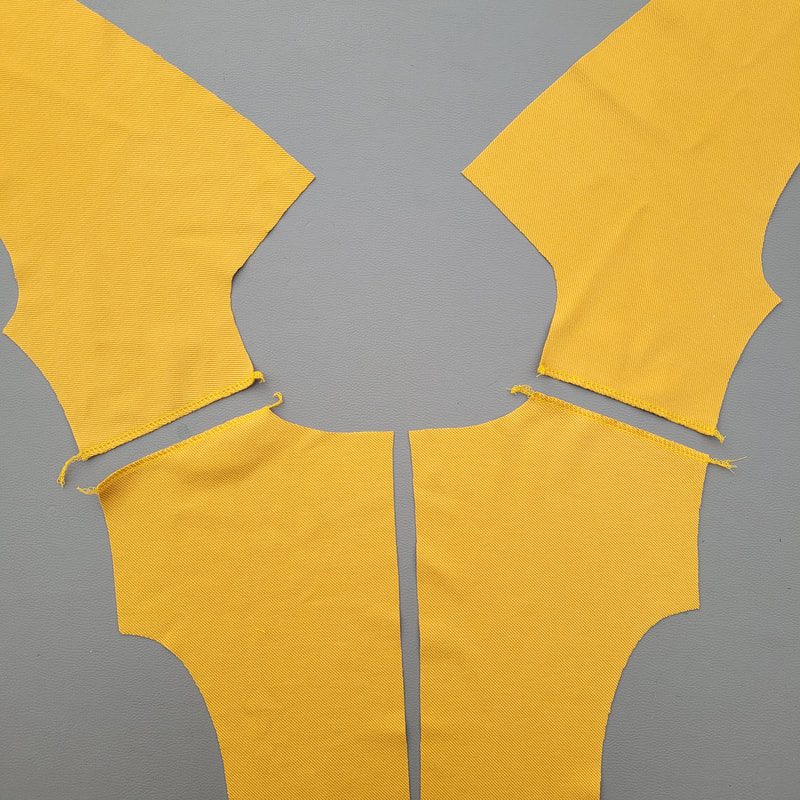
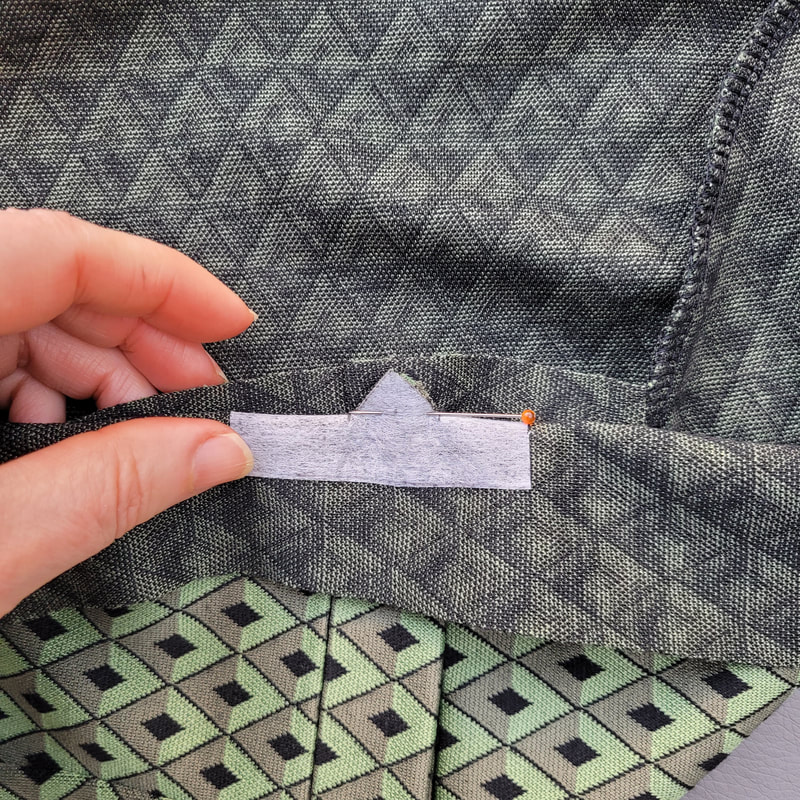
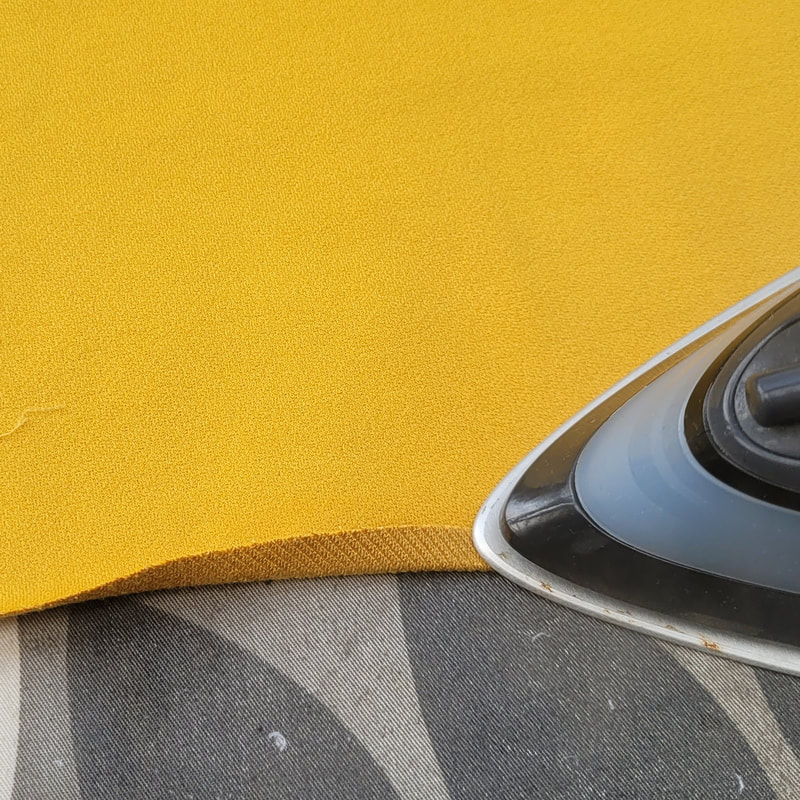
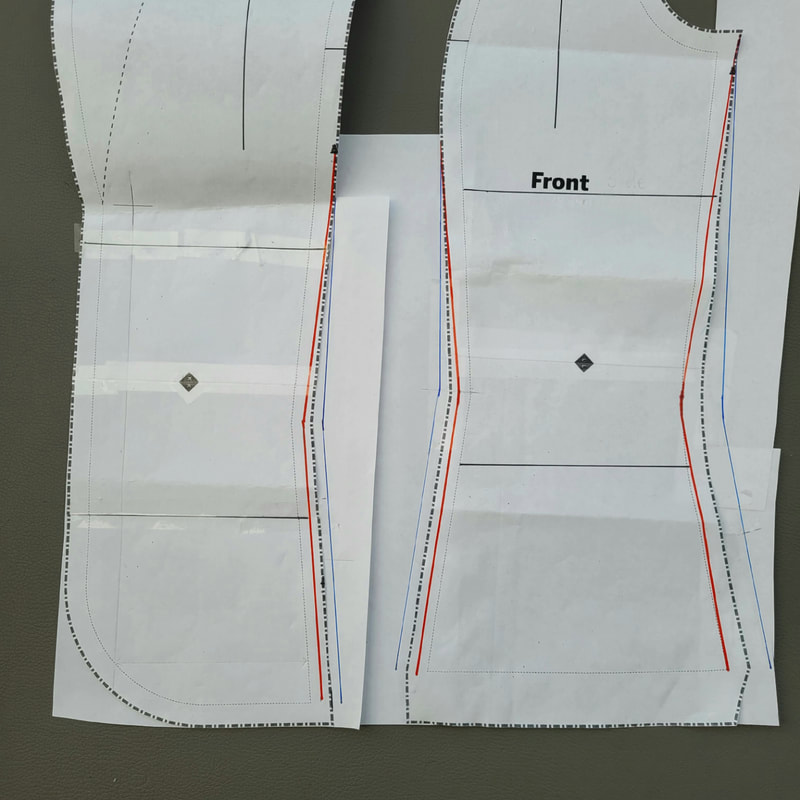
2b-5
Verdeel het aantal toe te voegen (of te versmallen) centimeters. 4cm of minder kan toegevoegd/weggehaald worden in de zijnaad, meer dan 4cm moet verdeeld worden over zijnaad en deelnaad. (In het voorbeeld: 1cm in de zijnaad plus 0,5cm per deelnaad is in totaal 8cm extra/minder rondom). Verbind de onderkant met de taille.
Divide the number of centimeters to be added (or reduced). 4cm or less can be added/reduced in the side seam, more than 4cm must be distributed over the side seam and dividing seam. (In the example: 1cm in the side seam plus 0.5cm per dividing seam is a total of 8cm extra/taken off all around). Connect the bottom with the waist.

De aanpassing voor een volle buste, aanbevolen voor een cup E/F of meer
Adjustments for a fuller bust for an E-F cup or higher

Picture
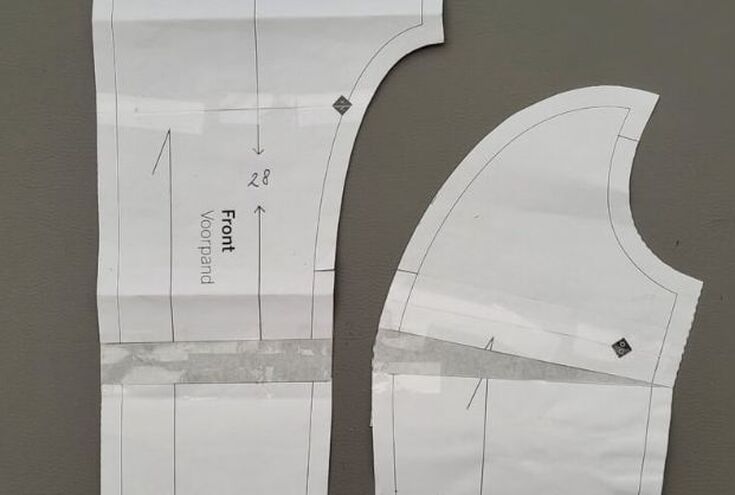
2c-1
Alle Elizabeth Sweetwater-patronen zijn gemaakt voor jerseystoffen.Het mooie van jersey is dat patroon aanpassingen vaak niet nodig zijn, maar door de buste ruimer te maken, trekt de stof niet bij de buste, wat een meer flatterende beeld geeft. In sommige gevallen zou je kunnen besluiten om een ​​kleinere patroon maat te kiezen als je een grote maat hebt gekozen vanwege je borstomvang, zodat je een betere pasvorm hebt rond de schouder en rug.
Check voor de uitleg over een fba (full bust adjustment) de werkbeschrijving van de pocket dress. Deze heeft een zelfde prinsesse lijn.
All Elizabeth Sweetwater patterns are made for jersey fabrics. The great thing about jersey is that often bust adjustments are not needed but by making the bust more roomy, the fabric will not stretch tightly at the bust giving a more flattering look. In some cases you might decide to choose a smaller size if you have chosen a large size due to your chest size, so you will have a better fit around the shoulder and bust.

3. 
Markering, verstevigen en naden,
Marking pieces, ironing on facing and seams

Picture
3a.
Neem alle kniptekens over op de stof.
Copy all the marks on the fabric.
Picture
3b.
Delen verstevigen met rekbare plakvlieseline:
- de bovenrand van de opgestikte zakken boven de stippellijn
- 1 kraagdeel
- Achterhalsbeleg
- Voor-belegdelen
! Heb je deze delen wat ruimer geknipt (zie hoofdstuk 1) in verband met krimp, leg dan opnieuw de patroondelen op de verstevigde stukken en knip deze precies uit.
Iron stretch interlining on:
- the tops of the patch pockets as indicated on pattern.
- 1 collarpart
- Backneck facing
- Front facing parts
! If you have cut these parts a little bigger (see Chapter 1) due to shrinkage, place the pattern parts again on the pieces with interlining and cut them out precisely.

Picture
3c-1
Werk de randen af van de schouders met een overlocksteek. Speld en stik de schoudernaden van de belegdelen met de goede kanten tegen elkaar. Strijk alle naden open en werk de beleg randen af met een overlocksteek. Naai eventueel een label op het achterhals beleg.
Finish the edges of the shoulders with an overlock stitch. Pin and sew the shoulder seams of the facing pieces right sides together. Press all seams open and finish the edges with an overlock stitch. Optionally sew a label onto the back neck facing.
Picture
3c-2
Tip: Het is ook mooi om de randen af te biezen met dezelfde stof als het jasje of kant en klaar tricot band.
Tip: for a clean look, finish the edges with the same fabric as the jacket or ready-made jersey band.
Picture
3c-3
Een restje tricot is ook heel geschikt om de randen mee af te biezen. Je knipt hiervoor een strook van 3cm hoog. Naai 0,5cm langs de rand, vouw om en stik door in de naad.
A leftover piece of jersey is also very suitable for finishing the edges. To do this, you cut a strip of 3cm high. Sew 0,5cm along the edge, fold over and topstitch in the seam.
Picture
3d.
Speld het voor-zijpand tegen het voorpand en het achter- zijpand tegen het achterpand.
De onderkant van het voorpand loopt hierbij ongelijk omdat het voorpand alleen naadwaarde heeft en het zijpand zoomwaarde (zie* op foto)
Pin the front-side piece to the front piece and the back-side piece to the backpiece. The bottom of the front will be uneven due to the front only having seam allowance and the side hem allowance.
Picture
3e.
Naai eerst de naden met de naaimachine en werk deze daarna af met de overlockmachine.
First sew the seams with the sewingmachine then finish the seams with the overlockmachine.
Picture
3f.
Een close up van de naad.
Strijk deze richting het voor/achterpand.
A close up of the seam.
Iron it towards the front/backpiece.


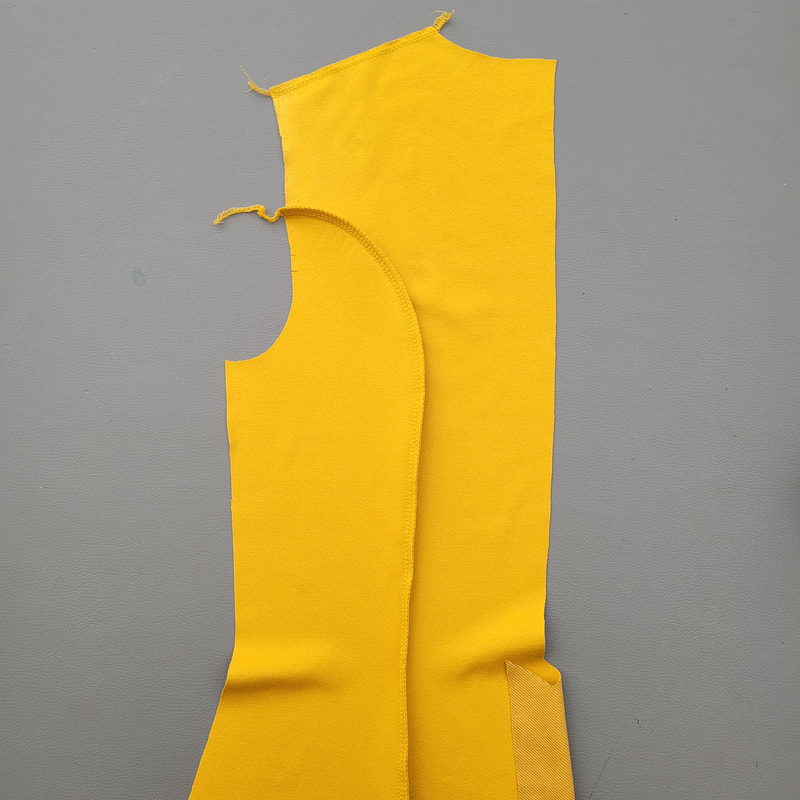
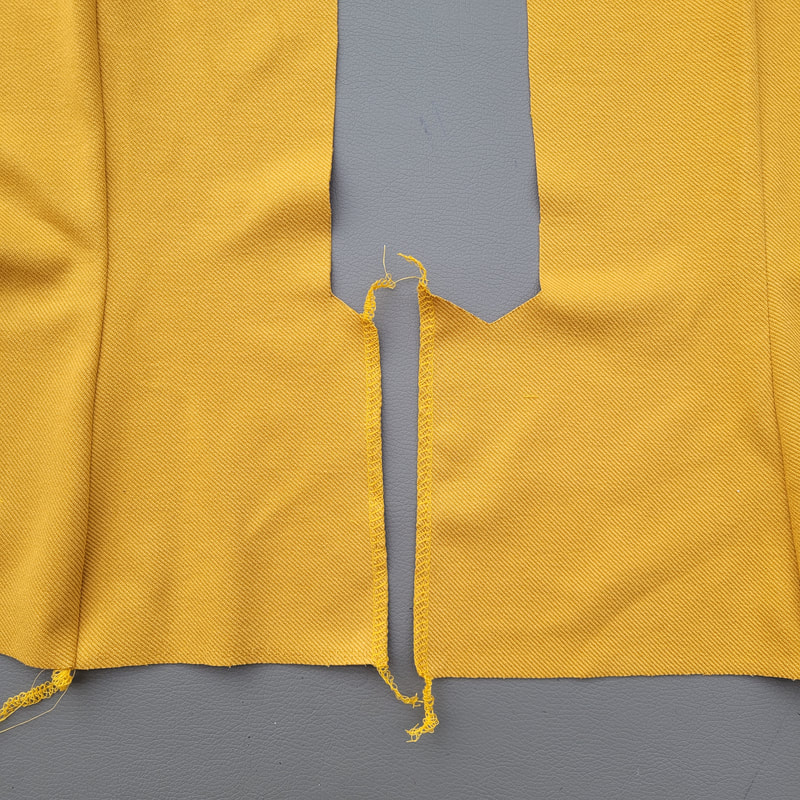
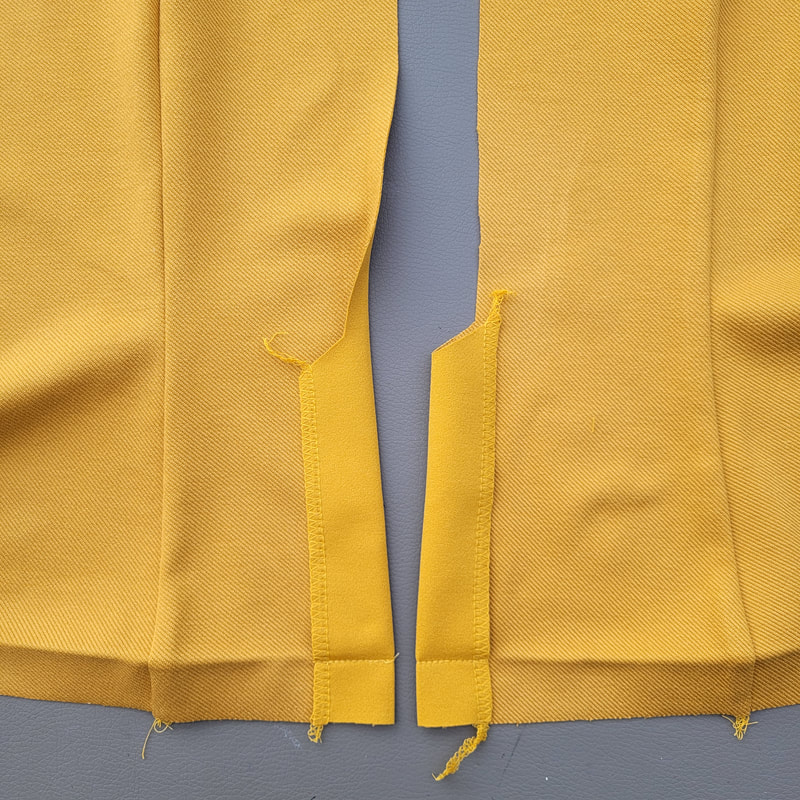
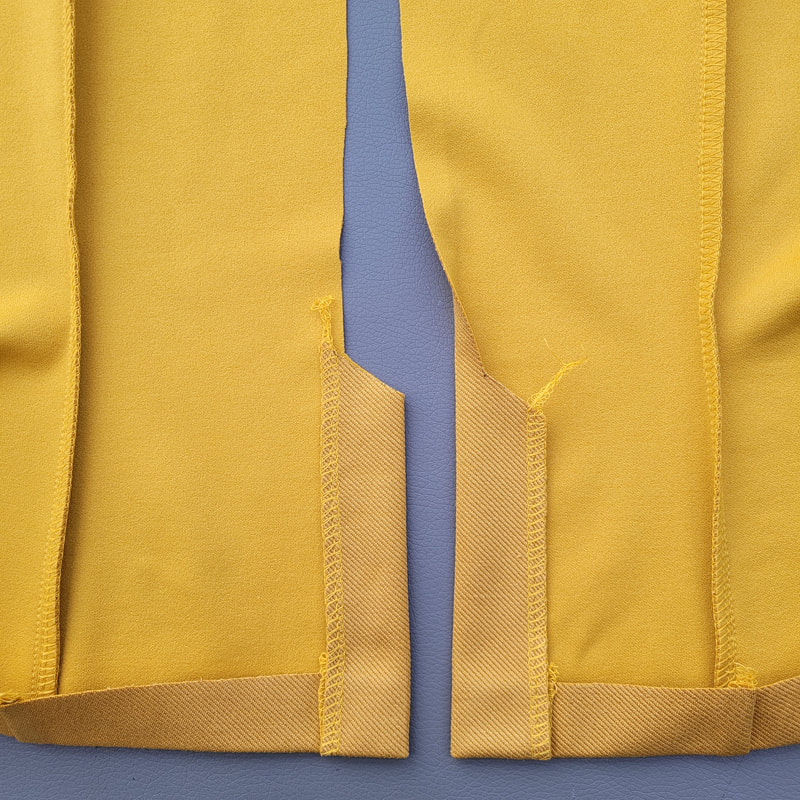
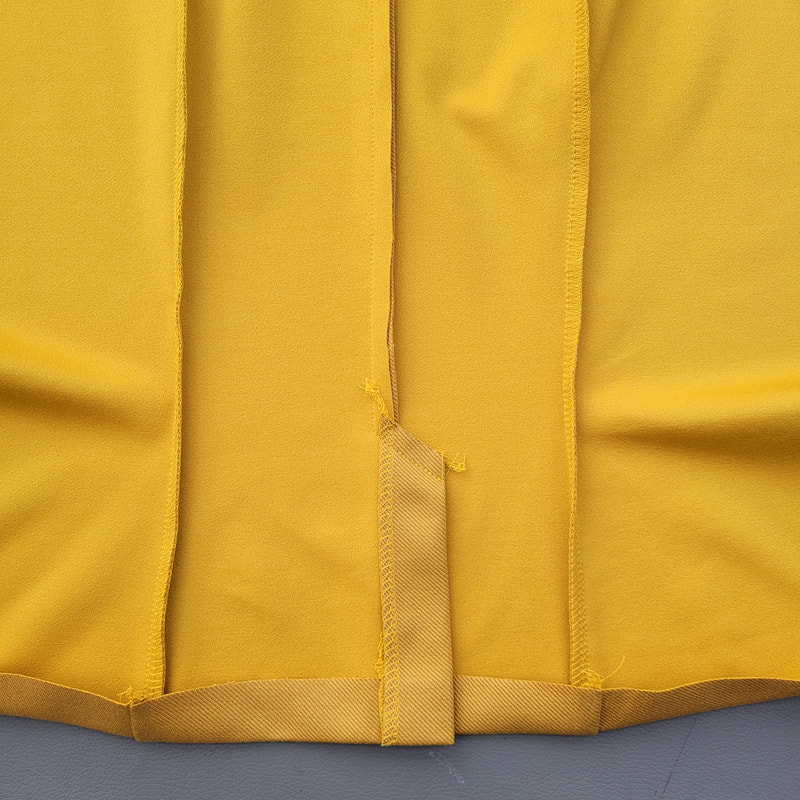
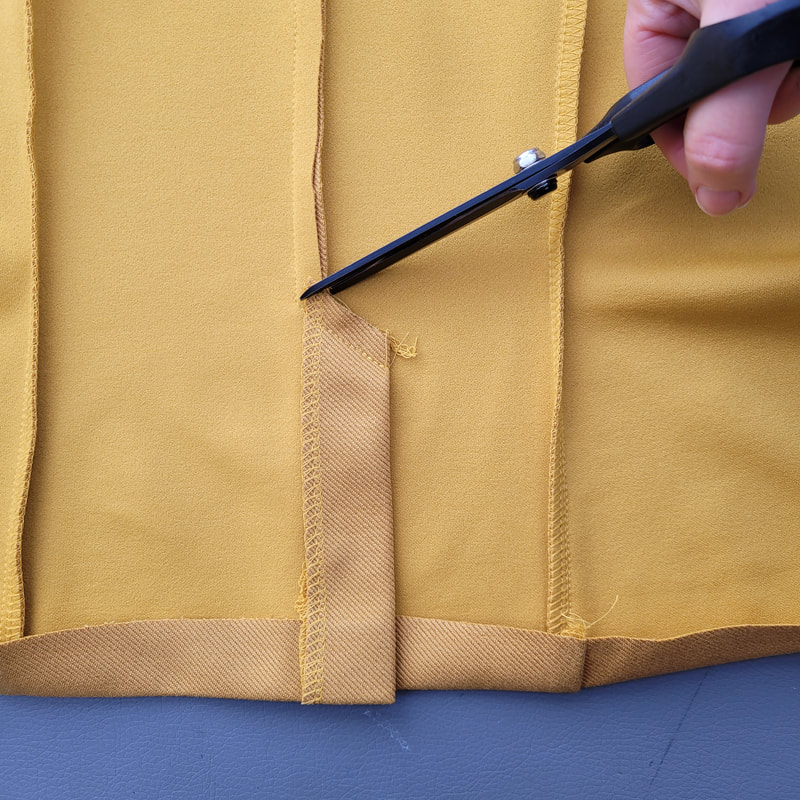
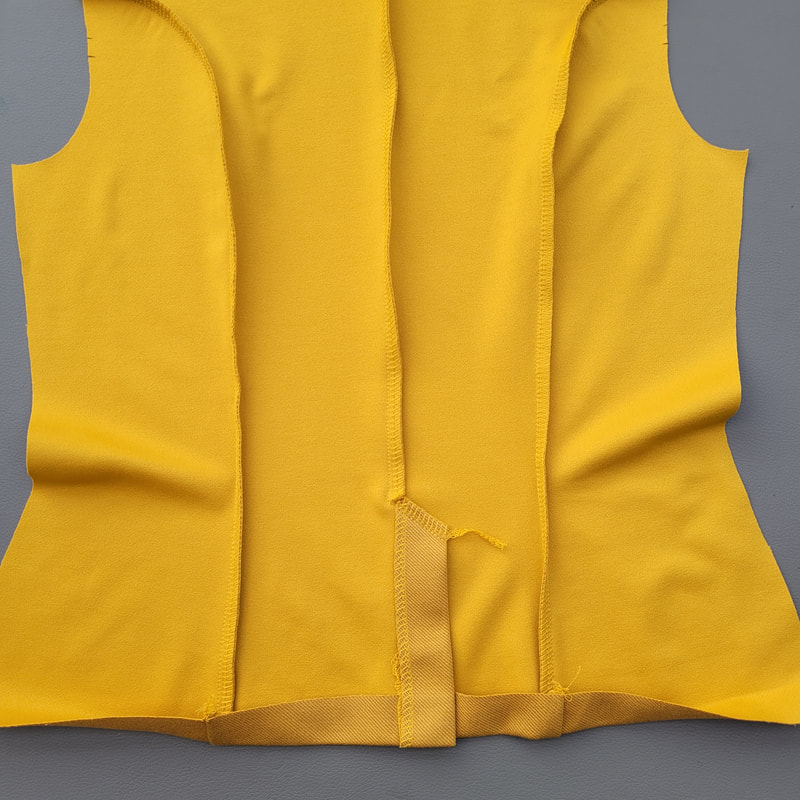
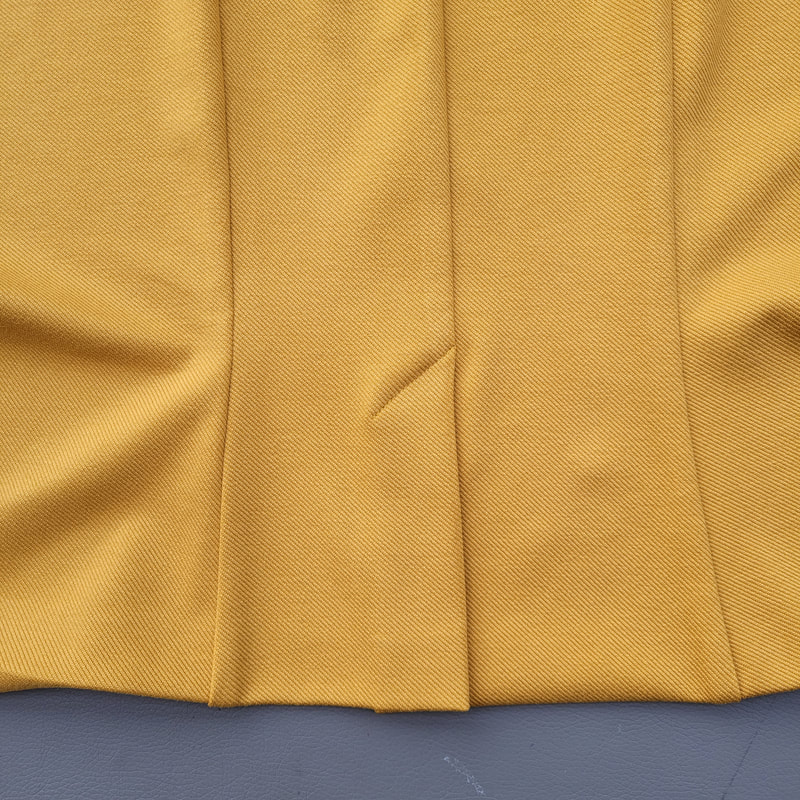
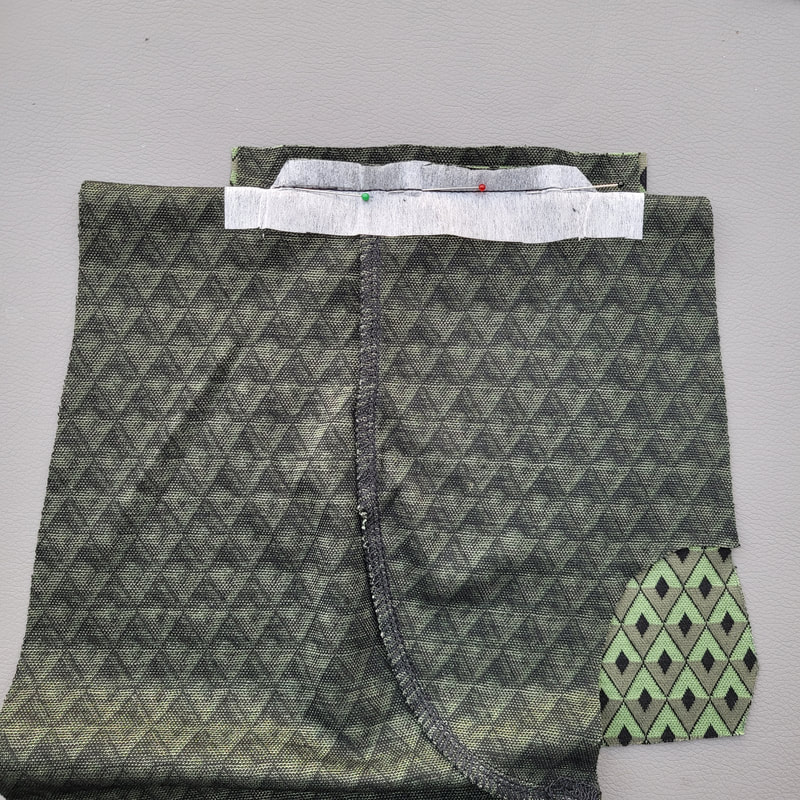
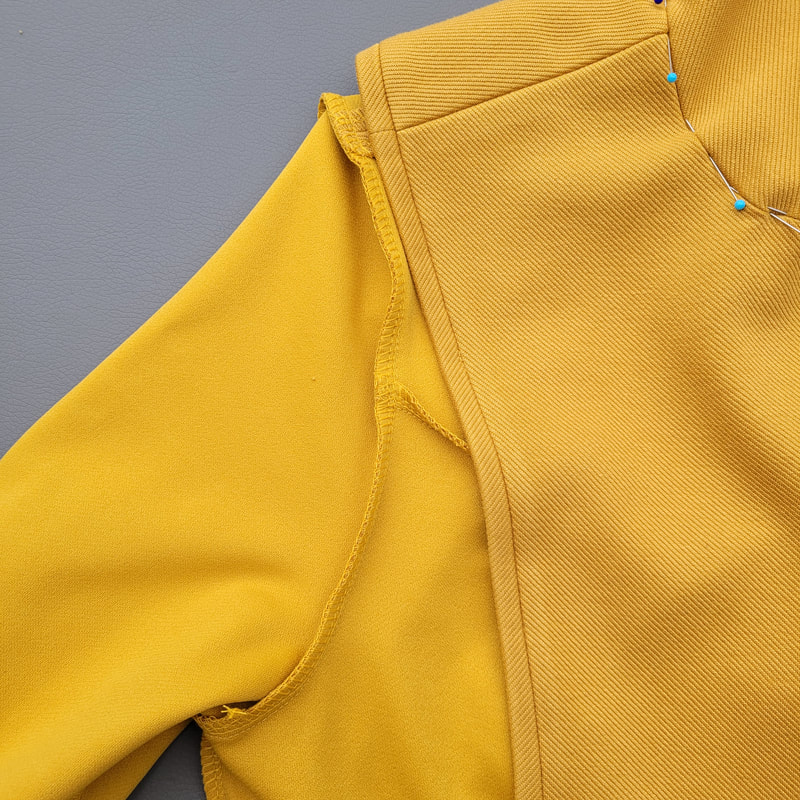
4.
Splitten en zakken
Slits and pockets

Picture
4a.
Het split midden achter en de mouw splitten.
Het achter rugpand bestaat uit twee delen, een linker en rechterpand. Het linkerpand valt straks over het (uitstekende) rechter splitdeel. Werk de randen eerst af met de overlockmachine.
The centre back slit and the sleeve slits. The back piece consists of two parts, a left and a right part. The left part folds over the right (sticking out) slit part. First finish the edges with the overlockmachine.
Picture
4b.
Vouw beide belegdelen naar de voorkant (op je patroon zie je een vouwlijn). Speld op 2,5 cm van de onderkant
Fold both facing parts over to the front (see  folding line on your paper pattern). Pin on 2,5cm from the bottom edge.
Picture
4c.
Stik op 2,5 cm van de onderkant en keer om.
Sew on 2,5cm from the bottom edge en turn inside out.
Picture
4d.
Leg de panden op elkaar. Speld en stik met de naaimachine de middenachternaad dicht en de bovenkanten van de splitdelen samen.
Place the parts on top of each other. Pin and sew the midbackseam and the top of the slit parts together with the sewingmachine.
Picture
4e.
Geef een knipje in hoek.
Clip the corner.
Picture
4f.
Overlock in een keer de middenachternaad en splitdelen samen. Vouw het beleg naar rechts.
Overlock the midbackseam and slit parts together. Fold the facing to the right.
Picture
4g.
Stik de bovenrand van de split door.
Topstitch the top edge of the slit.
Picture
4h.
De zoom wordt in een later stadium afgewerkt.
The hem will be finished in a later stage.
Picture
4i.
Pas dezelfde techniek toe op de mouwen.
Apply the same technique on the sleeves.
Picture
4j.
Naai de splitdelen op elkaar met 3 knoopjes (dit kan ook later als de knopen voor worden aangezet).
Attach the slit parts using 3 buttons (this can also be done in a later stage when the front buttons are sewn on).

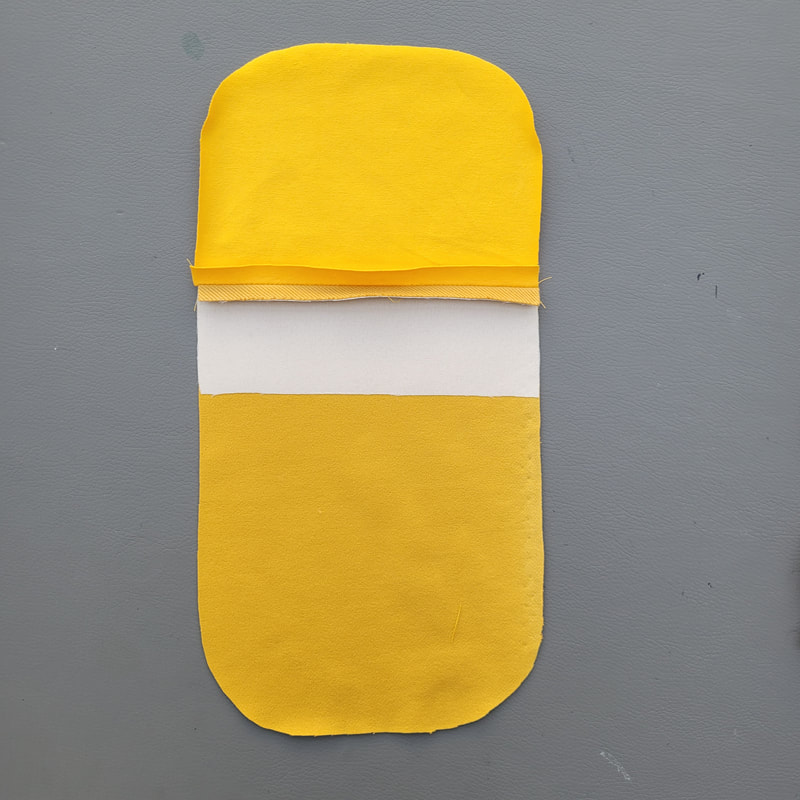
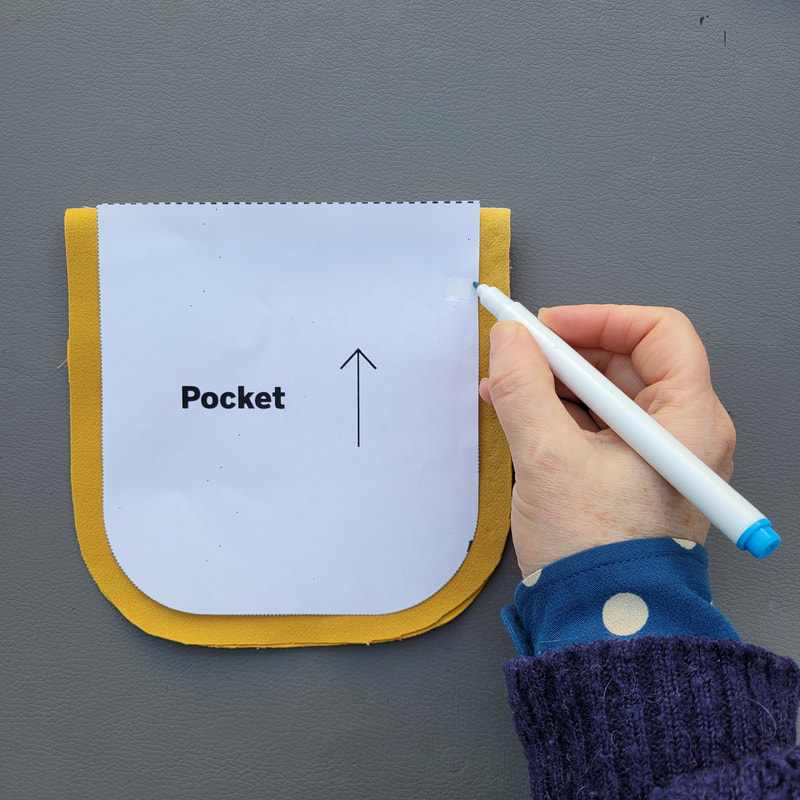
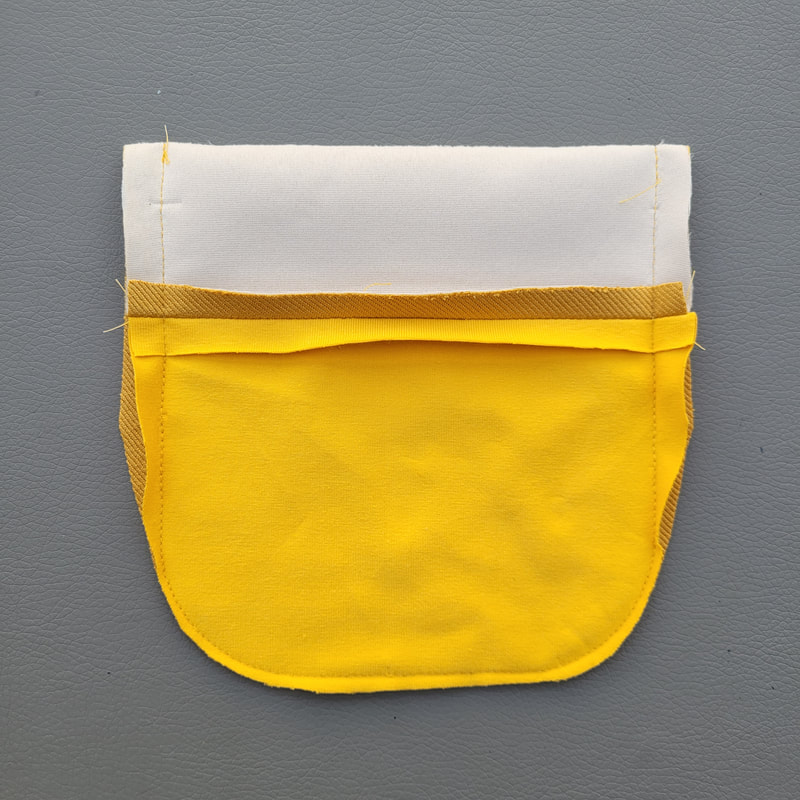
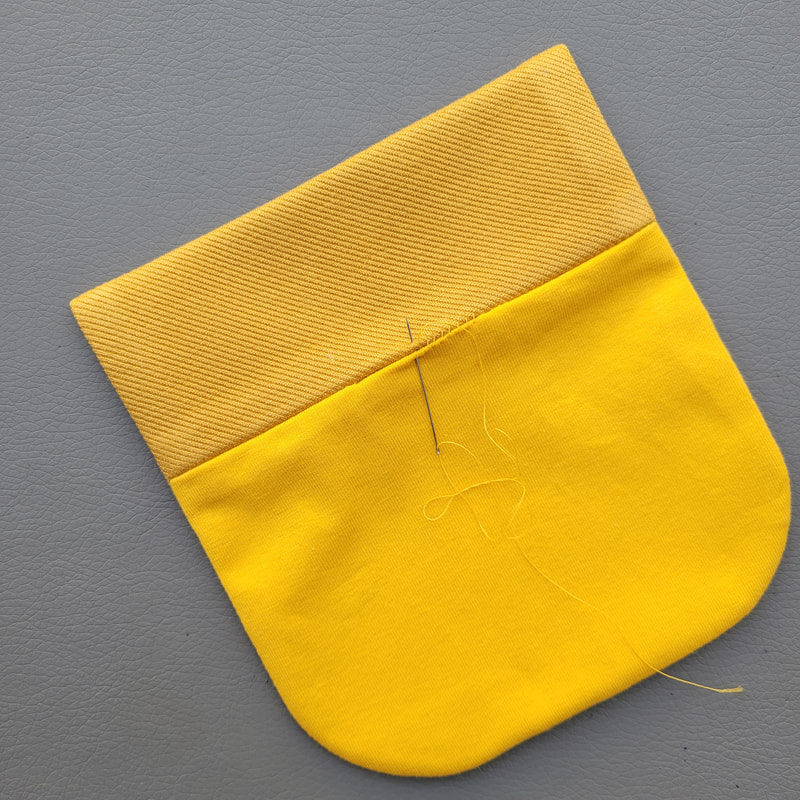
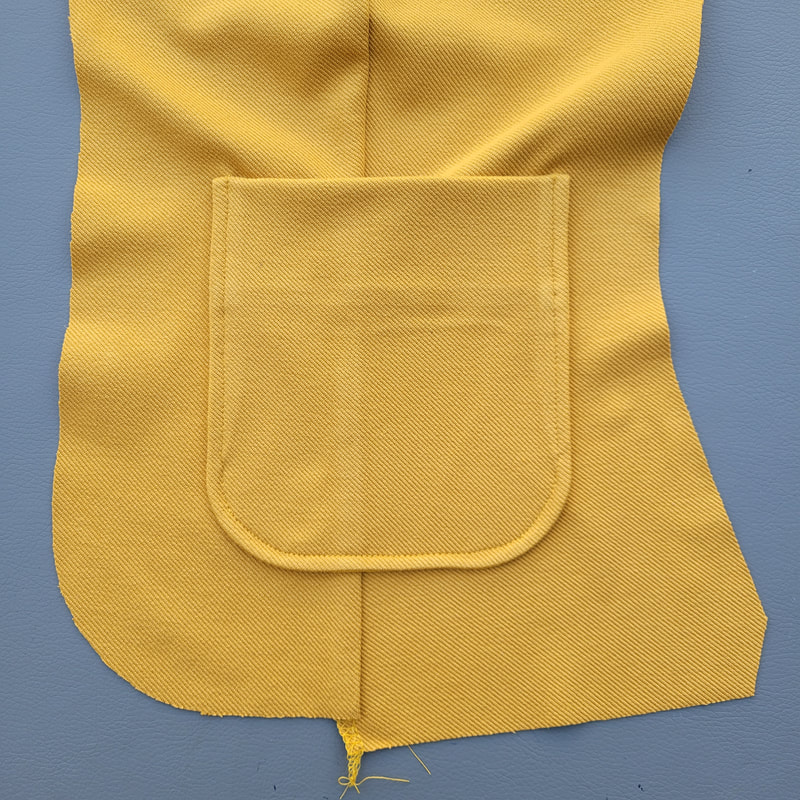
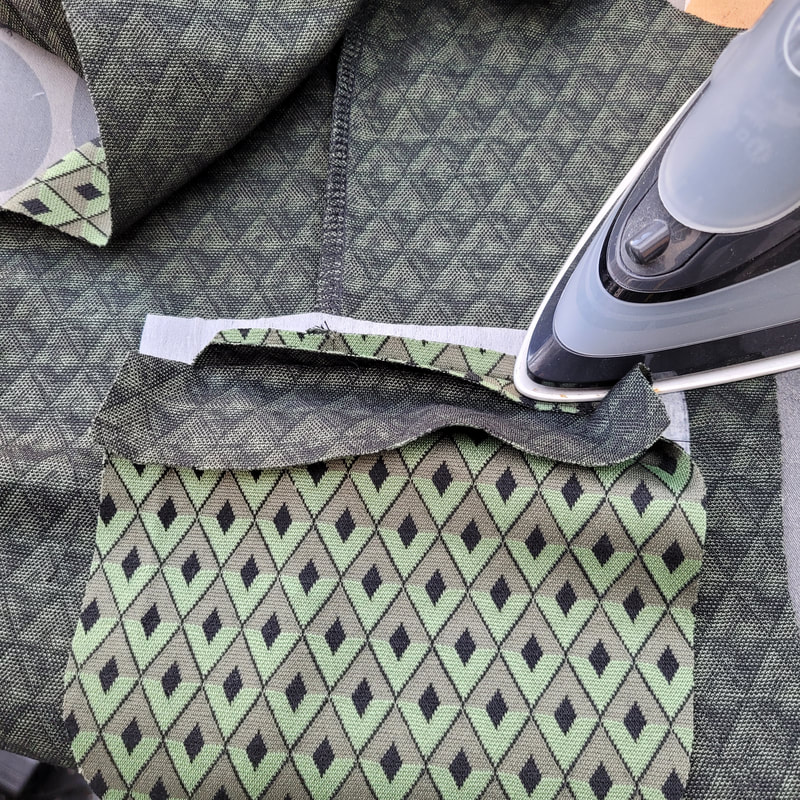
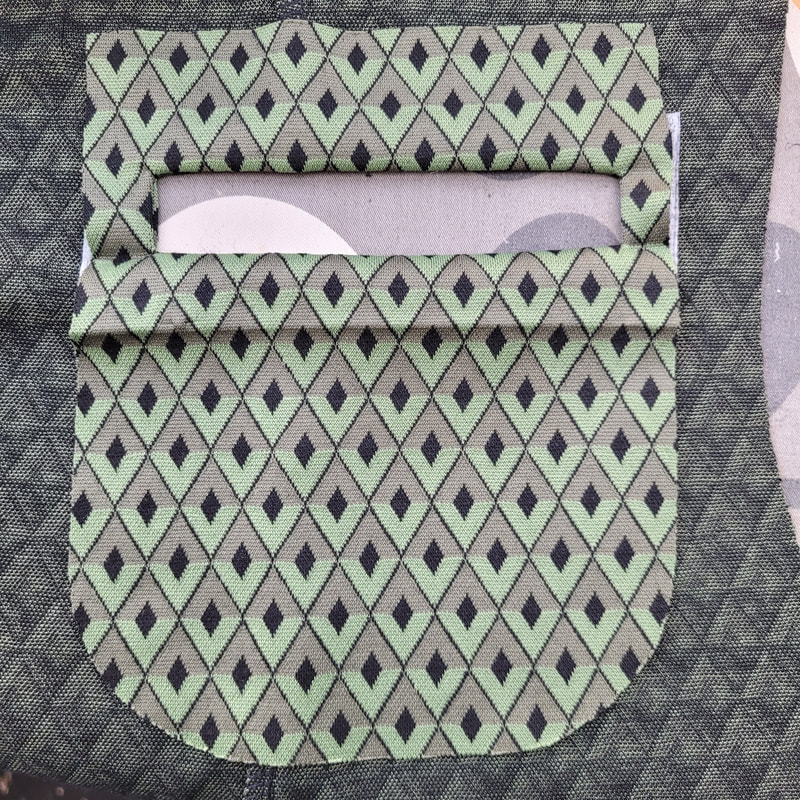
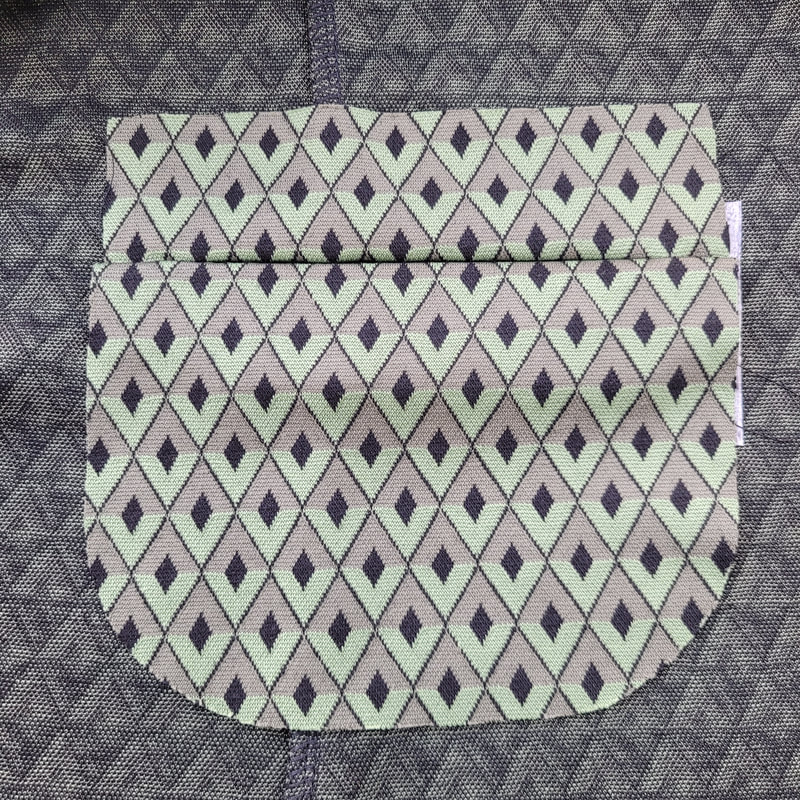
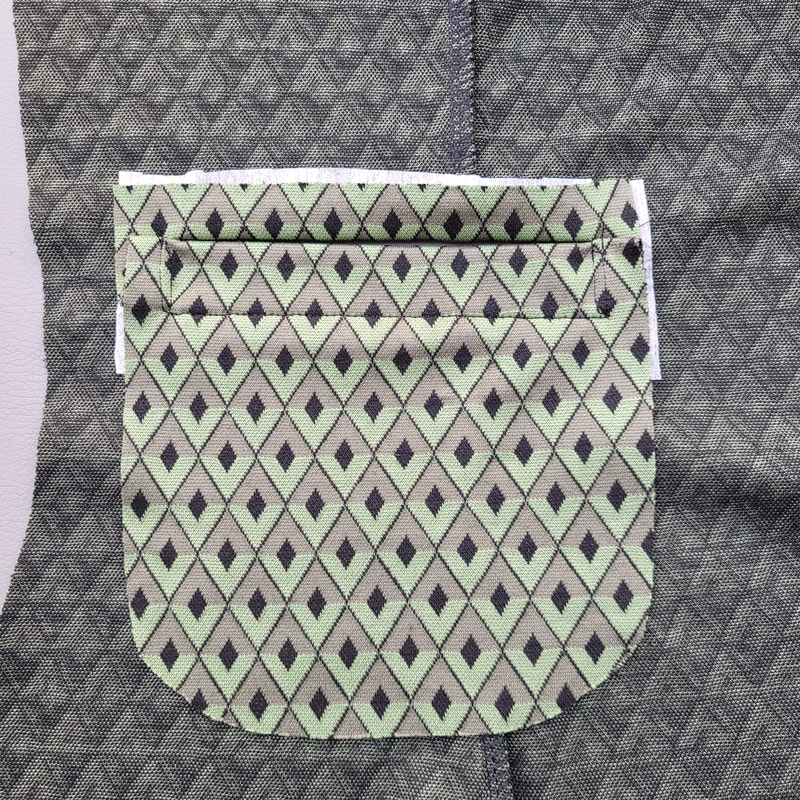
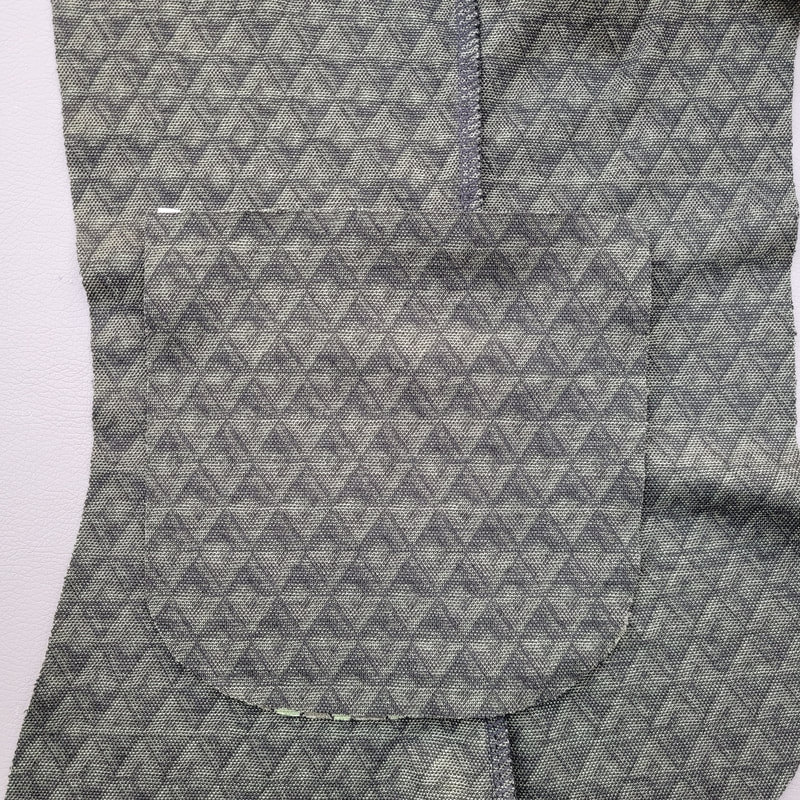
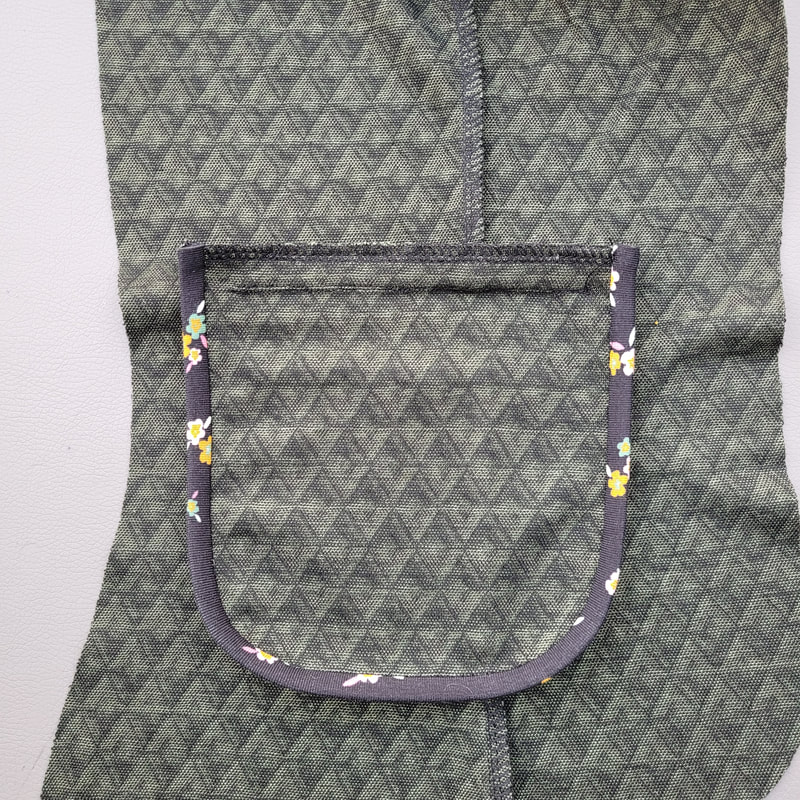
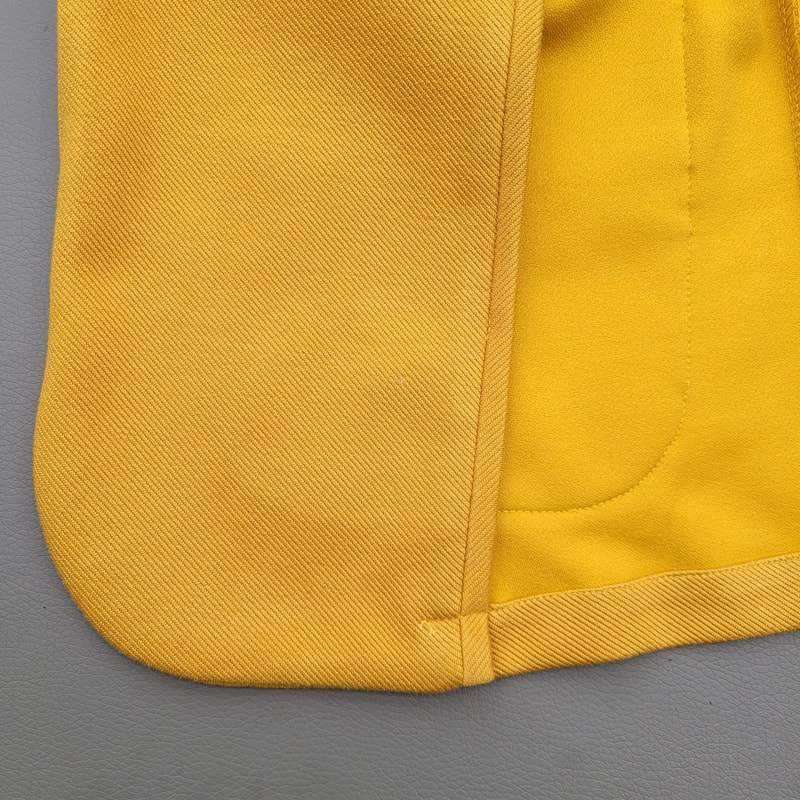
5.
Zakken
Pockets

De opgestikte zakvariatie
The patch pocket

Picture
5a.
Speld en stik de zakvoering delen tegen de zakdelen. Laat een stukje open in het midden om de zak te kunnen keren.
Pin and sew the pocketlining parts to the pocket parts. Leave an opening in the middle to turn the pocket later. 
Picture
5b.
Vouw de zak + zakvoering op de vouwlijn om met de goede kanten tegen elkaar. Speld en stik de delen tegen elkaar. 
Fold the pocket + pocketlining on the foldline right sides together. Pin and sew the parts together. 
Picture
5c.
Tip: gebruik eventueel het patroondeel van de zak zonder naadtoeslag als stiksjabloon.
Tip: optionally trace the patternpart of the pocket without seamallowance as a stitchguide. 
Picture
5d.
Strijk de naden rondom open. Knip de naad van de rondingen kort af.
Iron open the seams all around. Cut the curved seams short.
Picture
5e.
Keer de zak en strijk plat. Naai de opening aan de binnenkant met de hand dicht.
Turn the pocket and iron flat. Handsew the opening on the inside. 
Picture
5f.
Stik de zakken op de op het patroon aangegeven positie op de voorpanden, 0,5cm van de rand.
Topstitch the pockets on the indicated position of the front parts on 0,5cm from the edge.

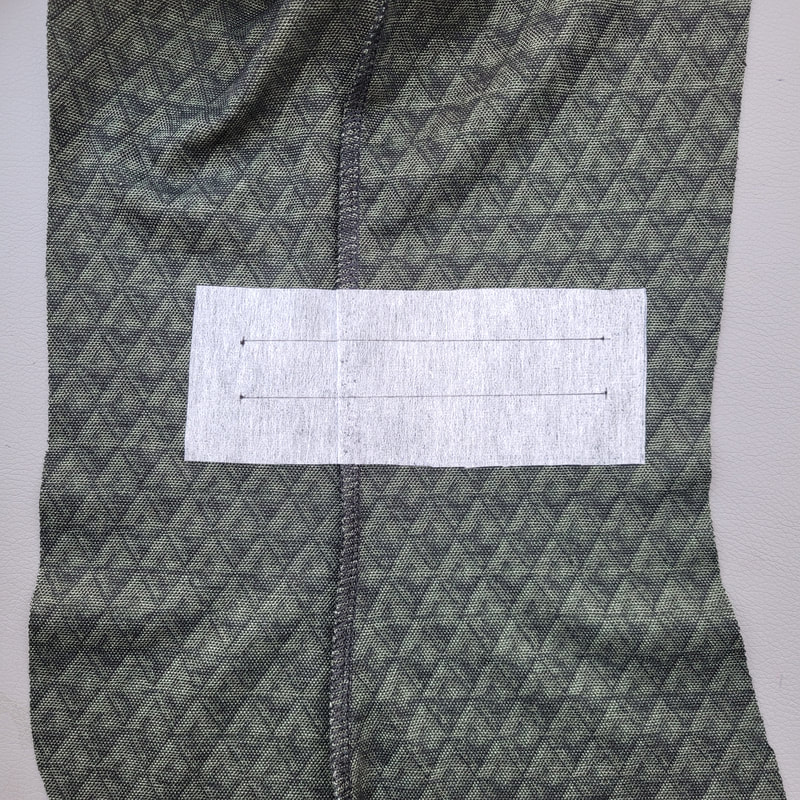
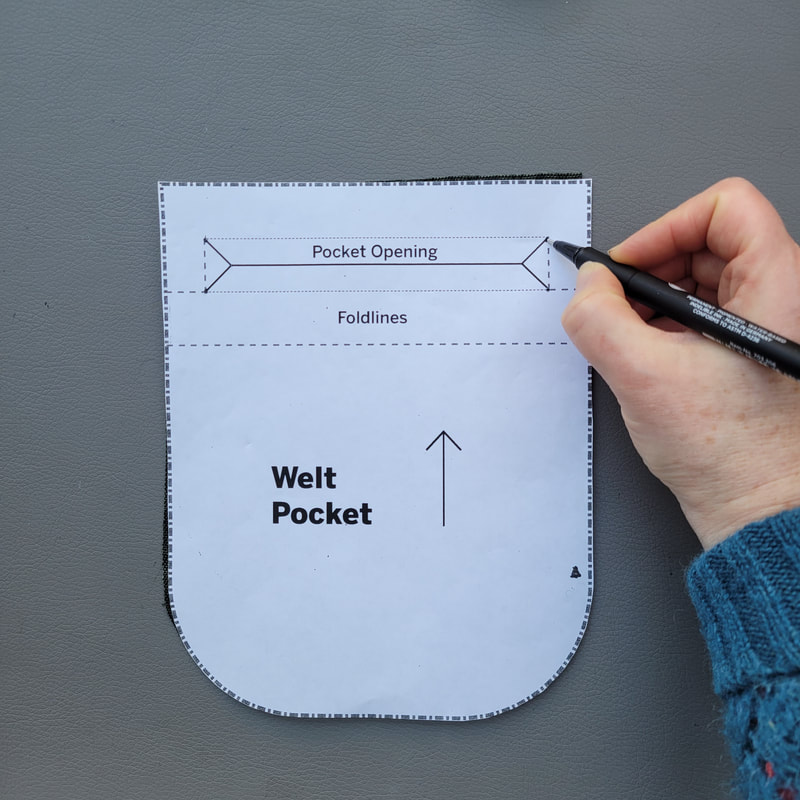
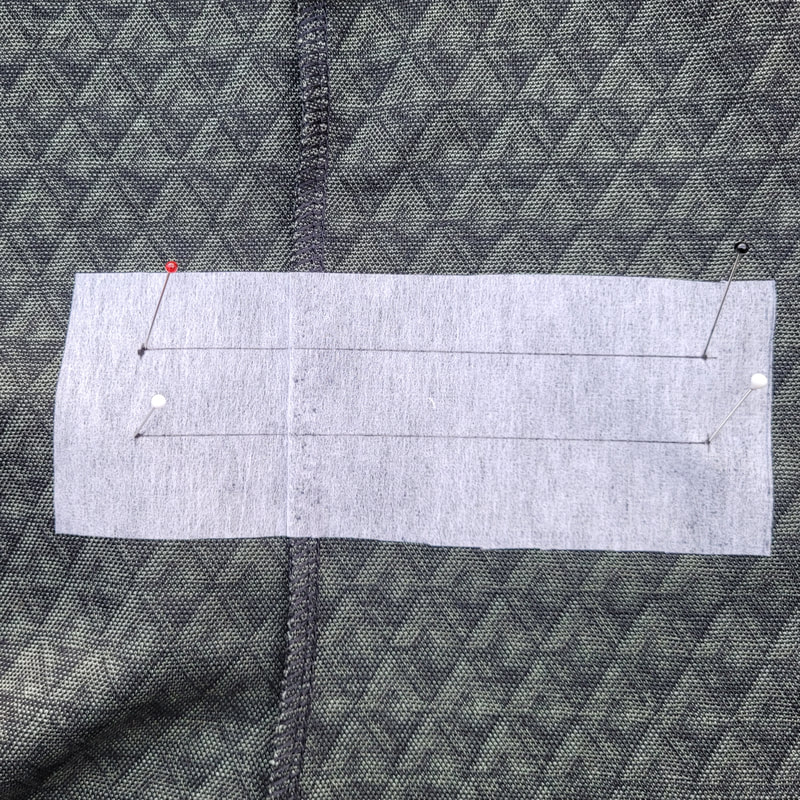
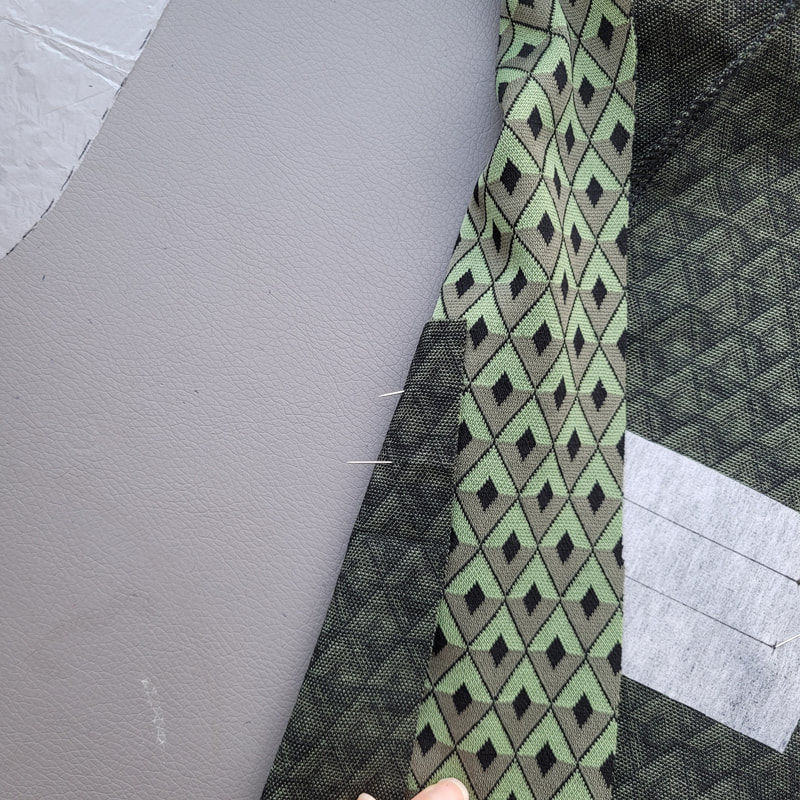
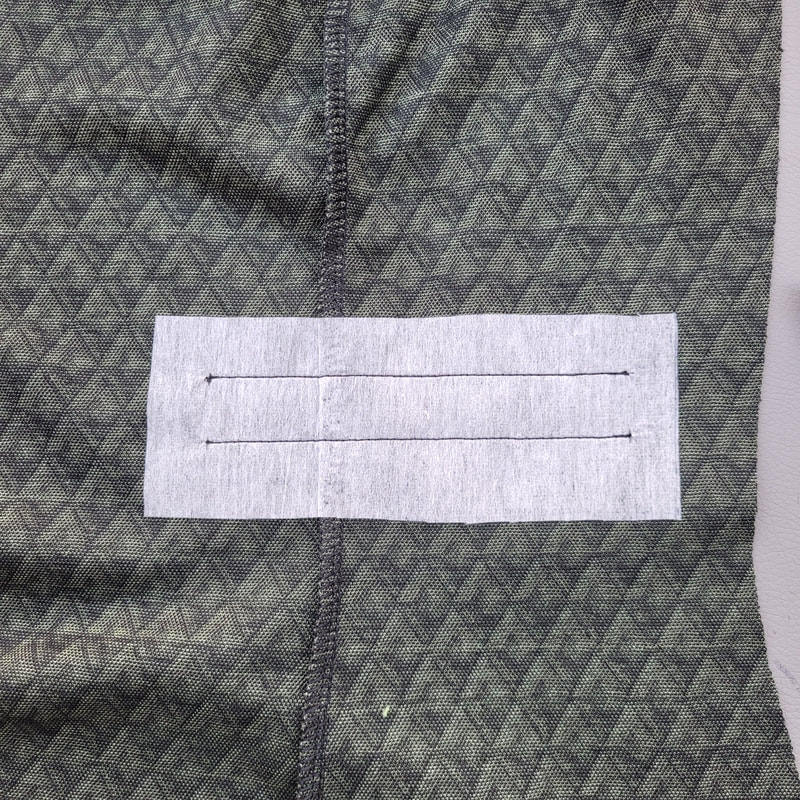
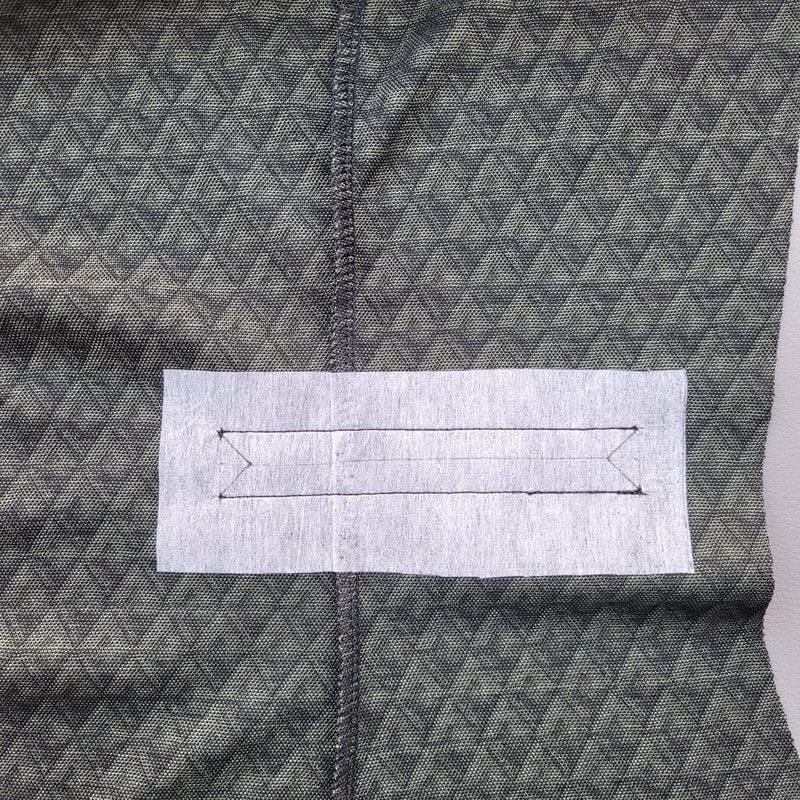
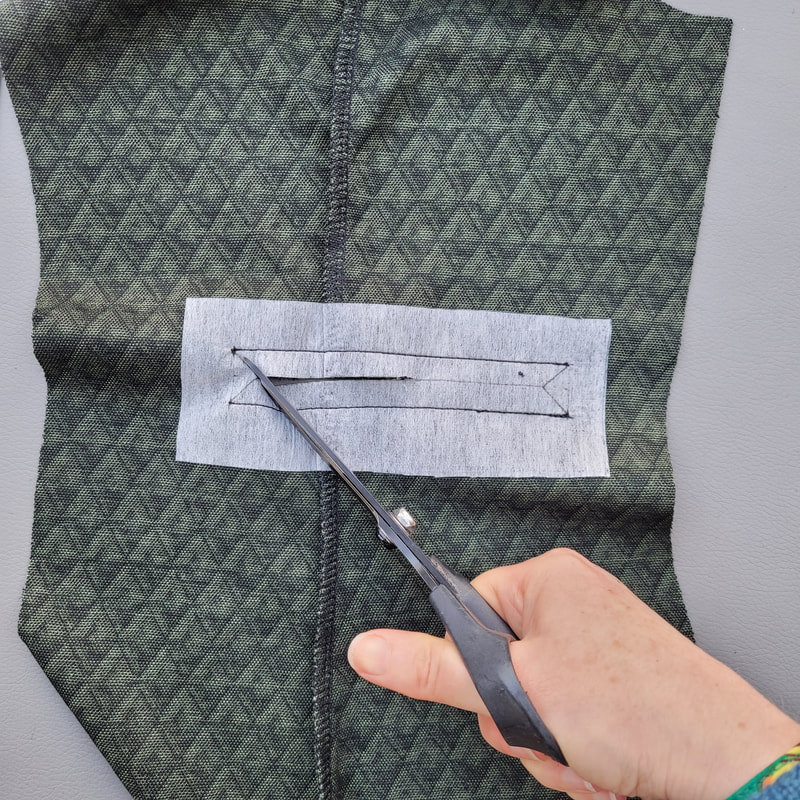
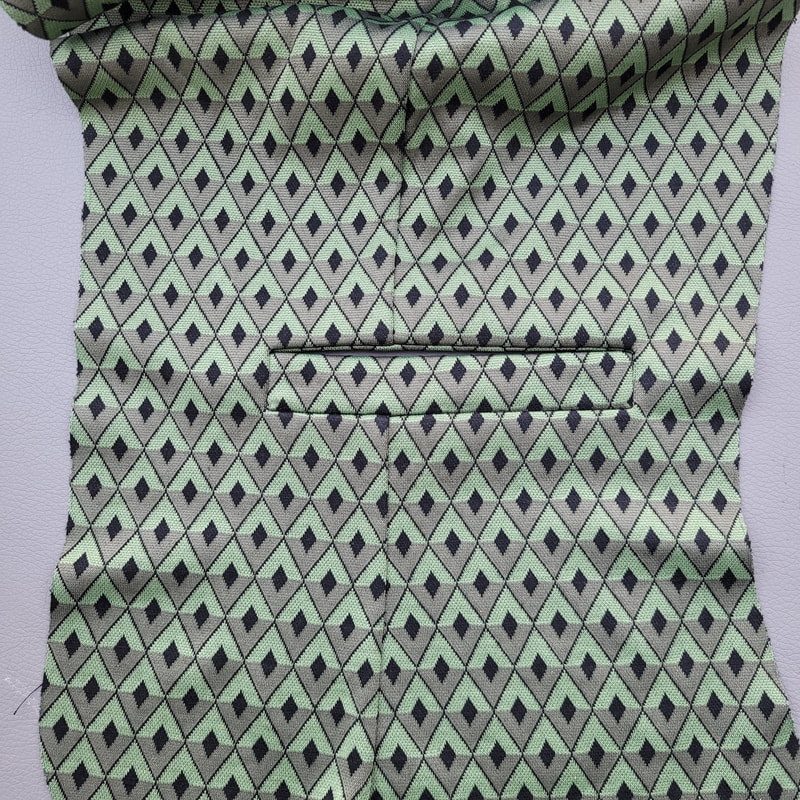
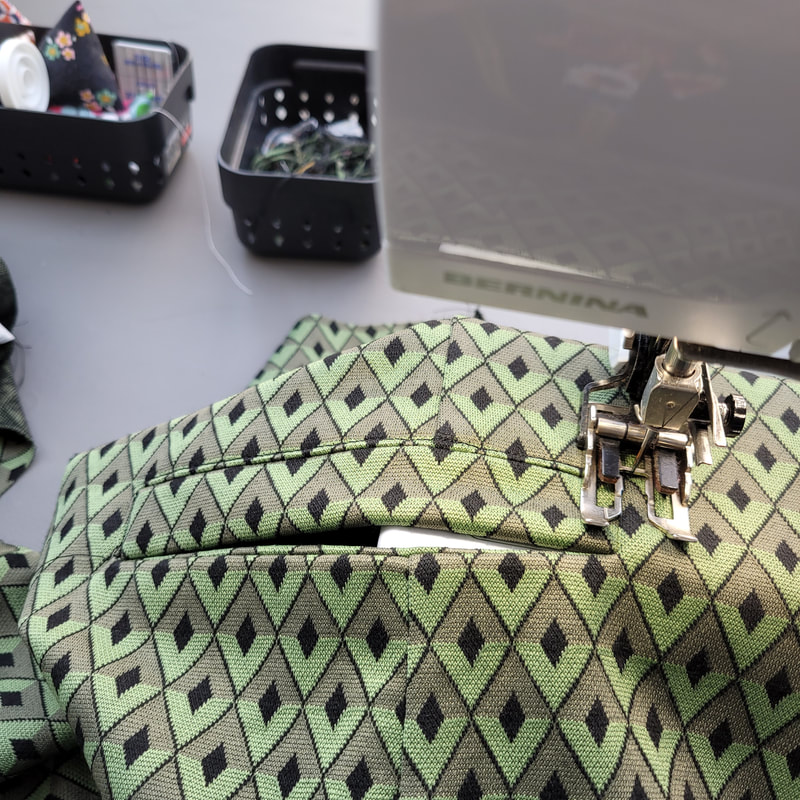
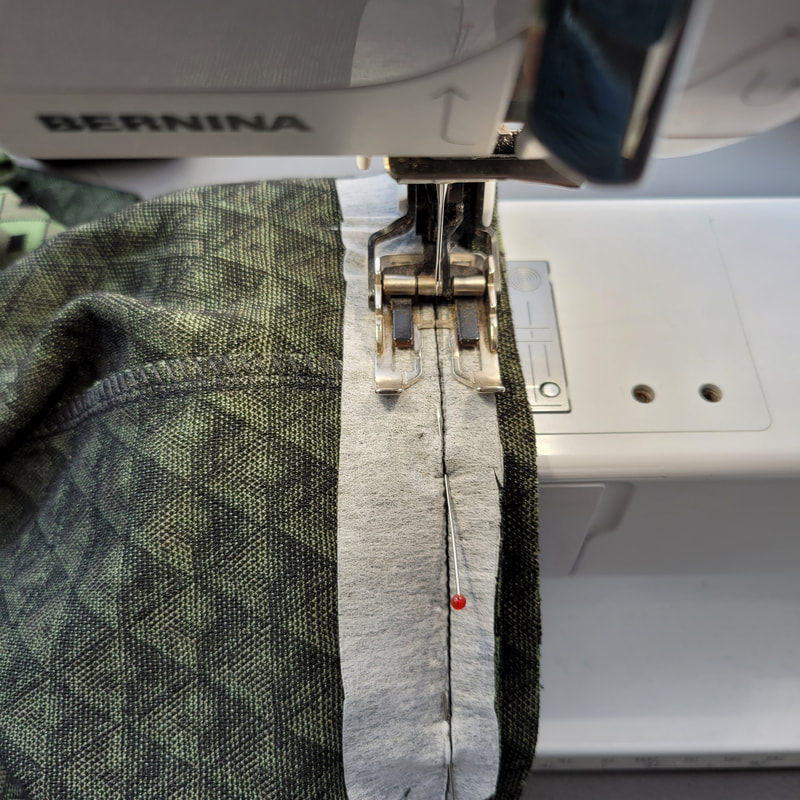
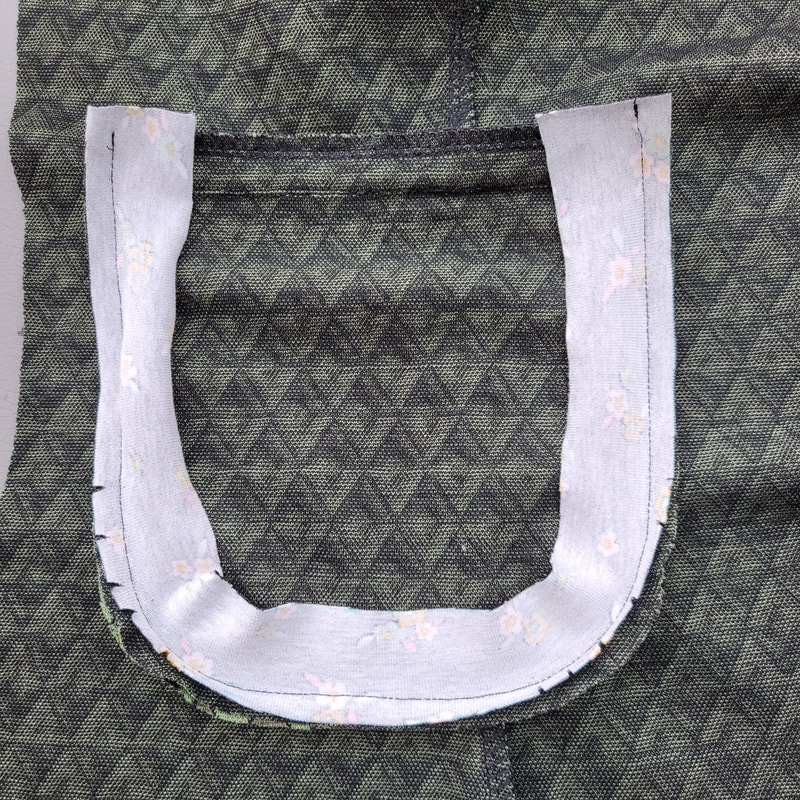
De strookzak variatie
Weltpocket variation

Picture
5g.
Strijk een strook niet rekbare plakvlieseline tegen de achterkant van het voorpand. De strook heeft de grootte van het strookzak deel tot de stippellijn.
Iron on a strip of non-stretch interfacing to the back of the front piece. The strip has the size of the welt pocket piece up to the dotted line.
Picture
5h.
Neem de hoeken van de zakopening over op de achterkant van de zakdelen. Leg de zakdelen met de goede kant tegen de goede kant van het voorpand.
Transfer the corners of the pocket opening on to the back of the pocket pieces. Place the pocketparts with the right side against the right side of the front pieces.
Picture
5i.
Neem ook de hoeken van de zakopening over op de plakvlieseline en trek 2 horizontale lijnen van hoek tot hoek. Steek een speldje in elke hoek.
Also transfer the corners of the pocket opening onto the interfacing and draw 2 horizontal lines from corner to corner. Place a pin in every corner.
Picture
5j.
Steek deze door de hoeken van de zakdelen en steek weer terug. Het zakdeel is nu precies op de juiste positie vastgespeld.
Insert this through the corners of the pocket parts and insert it back again.  The pocket part is now pinned in exactly the right position.
Picture
5k.
Stik over de lijnen.
Sew over the lines.
Picture
5l.
Neem de kniplijnen over van het patroondeel op de vlieseline.
Copy the cutting lines from the pattern part onto the interfacing.
Picture
5m.
Knip de zakingang open gebruik makend van de kniplijnen. Knip 1 horizontale lijn in het midden en 4 diagonale naar de hoeken toe.
Cut the pocketopening using the cutting lines.
So 1 horizontal line and 4 diagonal corner lines.

Picture
5n.
Keer nu het zakdeel door de opening en strijk de naden open.
Turn the pocket part through the opening and iron open the seams.
Picture
5o.
Strijk de opening plat. Eventueel alvast de vouwlijn (zie patroondeel) platstrijken.
Iron the opening flat. Optionally iron flat the foldline (see patternpiece.)
Picture
5p.
Vouw de zak zodanig dat de vouwlijn aan de bovenrand van de zakopening zit.
Fold the pocket in a way the foldline is positioned at the top of the pocketopening.
Picture
5q.
Speld en stik de driehoekjes (die zijn ontstaan door de zijkanten schuin in te knippen) tegen de zijkanten van het omhoog gevouwen zakdeel.
Pin and sew the triangles (created by cutting the sides diagonally) against the sides of the folded up pocket part.
Picture
5r.
Nu blijft het gevouwen deel op zijn plaats en zijn de zijkanten van de strook vastgestikt.
Now the folded part stays in place and the sides of the welt are sewn in place.
Picture
5s.
Stik de zijkanten en onderkant van de strook door.
Topstitch the sides and bottom of the welt.
Picture
5t.
De achterkant van de zak ziet er nu zo uit.
The back of the pocket now looks like this.
Picture
5u.
Leg het zak voeringdeel met de goede kanten tegen het zakdeel.
Place the pocketlining piece right sides together on the pocket piece.
Picture
5v.
Speld de bovenkanten van beide delen tegen elkaar op de bovenste zakopening lijn.
Pin the tops of both pieces together at the top pocketopening line.
Picture
5w.
Hiermee stik je de bovenrand van de zakopening vast aan de voeringzak.
This will attach the top edge of the pocket opening to the lining pocket.
Picture
5x.
Werk de bovenrand van de zak af met de overlockmachine. Je kunt nu de zakdelen rondom tegen elkaar stikken met de overlockmachine of je kunt deze rondom afbiezen. Stik in dit geval eerst een strook tricot of kant en klaar tricot biesband langs de zakdelen.
Finish the top edge of the pocket with the overlock machine. You can now sew the pocket parts together all around with the overlock machine or you can finish them by sewing binding all around. In this case, first sew a strip of jersey or ready-made jersey binding along the pocket parts.
Picture
5y.
Vouw deze om en stik door.
Fold it over and topstitch.
Picture
5z.
Voor je verder gaat met stap 6: Speld en stik de schoudernaden tegen elkaar en strijk deze open.
Before continuing with step 6: pin and sew the shoulderseams together and press open.

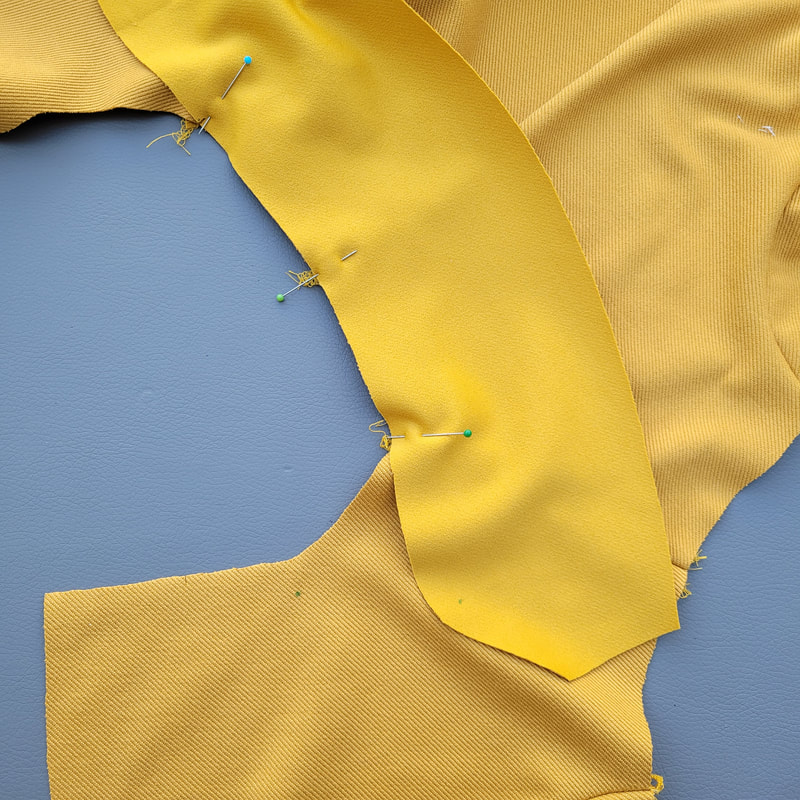
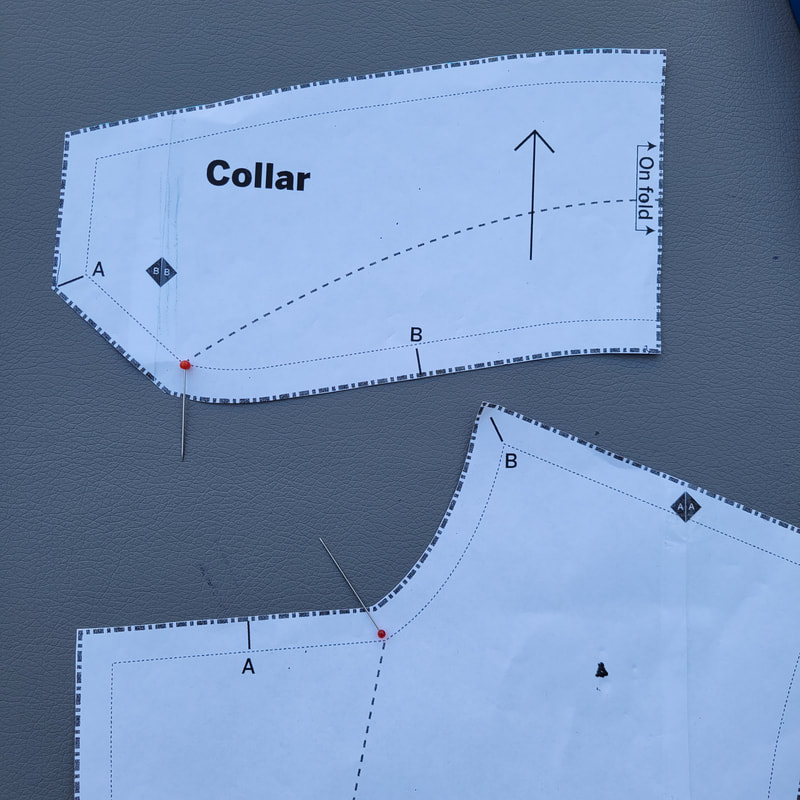
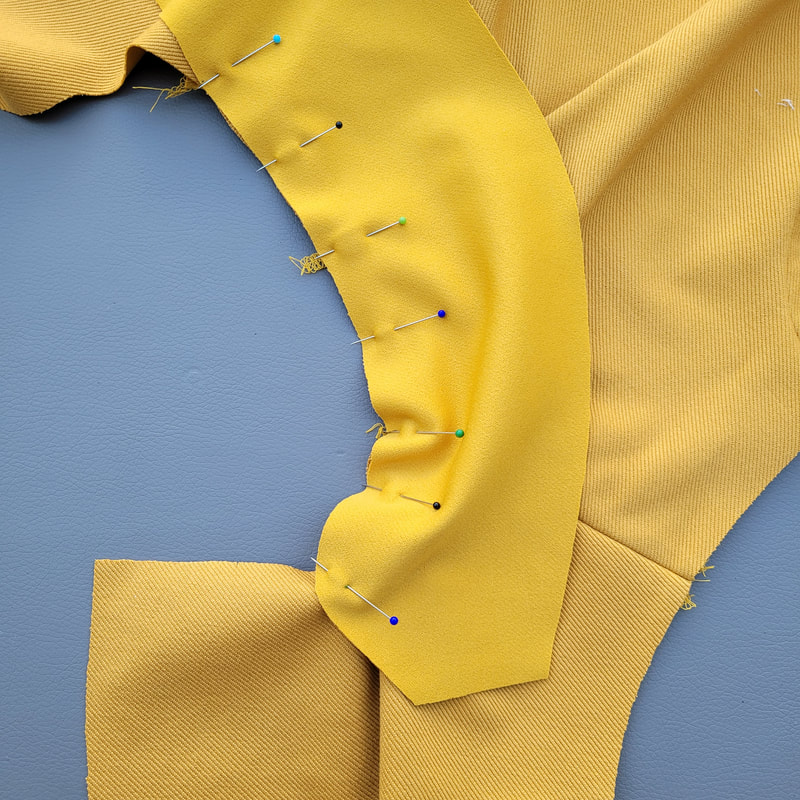
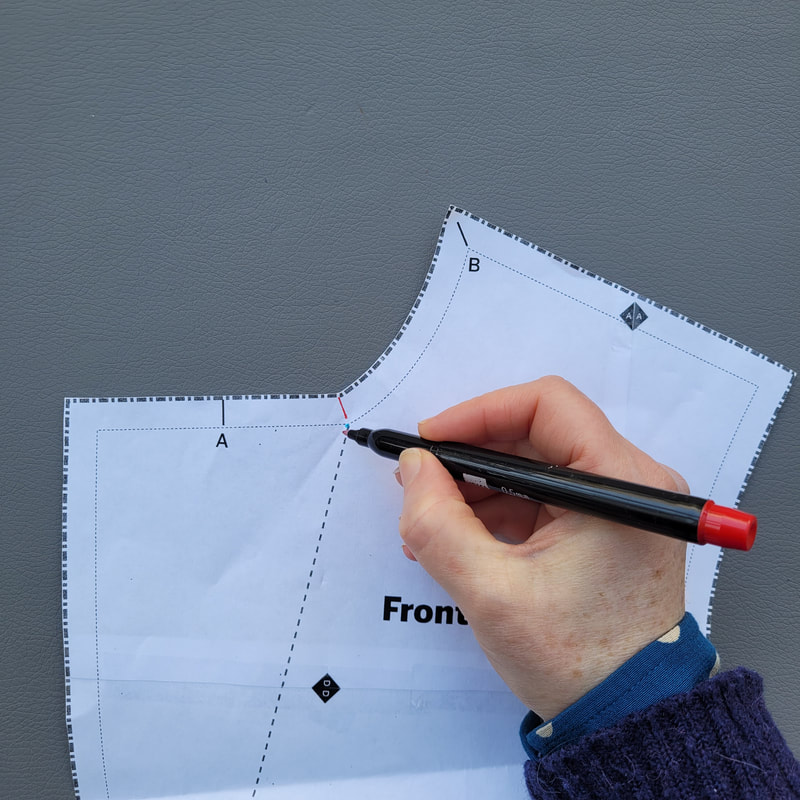
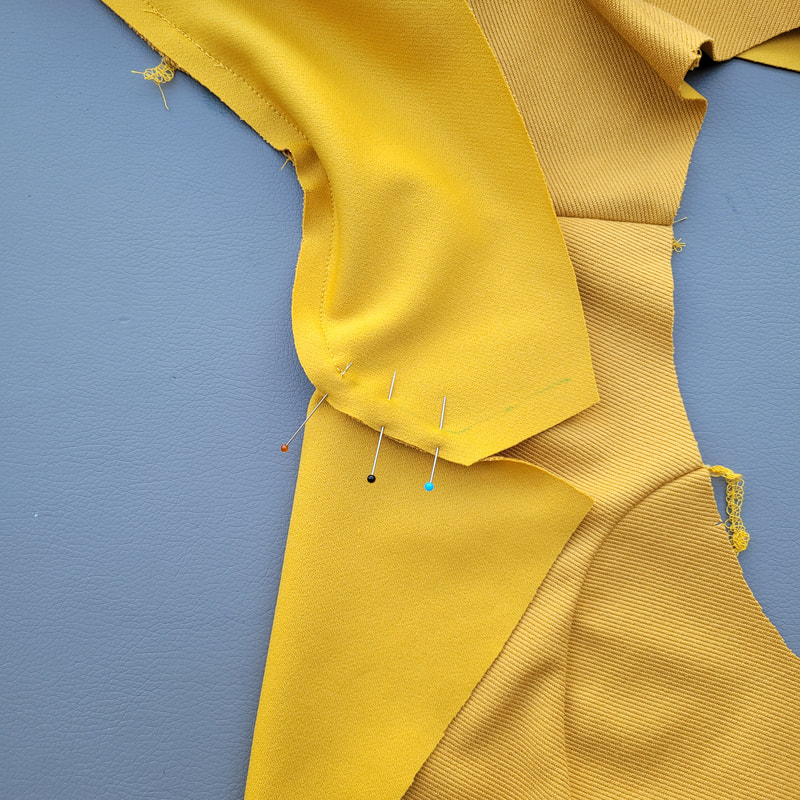
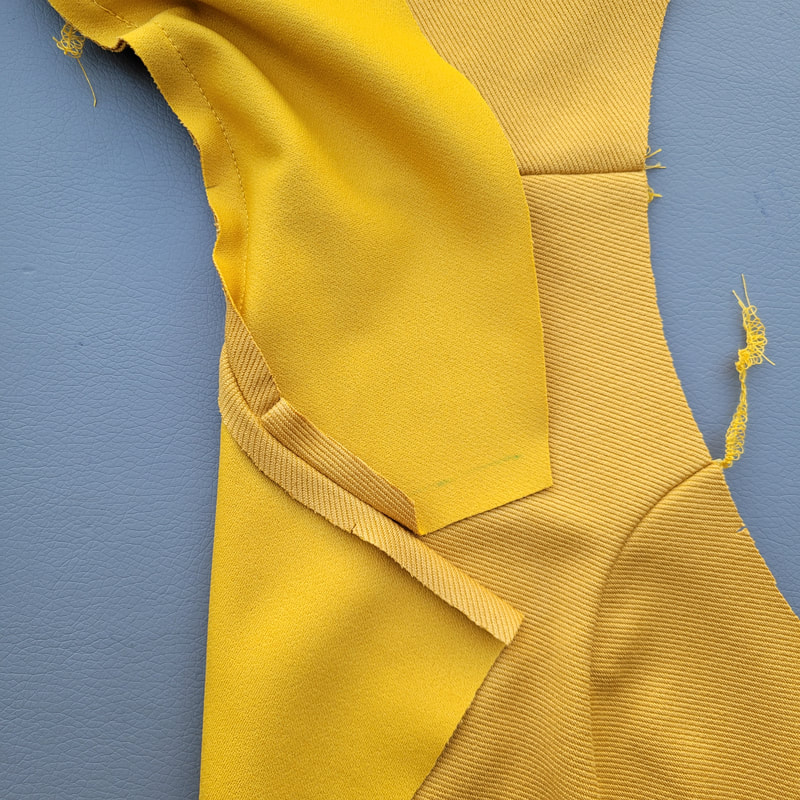
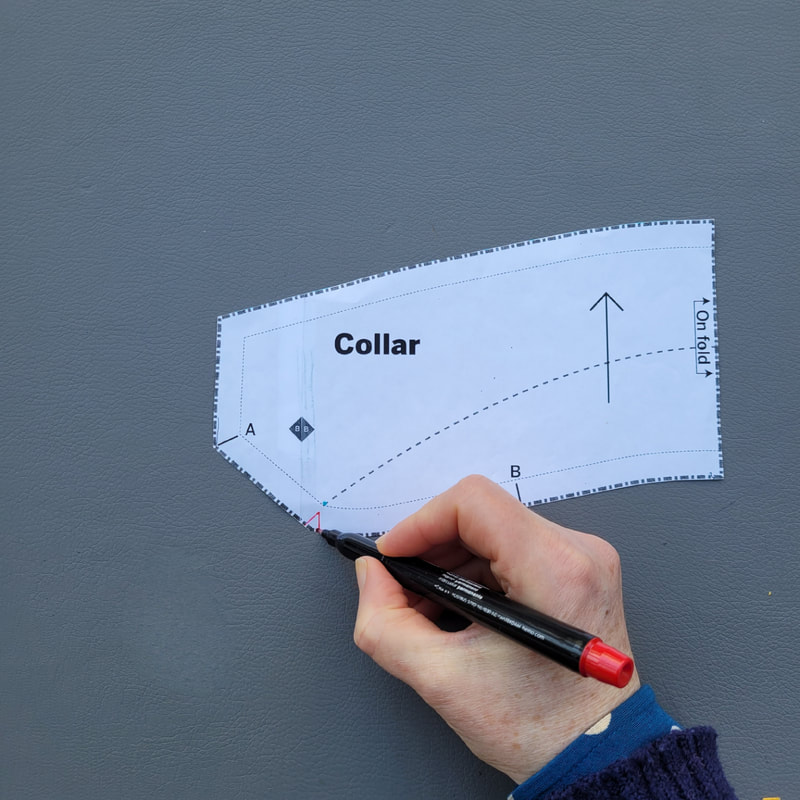
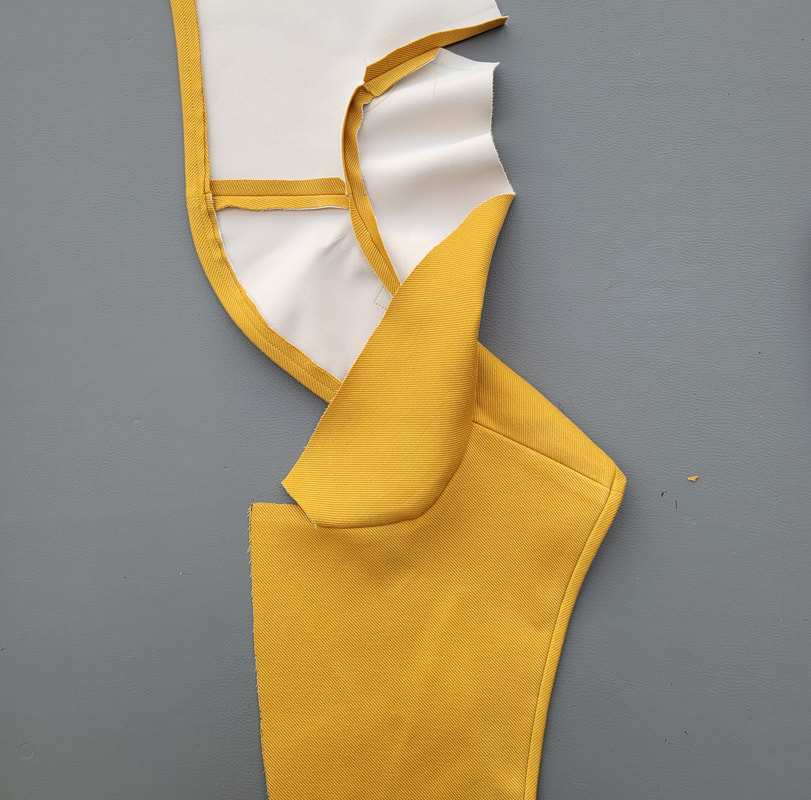
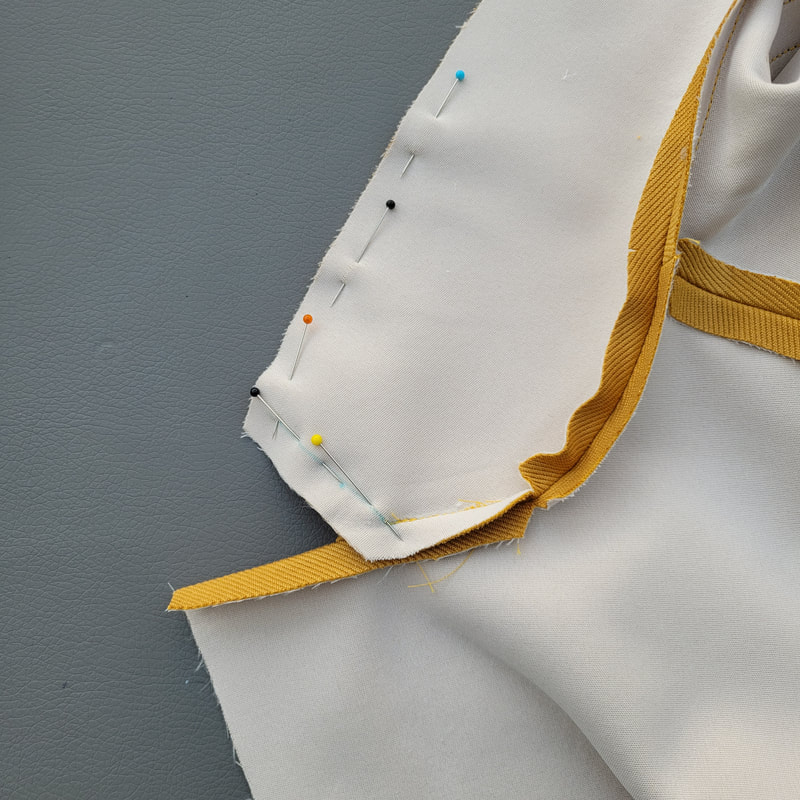
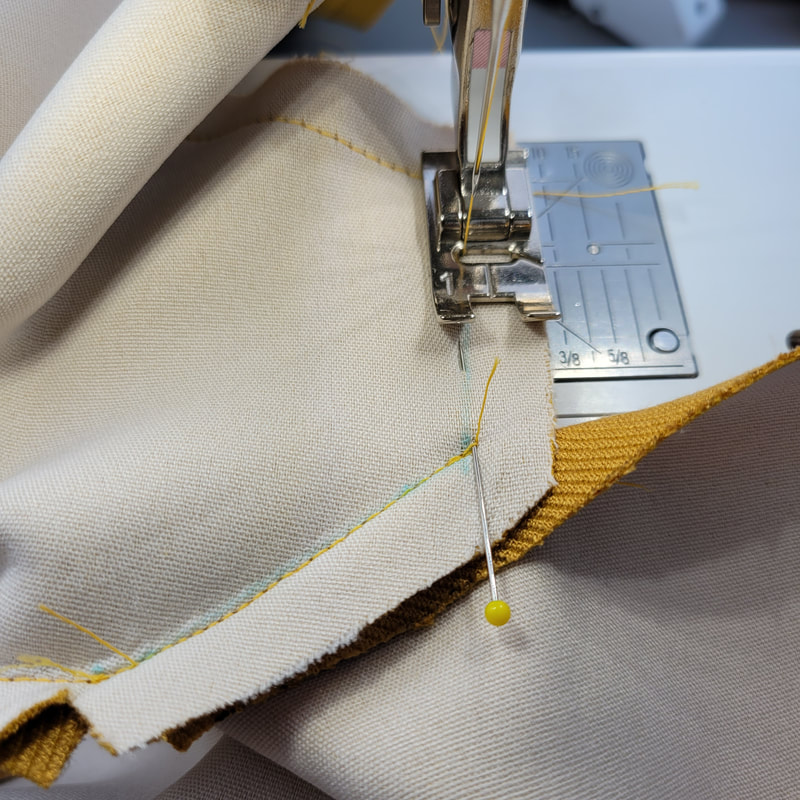
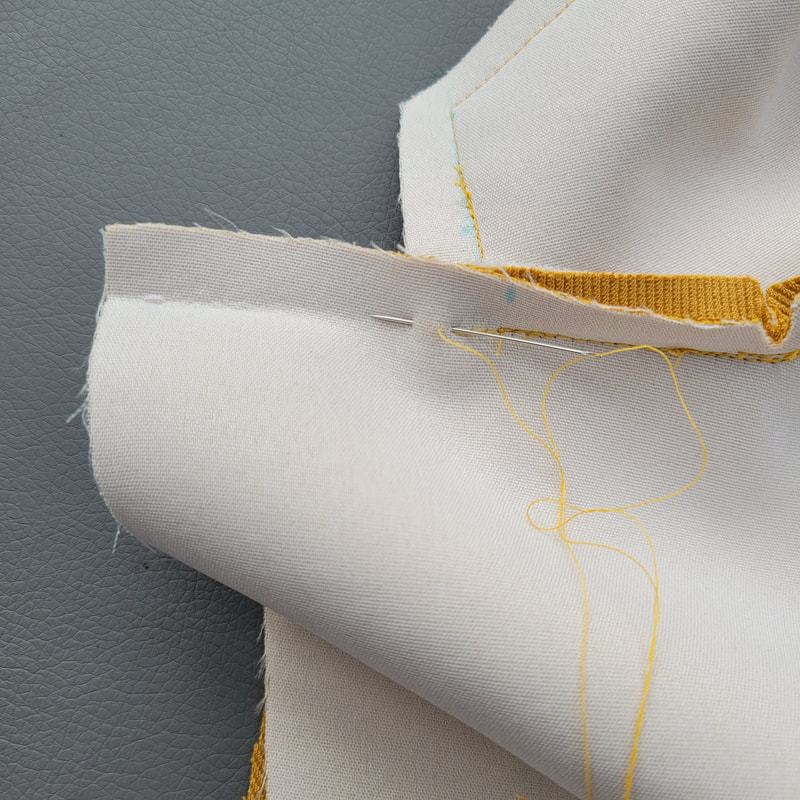
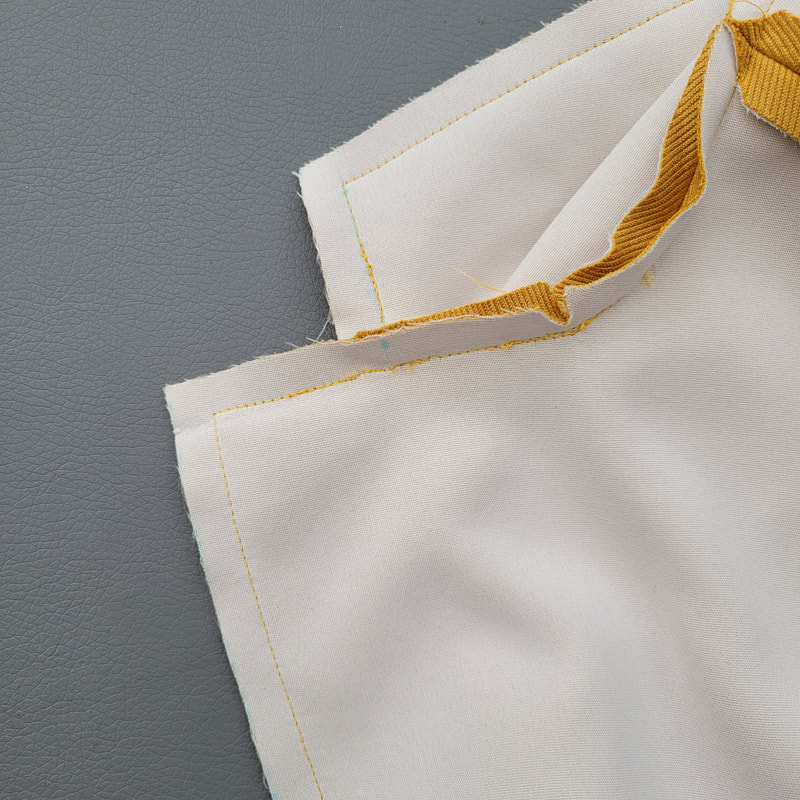
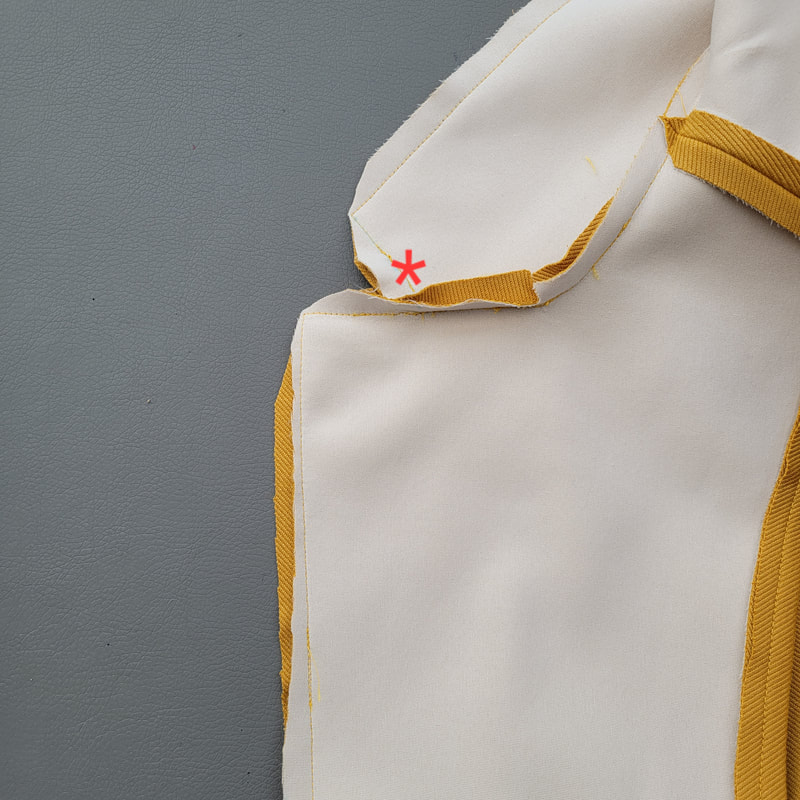
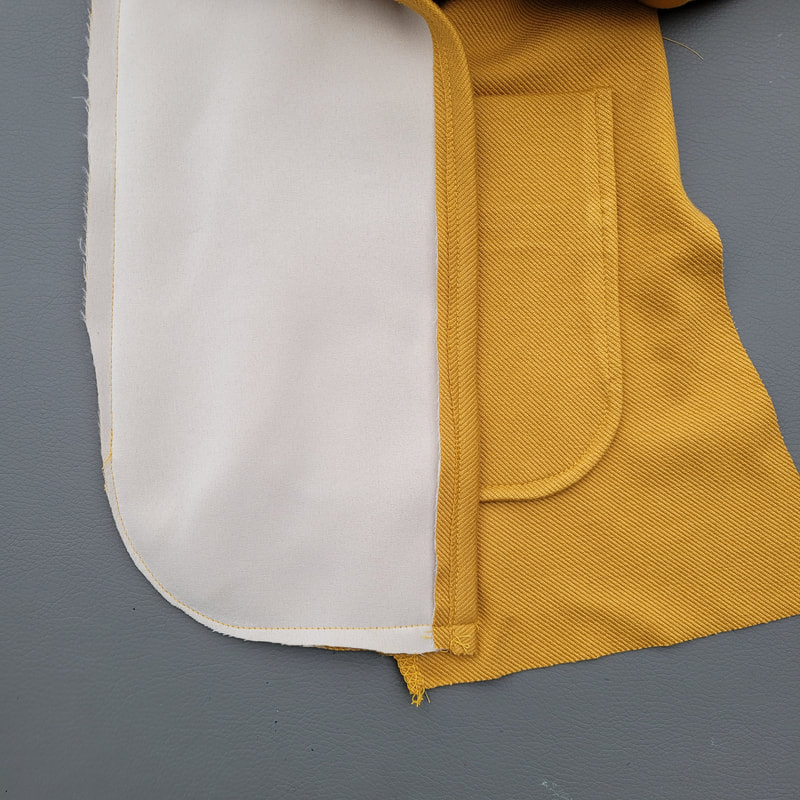
6.
Kraag en revers
Collar and lapels

Picture
6a.
Het aanzetten van de kraag:
Het niet verstevigde kraagdeel gaat tegen de hals van het jasje. (Het verstevigde deel gaat later tegen het beleg.)
Speld de volgende punten tegen elkaar:
-Het schoudertekentje van de kraag (b) tegen de schoudernaad (b).
-Het midden van de kraag tegen de midden- achter naad.
Attaching the collar:
The collar piece without  interfacing will be attached to the outer jacket. (The piece with interfacing will be attached to the facing later).
Pin the following points together:
-The shoulder mark (b)of the collar to the shoulderseam (b).
- The middle of the collar  to the midback seam.

Picture
6b.
En speld vervolgens:
-Het punt waar de vouwlijn begint op kraag tegen het vouwlijn punt van de hals (hier aangeduid met het knopje van de speld op het patroon).
And continue to pin:
-The point where the fold line starts on the collar to the foldline point of the neck (indicated here by the top of the pin on the pattern).

Picture
6c.
Naai nu de kraag de kraag vast van vouwlijn punt tot vouwlijn punt.
Attach the collar with the sewing machine from foldline point to foldline point.
Picture
6d.
Geef een knipje in de naad (op de foto zie je waar het knipje moet).
Clip the seam (on the image you see where to cut).
Picture
6e.
Na het inknippen van de naad kunnen nu de 2 delen ten opzicht van elkaar gedraaid worden en kan punt a (zie patroon) van de kraag tegen punt a (zie patroon) van de revers gespeld worden.
Begin met naaien vanaf punt a (blauwe speld) en eindig precies in de laatste steek van de zojuist gestikte naad (oranje speld).
After cutting the seam, the 2 parts can now be rotated in relation to each other and point a (see pattern) of the collar can be pinned against point a (see pattern) of the lapel.
Start sewing from point a and end exactly in the final stitch of the seam that has just been sewn.

Picture
6f.
Strijk de naad open.
Iron open the seam.
Picture
6g.
Knip op dit punt in de naad een driehoekje stof weg.
Cut away a small triangle of fabric at this point in the seam.
Picture
6h.
Speld en stik het verstevigde kraagdeel tegen de hals van het beleg op dezelfde manier.
Pin and sew the collarpart with the lining to the neck of the facing in the same way.
Picture
6i.
Speld en stik de onderkraag (die vastzit tegen het jasje) tegen de bovenkraag (die vastzit aan het beleg) beleg met de goede kanten tegen elkaar tot aan punt a.
Pin and sew the under collar (which is attached to the jacket) to the top collar (which is attached to the facing) right sides together up to point a.
Picture
6j.
Stik de kraagdelen tegen elkaar.
Sew the collarparts together.
Picture
6k.
Nu moeten de revers gestikt worden. Eigenlijk moet begonnen worden met stikken onder de opengelegde naad. Daar kom je met het naaivoetje niet makkelijk bij.
Naai daarom de eerste paar steekjes met de hand. Met een gewone naald kom je wel op het punt waar de naden precies op elkaar komen.
Now the lapels need to be sewn. The  sewing should start under the exposed seam. This is not easy to reach with the presser foot.
Therefore, sew the first few stitches by hand.  With a regular needle you will get to the point where the seams meet exactly.

Picture
6l.
Als het lastige stukje dicht zit kun je de revers, de rand voor en ronding onder verder tegen elkaar spelden en stikken. Begin met stikken aan de onderkant van het jasje
Once the difficult part is sewn, you can further pin the lapel, the front edge and the curve at the bottom together and sew it. Start sewing at the bottom of the jacket.
Picture
6m.
Knip de punten van kraag en revers schuin af.
Knip ook de punten van de kraag die kruisen met de spiegelnaden schuin af (zie sterretje).
Cut the points of the collar and lapel diagonally.
Also cut the points of the collar that intersect with the mirror seams diagonally (see asterisk).

Picture
6n.
Knip de naad in de ronding onder kort af.
Cut the seam in the curved bottom short.
Picture
6o.
Strijk de naad van de kraag, revers, voorkant en onderkant open op een mouwplankje.
Iron open the seam of the collar, lapel, front and bottom on a sleeve board.
Picture
6p.
De halslijn en spiegelnaad (zie sterretje) van jasje en beleg en de zijn nog los van elkaar. Je kunt in de naad de twee lagen vastzetzetten met naald en draad. Zet ook het beleg vast in de schoudernaad.
The neckline and mirror seam (see asterisk) of the jacket and facings are still separate.  You can secure the two layers in the seam with a needle and thread. Also secure the facing in the shoulder seam.

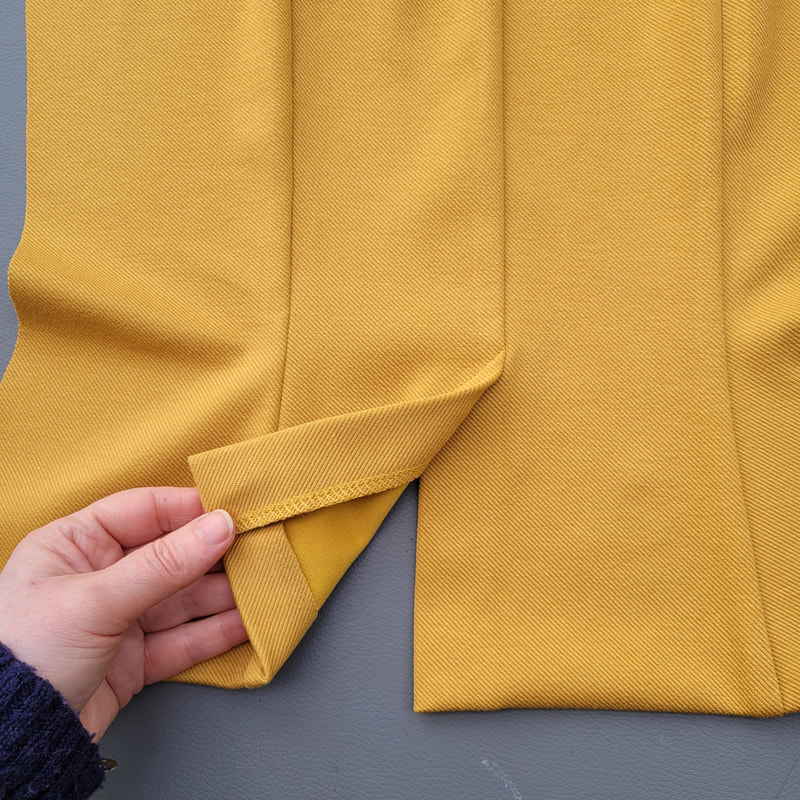
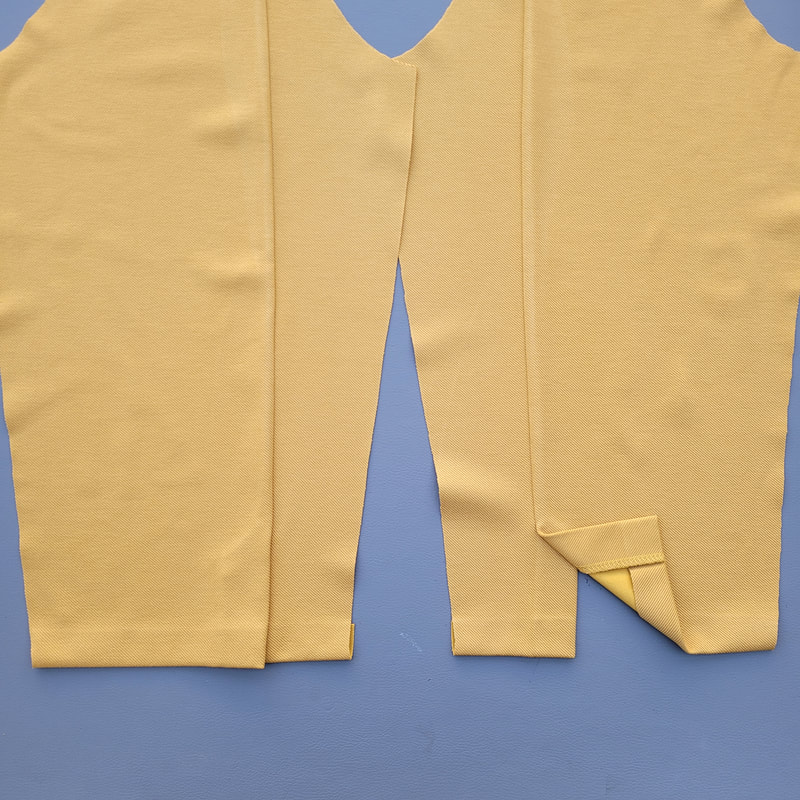
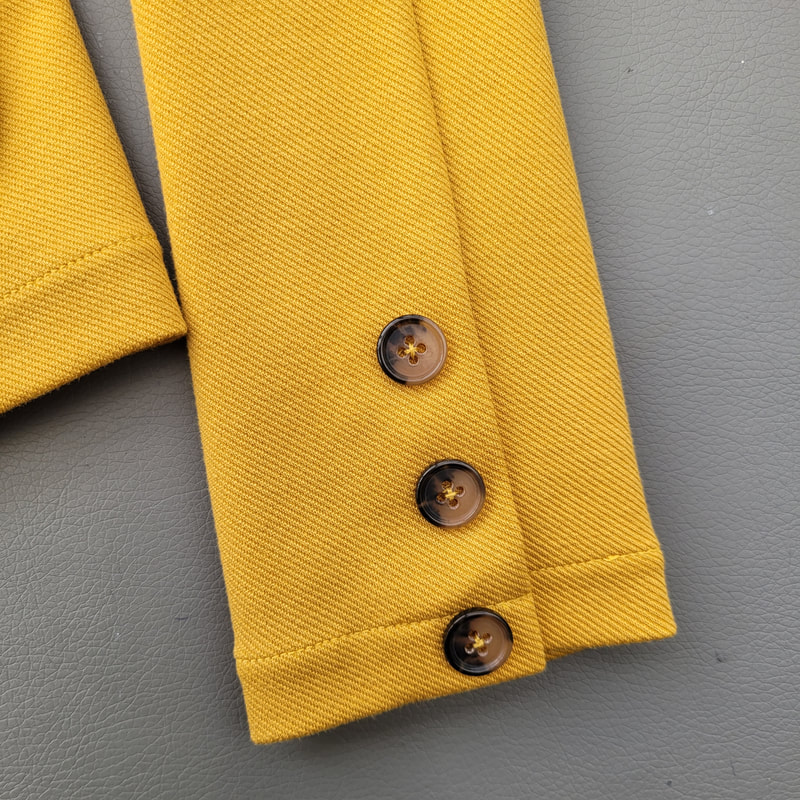
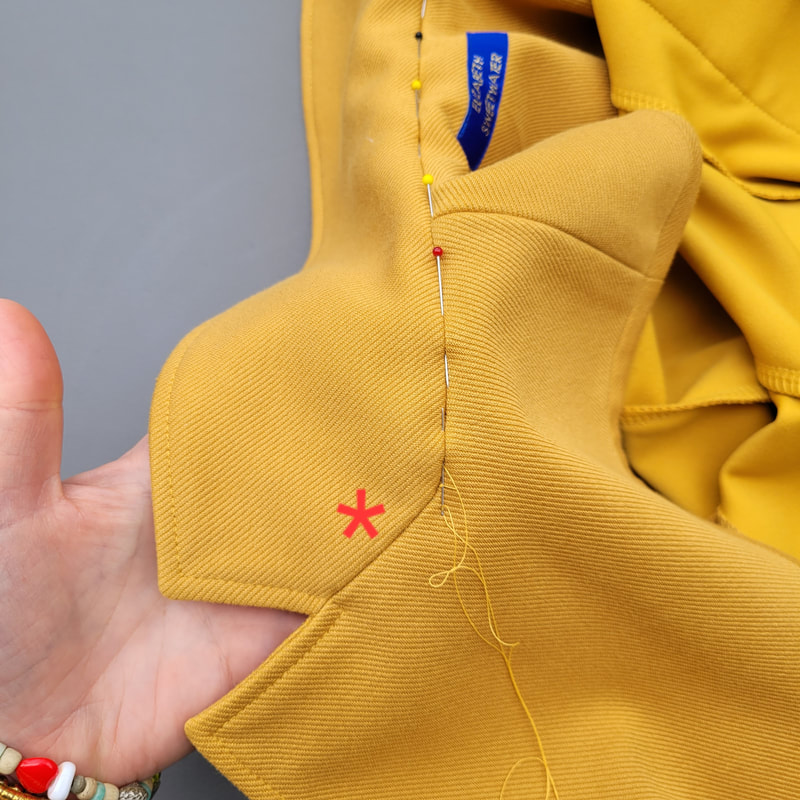
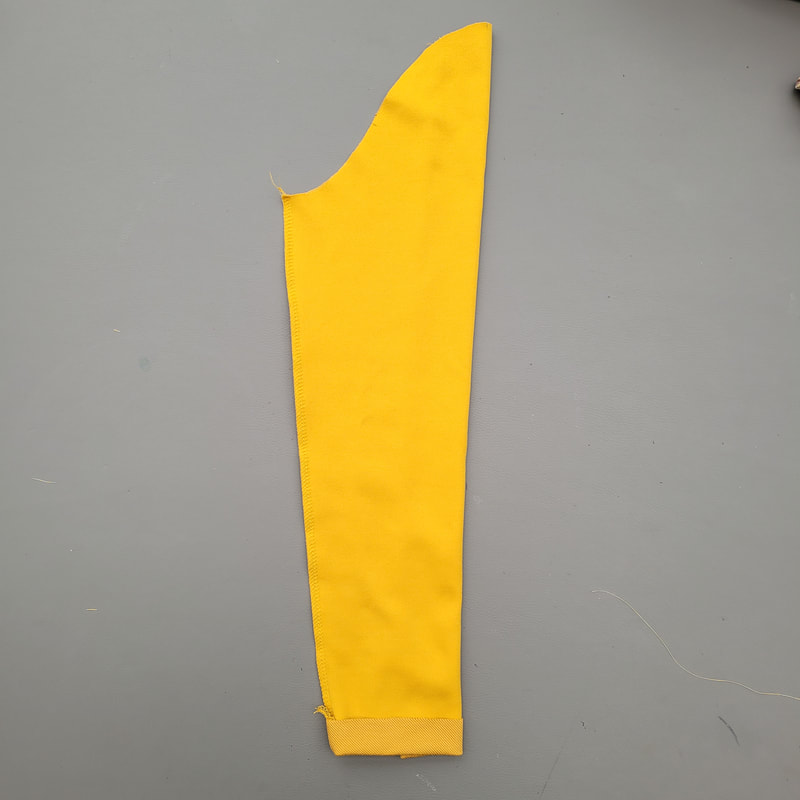
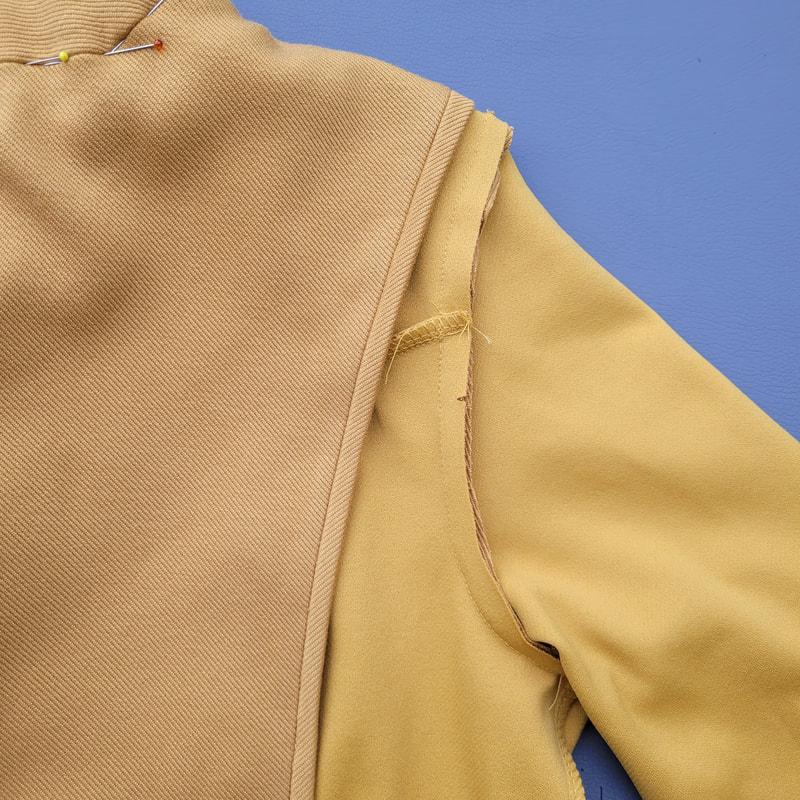
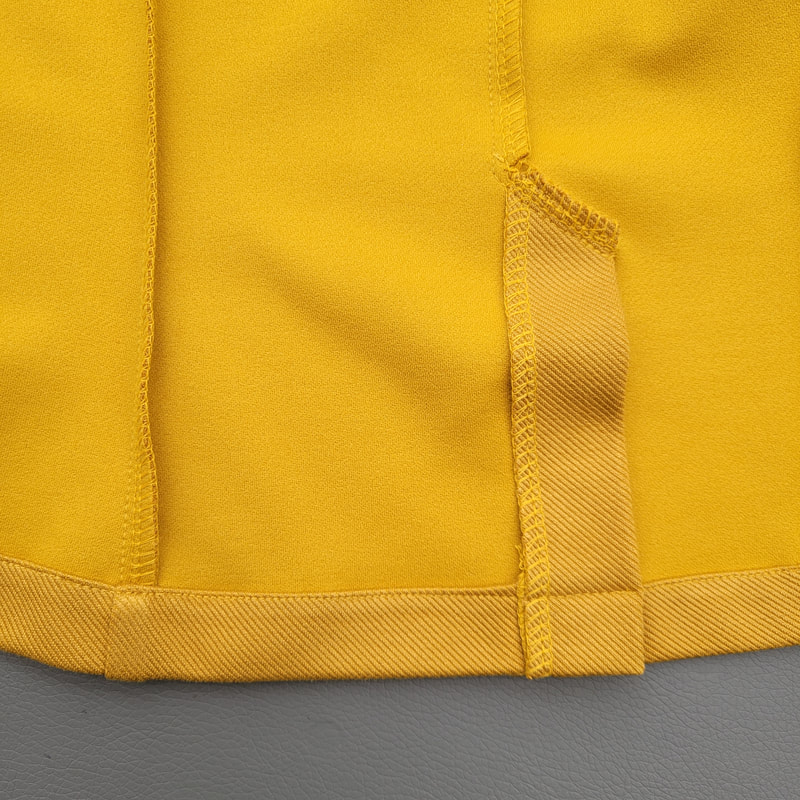
7.
Mouwen en zomen
Sleeves and hems

Picture
7a.
Speld en stik met de overlockmachine de zijnaden dicht.
Pin and sew with the overlockmachine the sideseams.
Picture
7b.
Speld en stik met de overlockmachine de mouwnaden dicht.
Pin and sew with the overlockmachine the sleeveseams.
Picture
7c.
Speld de mouw in het armsgat, gebruik de kniptekens op het patroon. De ruimte tussen de kniptekens is iets ruimer in de mouw dan in het armsgat. Deze ruimte moet gelijkmatig verdeeld worden. Zet de mouw eerst in met de naaimachine, zijnaad en mouwnaad komen op elkaar.
Pin the sleeve into the armhole, using the  marks on the pattern.The space between the marks is slightly wider in the sleeve than in the armhole. This space must be distributed evenly.  First insert the sleeve with the sewing machine, the side seam and sleeve seam are sewn together.
Picture
7d.
Werk vervolgens af met de overlockmachine.
Then finish with the overlock machine.
Picture
7e.
Vouw een randje van 0,5cm in aan de onderkant van de mouwen en het jasje en strijk deze.
Fold over a 0.5cm edge at the bottom of the sleeves and jacket and iron.
Picture
7f.
Vouw nogmaals 2cm in en speld de zomen. Begin met het naaien van de zomen bij de split.
Fold in another 2cm and pin the hems.
Start sewing the hems at the slits.

Picture
7g.
En eindig bij de deelnaad. De zoom loopt een stukje door onder het beleg.
And end at the dividing seam. The hem is continuing a bit under the facing.
Picture
7h.
Vanaf de deelnaad stik je de voorpanden, revers en kraag door op ongeveer 0,5cm van de rand.
From the dividing seam topstitch the front parts, lapel and collar on approx 0,5cm from the edge.
Picture
7i.
Maak 2 horizontale knoopsgaten in het rechtervoorpand. (Vanuit jezelf bekeken).
Naai 2 knopen aan op het linkervoorpand.
Naai ook de 3 knopen op het mouwsplit mocht dit nog niet gebeurd zijn.
Make 2 horizontal buttonholes on the right front piece. (Viewed from your perspective).
Sew 2 buttons on the left front piece.
Also sew 3 buttons on the sleeve slt if this hasn't been done yet.

Picture
7j.
Nu nog 1 keer goed strijken en je blazer is klaar.
Tip: gecombineerd met de easy fit trousers heb je een geweldig pak.
One more final iron and your blazer is done!
Tip: combined with the easy fit trousers it will make a great suit!


0 Comments


Leave a Reply.

    Picture

    For all the latest patterns to buy visit my Webshop.

Powered by Create your own unique website with customizable templates.
  • Tutorials
  • Movies
  • Happy Sewers
  • About