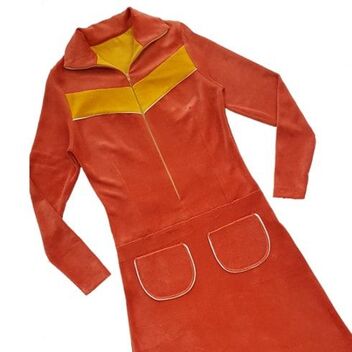
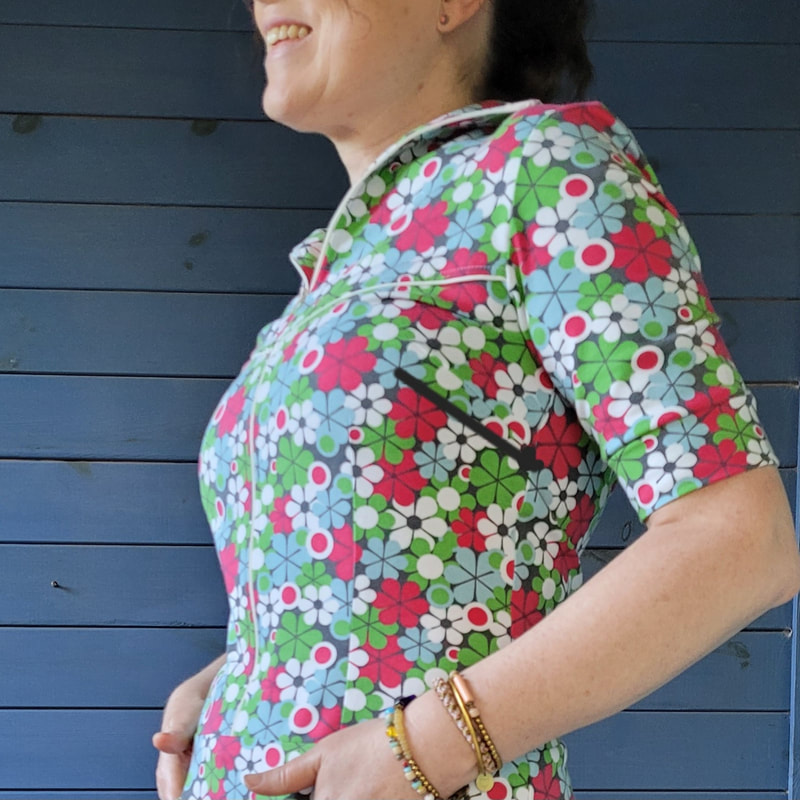
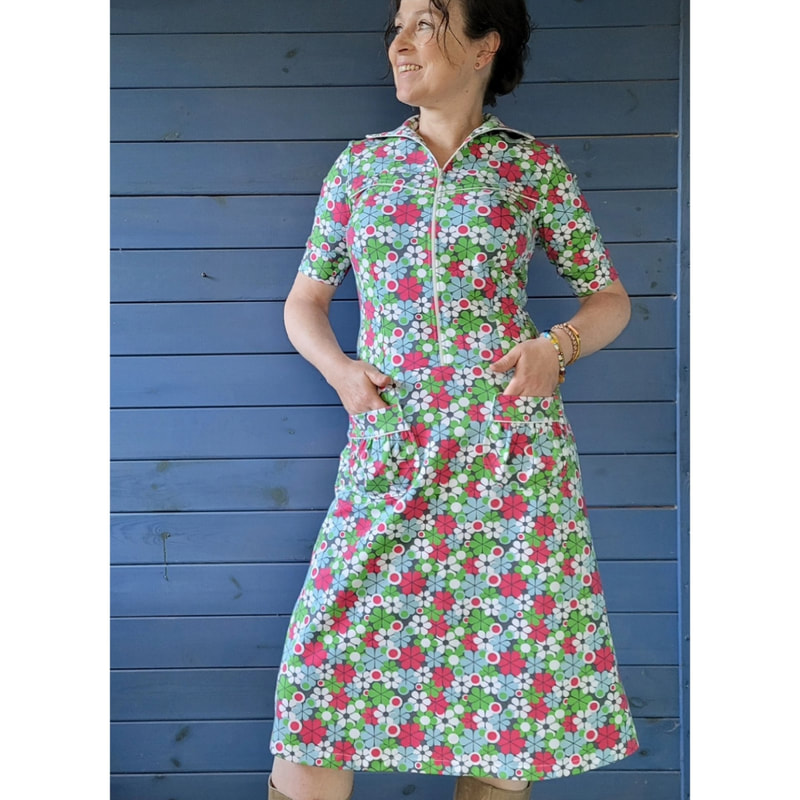
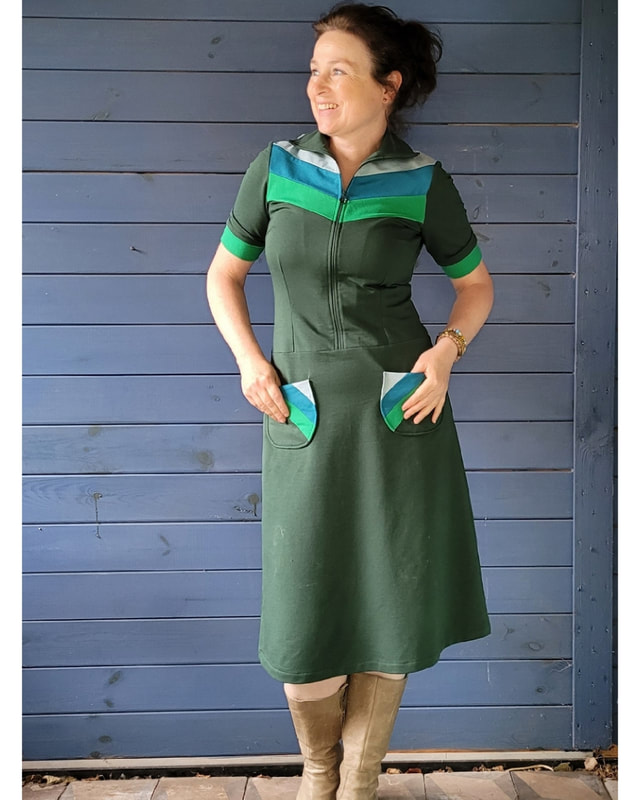
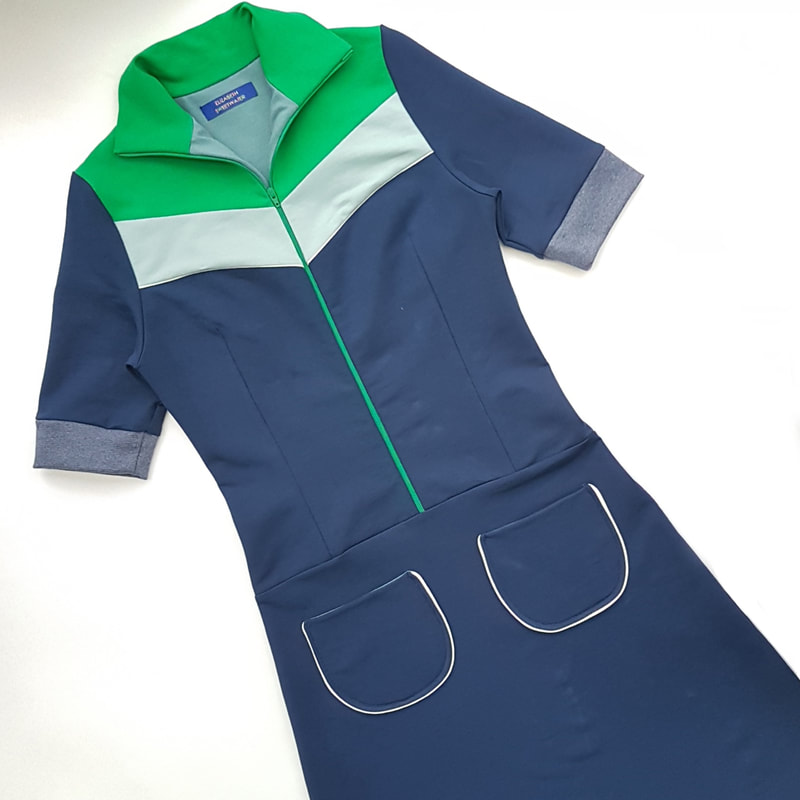
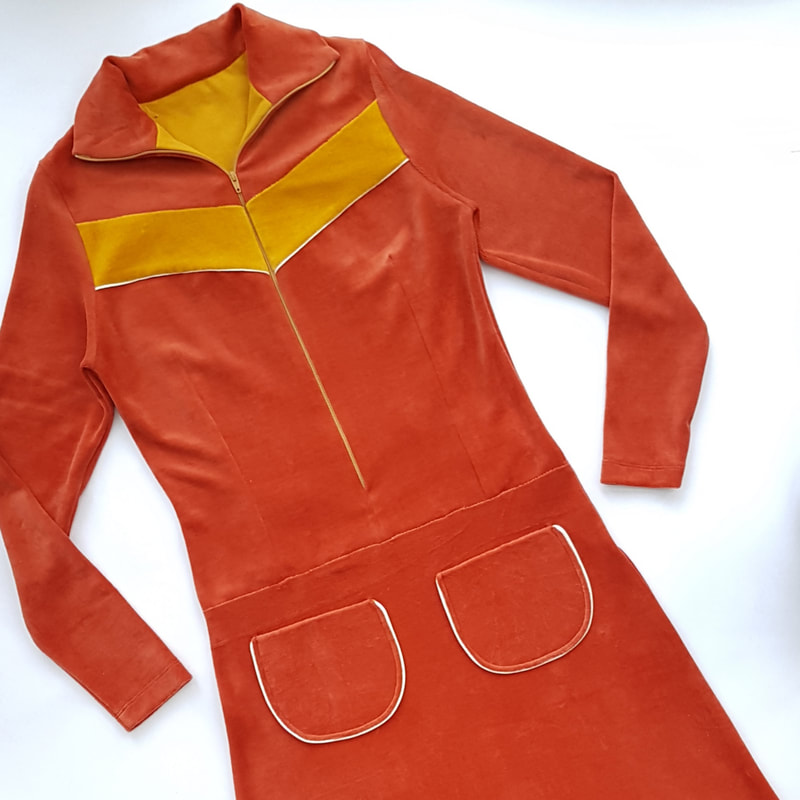
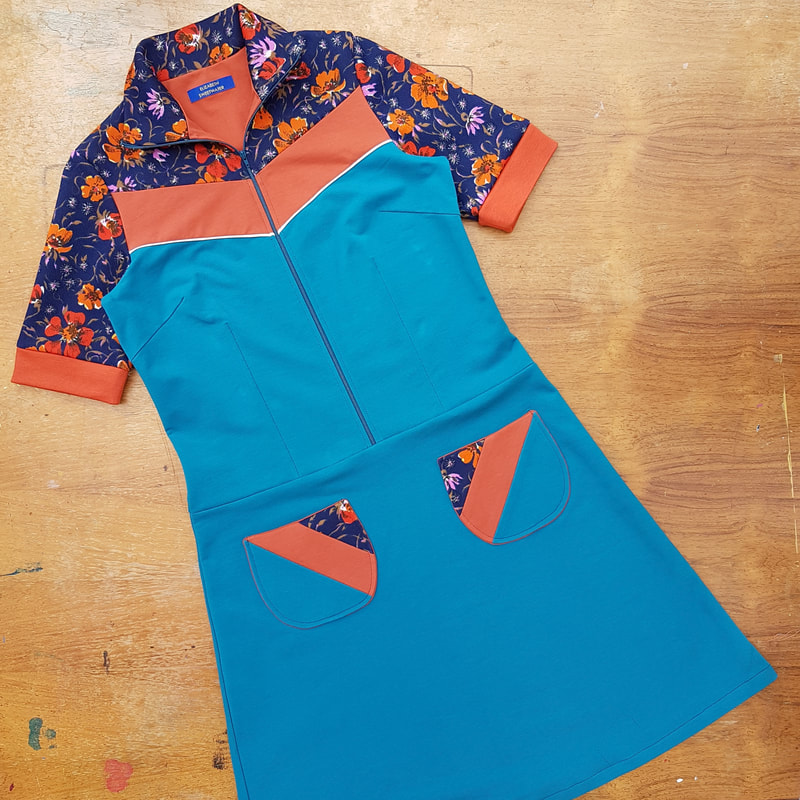
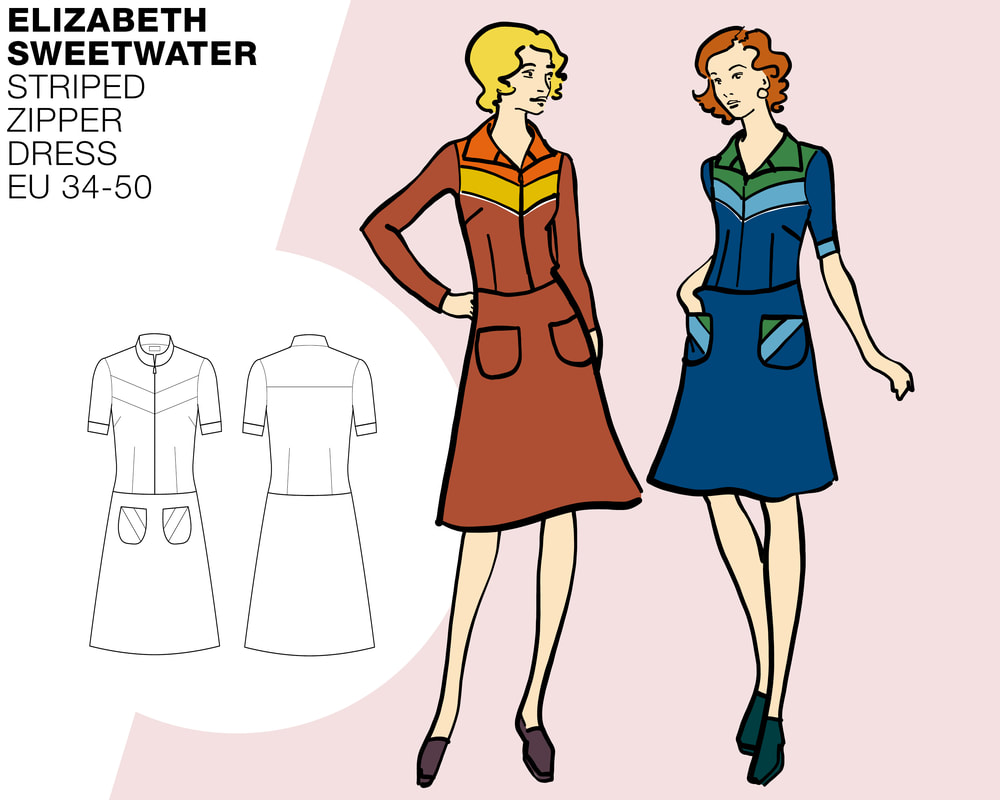
Elizabeth Sweetwater
  • Tutorials
  • Movies
  • Happy Sewers
  • About

Striped zipper dress

1/16/2020


Ritsjurk

Picture
Introductie
​Stoer en veelzijdig retro rits colourblock jurkje. Door de coupenaden in de body van de jurk creëer je een mooie aangesloten pasvorm. Maak ‘m zo kleurrijk als je wilt door gekleurde banen. Of kies voor een basic in uni met alleen een pipingbandje. Het patroon bevat twee mouwlengtes en ik leg je in de volgende tutorial uit hoe je een hele leuke zakvariatie kunt maken. Draag met sneakers voor een sportieve look of met hoge laarzen voor een gave retro outfit. Het materiaal gebruikt voor deze jurk is French terry maar ze is ook leuk in Nickyvelours. 

Introduction
Cool and versatile retro zipper color block dress. Because of the added darts to the body you can create a beautiful fit. Create a top as colourful as you like by adding stripes and colour block. Or keep it basic in just one colour with a piping accent. The pattern contains two sleeve lengths and in the next tutorial I will explain how to make a stripe variation on the pocket. Wear with sneakers for a sporty look or with high boots for a awesome retro outfit. I have used French terry for the purpose of this tutorial. Nickyvelours also works well.
Picture
Picture
Picture

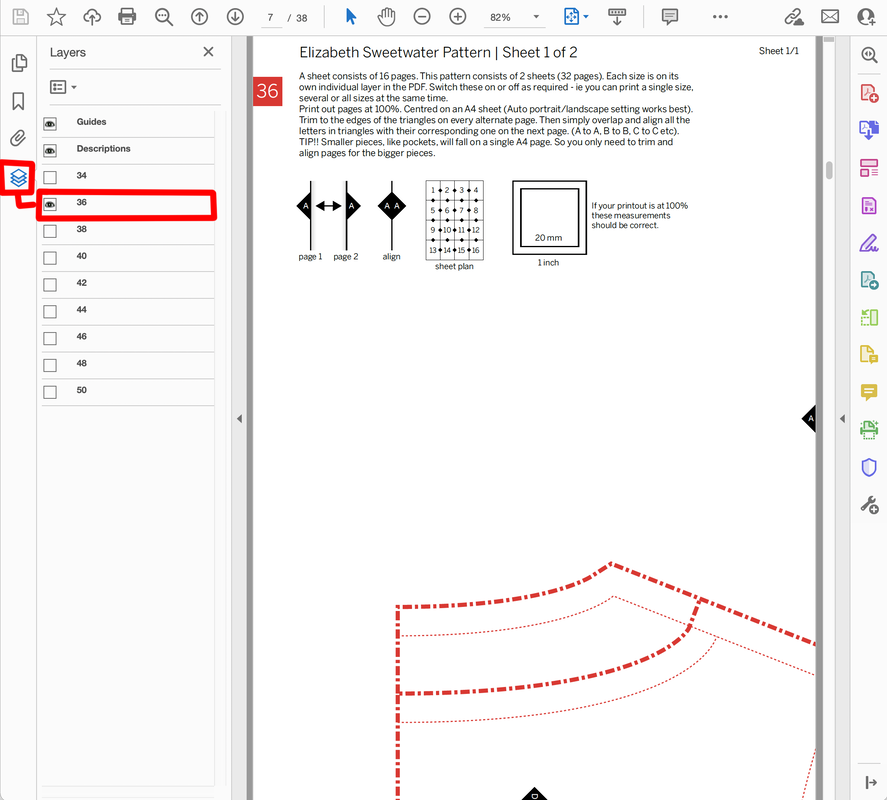
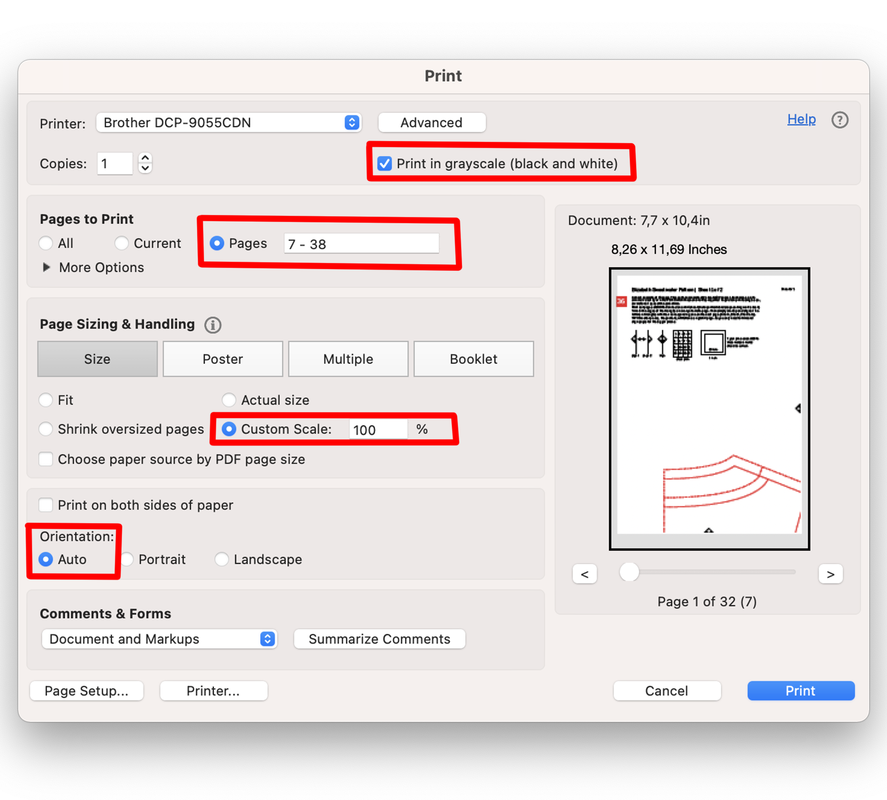
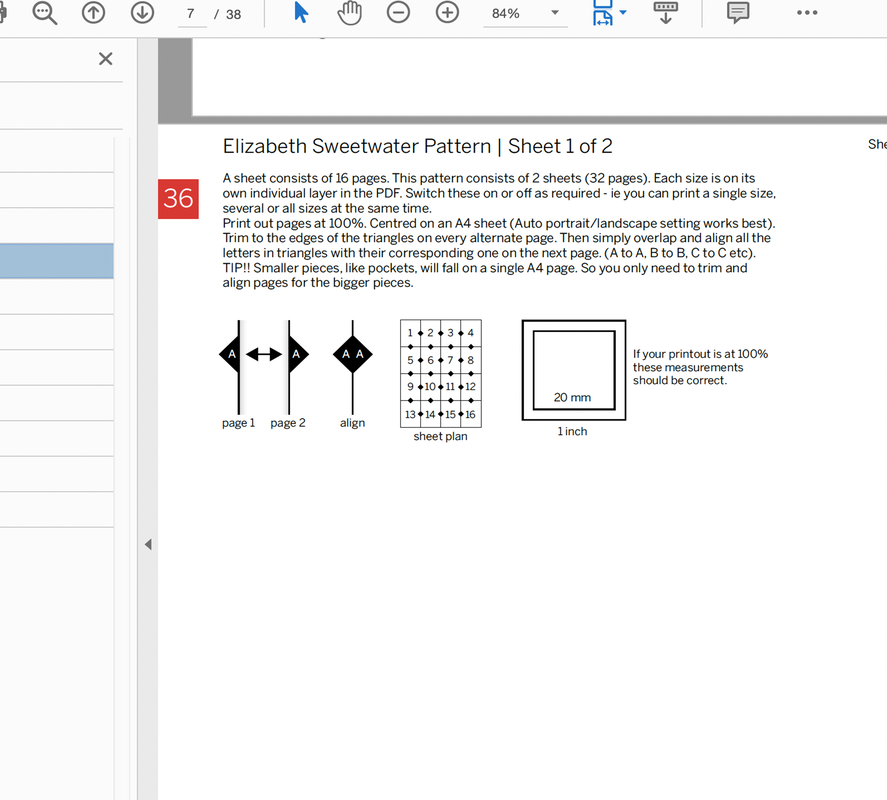
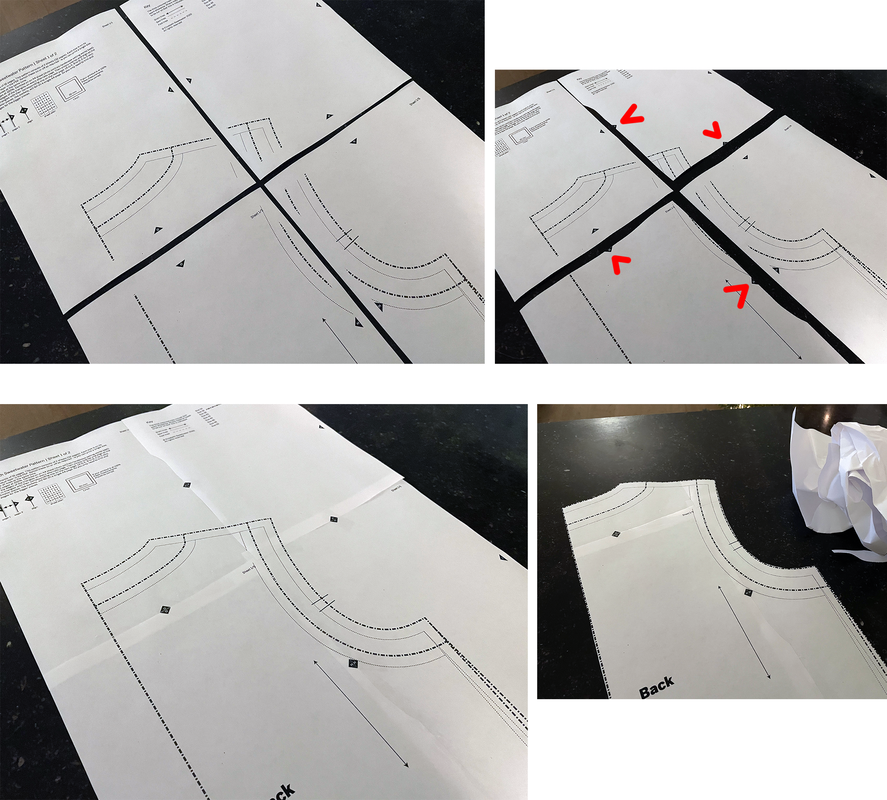
1.
Voorbereiding
Preparation
Bij aankoop van een van onze patronen ontvangt u 3 PDF-bestanden: een voor thuisprinters om op A4-papier af te drukken, een tweede voor A0-gebruikers om af te drukken in een printshop en een derde is voor mensen die een overheadprojector gebruiken. De volgende algemene introductietekst geeft een overzicht van hoe onze patroon-pdf's zijn opgezet en legt uit hoe je de A4-versie kunt afdrukken en hoe je de pagina's aan elkaar kunt plakken. A0-gebruikers kunnen bij hun printshop aangeven welke pagina's ze nodig hebben. Op de projector bestanden staan alle panden in dezelfde richting.
On purchasing any of our patterns you will receive 3 PDF files: one for home printers to print on A4 paper, a second at A0 is for printshop users and a third is for sewers who use an overhead projector. The following general introduction text provides an overview of how our pattern pdfs are set up and explains how to print out the A4 version and how to stick the pages together. A0 users should simply instruct their printshop which pages they require. Projector users will note that all pieces have the grain direction facing the same way.
Picture
1a.
Al onze patronen volgen dezelfde opzet zoals hier uitgelegd. Elk patroon begint met een voorblad, een inleiding, een lichaamsmatentabel, een ontwerptekening, een patroonchecklist en een kleurplaat. Het patroon is te vinden op de laatste lijst onder het tabblad Bladwijzers. 
All of our patterns follow the same set up as explained here. Each pattern starts with a cover page, an introduction, a body size chart, a design drawing, a pattern checklist and a colouring sheet.The pattern can be found on the last listing under the bookmarks tab.
Picture
1b.
After locating the pattern click on the layers icon. Here you can see the full range of sizes. They are all layered on top of one another. You can click on the eye icon by each individual size to turn it on or off.
After locating the pattern click on the layers icon. Here you can see the full range of sizes. They are all layered on top of one another. You can click on the eye icon by each individual size to turn it on or off.
Picture
1c.
Je kunt vervolgens de maat of maten selecteren die je wilt afdrukken.
You can then select the size or sizes you wish to print out.
Picture
1d.
Als je thuis print op een A4-printer, drukt u op het afdrukpictogram in het bovenste menu van de PDF. Uw afdrukdialoogvenster kan hiervan verschillen  (rechts in het midden weergegeven), maar ik heb een paar knoppen gemarkeerd om het te verduidelijken. Om inkt te besparen kun je instellen dat het patroon in grijstinten wordt afgedrukt. Selecteer de pagina's die je wilt afdrukken, over het algemeen vanaf pagina 7 tot de laatste pagina. Zorg ervoor dat de schaal is ingesteld op 'ware grootte' of '100%' - NOOIT op 'passend op pagina'. Het werkelijke paginaformaat van de PDF is kleiner dan A4. Stel de oriëntatie in op Auto, ik vind dat dit het beste werkt omdat het dan de pdf op een A4-blad centreert.
If printing at home on an A4 printer press the print icon in the top menu of the PDF. Your print dialogue box may vary to this one (shown middle right), but I have highlighted a few buttons to take note of. To save ink you can set to print the pattern in greyscale. Select the pages to print which will usually be from page 7 until the final page. Make sure the scale is set to 'actual size' or ‘100%' - NEVER to 'fit to page’. The actual page size of the PDF is smaller than A4. Set the orientation to Auto, I find this works best as it will then centre the pdf on an A4 sheet.
Picture
1e.
Rond elke pagina zie je kleine zwarte driehoekjes met letters erin. Met een schaar en doorzichtig plakband bij de hand, kun je vervolgens om elke pagina uitknippen tot aan de driehoeken en vervolgens de letters in de zwarte driehoeken uitlijnen met de overeenkomende op de volgende pagina (A naar A, B naar B, enz.). Vervolgens kunt u het blad aan elkaar plakken. Een vel kan uit 16 of 20 pagina's bestaan, afhankelijk van het gekochte patroon. Sommige patronen bestaan ​​uit één volledig vel (bijv. rokken met 16 pagina's), sommige uit twee vellen (bijv. jurken met 32 ​​pagina’s).
Around each page you will see small black triangles with letters inside. With scissors and clear sticky tape at hand, you can then cut out every alternate page to the triangles and then align the letters in the black triangles with the matching ones on the following page (A to A, B to B, etc). You can then proceed to stick the sheet together. One sheet can consist of 16 or 20 pages depending on the pattern purchased. Some patterns consist of one full sheet (eg. skirts with 16 pages), some of two sheets (eg. dresses with 32 pages).
Picture
1f.
Nadat je je pagina's hebt afgedrukt, leg je ze op een plat oppervlak. Knip de pagina's om en om uit tot aan de driehoekjes. Plak vervolgens met doorzichtig plakband de driehoeken met dezelfde letter aan elkaar. Knip vervolgens je patroondeel uit tot aan de stippellijnen. Deze stippellijnen bevatten de benodigde naadtoeslag voor elk stuk. De dunnere stippellijnen geven de uiteindelijke maat aan. Voor het gemak zijn alle namen van de stukken, samen met de draadrichting en handige instructies in de afzonderlijke patroondelen geplaatst, zodat u het overtollige papier veilig kunt weggooien (recycle). Let op dat sommige patronen ook een verklarend diagram kunnen bevatten op een van de pagina's die bewaard moeten worden. Als je de  patroondelen op patroonpapier wilt overtrekken, moet je er aan denken alle markeringen te kopiëren (bijv. draadrichting, knipjes etc.).
Once you have printed out your pages lay them out on a flat surface (top left). Cut out to the triangle edge on alternate pages (top right). Then with clear sticky tape connect the triangles that correspond to each other (bottom left). Then cut out your pattern piece to the dashed lines (bottom right). These dashed lines include the necessary seam allowance for each piece. The thinner dotted lines indicate the finished size. For convenience all names of pieces, along with grain direction and helpful instructions have been placed inside individual pattern pieces, so you can safely throw away (please recycle) the excess paper. Note some patterns may also include an explanatory diagram on one of the pages that should also be kept. 
To continue trace all the pattern pieces onto pattern paper, remembering to copy all the markings (eg. darts, piece to piece alignment lines etc).
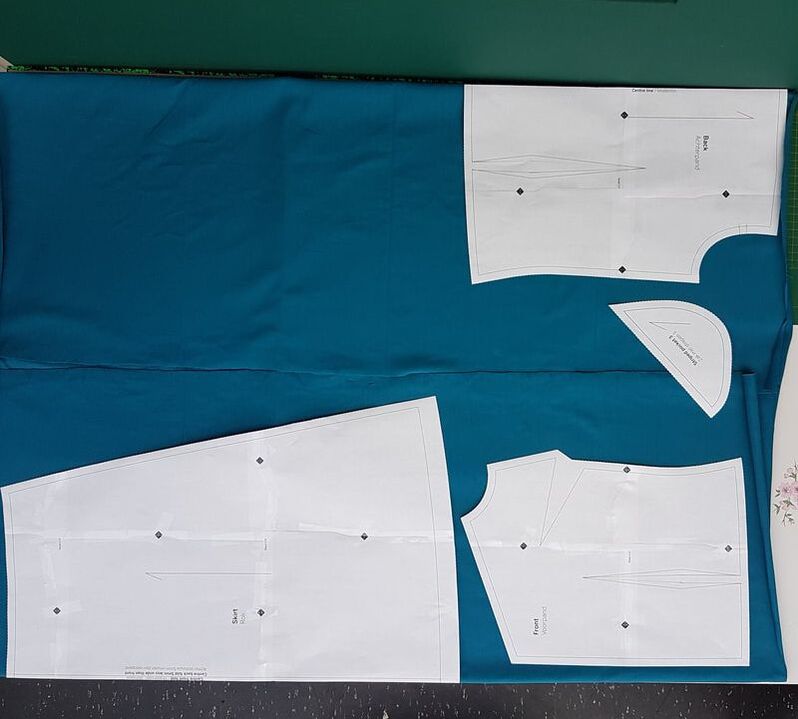
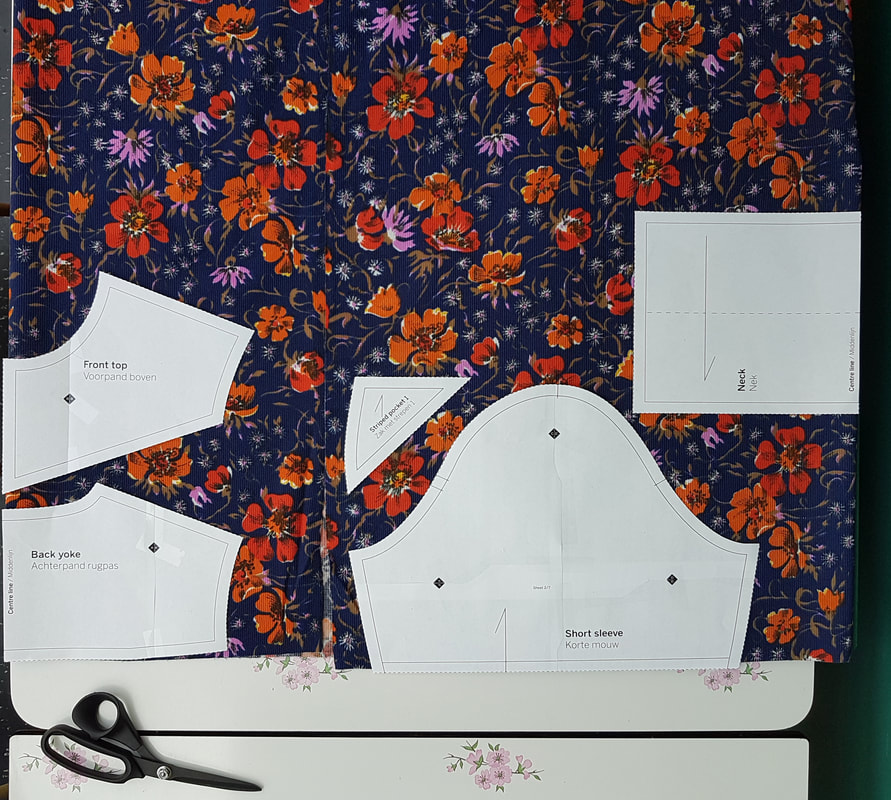
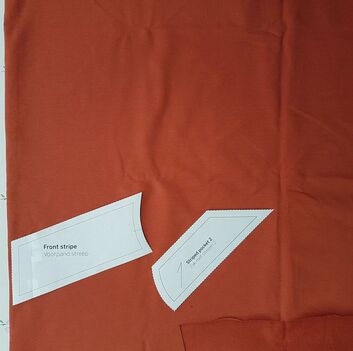
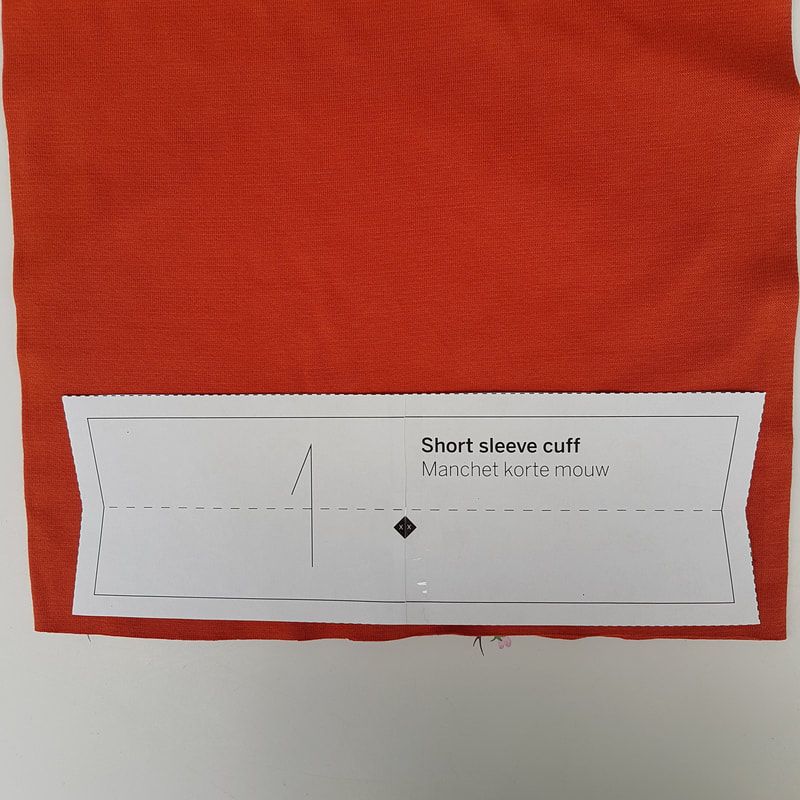
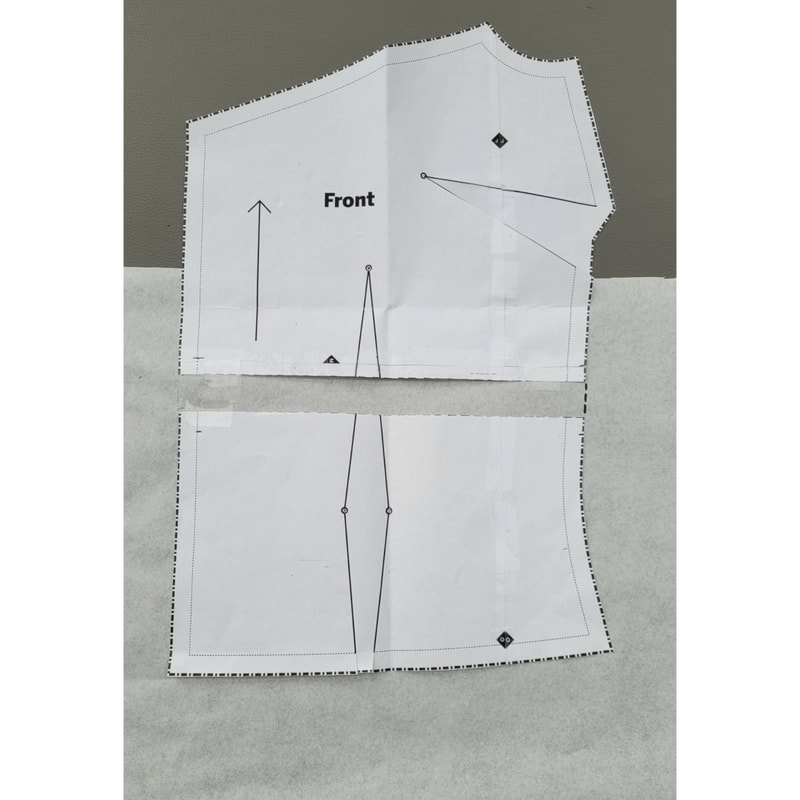
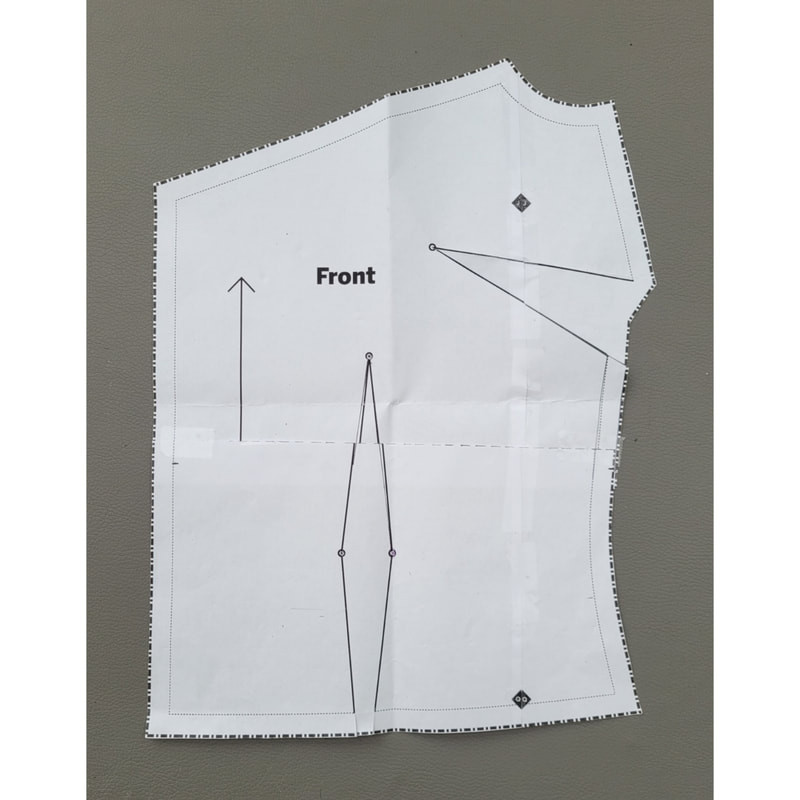
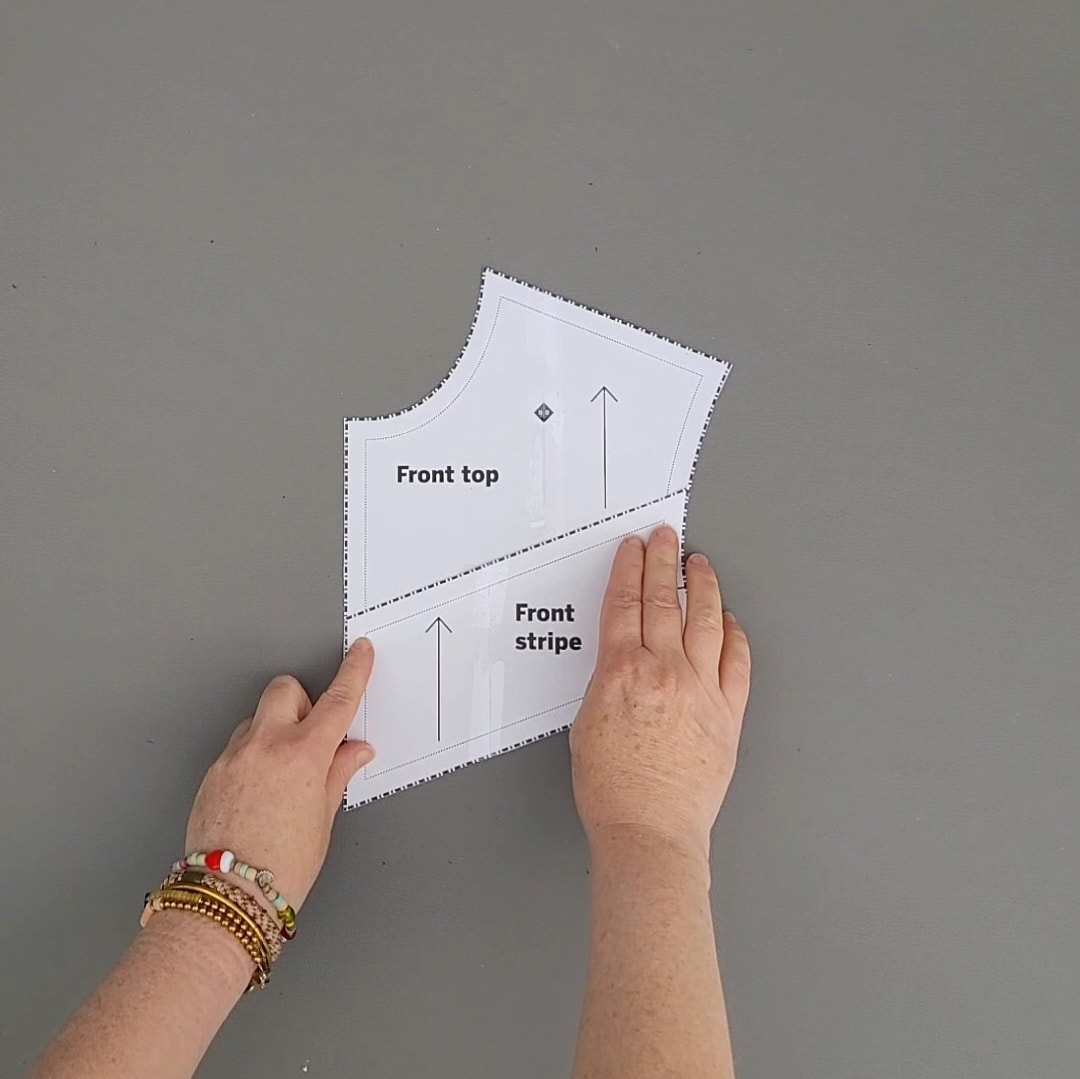
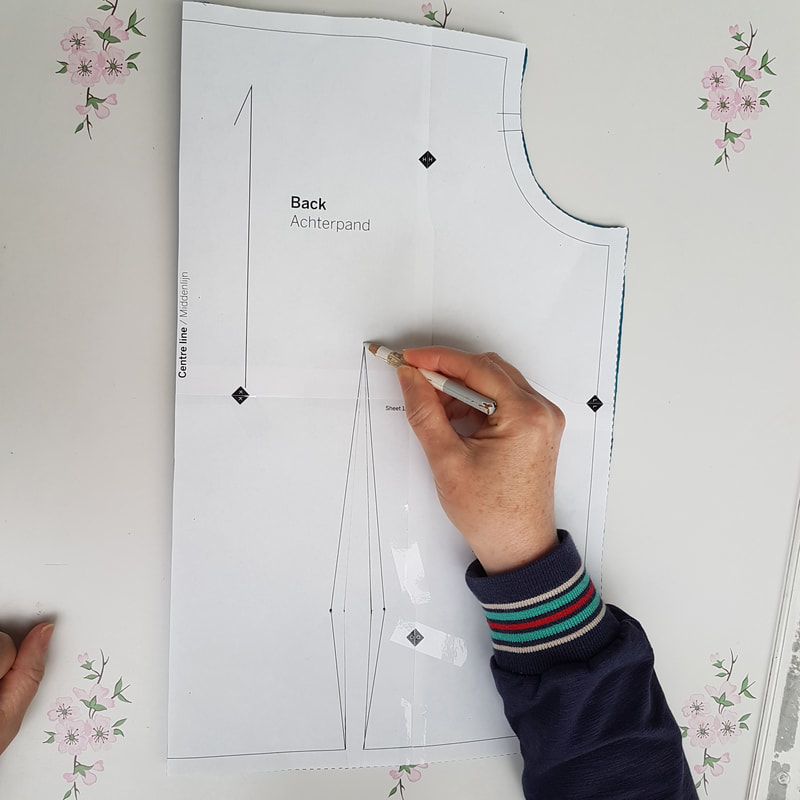
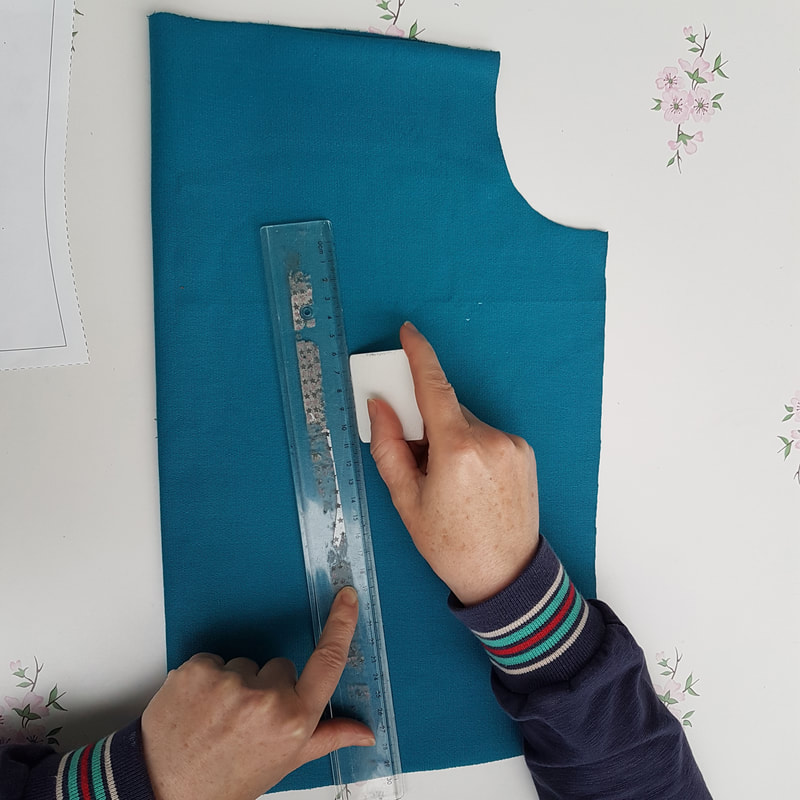
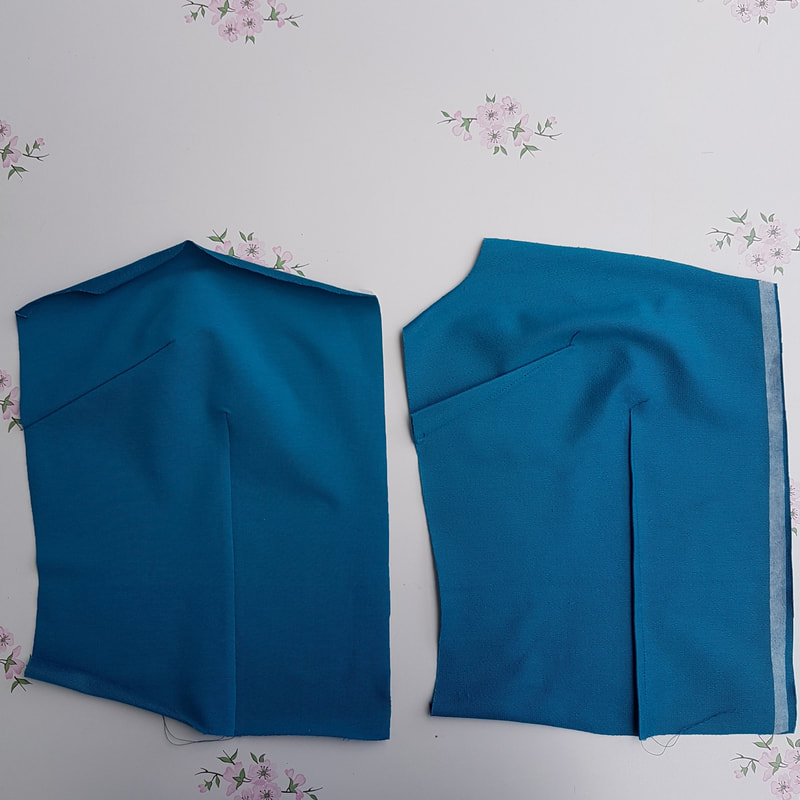
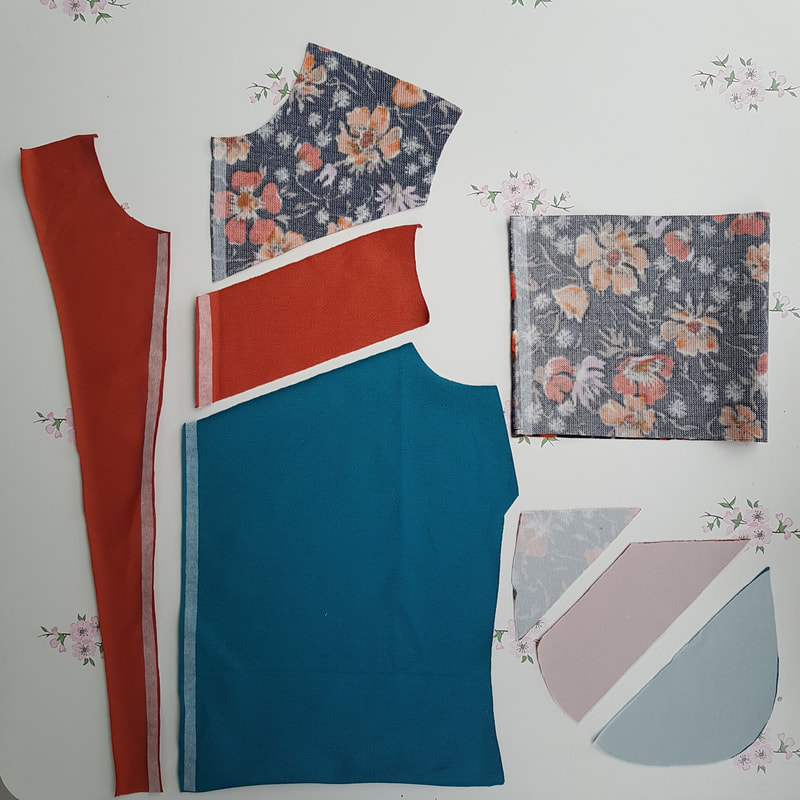
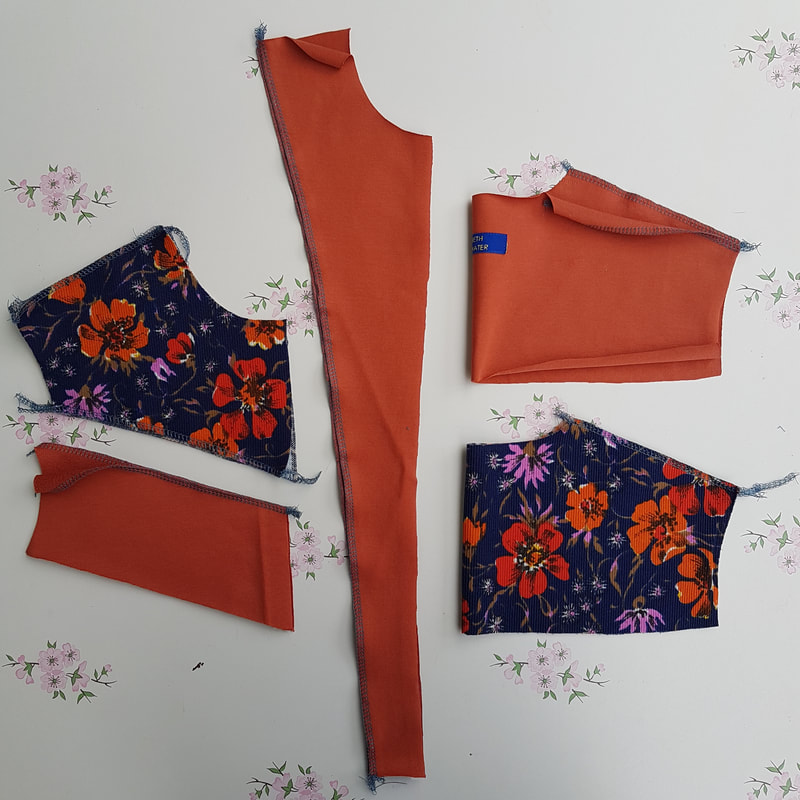
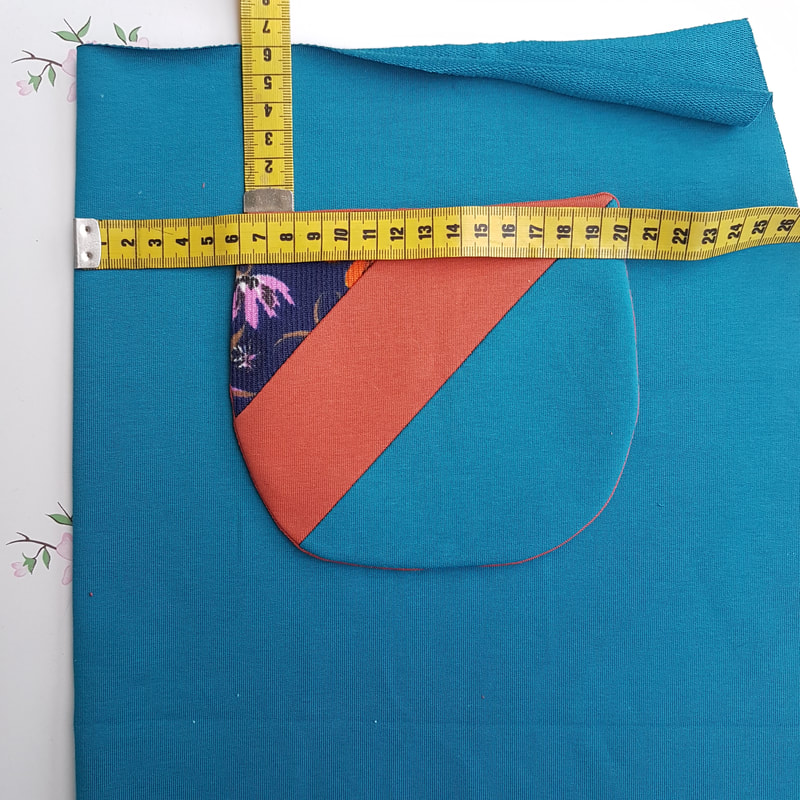
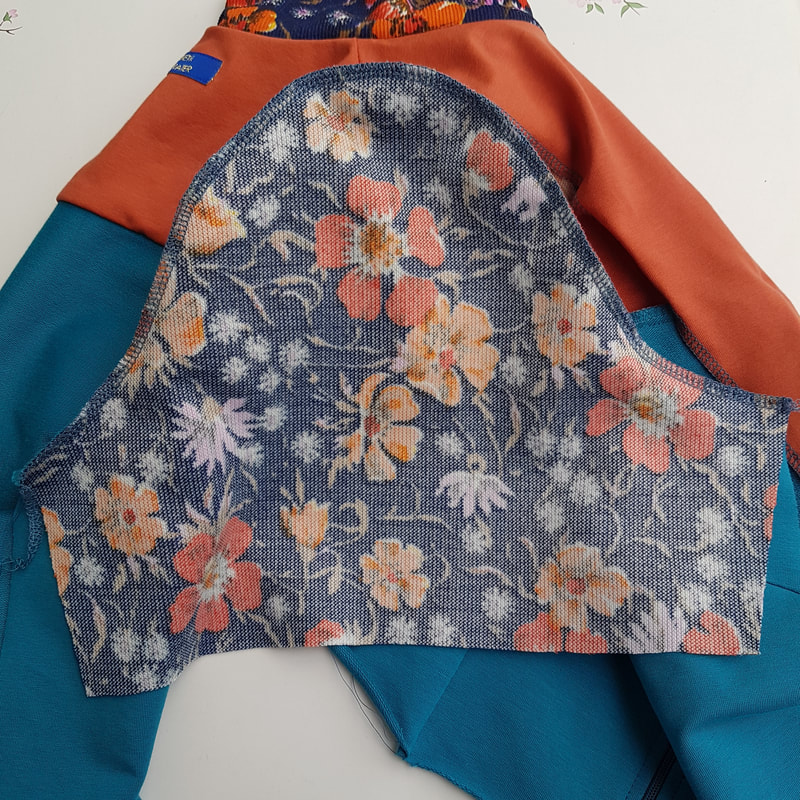
1g.
Nu je al je stukken hebt uitgeknipt raadpleeg het onderstaande overzicht om je voor te bereiden op het uitknippen van de door jou gekozen stof.
Now you have cut out all your pieces consult the overview below to prepare yourself for the next stage of cutting out the pieces from your chosen material.

Patroondelen:
- Voorpand knip 2x
- Streep voorpand knip 2x
- Schouderpand knip 2x
- Achterpand knip 1x aan stofvouw
- Achterpas knip 1x aan stofvouw en 1x voor beleg aan stofvouw
- Mouwen knip 2x
- Rokdeel knip 2x aan stofvouw
- Manchetten knip 2x aan stofvouw (het patroondeel is 1 hele manchet. Als je de manchetten aan de stofvouw knipt dan moet je het patroon even vertikaal doorknippen/vouwen. Zo leg je het voordeliger in.)
- Kraag knip 1x aan stofvouw
- Beleg knip 2x
- Zakdelen knip 2x plus 4x de halve zakdelen voor voeringzakken

Patternpieces:
- Front piece cut 2x
- Stripe front piece cut 2x
- Shoulder piece cut 2x
- Back piece cut 1x on fold
- Back yoke cut 1x on fold en 1x for facing on fold
- Sleeves cut 2x
- Skirt cut 1x on fold
- Cuffs cut 2x on fold (the pattern part is for a whole cuff, if you cut the cuff on fold than you need to fold/cut your paper pattern piece in half lengthways. This way you waste less fabric.)
- Collar cut 1x on fold
- Facing cut 2x
- Pockets cut 2x and the half lining pocket parts cut 4x


2.
​Delen op de stof liggen
Layout pattern pieces on fabric
Picture
Picture
2a.
Zo leg je de delen op de stof. Voorpand, achterpand, en 2 rokdelen aan beide kanten aan een vouw. Het rokdeel heeft maar is één patroondeel met één midden voorlijn en één midden achter lijn. Het zakdeel komt op een rest stukje. (ligt nu uiteraard niet goed maar dit is voor de overzichtsfoto.) Vanaf maat 42 zul je de rokdelen waarschijnlijk niet meer naast elkaar kunnen leggen en leg je één van de rokdelen aan een enkele vouw.
This is how you lay the pieces out on the fabric. Front, back and 2 skirt parts on both sides on fold. The skirtpart has only one pattern piece with one midfront line and one midback line.
The pocket piece will be cut out of a leftover piece. (not in the right place on te photo). From size 42 on you will probably not be able to lay them next to each other, so you will have to lay one of the skirtparts on a single fold.
2b.
Inleg mouw, voor-achterpas, zakdeel en kraag.
Inlay sleeve, front-backyoke, pocketpiece and collar.
Picture
2c.
Inleg streep deel en zakdeel.
Inlay stripe part and pocket part.
Picture
2d.
Korte mouw manchet (boord stof).
Short sleeve cuff  (cuff-rib fabric).
Picture
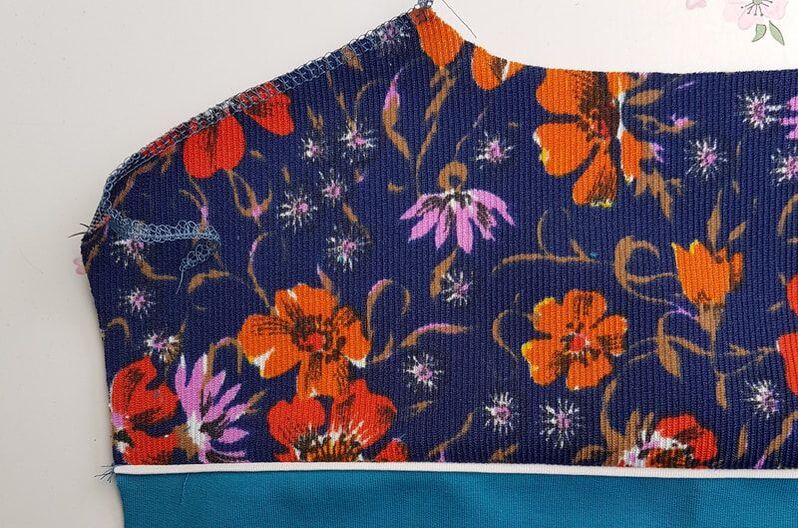
2e.
De belegdelen, zakvoering delen en rugpas voering deel aan de vouw.
The front facing, pocket lining parts en back facing on fold.

3.
Checklijst en patroon aanpassingen
Checklist and pattern adjustments

Picture
Materiaal nodig voor ritsjurk

Tricot print breedte 150 cm
Afmeting: 50cm
- Schouderpand
- Rugpas
- Kraag
- Mouwen (voor lange mouwen plus 35 cm)

French terry kleur petrol breedte 150 cm
Afmeting:
135cm t/m maat 40
150cm vanaf maat 42
- Achterpand
- Voorpand
- Rok
- Zakken

French terry kleur oranje breedte 150 cm
Afmeting: 20cm
- Streep voorpand
- Zakdeel

Single jersey tricot kleur oranje breedte 150 cm
Afmeting: 55cm
- Belegdelen
- Zak voering delen

Single jersey tricot kleur off white breedte 150cm
- Piping
Knip 2 stukjes van 2,5cm hoog en zo breed als de schuine streep en 1 stuk van 2.4cm hoog en zo breed als de rugpas en twee stukjes van 2.4cm hoog en 35cm breed voor de zak variatie met piping

Fournituren
- Vlieseline: band of geknipte strookjes (1cm breed x 3m)
- Ritsvoetje
- Eventueel Prymm wundertape voor de rits
- Eventueel label
- Plus een niet deelbare rits van minimaal 50cm (langere ritsen kun je op maat knippen)
- Een klein stukje rekbare plakvlieseline
Fabric needed for zipper dress

Jersey print 150 cm wide
Amount: 50 cm
- Shoulder piece
- Back Yoke
- Collar

- Sleeves (for long sleeves add 35 cm)

French terry colour petrol 150 cm wide
Amount:
135cm up to size 40
150cm from  size 42

- Back piece
- Front piece
- Pockets
- Skirt parts


French terry colour orange 150 cm wide
Amount: 20 cm
- Stripe front 
- Pocket piece


Single jersey colour orange 150 cm wide
Amount: 55cm
- Facing parts
- Pocket lining pieces


Single jersey 150cm wide colour off white
- Piping
Cut 2 pieces of 2,5cm high and as wide as the front stripe and 1 piece of 2,4cm hig
h and as wide as the backyoke 2 pieces of 2,4cm high and 35cm wide for the pocket variation with piping. 

Haberdashery
- Thin non-stretchable fusible interlining cut in ½
” strips or ready-made interlining tape.
- Zipper foot
- Prymm wonder tape (optional)

- A woven label (optional)
- Non-separating zipper of minimum 50cm length. (or longer, you can cut it to size)
- A small piece of stretch 
fusible interlining

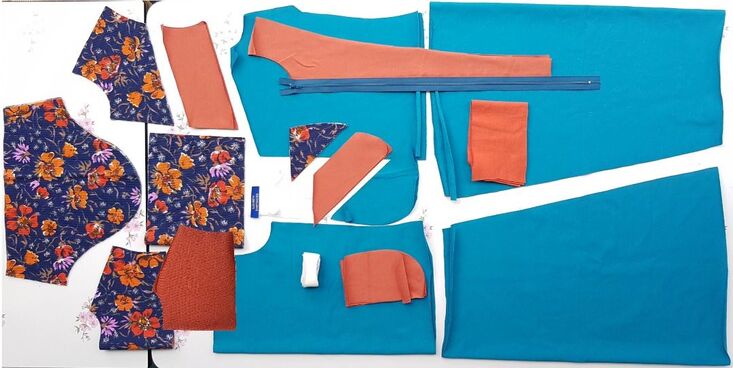
Algemeen patroon aanpassingen
General pattern adjustments

Picture
3a.1
Algemeen advies
General advice

Ik adviseer om eerst een proefmodel te maken voor je in een dure stof knipt. Onderstaand vind je wat aanpassingen die je kunt doen aan het jurk patroon. Lichaamsmaten in onze maattabel verspringen met 4cm per maat met uitzondering van maat 48-50 die met 6cm verspringt. 4cm per maat betekent 1cm per patroondeel (2x1cm voor, 2x1cm achter = 4cm). Voor bovenstukken  kies je over het algemeen voor de maat die het dichtst bij jouw bovenwijdte ligt. Vervolgens pas je de taille en eventueel heup aan. 
I recommend making a test model before cutting in expensive fabric. Underneath you'll find some adjustments you can make on the dress pattern. Body measurements on our size charts jump 4cm per size apart from size 48 to 50 which jumps 6cm. 4cm per size means 1cm per patternpiece (2x1cm front, 2x1cm back = 4cm). For tops, choose the size with a chest measurement closest to yours. Then adjust the waist and optionally the hipwidth. 
Picture
3a.2
Verbreden of versmallen taille
Widening or narrowing waist

Als je taille wat smaller of wat breder is dan de taillemaat die past bij de gekozen bovenwijdte dan kun je deze aanpassen door de coupenaden wat meer in te stikken (zie rode lijn) of wat minder in te stikken (blauwe lijn). Is dit niet voldoende, neem dan wat weg/voeg wat toe aan de zijnaad. Herhaal voor het achterpand.
If your waist is a little narrower or a little wider than the waist size that fits the chosen bust width, you can adjust it by sewing the darts a little wider (see red line) or a narrower (blue line).  If this is not sufficient, remove/add some widt to the side seam. Repeat for the back part.

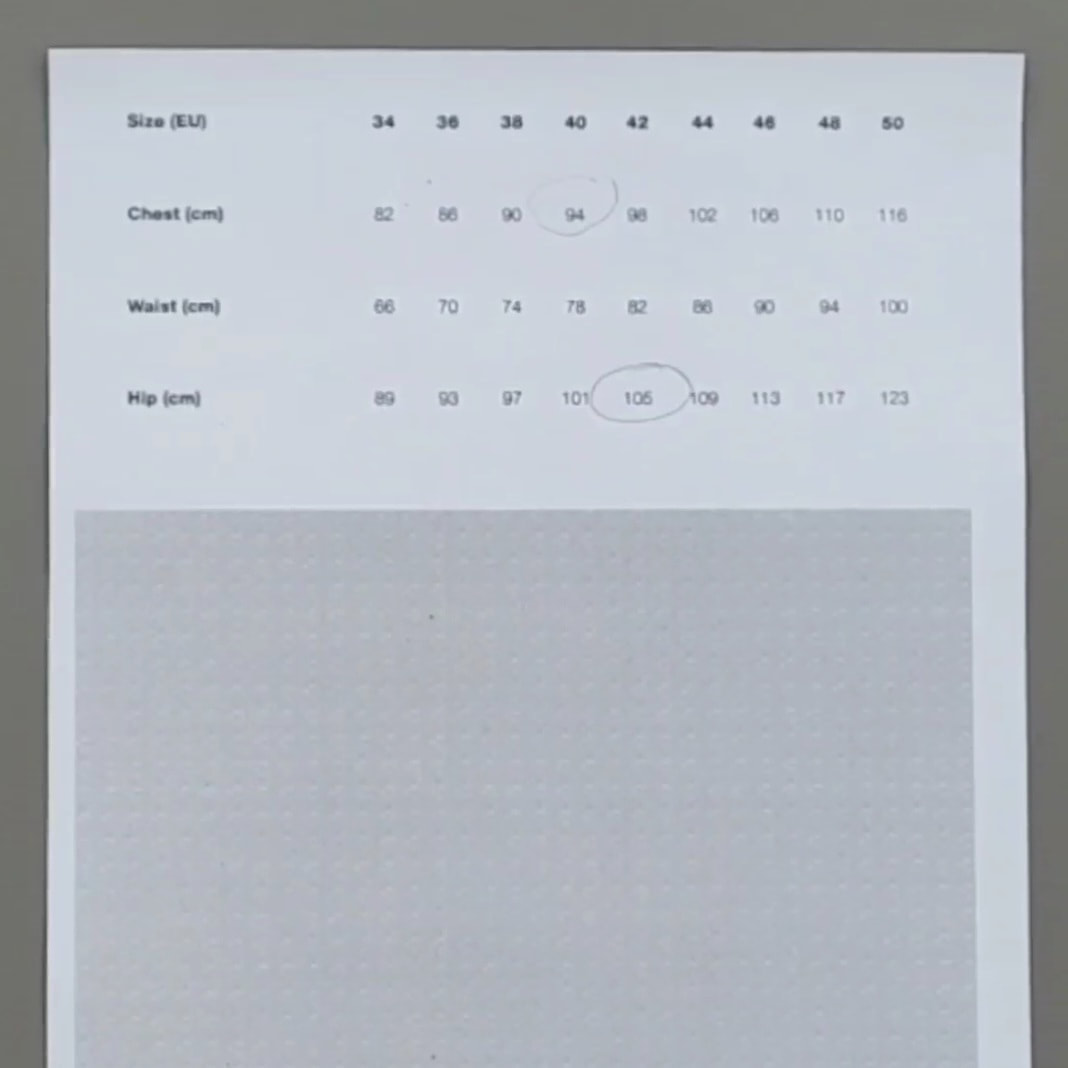
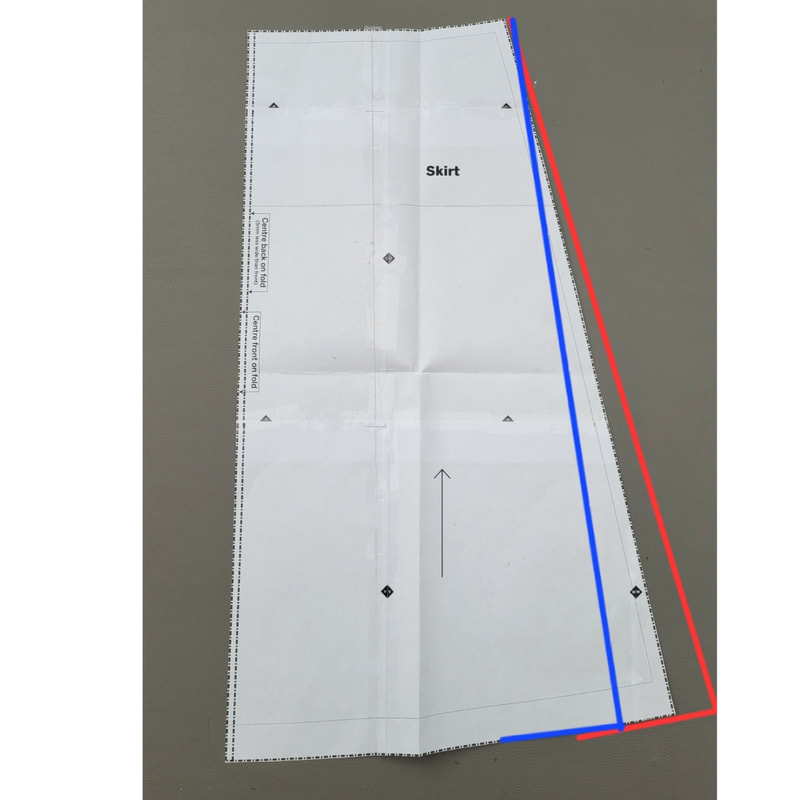
Vergroten of verkleinen heup
Widening or narrowing the hip

Picture
3b.1
Heb je een wat grotere of kleinere heupmaat dan bovenwijdte maat? Pas dan het rokdeel als volgt aan: Meet 14cm naar beneden (15 inclusief naad) op het rokpand en trek een horizontale lijn richting zijnaad. Dit is de heuplijn.
Voeg toe/verminder per maat 1cm op deze lijn.
Do you have a slightly larger or smaller hip size than your bust size? Then adjust the skirt part as follows: Measure 14cm down (15 including seam) on the skirt piece and draw a horizontal line towards the side seam. This is the hip line. Add/decrease 1cm per size on this line.
Picture
3b.2
Verbind de bovenkant van de rok met het nieuwe punt op de heup en trek deze lijn door tot de onderkant. De rok zal hierdoor wijder of smaller worden. (Zorg ervoor dat de onderkant haaks op de zijnaad komt).
Connect the top of the skirt to the new point on the hip and extend this line to the bottom.  This will make the skirt wider. (Make sure the hemline is perpendicular to the sideseam).

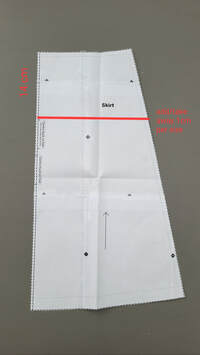
Verlengen/verkorten van het bovenlijf
Lengthening/shortening of the top
Picture
3c.1
Verlengen van het bovenlijf
Lengthening of the top

Als je langer dan 1.70m bent en je wilt de verlaagde taille behouden dan kun het bovenlijf met een paar cm te verlengen. Knip hiervoor het patroon door zoals aangegevenop de afbeelding. Leg hier een strook (patroon) papier onder en voeg het gewenste aantal cm toe. Teken de zijnaad/figuurnaad bij. Vergeet niet ook de achterkant te verlengen. Verleng eventueel ook het rokdeel op dezelfde manier. Je kunt de rok ook verlengen door aan de onderkant wat lengte aan te tekenen, de rok wordt dan wel wijder.
If you are taller than 1.70m and you want to keep the lowered waist, you can lengthen the torso by a few cm.  To do this, cut the pattern as shown in the image.  Place a strip of (patterned) paper underneath and add the desired extra length. Redraw the side seam/dart. Don't forget to extend the back as well. If necessary, extend the skirt part in the same way.  You can also lengthen the skirt by adding some length at the bottom. This will make the skirt wider.
Picture
3c.2
Verkorten van het bovenlijf
Shortening of the top

Wil je de taille wat hoger plaatsen of ben je kleiner dan 165? Dan kun je het bovenlijf wat inkorten. Knip hiervoor het patroon door zoals aangegevenop de afbeelding. Laat de panden 2à3 cm overlappen en plak vast. Teken de zijnaden en figuurnaden bij. Verkort eventueel ook het rokdeel op dezelfde manier. Je kunt de rok ook verkorten door aan de onderkant wat lengte af te halen, de rok wordt dan wel minder wijd.
Do you want to place the waist a little higher or are you shorter than 165?  Then you can shorten the upper body a bit. To do this, cut the pattern as shown in the image. Allow the panels to overlap by 2 to 3 cm and stick in place.  Redraw the side seams and darts. If necessary, also shorten the skirt part in the same way.  You can also shorten the skirt by removing some length at the bottom, but the skirt will then become less wide.

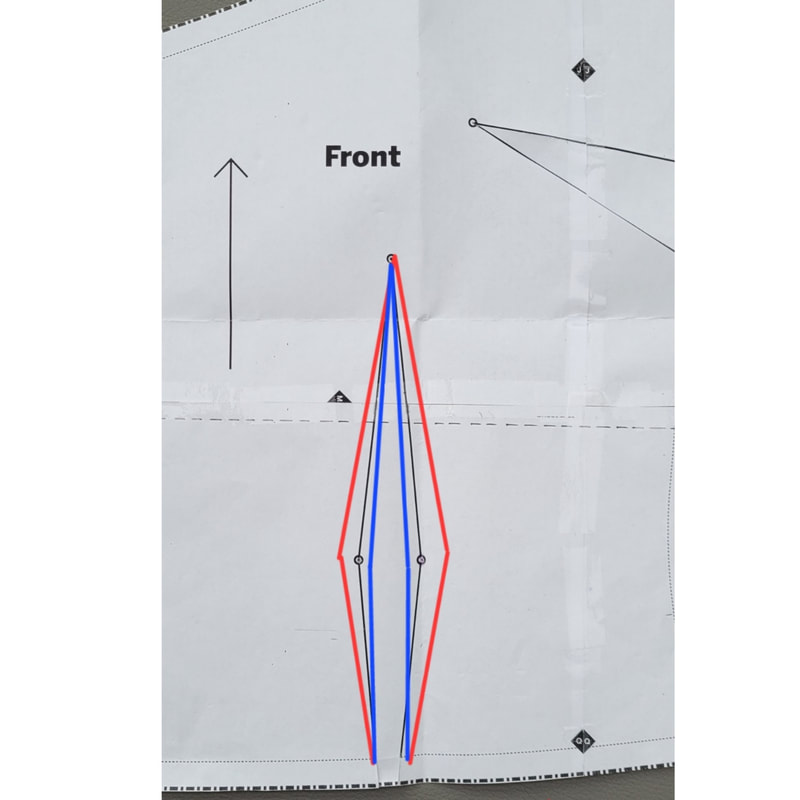
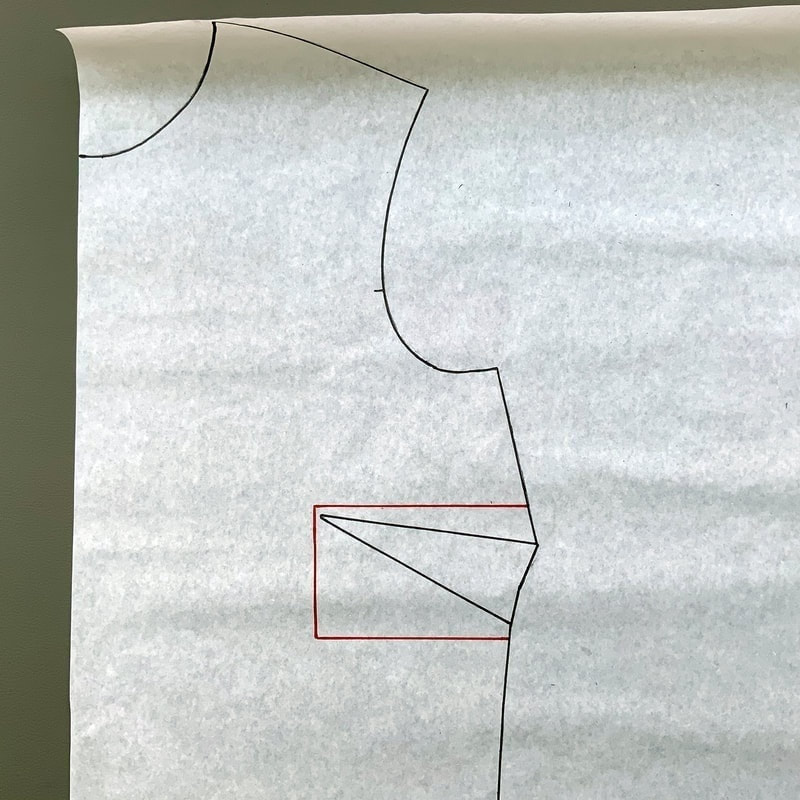
Het verlagen van de bustenaad
The lowering of the bust dart

Picture
3d.1
Op de afbeelding zie je waar de bustnaad zich bevindt (zie zwarte lijn).Zit de bustenaad bij jou hoger dan kun je deze verlagen.
On the image you can see where the bustdart is placed. If the bustdart sits too high you can lower it on the pattern.
Picture
3d.2
Teken een vierkant rond de figuurnaad op het papieren patroon.
Draw a box around the entire bust dart on your pattern piece.
Picture
3d.3
Knip het vierkant uit die je zojuist hebt getekend.
Cut out the box that you just drew.
Picture
3d.4
Schuif het vierkant het aantal cm die je de coupnaad wilt verlagen naar beneden en plak deze vast. Teken de zijnaad bij.
Slide the square down the number of cm that you want to lower the dart and stick it. Redraw the sideseam.

Maken in een jersey met print zonder strepen
Make in a printed jersey without stripes

Picture
3e.1
Dit patroon is ook geschikt voor een jurkje in een lichter gewicht single jersey met een print, eventueel met piping biesjes. Hoe je de zakjes maakt met de plooitjes vind je op onze instagram account.
This pattern is also suitable for a dress in a lighter weight single jersey with a print, possibly with piping bands. You can find how to make the pockets with the gathering on our Instagram account.
Picture
3e.2
Voor de jurk zoals op de foto hierboven plak je de 2 boven delen aan elkaar laat hierbij de naadtoeslag overlappen. Samen vormt het nu 1 patroondeel.
For the dress like on the image above, stick the 2 top parts together with the seam allowance overlapping. This is now 1 patternpiece.

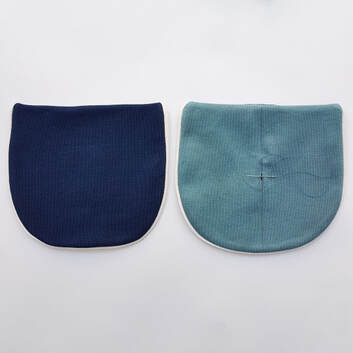
Een extra kleur toevoegen
Adding an extra colour

Picture
3f.1
Wil je nog een kleur toevoegen aan je zipperdress? Leg dan ook de schouderdelen aan elkaar zoals stap 3e.2, neem dit over op patroonpapier en verdeel in 3 gelijke delen. Vergeet niet bij elk deel naadtoeslag toe te voegen.
Do you want to add another color to your zipper dress? Then also put the shoulder parts together as in step 3e.2, transfer this to pattern paper and divide into 3 equal parts.  Don't forget to add seam allowance to each piece.

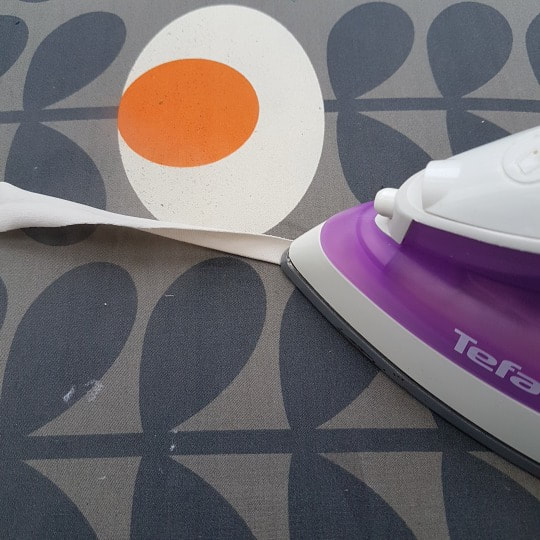
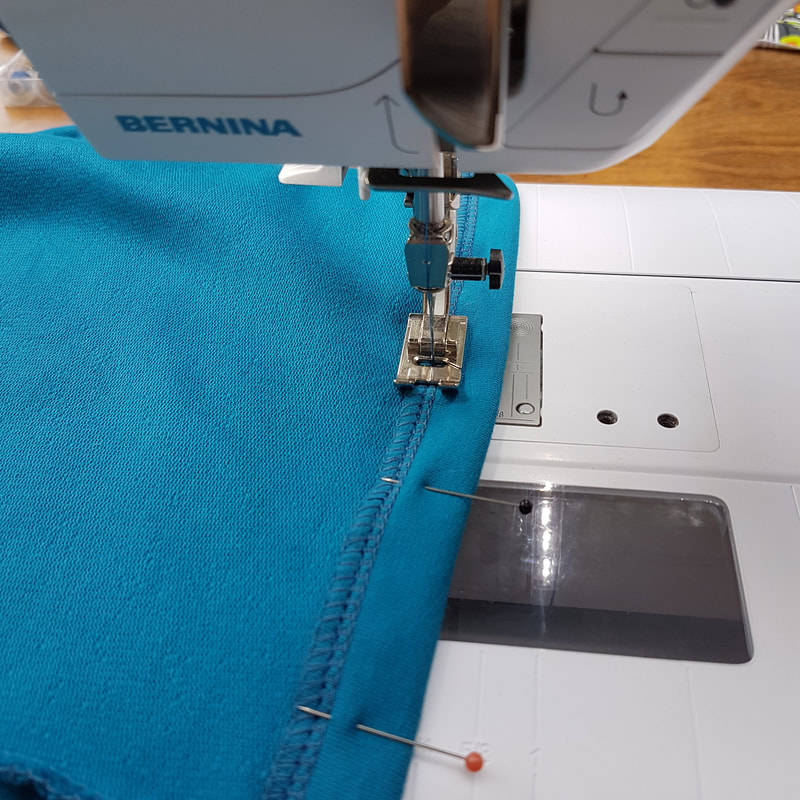
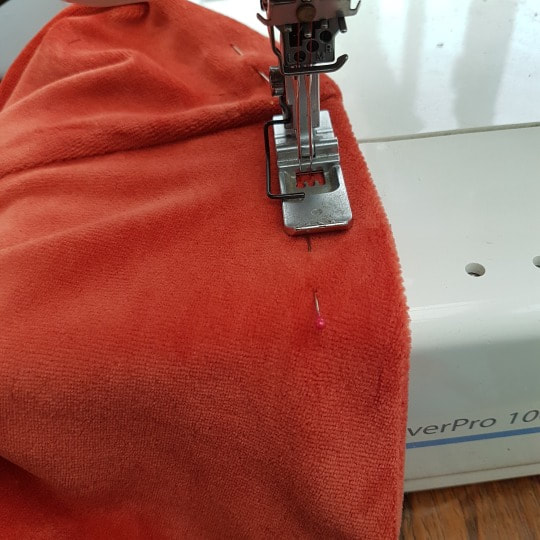
Goed om te weten
Ik ga in deze werkbeschrijving uit van het gebruik van een overlock machine. Mocht je daar niet over beschikken dan kun je een zig-zag steek gebruiken op een gewone naaimachine. Ik raad dan wel aan om er altijd een stretch stiksel naast te plaatsen. De naadtoeslag van de patronen is 1cm. Check wat de breedte instelling van je naad is op je lockmachine is. Is het 0,7cm dan kun je tijdens het stikken 3mm wegsnijden. De stretchnaden stik je met een stretchsteek instelling op de gewone naaimachine.


​Good to know
For this tutorial an overlock machine was being used for sewing most of the garment. However, it is possible to use a regular sewing machine and sew with a zigzag stitch. I do recommend sewing an extra stretch stitch next to it to create clean lines. The seam allowance of the patterns is 1cm. Check the seam width setting of your overlock machine. Is it less than 1cm? Then you can cut away a little while sewing. The stretch seams can be sewn using the stretch setting on a regular sewing machine.


4. 
Markering, opstrijken van band en afwerken van randen
Marking pieces, ironing on facing tape and finishing edges
Picture
Picture
Picture
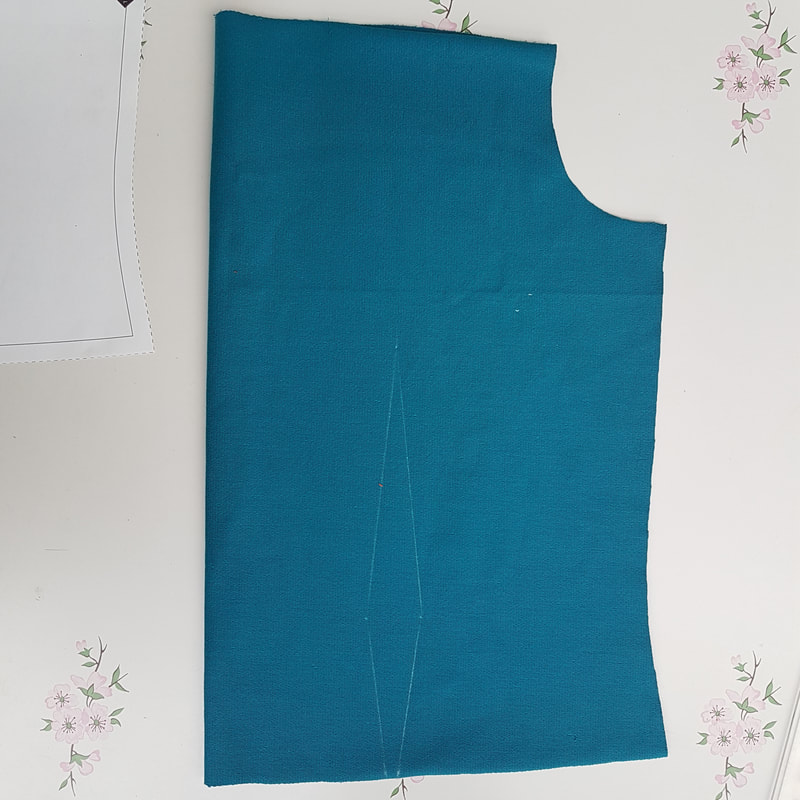
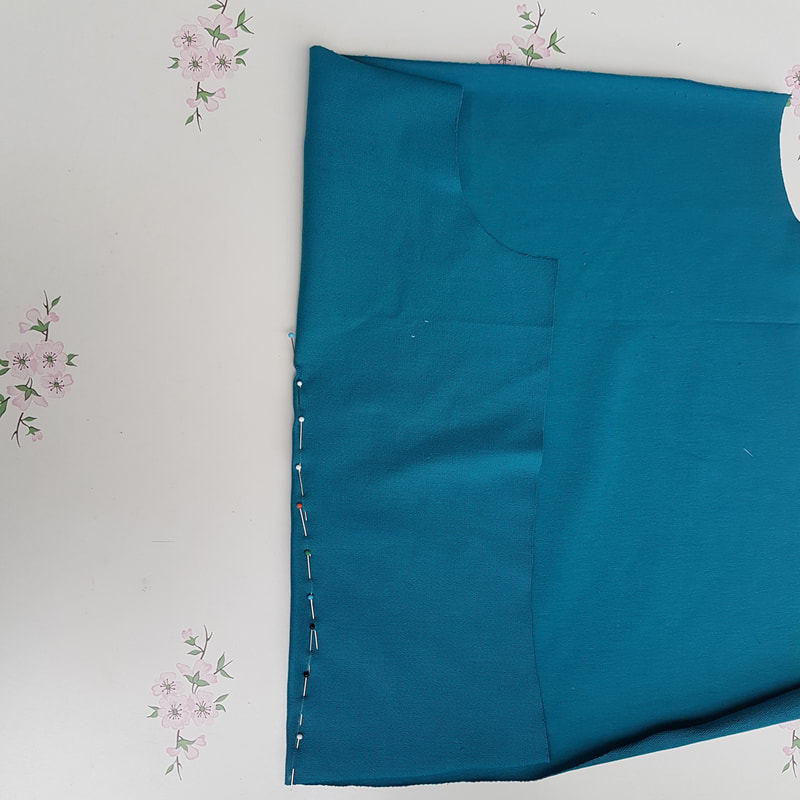
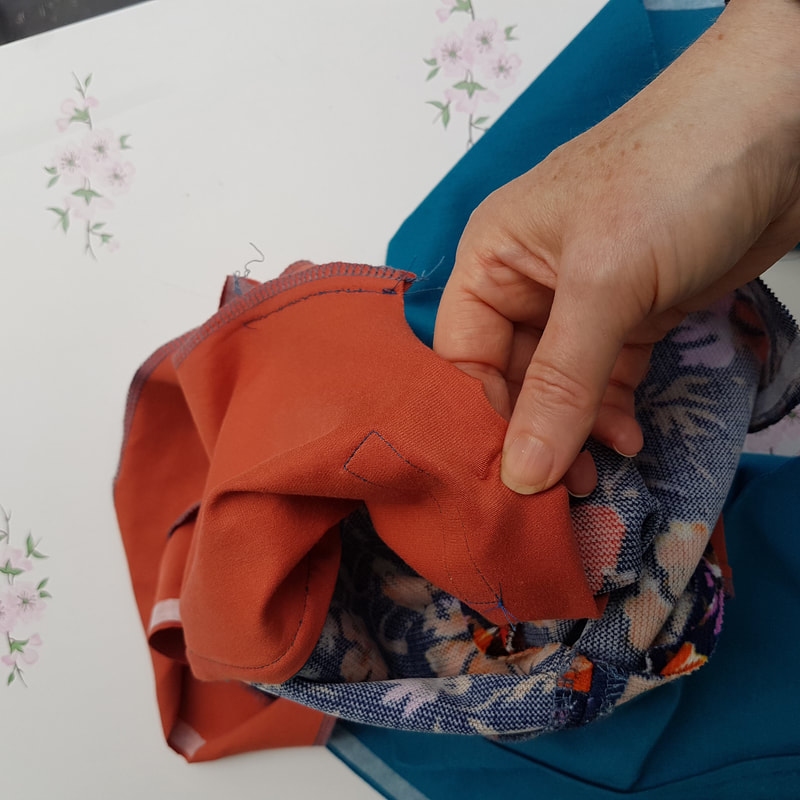
4a.
Kopieer alle coupenaden en pastekentjes op de achterkant van de stof. Voor de coupenaden prik je gaatjes aan de aan de punt en in het midden zodat je met een kalk potlood een puntje kunt zetten. Verbind met een lineaal de punten.
Copy all the darts and marks on the backside of the fabric. For the darts you punch little holes where the pont and hafway points of the darts are on the pattern. Copy these with a chalk pen. Connect the dots with a ruler.
Picture
4b.
Vouw het pandje in het midden van de coupe naad markering en speld de coupenaden van onder naar boven.
Fold the garment piece in half though the middle of the dart markings and pin from bottom to top.


Picture
4c.
Stik de coupenaden met een stretchsteek op een reguliere naaimachine. Speld en stik op dezelfde manier de coupenaden in het achterpand.
Sew the darts with a stretch stitch setting on your sewing machine. Pin and stitch the darts in the backpiece in the same way.

Picture
4d.
Strijk de vlieseline versteviging op een paar millimeter van de rand van:
- Middenvoor kraag beide zijden
- Middenvoor van alle voorpandjes
- Middenvoor van beleg deel
Dit zijn alle naden waar de rits langs gestikt wordt en mogen dus niet rekken.
Iron on the fusible interlining strips a little off the edge of:
- Mid front collar both sides
- Mid front of all front pieces
- Mid front of lining part
These are all parts that will have a zipper attached to, they therefore can not be stretchable.

Picture
4e.
Werk de randen af van:
- De schoudernaden van het achterpasje en voering achterpasje
- De schoudernaden van het schouderpandje
- De onderkant van het schouderpandje
- De bovenkant van de schuine streep
- De buitenrand van de voorbelegdelen.
Finish edges of:
- The shoulderseams of the backyoke and backyoke lining.
- The shoulderseams of the front top piece
- The bottom of the front top piece
- The top edge of the stripe part
- The outer edge of the front facing pieces.


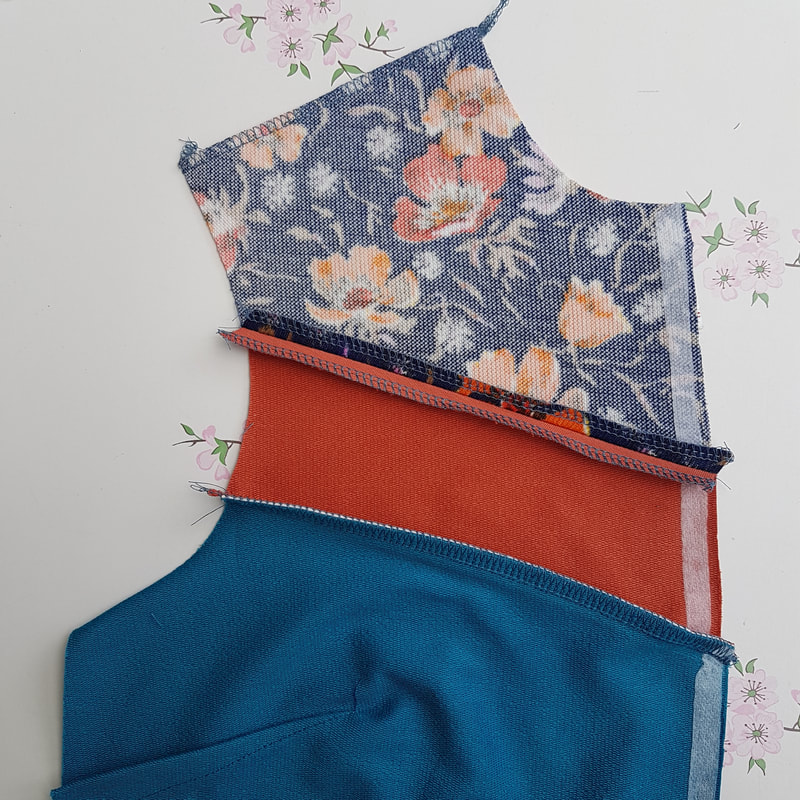
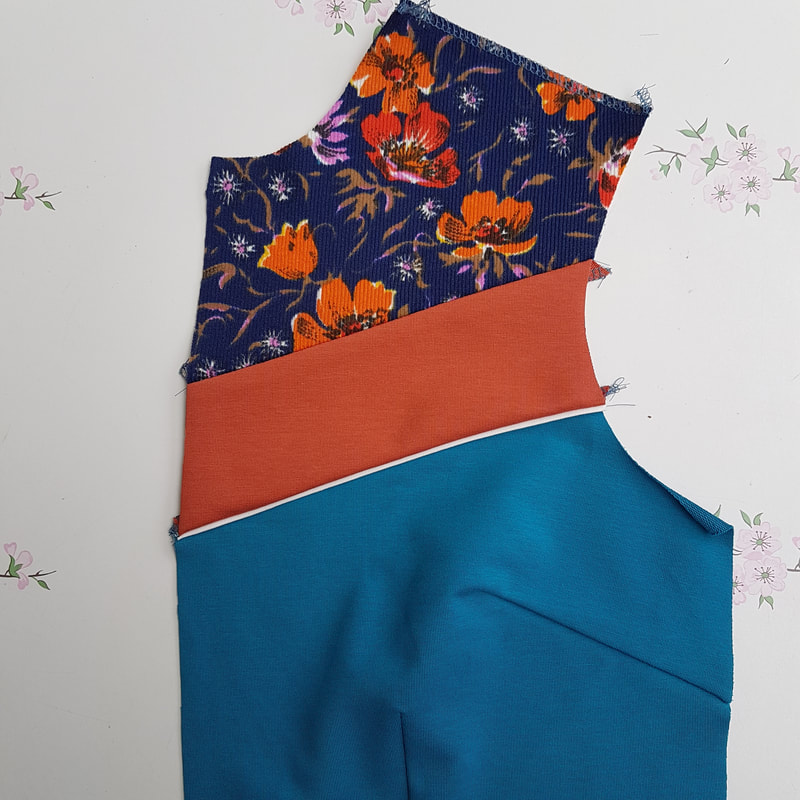
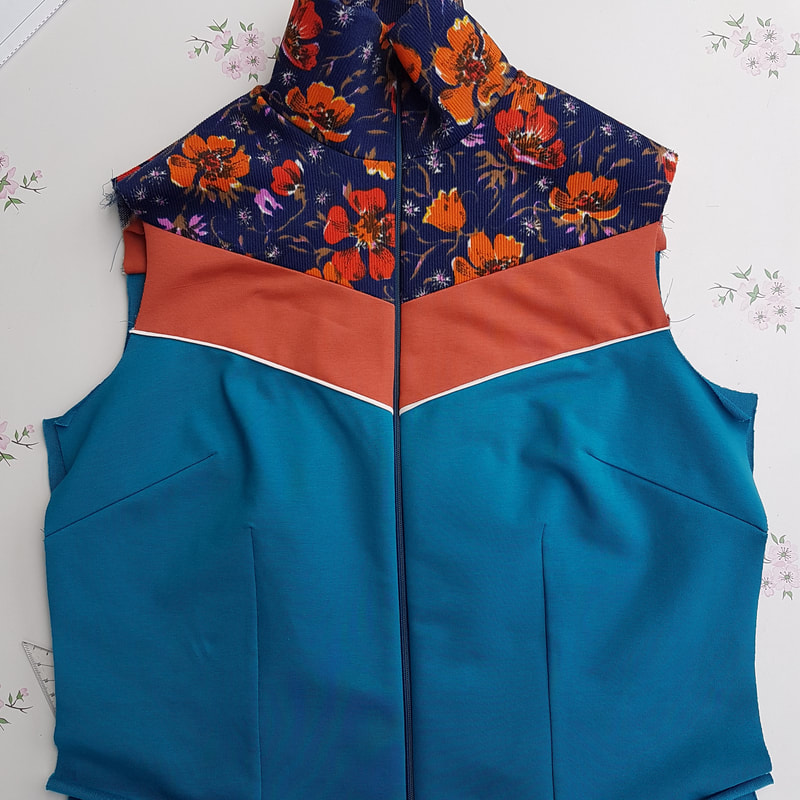
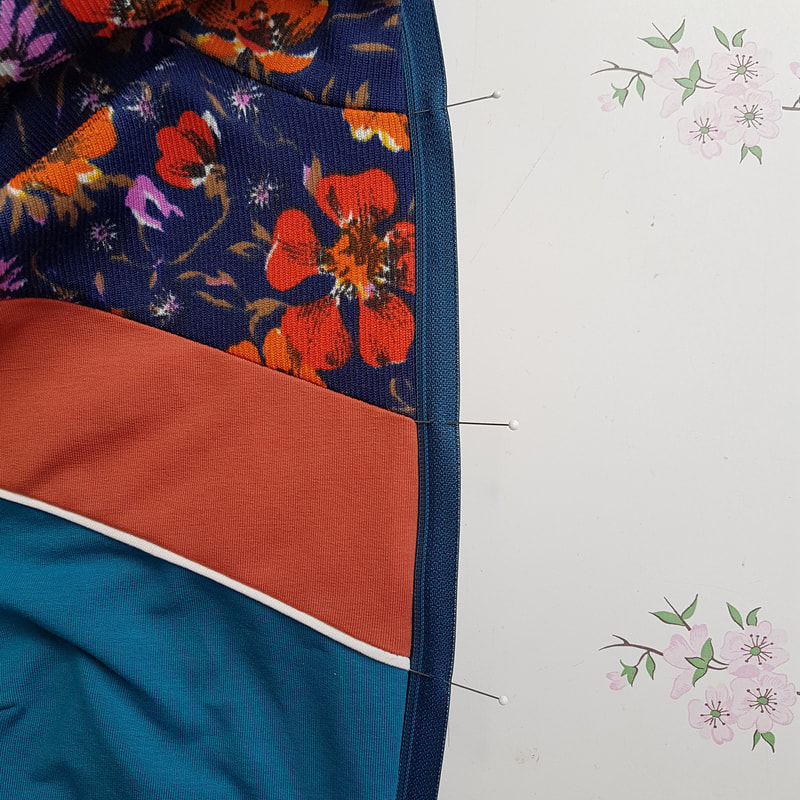
5.
Streep, piping en achterpas

Piping, stripe and backyoke

Picture
5a.
Vouw de strookjes stof die je geknipt hebt voor de piping om en pers plat. Fold the strips of fabrics you cut for the piping over and press.
Picture
5b.
Speld en stik de strookjes op de voorpanden op 0,5 cm van de randen op de goede kant met een naaimachine steek.
​Pin and sew the piping on the right side of the front pieces a little less than a ¼“ of the edge with a regular sewing machine stitch.

Picture
5c.
Speld en stik de strepen op de voorpanden en de piping met de goede kanten op elkaar. Stik eerst met een gewone steek op 1cm van de kant. Vouw terug en check of de piping netjes gelijk is.Pin and sew the stripes on the right side of the front pieces including the piping with a regular stitch on 1/3” from the edge. Fold back and check the piping. When you are happy with the result, sew over it an overlock/serger and cut away 3mm.
Picture
5d.
Ben je tevreden ga er dan nog eens overheen met de lockmachine. snijd 3mm weg tijdens het stikken.
When you are happy with the result, sew over it an overlock/serger and cut away 1/10"

Picture
5e.
Voor en achterkant van het voorpand.
Front and back of the front pieces.

Picture
5f.
Speld en stik de schouderpandjes tegen strepen met de goede kanten op elkaar en stik met een stretch steek. Pers de naad open.Maak je deze jurk in Nicky velours dan kun je de naden samen aflocken.
Pin and sew the shoulder pieces on the right side of the stripes and stitch with a stretch stitch. Press the seam open. If you make this dress in Nicky velours you can overlock the seams together.

Picture
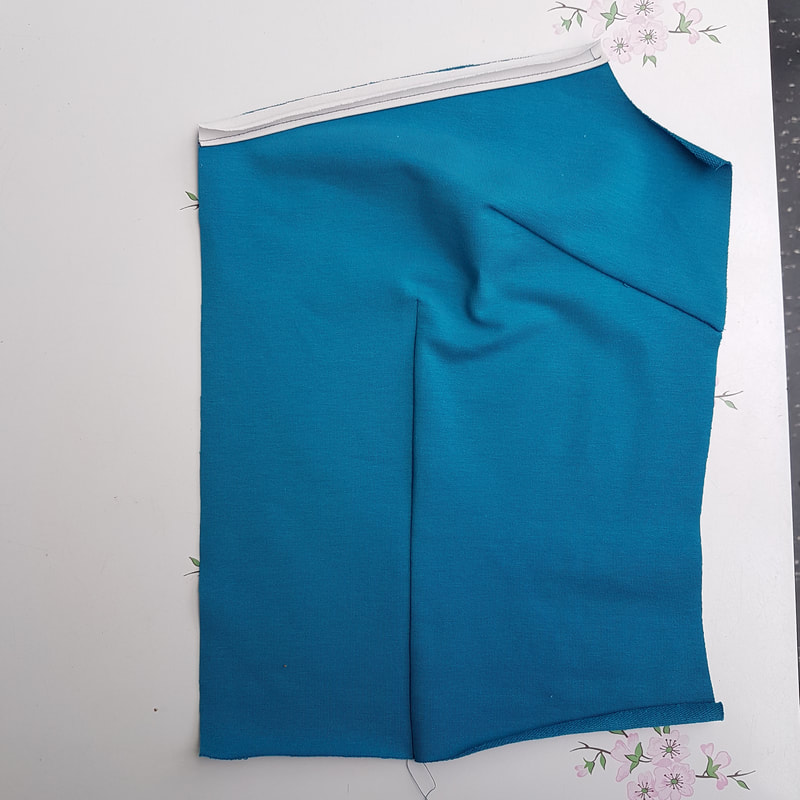
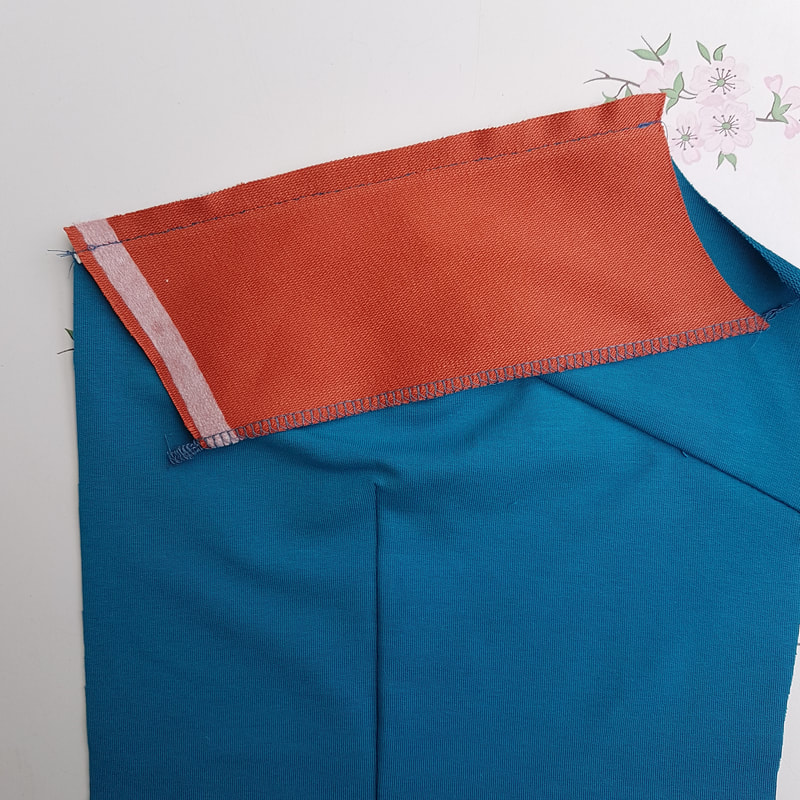
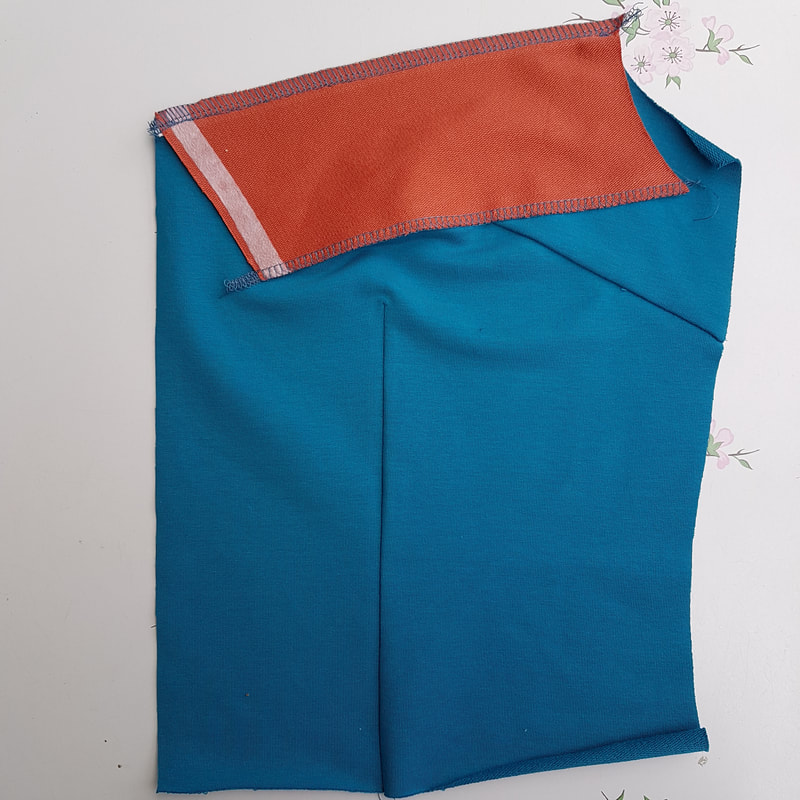
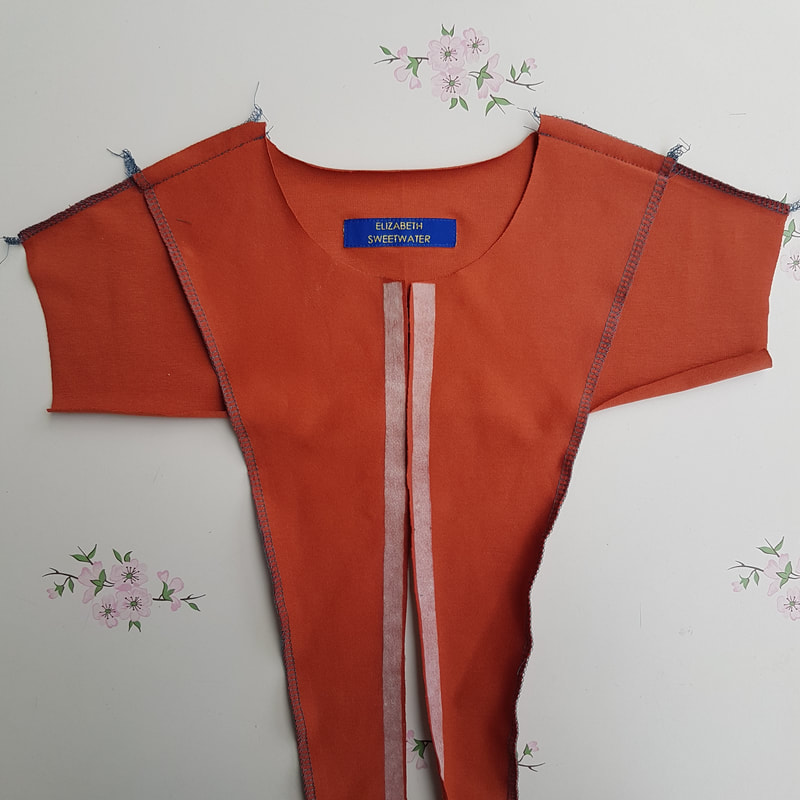
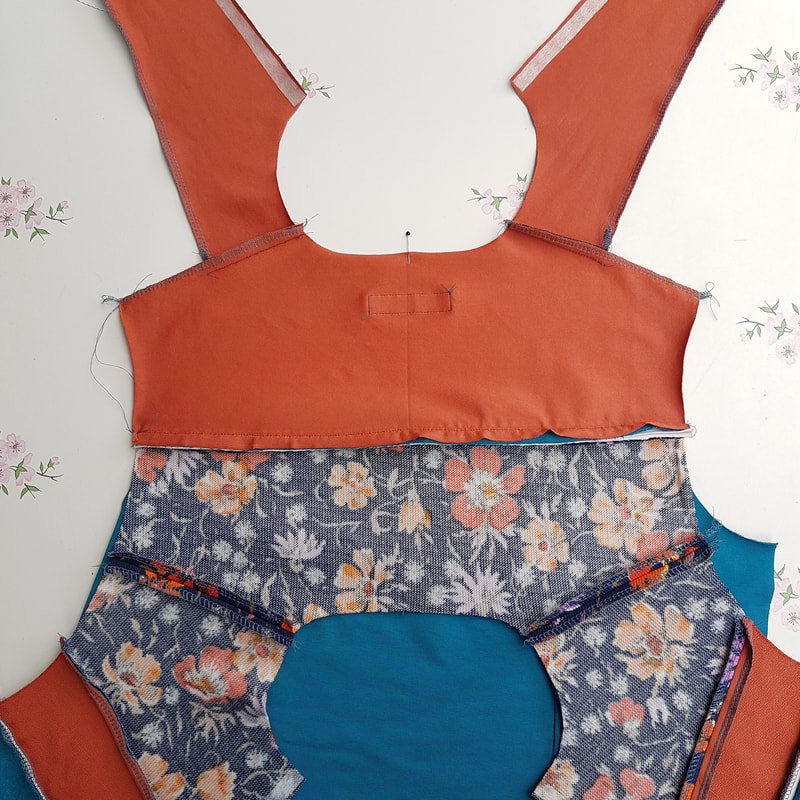
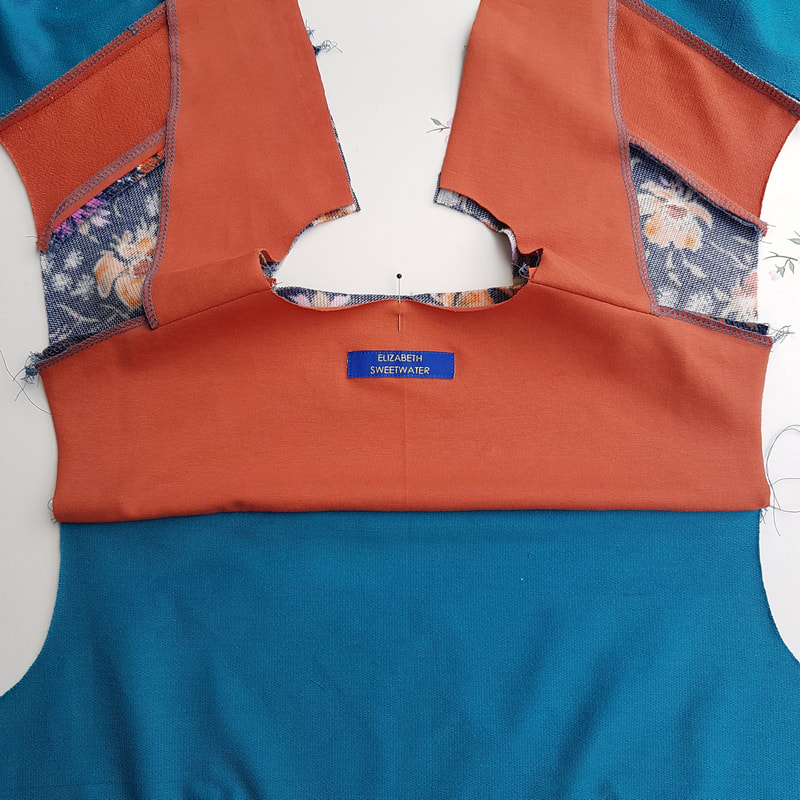
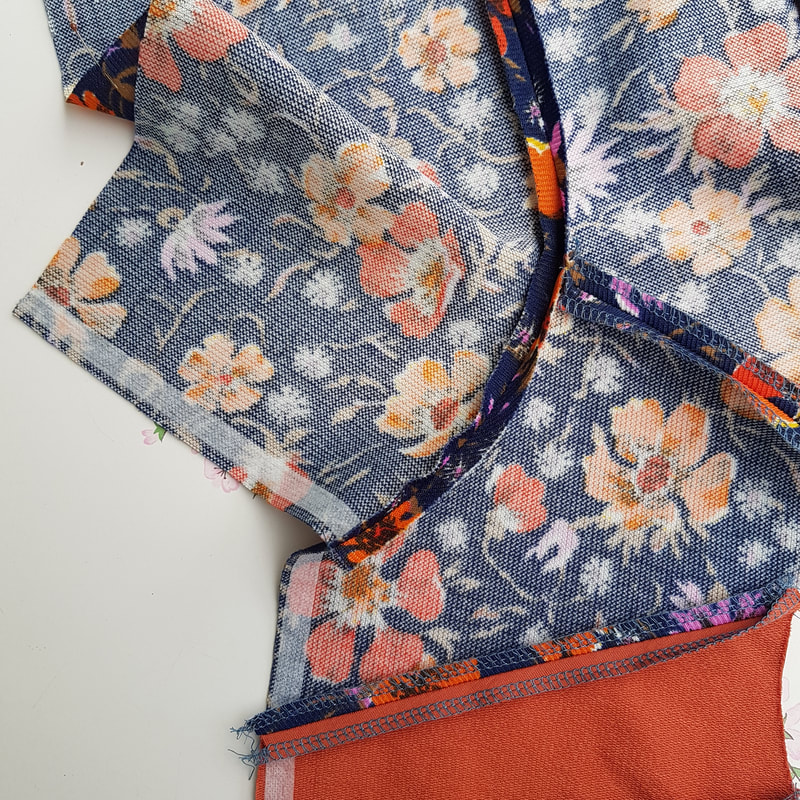
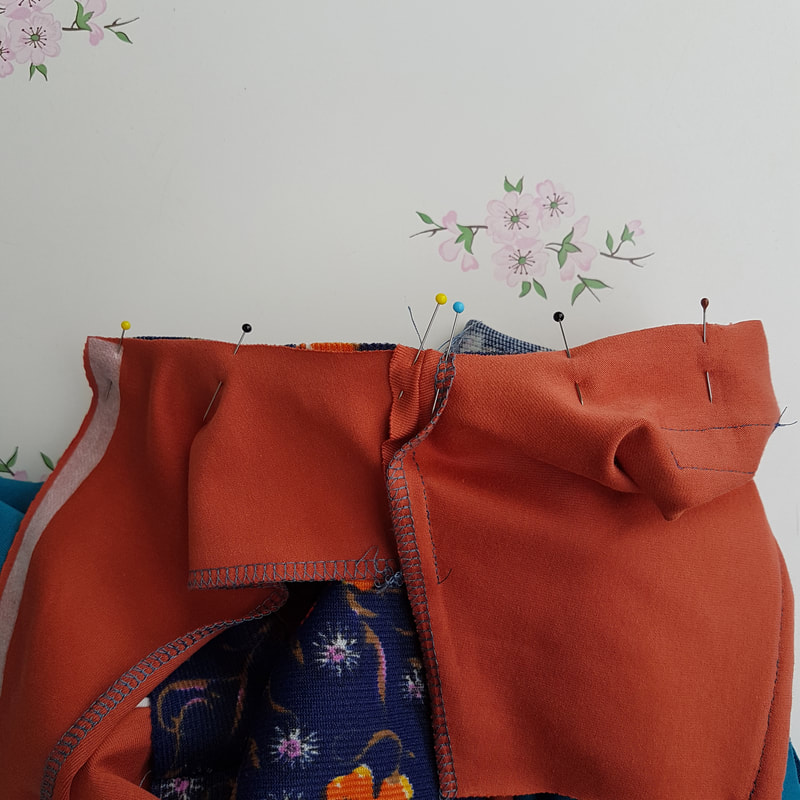
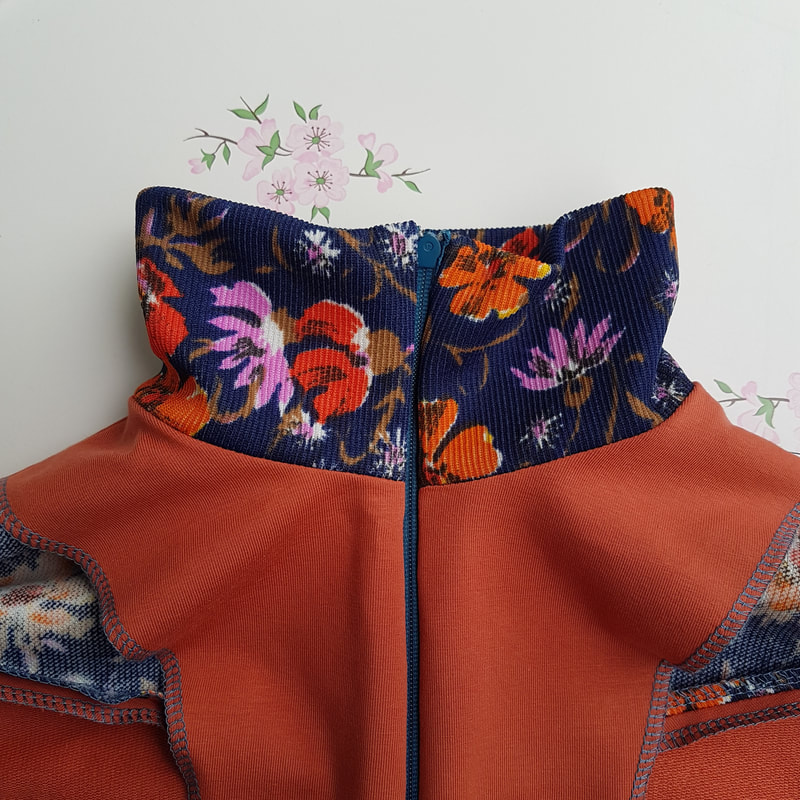
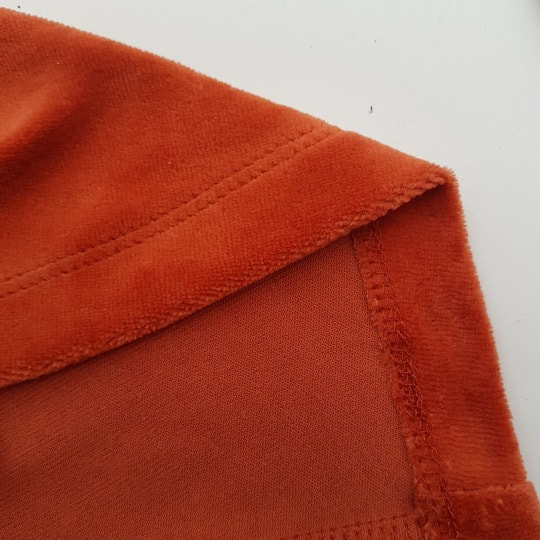
5h.
Herhaal de stap van het verwerken van de piping maar sla het overlock deel over. Zo zien de achterkant en voorkant eruit als het genaaid en geperst is.
​
Repeat the step of the piping on the front but leave the overlock part. This is what the back and front look like when sewn and pressed.

6.
Afwerken van de pandjes met beleg en kraag aanzetten

Finishing the top with facing and attaching the collar

Picture
6a.
Speld en stik de schoudernaden met de goede kanten op elkaar en pers de naden open.
Het beleg: Naai het label op de achterpas (Optioneel). Speld en stik de schoudernaden met de goede kanten op elkaar en pers de naden open.
Pin and sew the shoulderseams right way on top of each other and press the seams open.
​The facing: Sew on the label (optional). Pin and sew the shoulderseams right way on top of each other and press the seams open.


Picture
6b.
Leg de achterpas op het achterpand met de goede kanten op elkaar en het beleg deel met de goede kant op de de achterkant van het achterpand. De piping zit nu tussen de twee naden. Speld en stik de naad met een stretch steek op het schouderpandje, niet het beleg deel. Zo kun je de stiklijn volgen die je eerder maakte zodat je niks van de piping weg stikt.
​Lay the back yoke on the back piece with the right sides together and lay the facing part with the right side on the back of the back piece. The piping is now sandwiched between the two seams. Pin and sew with an stretch stitch on the front side, not the facing side. Follow the stitching line you made before so the piping doesn’t get any narrower.
Picture
6c.
Vouw omhoog en pers plat.
Fold up and press flat.

Picture
6d.
Stik de kraag tegen de hals aan, gebruik de pastekentjes op het patroon. Pers de naad open. 
Sew the collar to the neck, using the indicators on the pattern. Press open the seam.

Picture
6e.
Vouw nu de kraag naar binnen en het beleg naar boven. Pak met duim en wijsvinger de twee naden bij elkaar.
Fold the collar over and the facing up. Pinch with your thumb and indexfinger the seams together.

Picture
6f.
Draai binnenstebuiten via het armsgat terwijl je de naad vasthoudt.
Turn it inside out the armhole while still pinching the seams. 


Picture
6g.
Zet een speld daar waar je naad vasthoudt en speld dan door tot je bij middenvoor bent. Gebruik hierbij de kniptekens.Place a pin where you are pinching the seam. Continue pinning until you reach midfront. Use the indicators on the pattern.
Picture
6h.
Stik met een stretch steek het stuk naad van midden achter tot middenvoor en pers  open. Herhaal dit proces nu met de andere kant. Je heb nu de kraag mooi blind aan de hals verwerkt.Sew with a stretch stitch the seam from midback to midfront and press open. Repeat the proces on the other side. The result is a neat, blind seam.

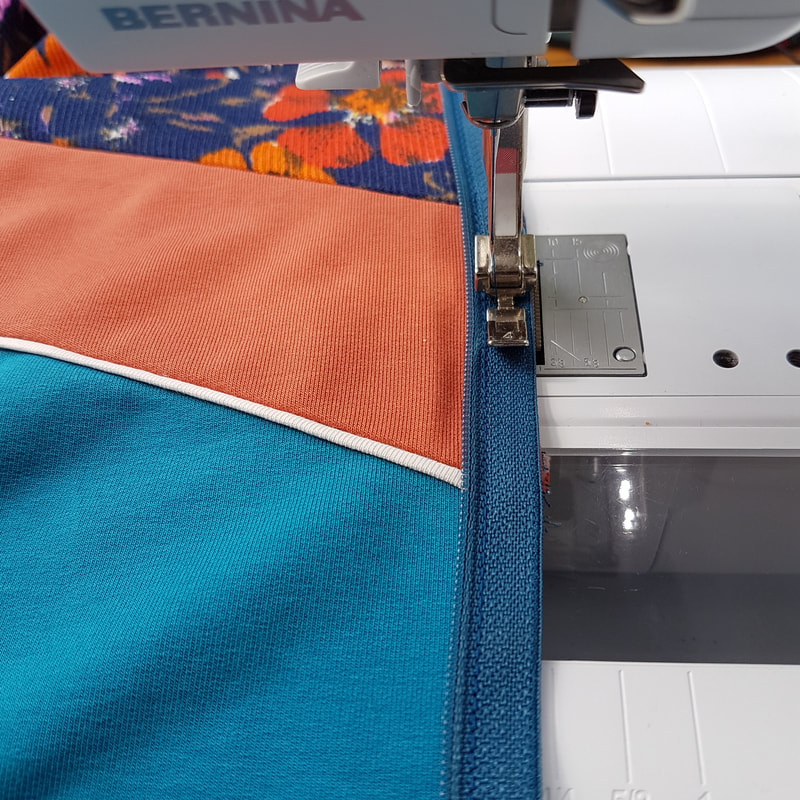
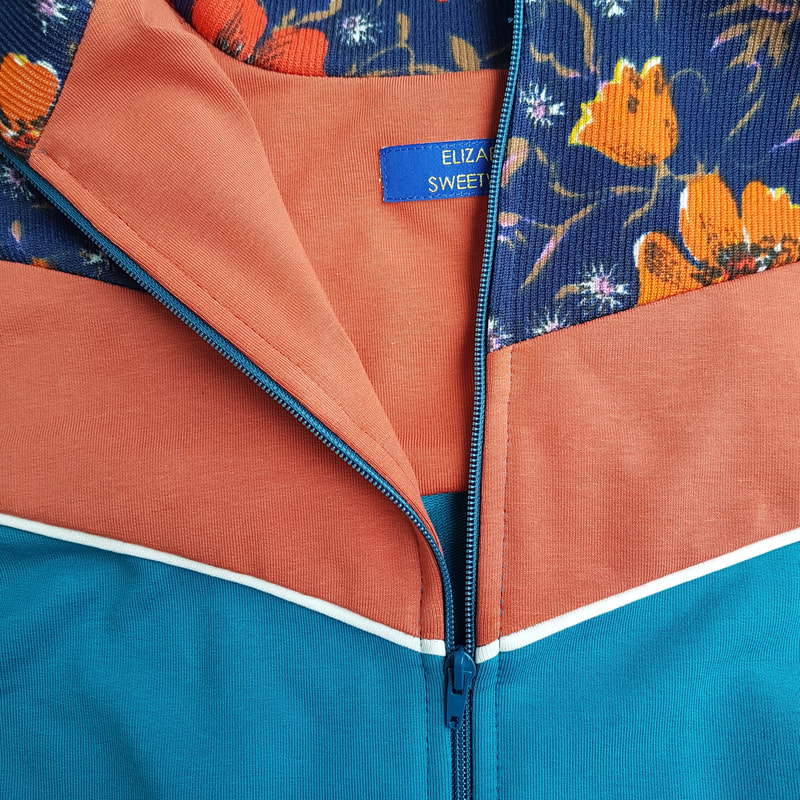
7.
De rits inzetten
Putting in the zipper

Picture
7a.
Meet voor alle zekerheid of de lengte van top van kraag tot onderkant 53 cm is. Corrigeer indien nodig. Verwissel het gewone voetje voor het ritsvoetje en zet de naald in de meest linker stand.
Just to make sure check if the measurement from top of collar to bottom is 20 4/5″. Correct if it is not.
Change the regular foot for the zipperfoot and place the needle in the most left position.

Picture
7b.
Geef met een speldje aan waar de bovenkant van de kraag is. Leg de rits met de goede kant tegen goede kant van de stof. Vouw de bovenkant van de rits band om en zet deze een paar mm onder het speldje vast.
Indicate with a pin the top of the collar. Put the zipper right side on top of the right side of the fabric. Fold over de zipper tape and attach a couple of millimeters (approx. 1/10“) under the pin.

Picture
7c.
Speld (of gebruik clips) de rest van de rits vast op de rand van de stof. Als je gebruik maakt van Magic tape: plak de tape op de rits, verwijder het papier en plak de rits vast op de rand van de stof.
Pin (or use clips) the rest of the zipper to the edge of the fabric. If you are using Magic tape: stick the tape on the zipper tape, remove the paper en stick the zipper onto the edge of the fabric.

Picture
7d.
Begin met naaien als de rits open is. Als je voorbij de naden bent, laat de naald in de hoogste positie in de stof, doe het voetje omhoog en trek voorzichtig de rits dicht. Nu kun je verder naaien tot de hele rits helft vastgenaaid is.
​
Sew one half of the zipper, regular stitch. Start sewing when the zipper is open. When you are past the seams, leave the needle in it’s highest position in the fabric and close the zipper. Now you can continue to sew until the zipper is sewn.
Picture
7e.
Neem alle punten waar de lijnen netjes naast elkaar moeten komen over met een speldje aan de andere kant van de rits. Speld deze punten eerst. Speld of clip (of plak) dan de rest van de rits helft tegen de andere helft van het vest. Check even of alle naden netjes doorlopen voor je gaat naaien. Naai dan de andere rits helft.
Copy all the points where the lines need to meet neatly with a pin. Pin these points first. Then pin or clip (or stick) the other half of the zipper to the other half of the jacket. Check if all the lines line up and sew the other zipper half.
Picture
7f.
Draai om en pers plat. (gebruik een dunne katoenen perslap voor het geval je strijkijzer lekt of als het op een te hete setting staat en je rits smelt).
Turn over and press. (use a cloth, in case your iron leaks or if the setting is too hot and melt your zipper).
Picture
7g.
Nu moet het beleg en de andere kant van de kraag  tegen de rits aangezet worden. Leg je de goede kanten van het beleg tegen de goede kanten van het pand, de kraag delen goede kanten tegen elkaar Stik het beleg en kraag vast aan de voorpand zijde, niet aan de beleg zijde. Stik over het stiksel wat je ziet heen.
Now the facing, the other side of the collar and the hip band needs to be attached to the zipper. Lay the right side of the facing on the right side of the front part and the collar right sides together. Sew The facing and collar on the jacket side, not the facing side. Sew over the visible stitching.
Picture
7h.
Keer het beleg terug en de binnenkant zou er zo uit moeten zien.
Fold it back inside out and the inside of the jacket should look like this.
Picture
7i.
Zet het beleg vast in de armsgat opening voor je de mouw inspeldt.
Pin the facing in to the sleeve opening before pinning in the sleeve.
Picture

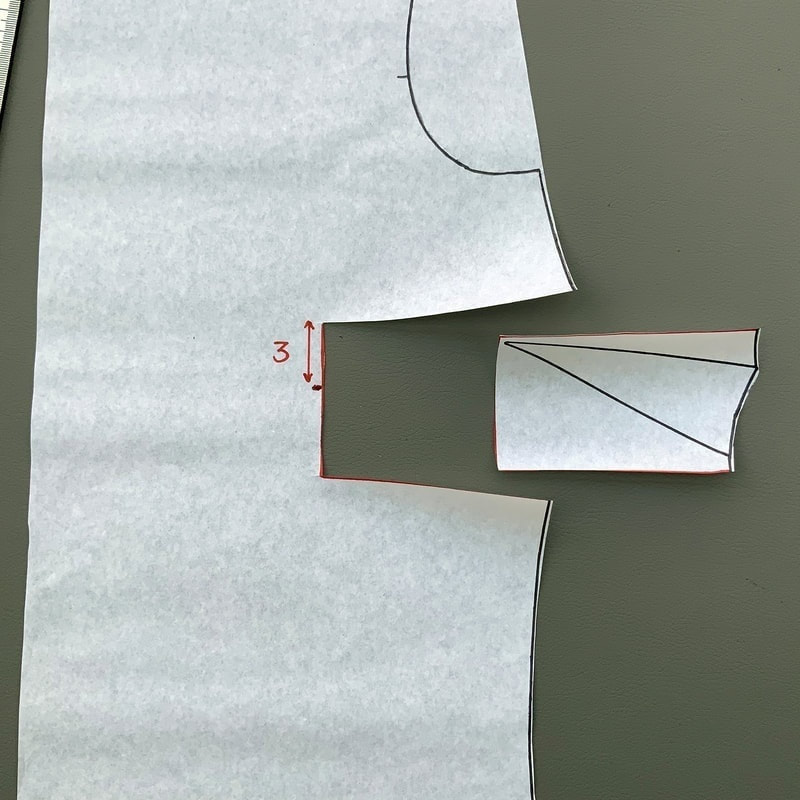
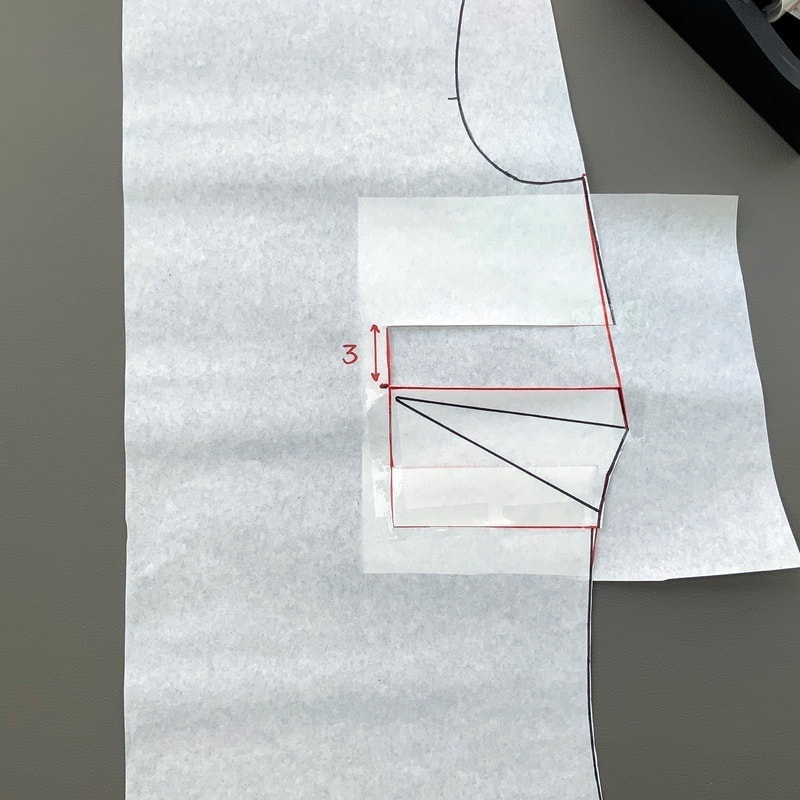
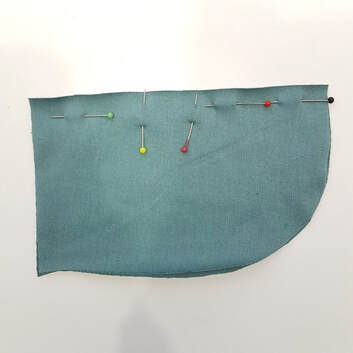
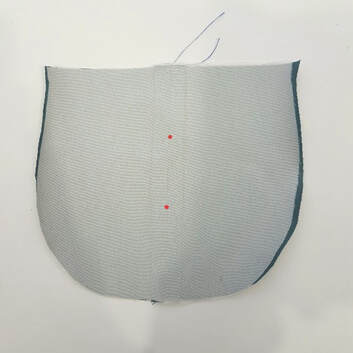
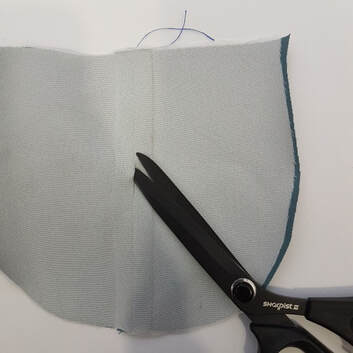
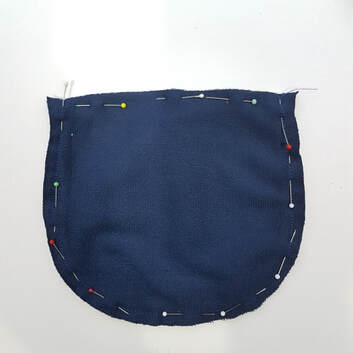
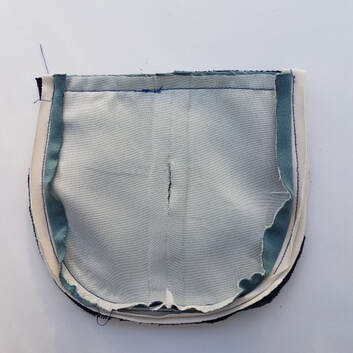
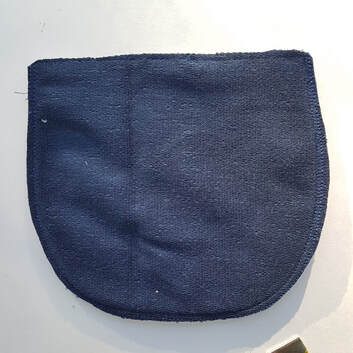
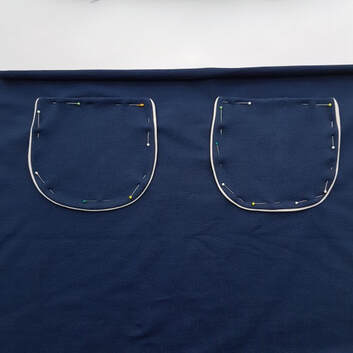
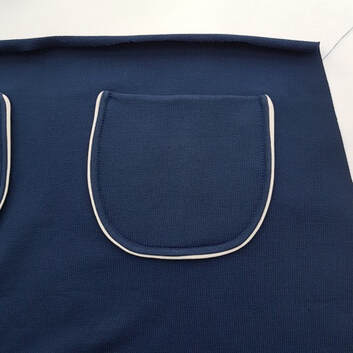
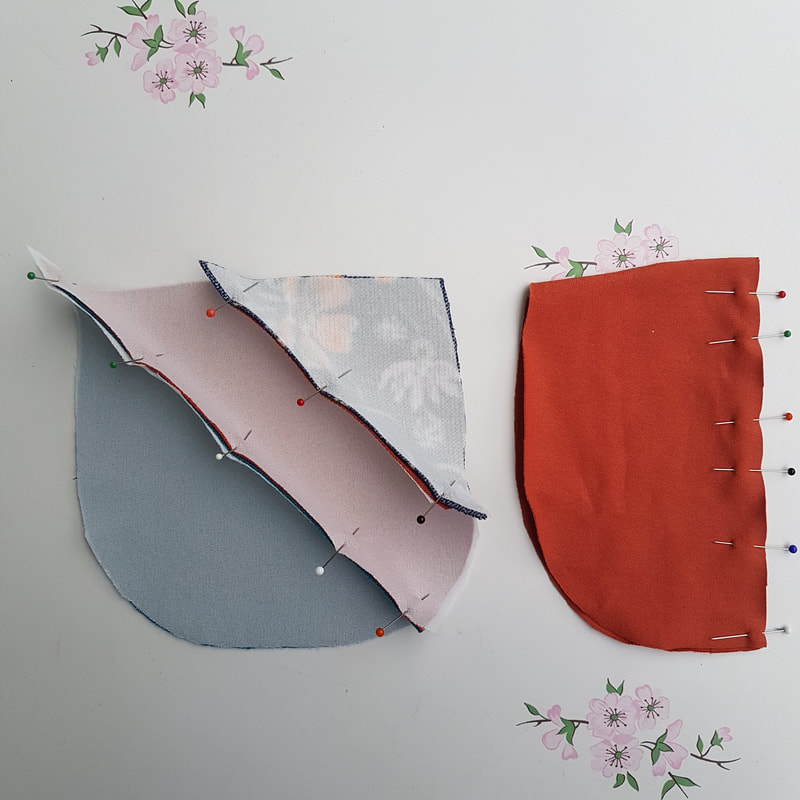
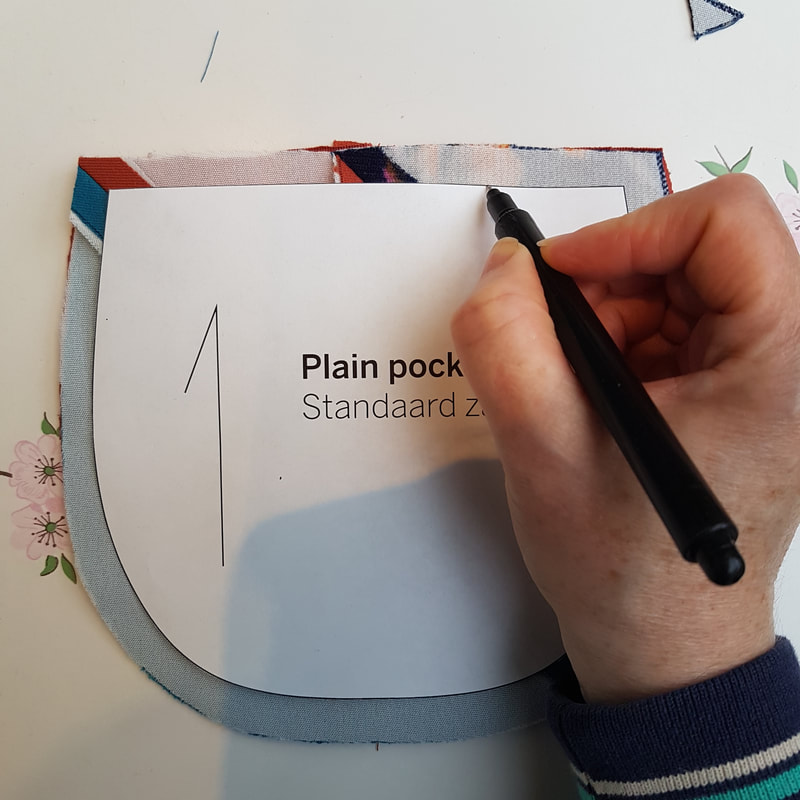
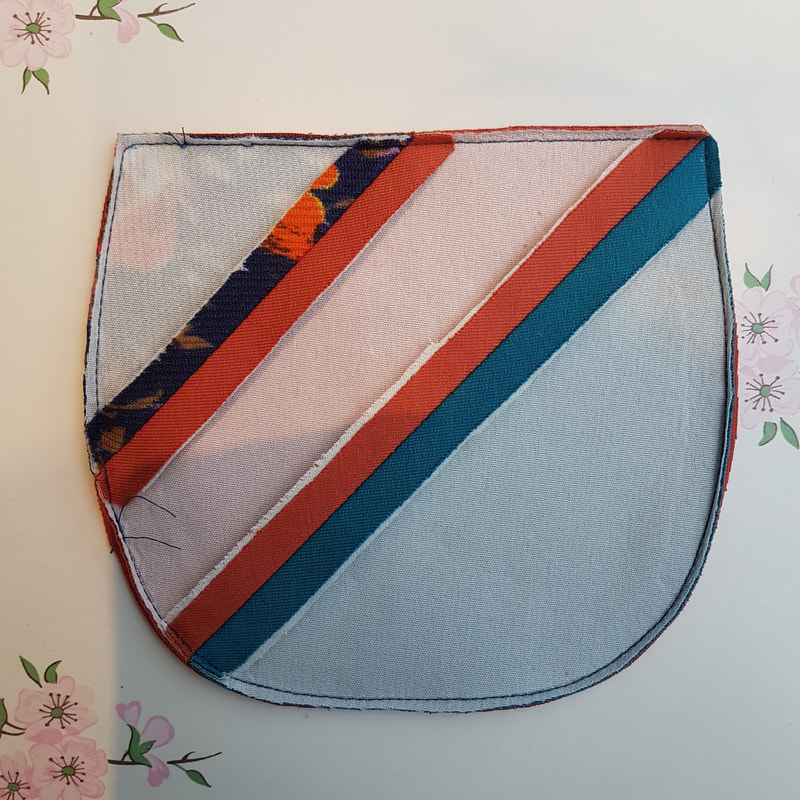
8.
De zakken

The pockets

Optie met piping
Plain option with piping

Picture
8a.
Speld en stik de piping langs de rand van de zak op ongeveer 0.7 cm. Speld de twee voering deeltjes tegen elkaar, laat een stukje open om de zak later te kunnen keren.
Pin and stitch the piping along the edge of the pocket approx. 1/4″ of the edge. Pin the two lining parts together leaving an opening to turn the pocket later.

Picture
8b.
Pers de naad open.
​Press open de seam.


Picture
8c.
Strijk de rekbare vlieseline tegen de achterkant van de zakvoering.
Iron on the stretch fusible interlining against the back of the pocket lining.
Picture
8d.
Knip ook een opening in de vliesline.
Cut an opening in the interlining.
Picture
8e.
Speld en stik de voering met de goede kant tegen de goede kant van het zak deel op 1 cm van de kant.Pin and stitch the lining with the right side on to the right side of the pocket piece 1/3″ from the edge.

Picture
8f.
Je kunt nu de naden wat open persen aan beide kanten. Dit geeft een wat strakker resultaat. Knip daarna de naden weg tot een paar mm.
You can now press the seams open on both sides. This will give a cleaner result.
Picture
8g.
Knip daarna de naden weg tot een paar mm.
​After that cut away the access fabric


Picture
8h.
Keer nu de zak door de opening en naai het dicht met de hand.
Turn the pocket through the opening and close the opening by hand.
Picture
8i.
Speld de zakken op de rok. Gebruik de buitenste kniptekens op het patroon.
Pin the pockets on the skirt. Use the outer cross on your pattern as a guide.


Picture
8j.
Naai de zakken vast op ongeveer 0,5 cm van de kant. Dit kan met een gewone stiksteek op de naaimachine.
Topstitch the pockets about 1/5″ off the edge. You can use a regular stitch on your sewing machine.

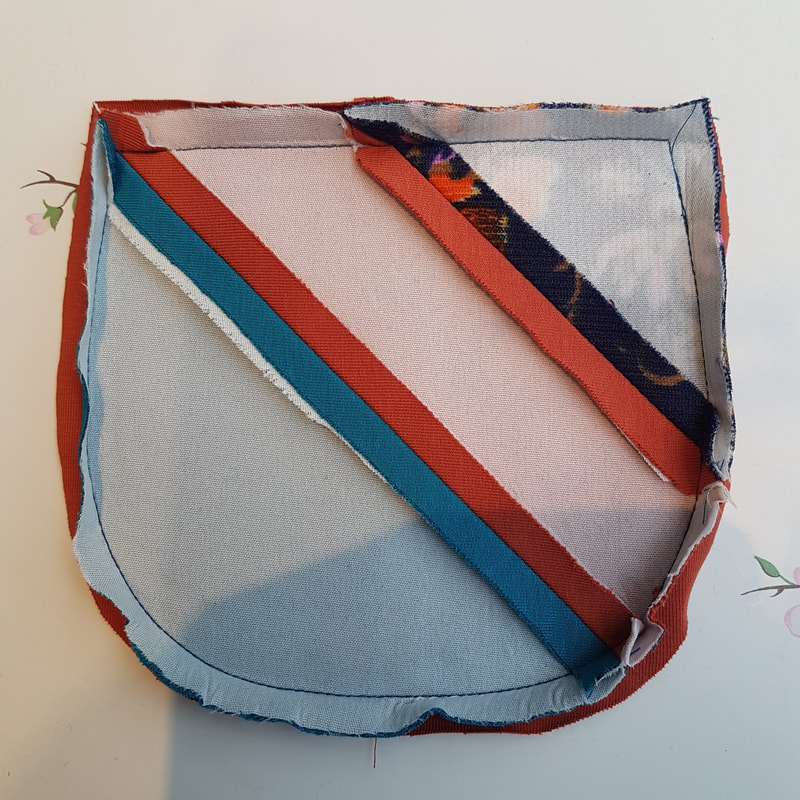
Optie met strepen
Option with stripes
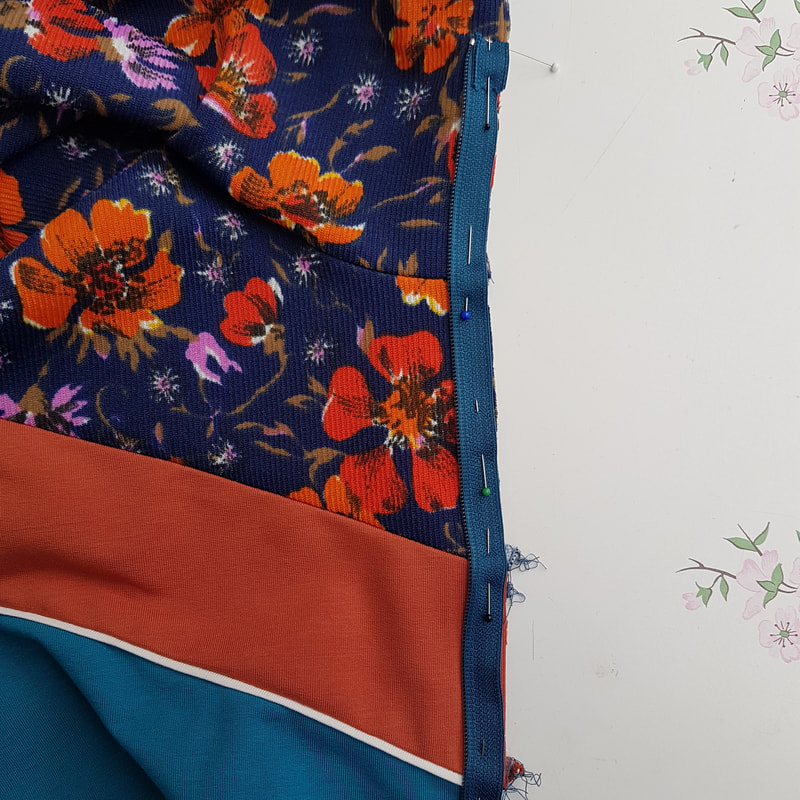
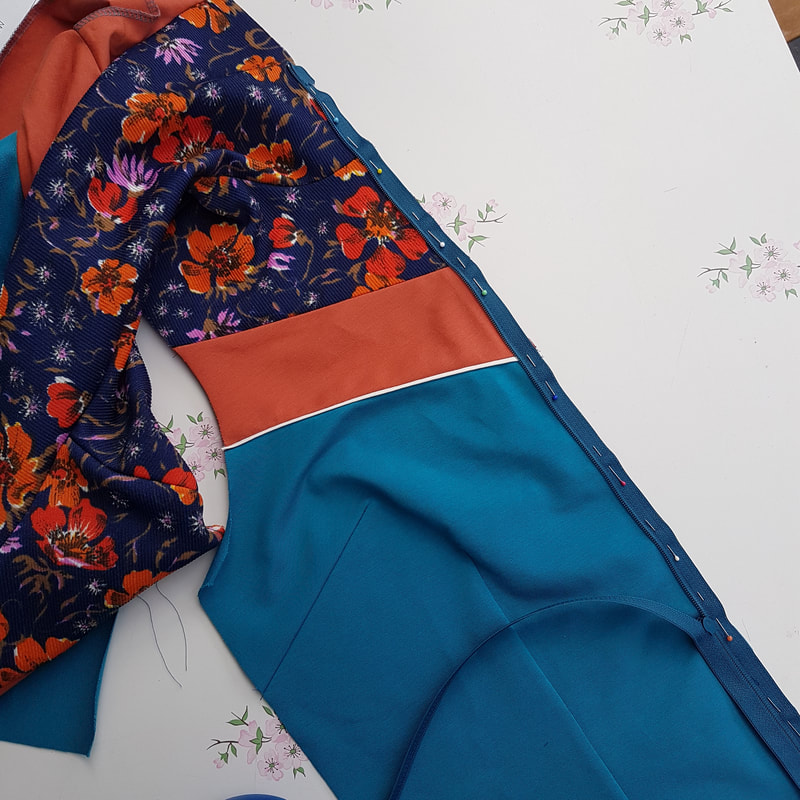
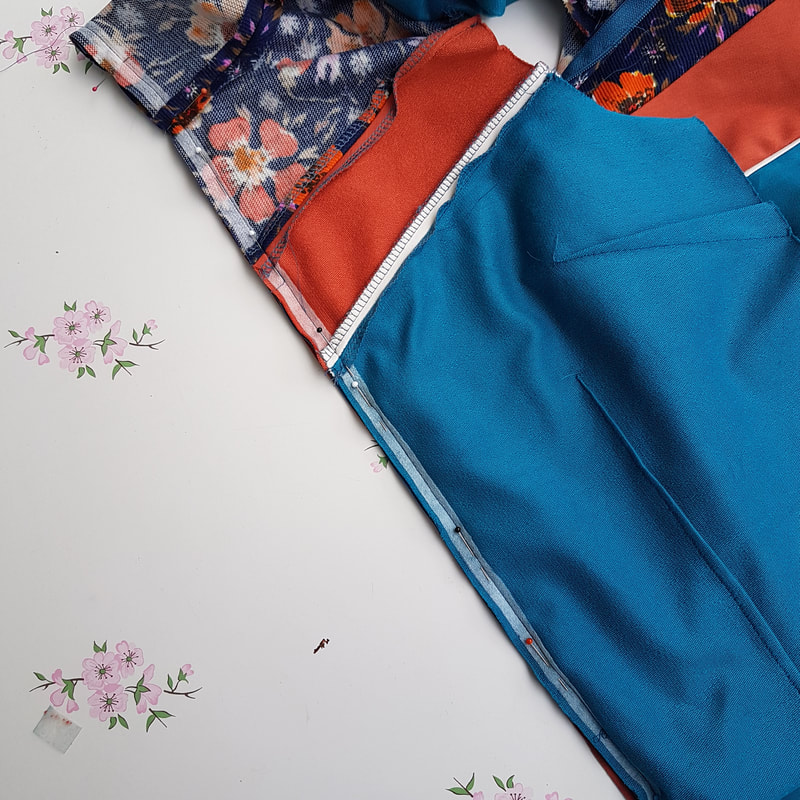
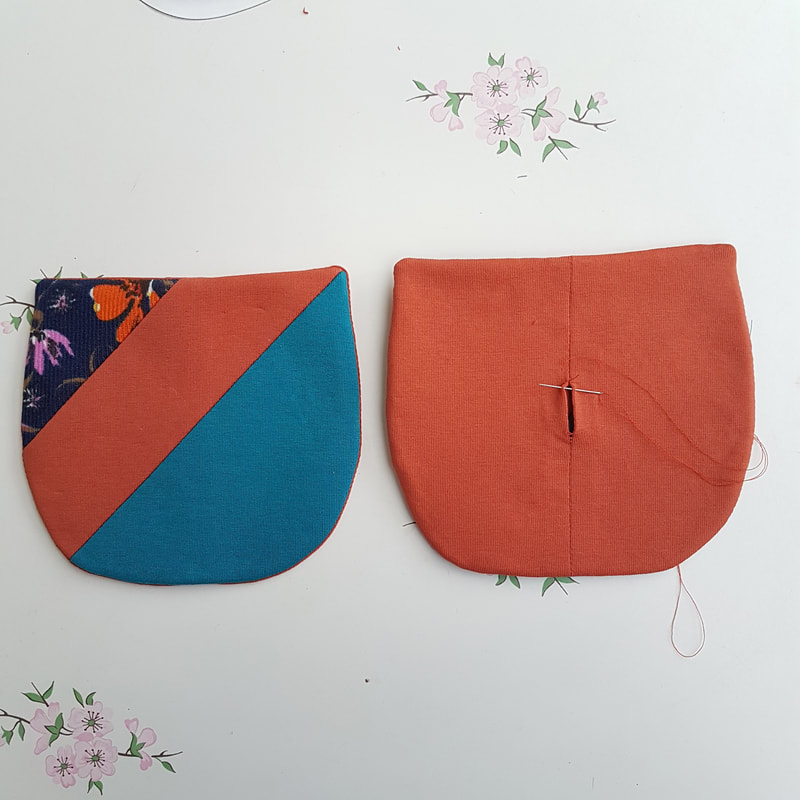
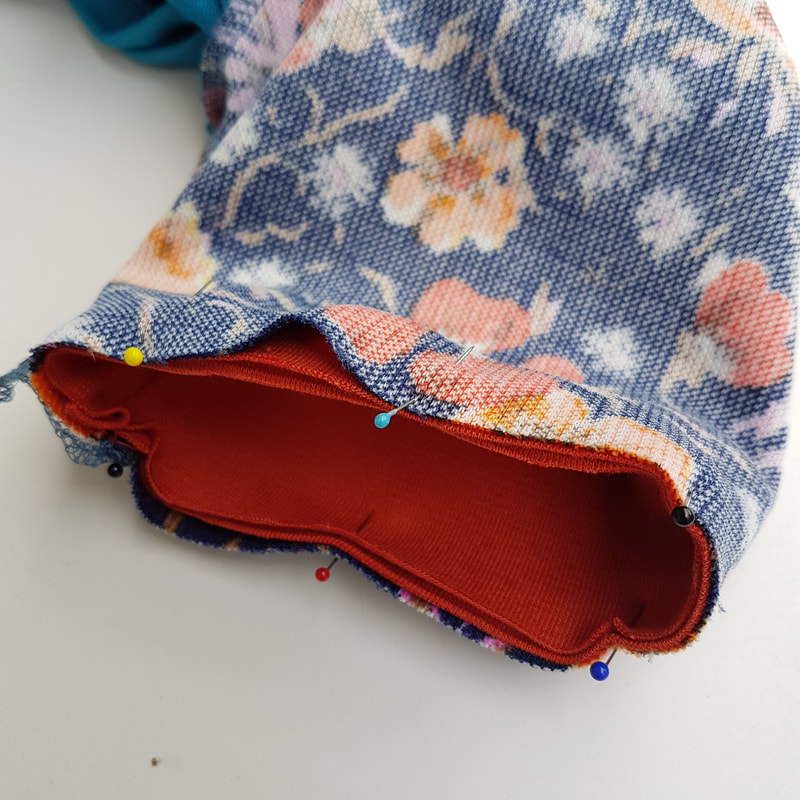
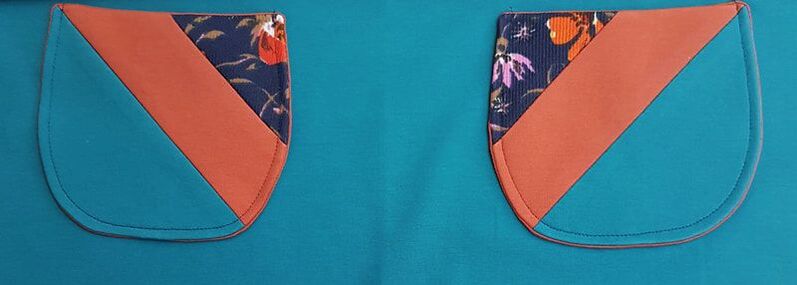
Picture
8.2a.
​Speld nu de zakdelen en de zakvoering delen. Laat een stukje open in de voeringdelen om later de zakken te kunnen keren.
Pin both lining as pocket pieces together leaving an opening in the lining pieces so you can turn the pocket later.
Picture
8.2b.
​Stik de naden met een stretch stiksteek. Dit is noodzakelijk omdat je later door het stiksel heen moet knippen en een gewoon stiksel gaat dan kapot. Pers de naden open.
Sew the seams with a stretch stitch on you sewing machine. This is necessary because later you will have to cut through the seams and than they will break. Press open the seams.
Picture
8.2c.
​Als je het zakpatroon overneemt zonder zoom dan heb je een mooi sjabloon die je op de vliesline kant kunt overtrekken. Je kunt dan over deze lijn stikken voor een mooie vorm.
When you copy the pattern piece of the pocket without the seam allowance you have a template you can trace. Sew over it for a nice clean shape.
Picture
8.2d.
Speld de voering tegen de zak.
Pin the lining against the pocket.
Picture
8.2e.
​Pers de naden om van zowel voor-als achterkant.
Press open the seams of the pocket on both front and back.
Picture
8.2f.
​Knip de naden kort af.
Trim off the excess seams.
Picture
8.2g.
​Keer de zak om. Pers plat. De opening in de voering naai je dicht met de hand.
Turn inside out. Press flat. The opening in the lining can be sewn by hand.
Picture
8.2h.
​Speld en naai de zak op de rok op 5mm vanaf de rand. Voor de positionering zie hierboven - ong. 60mm vanaf middenvoor en 60mm vanaf bovenkant.
Pin and topstitch the pocket 5mm from the edge. Position the pocket approx 60mm down and 60mm from the centreline.
Picture
8.2i.
​De zakken zijn klaar!
Completed pockets

9
Het rokdeel aanzetten en de mouwen inzetten

Attaching skirt and sleeves

Picture
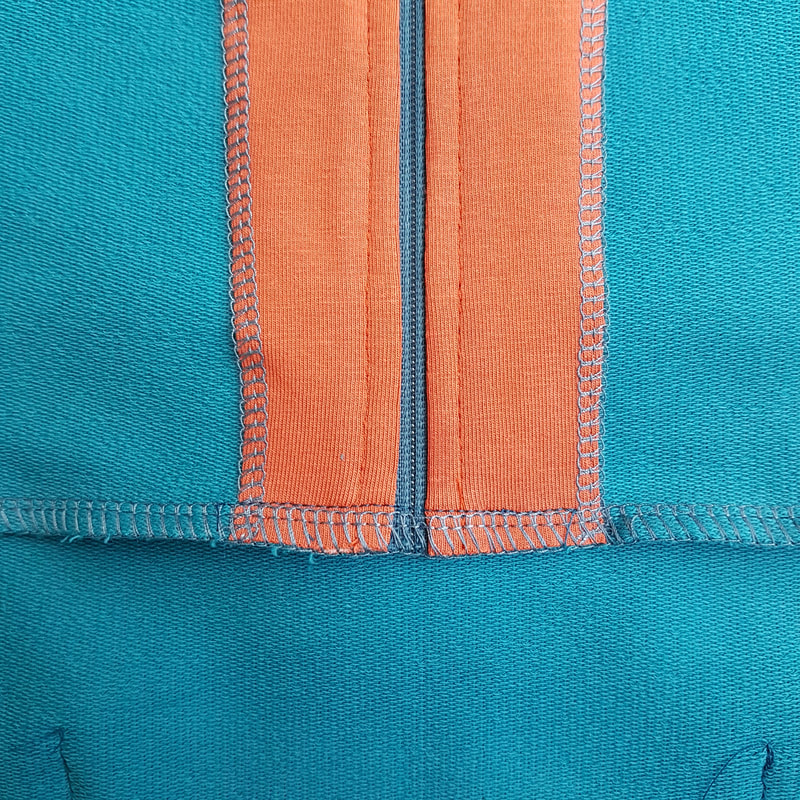
9a.
Speld de goede kant van het rokdeel tegen de goede kant van het bovenstuk. Doe dit ook met de achter rok-en pand. Gebruik de overlock machine om de naden te stikken. Versterk het stukje waar de rits zit met een paar steekjes op je naaimachine.
Pin the right side of the skirt to the right side of the top. Do the same with the back pieces.
Use the overlock machine to sew the pieces together. With a couple of stitches, reinforce the zipper area.
Picture
9c.
Pers de naad van het voorpand omlaag en van het achterpand omhoog.
Press the seam of the front skirt piece down and from the back up.
Picture
9d.
​
Speld en stik met een overlock steek de mouw in het armsgat. Gebruik hiervoor de kniptekens. Het knipteken vop de mouw voor gaat tegen de lijn met de piping.
Pin and sew with an overlock stitch the sleeve into the sleeve opening. Use the markings on your pattern. The front marking on the sleeve needs to align with the line with the piping.
Picture
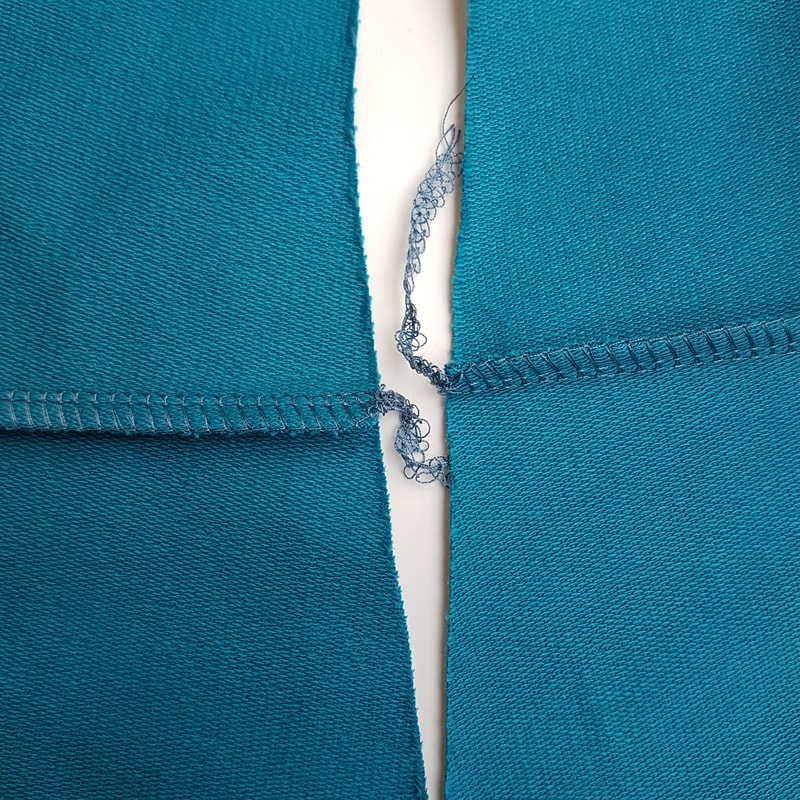
9e.
Gebruik een mouwplank om de mouw te persen. Pers de naad naar buiten. Een vochtige doek zorgt ervoor dat je de naden niet door perst.
Use a sleeve board to press the sleeve. Press the seam outwards. A moist cloth prevents the seam from pressing through.

10.
Zijnaden dichtmaken, zomen en manchetten

Closing sideseams, hems and cuffs

Picture
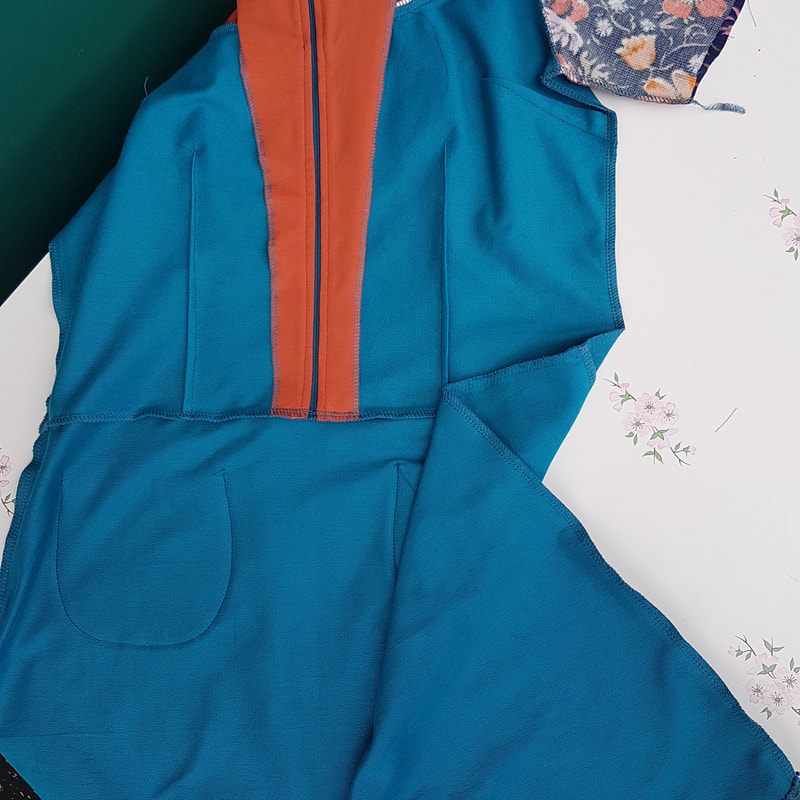
10a.
Je kunt nu de zijnaad spelden en stikken met de overlock machine, in één lijn van mouw tot onderkant. Vouw hierbij de mouwnaad naar boven bij het voorpand en naar beneden bij het achterpand. Zo krijg je geen dikke naden op elkaar. Overlock de onderkant van de jurk, vouw 2,5 cm om en pers. Heb je een coverlock of gebruik je een tweeling naald voor de zoom  dan hoef je niet eerst de rand af te werken.
Now you can pin and sew the sideseams with the overlock machine in one line from sleeve to hem. Fold while sewing the armhole seam up for the front and down for the back. Overlock the bottom of the dress. Fold over 1″ and press. Do you use a coverlock or twin needle? than finishing the edges first is not necessary. 
Picture
10b.
Naai de zoom vast met een gewone steek.
Sew the hem with a regular stitch.
Picture
10c.
In het geval van een coverlock of tweeling naald stik je aan de goede kant van de stof.
Sew the hem. If you use a coverlock or twin needle you stitch the hem on the right side of the fabric.
Picture
10cc.
Buiten-en binnenkant van de zoom.
Outside and inside of the hem.
Picture
10e.
Herhaal het proces van de zoom voor het omzomen van de lange mouwen.
Repeat this process described for the hem for hemming the long sleeves.

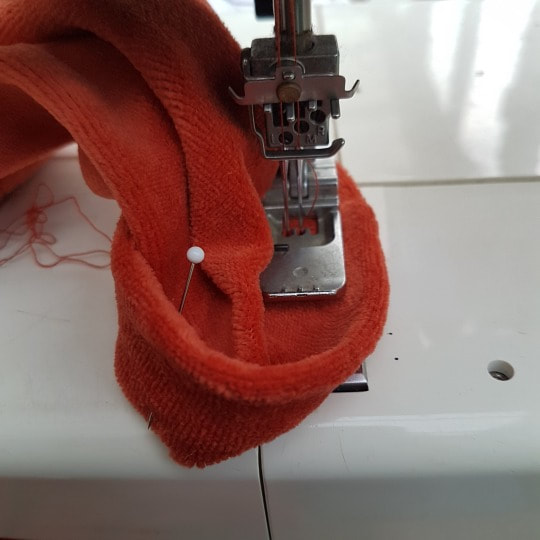
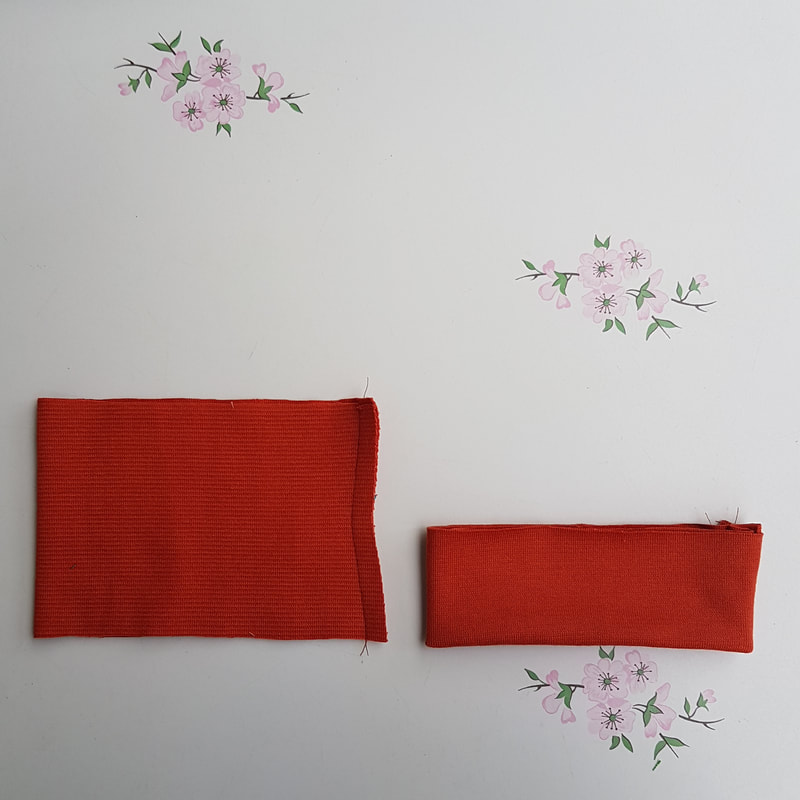
11.
Manchet voor de korte mouw
Cuff for the short sleeve

Picture
11a.
Maak je de mouw met manchet: Speld en lock de naden van de manchetten dicht en geef een knipje in het midden. (kijk uit dat je niet het hele stiksel doorknipt.) Vouw de naden boven en onder het knipje een andere kant op. Keer de manchet om tot je in het midden een vouw hebt.If you make the version with the sleeves with cuffs: pin and overlock the seams of the cuffs and cut it in the middle. (careful you don’t cut through the stitching). Fold the seams above and underneath the cut in a different direction. Turn the cuff until you get a fold halfway.

Picture
11b.
Keer de mouw binnestebuiten en speld de manchet in de mouwopening. Het is makkelijker om de mouwopening te stikken dan de manchet. Naai de manchet vast met een overlock steek. Keer de mouw weer terug om.
Fold the sleeve inside out and pin the cuff into the sleeve opening. It is easier to sew the sleeve opening than it is the cuff. Sew the cuff in the sleeve opening with an overlock stitch. Turn the sleeve. 

Nu de jurk netjes strijken en ze is klaar!
Give your dress a final press and she's finished!
Picture
Picture
Picture


Comments are closed.
    Picture
    For all the latest patterns to buy visit my Etsy shop today.
Powered by Create your own unique website with customizable templates.
  • Tutorials
  • Movies
  • Happy Sewers
  • About