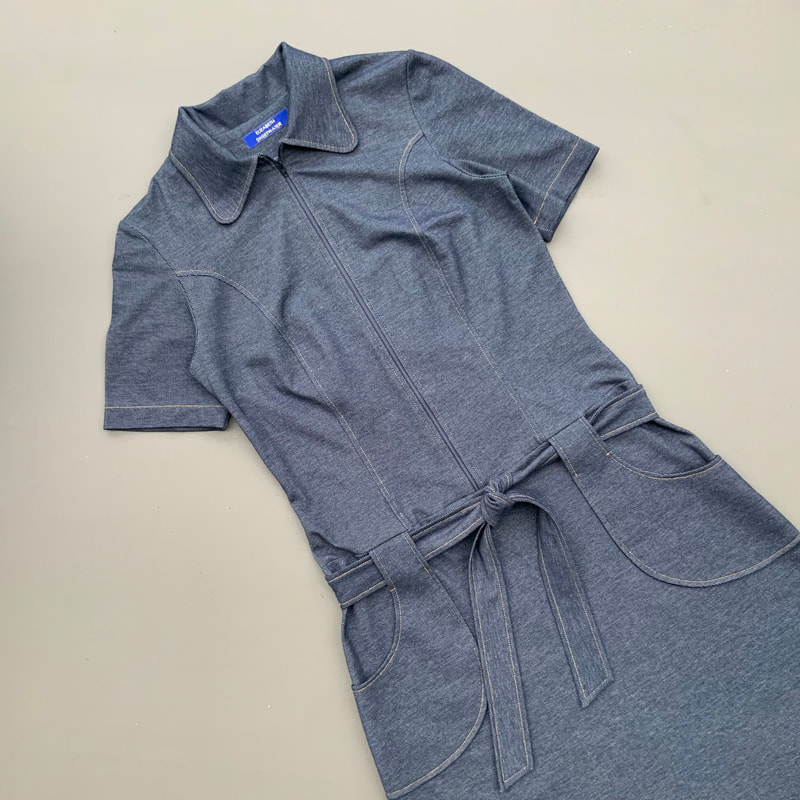
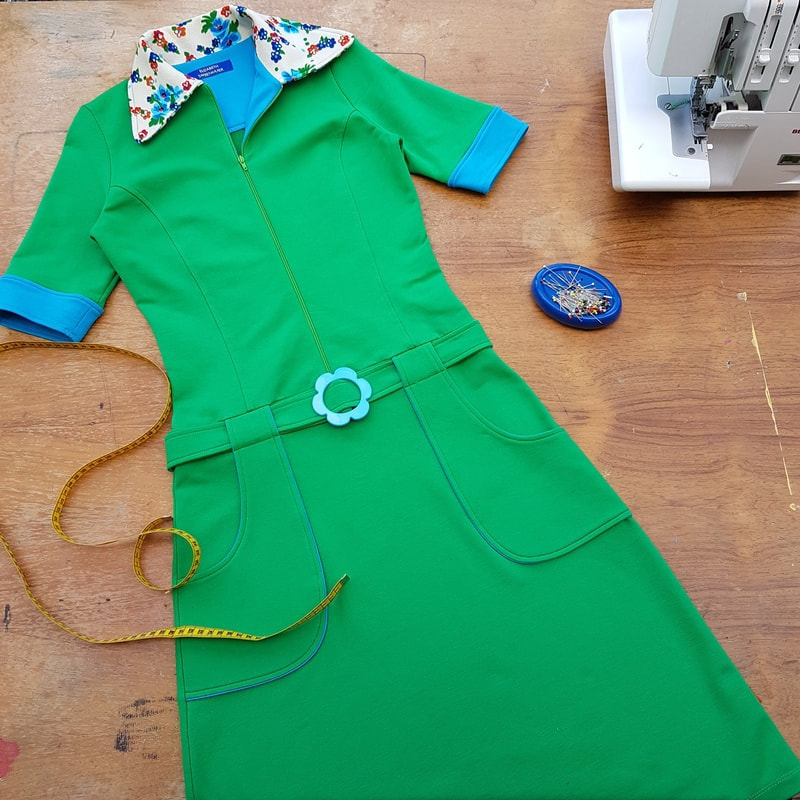
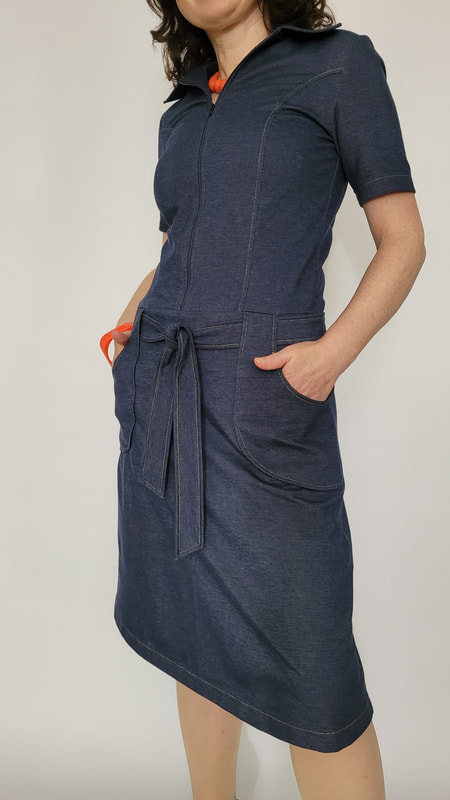
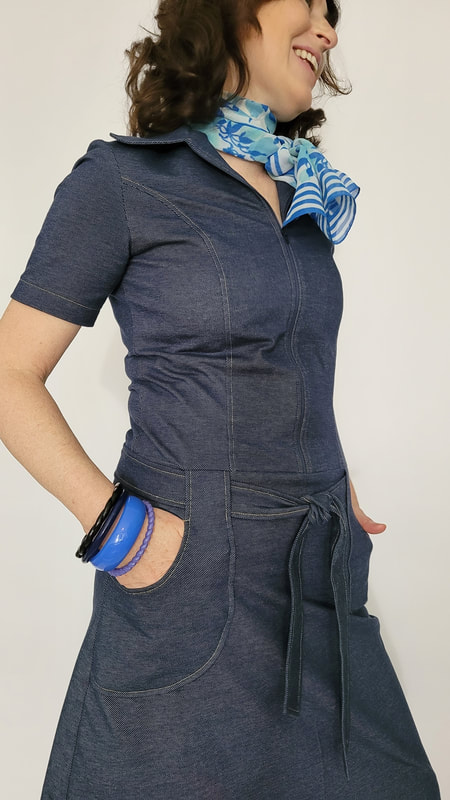
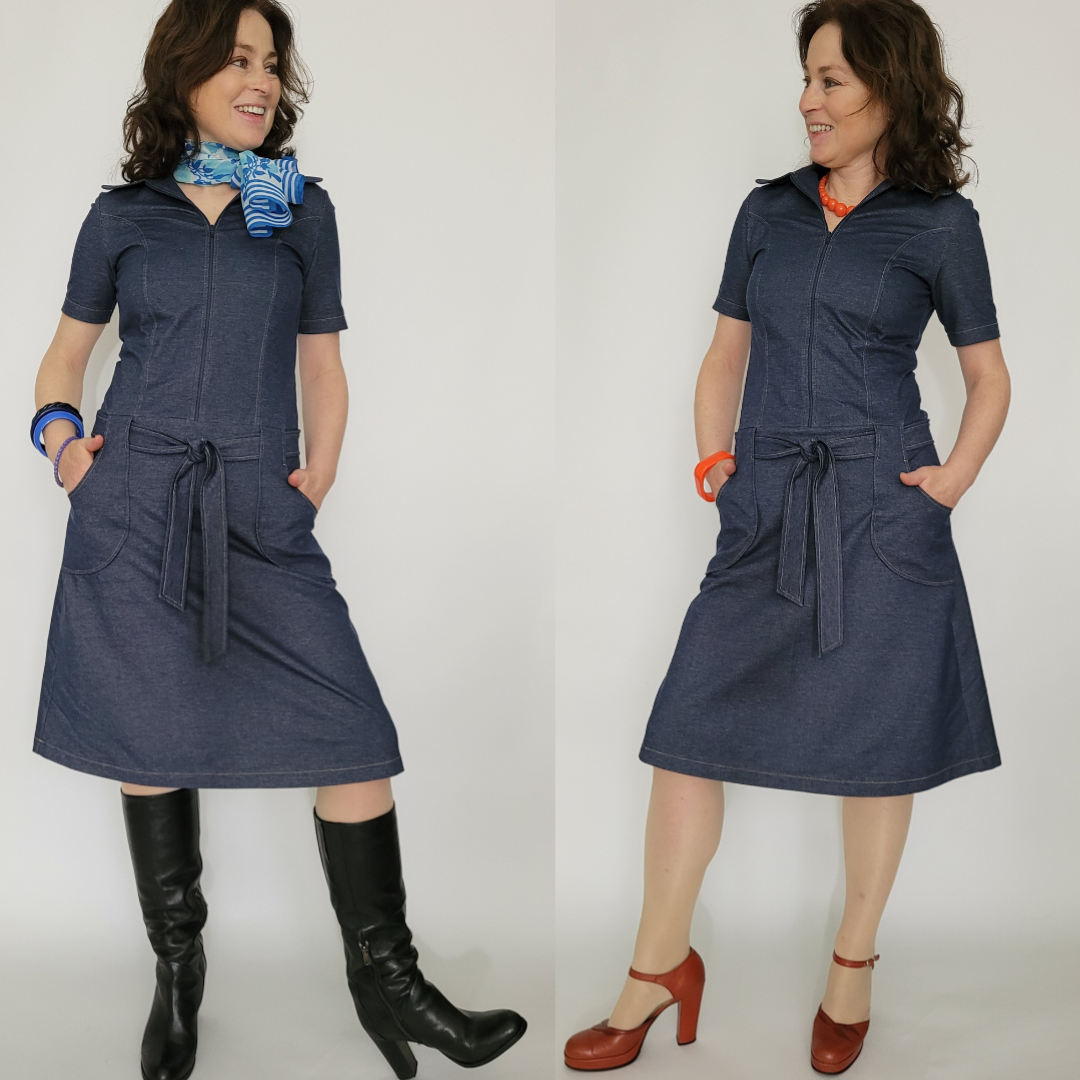
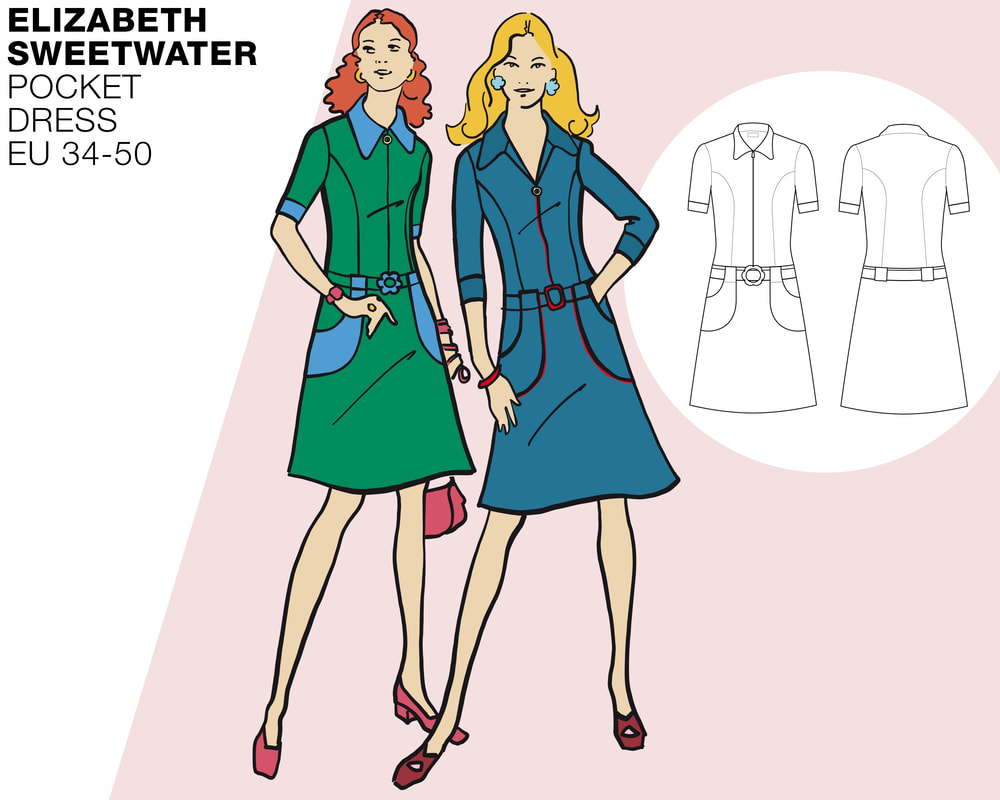
Elizabeth Sweetwater
  • Tutorials
  • Movies
  • Happy Sewers
  • About

Pocket Jurk

8/3/2020

 
Pocket zip dress
Picture
Introductie
​Dit geïnspireerd op de mode uit de jaren '60 rits jurkje is heel vrouwelijk door zijn aangesloten belijning maar ook stoer door de zakken en riem. Draag met sneakers voor een sportieve look of met hoge laarzen voor een gave retro outfit. Maak een tijdloze uni basic, of een stoere denim variant. Je kunt ook spelen met kleurcontrasten of 'm zelfs in een print maken. Het patroon bevat twee mouwlengtes. Ik leg je in deze tutorial stap voor stap uit hoe je deze jurk kunt maken. Het materiaal gebruikt voor deze jurk is French terry (een lichtgewicht, ongeruwde sweat kwaliteit) maar ze is ook leuk in denim French terry of een mooie Punta. 

Introduction
This inspired by sixties fashion zipper dress is very feminine because of its fitted shape but also cool with the big pockets and belt. Wear with sneakers for a sporty look or with high boots for a awesome retro outfit. Make a timeless basic in a solid colour or a tough denim version. You can also play with colour blocking or even make it in a print. This pattern contains 2 sleeve lengths. In this step by step tutorial I will explain how to make this dress. The material used is a French terry, a lightweight cotton sweat fabric. It will also work in a Denim French terry and a Punta.
Picture
Picture
Picture

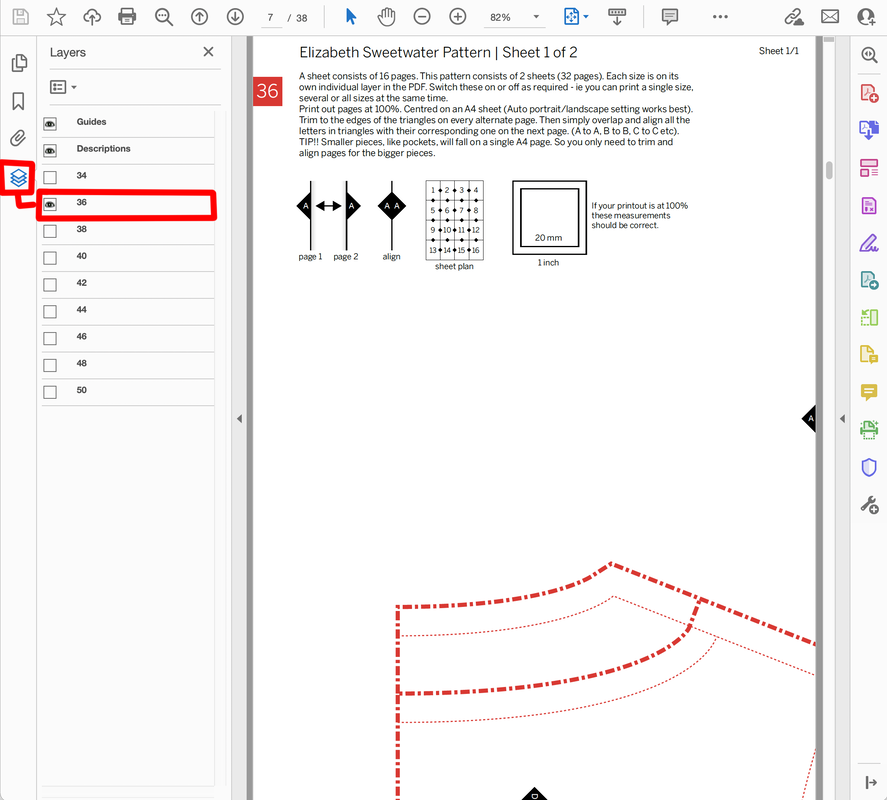
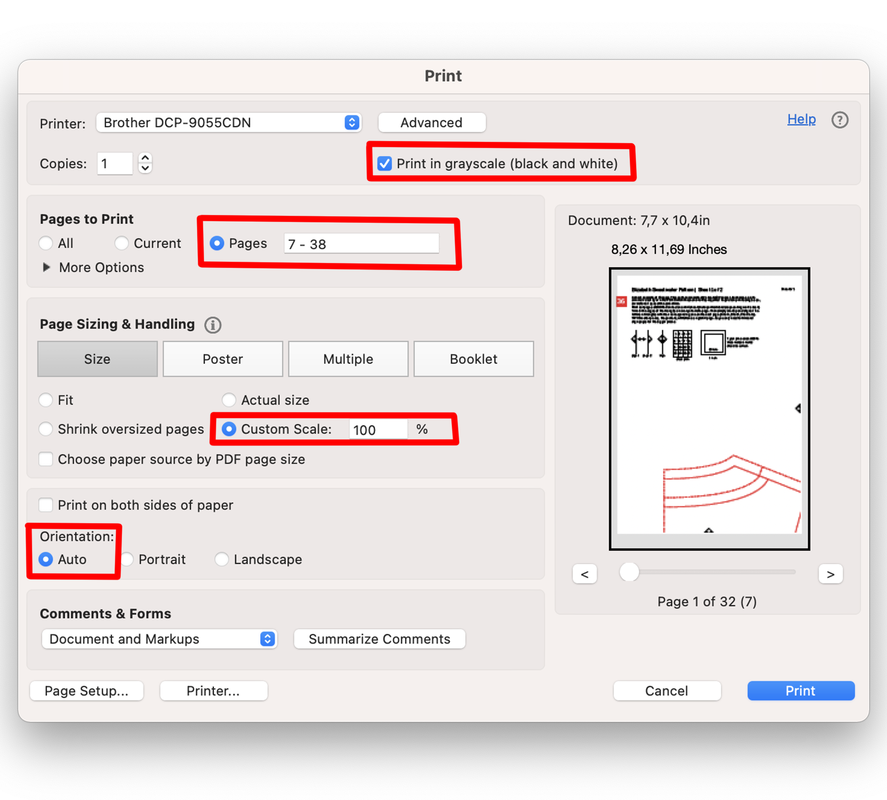
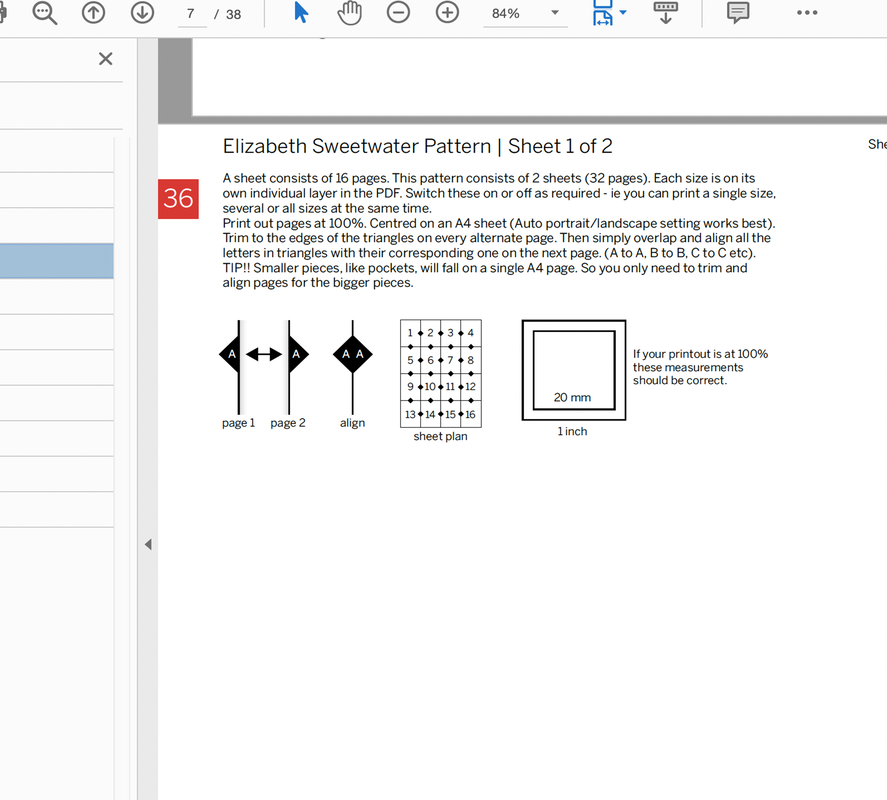
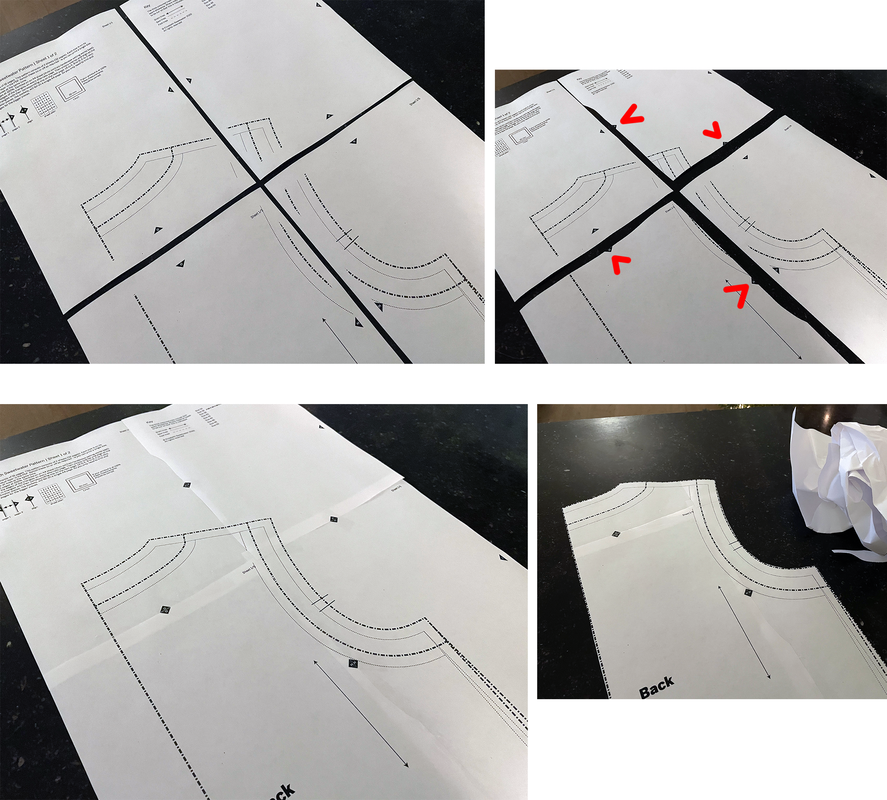
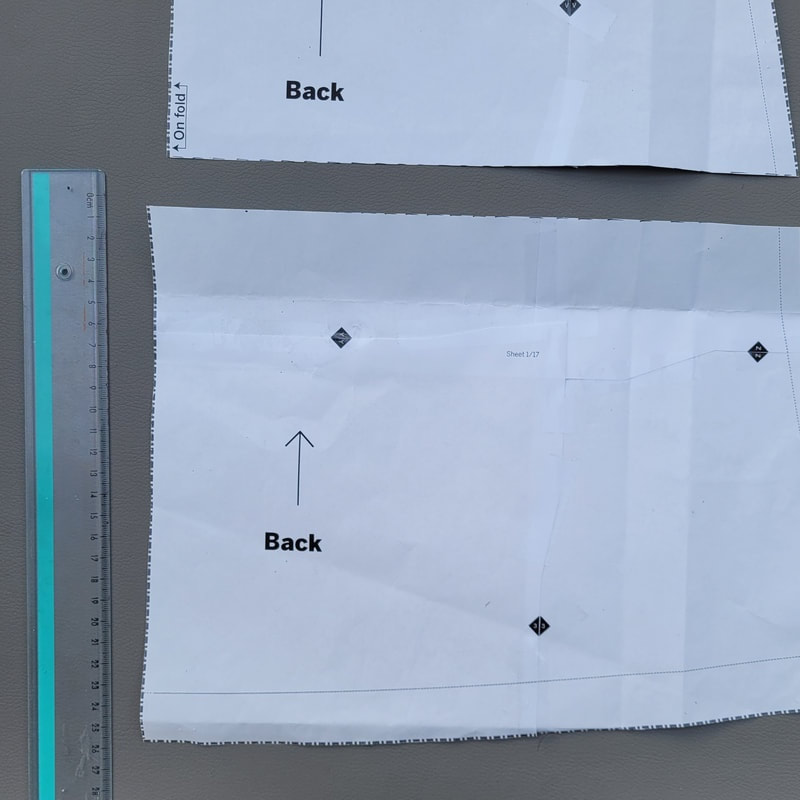
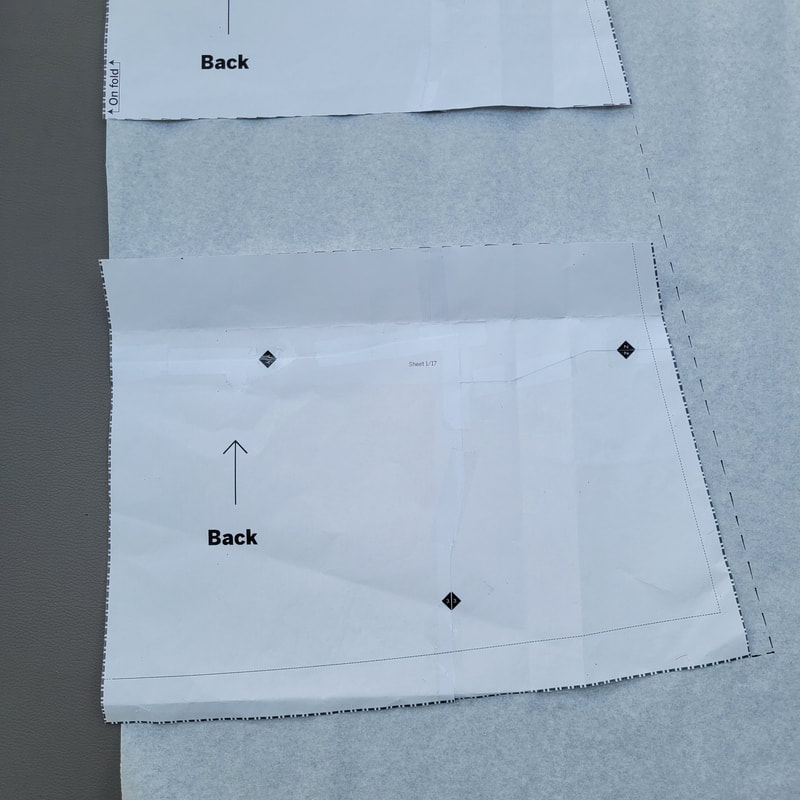
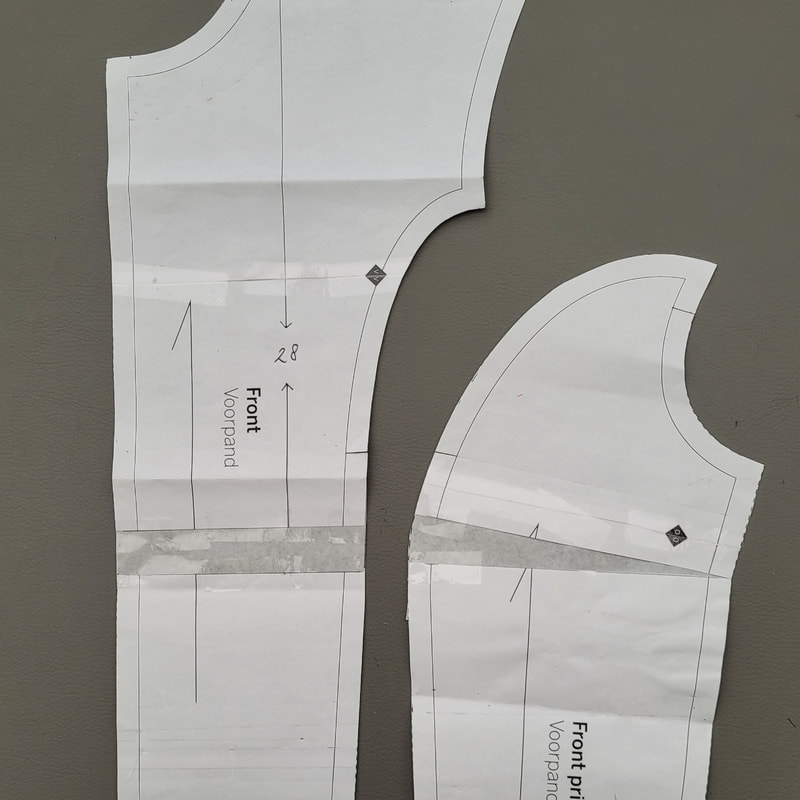
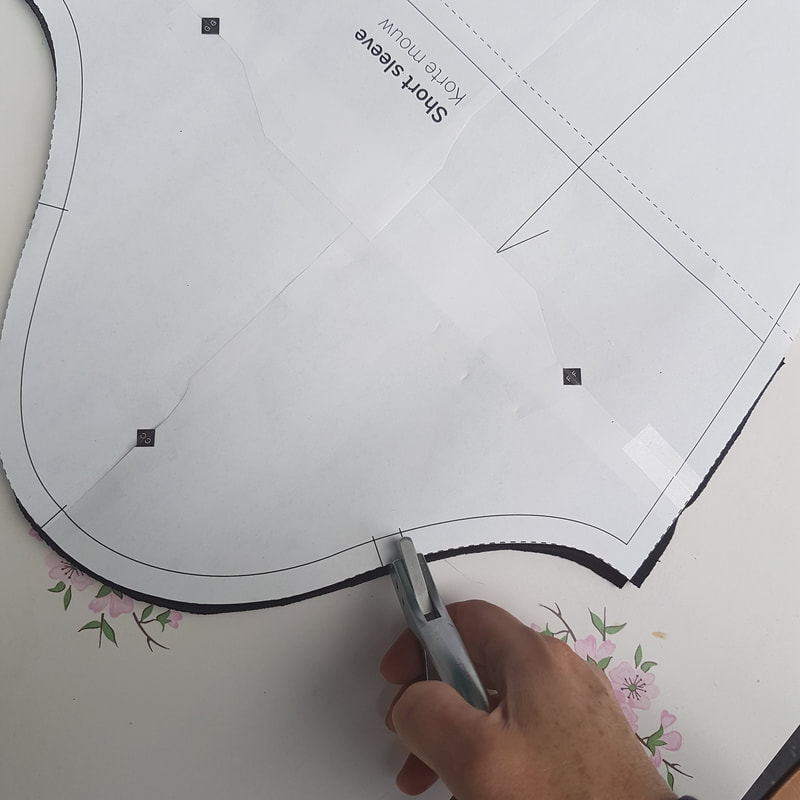
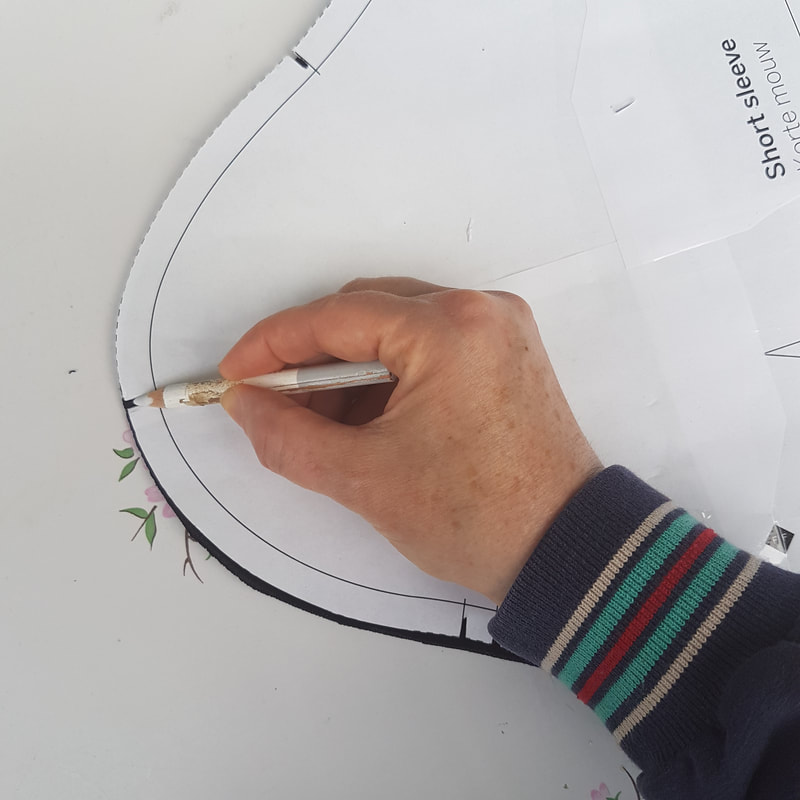
1.
Voorbereiding
Preparation

Bij aankoop van een van onze patronen ontvangt u 3 PDF-bestanden: een voor thuisprinters om op A4-papier af te drukken, een tweede voor A0-gebruikers om af te drukken in een printshop en een derde is voor mensen die een overheadprojector gebruiken. De volgende algemene introductietekst geeft een overzicht van hoe onze patroon-pdf's zijn opgezet en legt uit hoe je de A4-versie kunt afdrukken en hoe je de pagina's aan elkaar kunt plakken. A0-gebruikers kunnen bij hun printshop aangeven welke pagina's ze nodig hebben. Op de projector bestanden staan alle panden in dezelfde richting.
On purchasing any of our patterns you will receive 3 PDF files: one for home printers to print on A4 paper, a second at A0 is for printshop users and a third is for sewers who use an overhead projector. The following general introduction text provides an overview of how our pattern pdfs are set up and explains how to print out the A4 version and how to stick the pages together. A0 users should simply instruct their printshop which pages they require. Projector users will note that all pieces have the grain direction facing the same way.
Picture
1a.
Al onze patronen volgen dezelfde opzet zoals hier uitgelegd. Elk patroon begint met een voorblad, een inleiding, een lichaamsmatentabel, een ontwerptekening, een patroonchecklist en een kleurplaat. Het patroon is te vinden op de laatste lijst onder het tabblad Bladwijzers. 
All of our patterns follow the same set up as explained here. Each pattern starts with a cover page, an introduction, a body size chart, a design drawing, a pattern checklist and a colouring sheet.The pattern can be found on the last listing under the bookmarks tab.
Picture
1b.
After locating the pattern click on the layers icon. Here you can see the full range of sizes. They are all layered on top of one another. You can click on the eye icon by each individual size to turn it on or off.
After locating the pattern click on the layers icon. Here you can see the full range of sizes. They are all layered on top of one another. You can click on the eye icon by each individual size to turn it on or off.
Picture
1c.
Je kunt vervolgens de maat of maten selecteren die je wilt afdrukken.
You can then select the size or sizes you wish to print out.
Picture
1d.
Als je thuis print op een A4-printer, drukt u op het afdrukpictogram in het bovenste menu van de PDF. Uw afdrukdialoogvenster kan hiervan verschillen  (rechts in het midden weergegeven), maar ik heb een paar knoppen gemarkeerd om het te verduidelijken. Om inkt te besparen kun je instellen dat het patroon in grijstinten wordt afgedrukt. Selecteer de pagina's die je wilt afdrukken, over het algemeen vanaf pagina 7 tot de laatste pagina. Zorg ervoor dat de schaal is ingesteld op 'ware grootte' of '100%' - NOOIT op 'passend op pagina'. Het werkelijke paginaformaat van de PDF is kleiner dan A4. Stel de oriëntatie in op Auto, ik vind dat dit het beste werkt omdat het dan de pdf op een A4-blad centreert.
If printing at home on an A4 printer press the print icon in the top menu of the PDF. Your print dialogue box may vary to this one (shown middle right), but I have highlighted a few buttons to take note of. To save ink you can set to print the pattern in greyscale. Select the pages to print which will usually be from page 7 until the final page. Make sure the scale is set to 'actual size' or ‘100%' - NEVER to 'fit to page’. The actual page size of the PDF is smaller than A4. Set the orientation to Auto, I find this works best as it will then centre the pdf on an A4 sheet.
Picture
1e.
Rond elke pagina zie je kleine zwarte driehoekjes met letters erin. Met een schaar en doorzichtig plakband bij de hand, kun je vervolgens om elke pagina uitknippen tot aan de driehoeken en vervolgens de letters in de zwarte driehoeken uitlijnen met de overeenkomende op de volgende pagina (A naar A, B naar B, enz.). Vervolgens kunt u het blad aan elkaar plakken. Een vel kan uit 16 of 20 pagina's bestaan, afhankelijk van het gekochte patroon. Sommige patronen bestaan ​​uit één volledig vel (bijv. rokken met 16 pagina's), sommige uit twee vellen (bijv. jurken met 32 ​​pagina’s).
Around each page you will see small black triangles with letters inside. With scissors and clear sticky tape at hand, you can then cut out every alternate page to the triangles and then align the letters in the black triangles with the matching ones on the following page (A to A, B to B, etc). You can then proceed to stick the sheet together. One sheet can consist of 16 or 20 pages depending on the pattern purchased. Some patterns consist of one full sheet (eg. skirts with 16 pages), some of two sheets (eg. dresses with 32 pages).
Picture
1f.
Nadat je je pagina's hebt afgedrukt, leg je ze op een plat oppervlak. Knip de pagina's om en om uit tot aan de driehoekjes. Plak vervolgens met doorzichtig plakband de driehoeken met dezelfde letter aan elkaar. Knip vervolgens je patroondeel uit tot aan de stippellijnen. Deze stippellijnen bevatten de benodigde naadtoeslag voor elk stuk. De dunnere stippellijnen geven de uiteindelijke maat aan. Voor het gemak zijn alle namen van de stukken, samen met de draadrichting en handige instructies in de afzonderlijke patroondelen geplaatst, zodat u het overtollige papier veilig kunt weggooien (recycle). Let op dat sommige patronen ook een verklarend diagram kunnen bevatten op een van de pagina's die bewaard moeten worden. Als je de  patroondelen op patroonpapier wilt overtrekken, moet je er aan denken alle markeringen te kopiëren (bijv. draadrichting, knipjes etc.).
Once you have printed out your pages lay them out on a flat surface (top left). Cut out to the triangle edge on alternate pages (top right). Then with clear sticky tape connect the triangles that correspond to each other (bottom left). Then cut out your pattern piece to the dashed lines (bottom right). These dashed lines include the necessary seam allowance for each piece. The thinner dotted lines indicate the finished size. For convenience all names of pieces, along with grain direction and helpful instructions have been placed inside individual pattern pieces, so you can safely throw away (please recycle) the excess paper. Note some patterns may also include an explanatory diagram on one of the pages that should also be kept. 
To continue trace all the pattern pieces onto pattern paper, remembering to copy all the markings (eg. darts, piece to piece alignment lines etc).
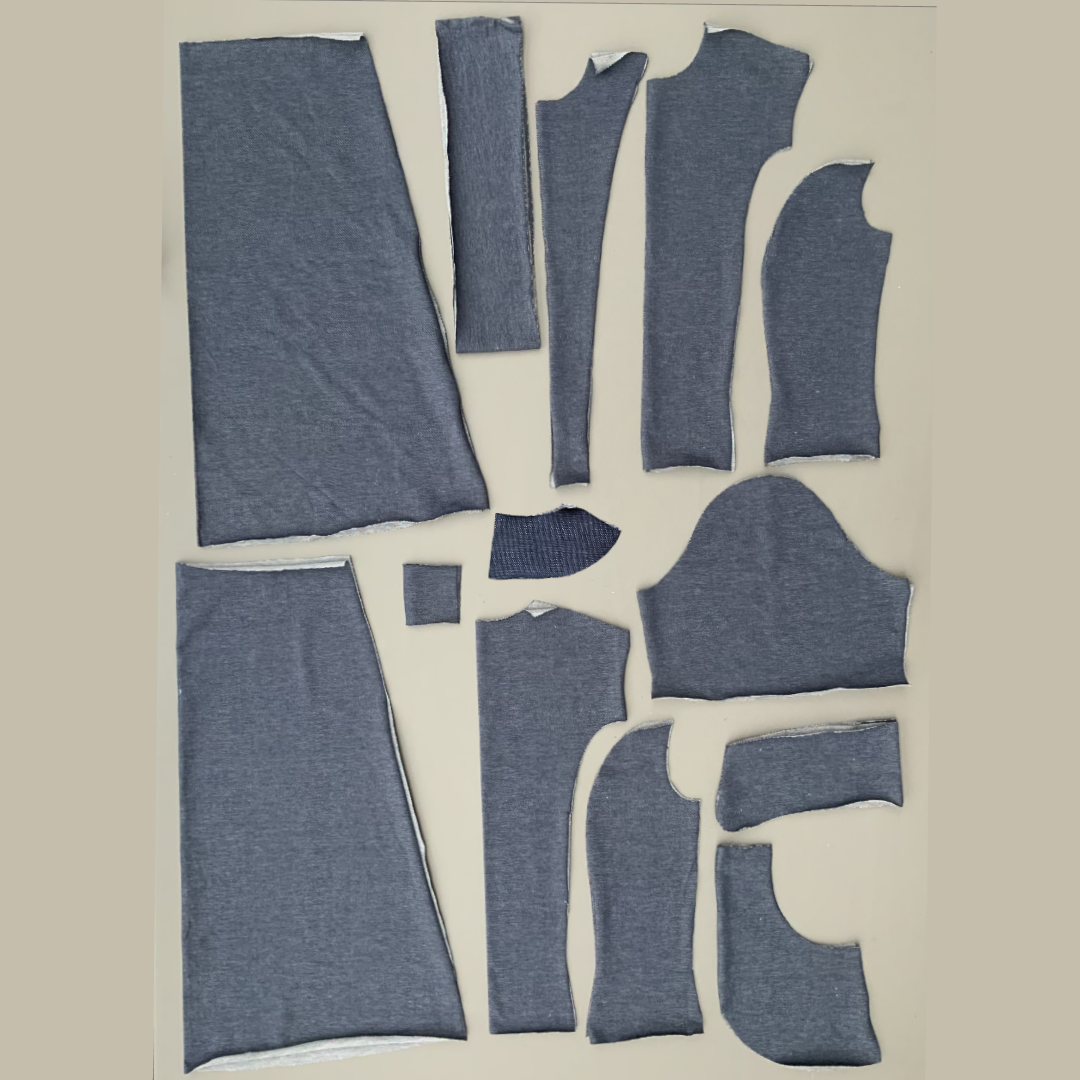
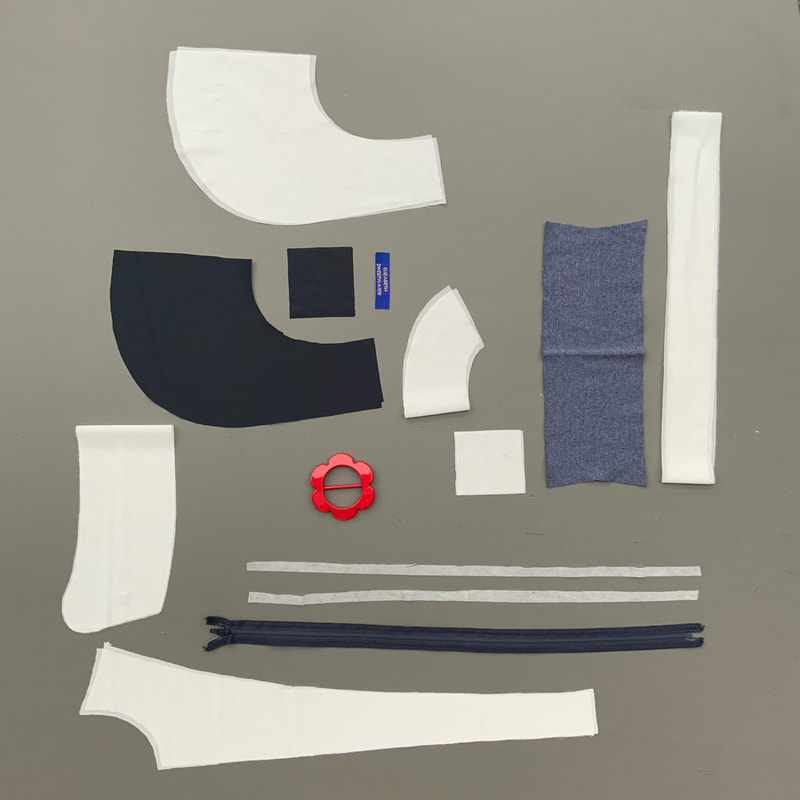
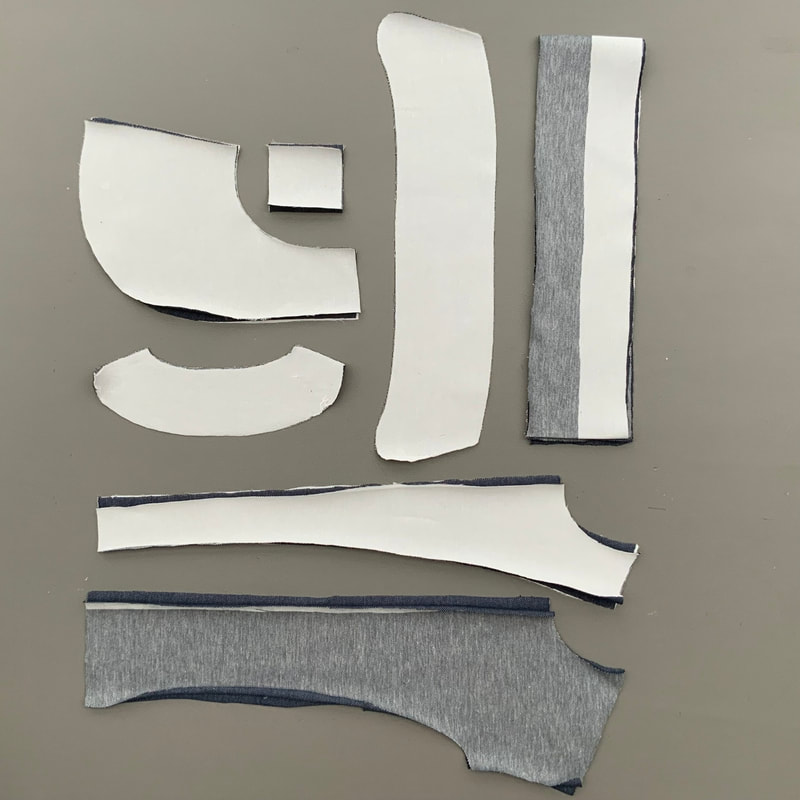
1g.
Nu je al je stukken hebt uitgeknipt raadpleeg het onderstaande overzicht om je voor te bereiden op het uitknippen van de door jou gekozen stof.
Now you have cut out all your pieces consult the overview below to prepare yourself for the next stage of cutting out the pieces from your chosen material.
Patroondelen
- Voorpand knip 2x
- Zijpand knip 2x
- Achterpand knip 1x aan stofvouw
- Achter zijpand
- Mouwen knip 2x
- Rokdeel knip 2x aan stofvouw
- Manchetten knip 2x
- Kraag knip 2x aan stofvouw
- Voorbeleg knip 2x
- Achterbeleg knip 1x aan stofvouw
- Zak delen knip 2x plus 2x voering zakken
- Lussen knip 2x plus 2x voering delen
- Ceintuur knip op maat 10 cm breed, 120 cm lang voor maat 34 t/m 40 en 125 cm voor maat 42 t/m 50
Pattern pieces
- Front piece cut 2x
- Side piece
- Back piece cut 1x on fold
- Back side piece
- Sleeves cut 2x
- Skirt parts  cut 2 x on fold
- Cuffs cut 2x
- Collar cut 2x on fold
- Front facing cut 2x
- Back facing cut 1x on fold
- Pockets cut 2x and pocket parts cut 2x
- Belt loops cut 2x and lining parts cut 2x
- Belt: cut to size 10 cm by 120cm for size 34 up to 40  and 125cm for size 42 up to size 50


1h.
Checklijst
Checklist
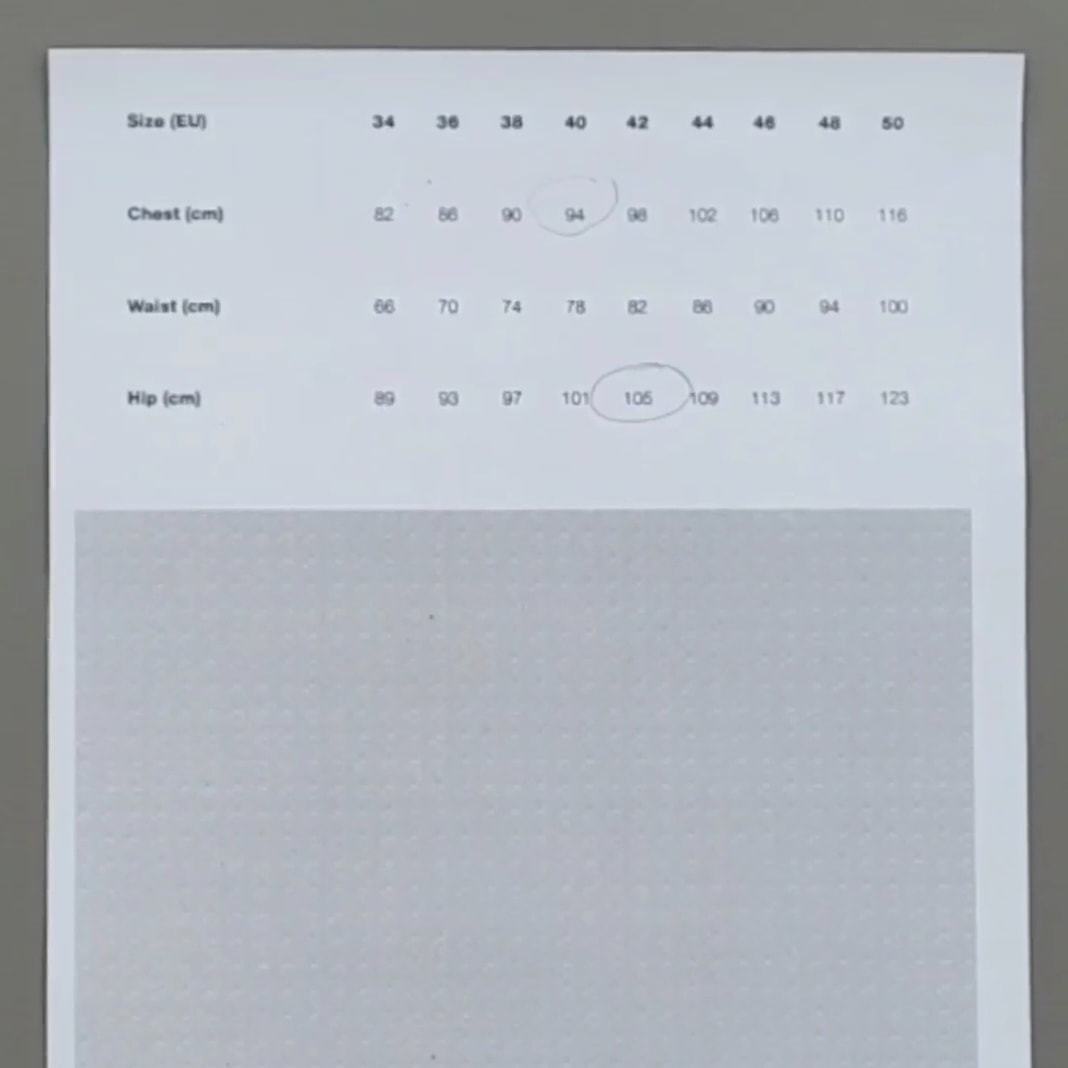
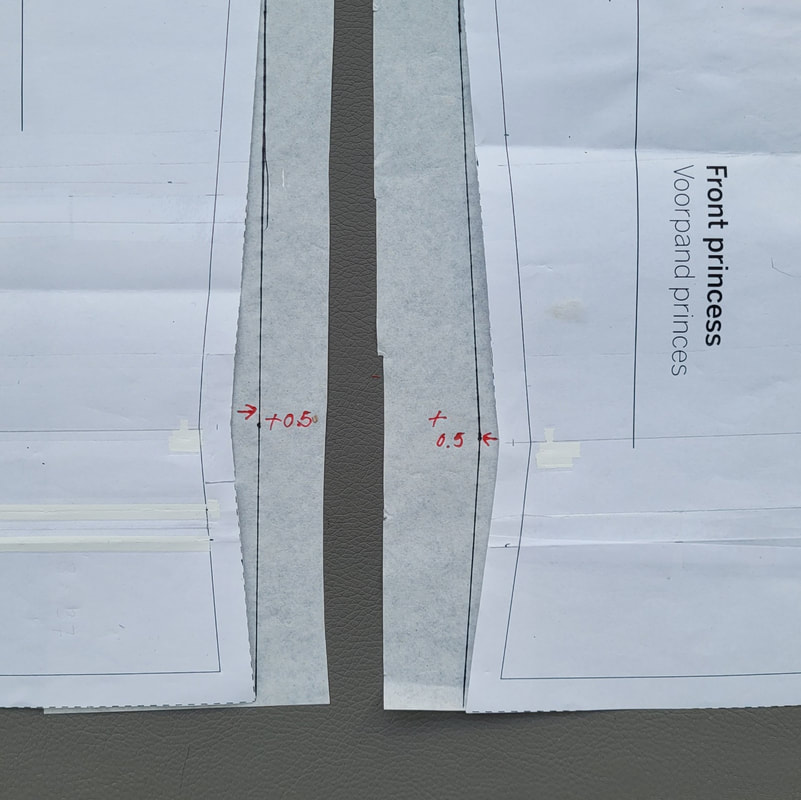
Picture
Picture
Materiaal nodig voor pocket jurk

Geschikte stoffen:
Voor de pocketdress gebruik je het best stevige tricot kwaliteiten zoals French terry/jogging, een denim french terry voor een spijkerjurk look, punta di Milano (zware, dikke tricot), punta di Roma (een wat lichtere kwaliteit), jacquard punta tricot of met print, katoen jacquard tricot.

Materiaal nodig:
Maat 34 t/m 40: 150cm (breedte 150cm)
Maat 42 t/m 50: 180-200cm (breedte 150cm)

Rekbare voeringstof of een dunne tricot:
0,3m. Dit is een inschatting. Het beste print je eerst de patroon delen uit en legt ze in op een breedte van 75 cm (150cm dubbelgevouwen). Meet dan op hoeveel je nodig hebt en bestel de stof.

Fournituren:
- Tricot plakvlieseline: 0,5m
- Boordstof (als de mouw wordt afgewerkt met een boordje): 10cm
- Niet rekbare plakvlieseline: 2 strookjes 1cm x 50cm
- Niet deelbare rits: 50 cm
- Eventueel een geweven label
- Eventueel een gesp 4cm

Delen knippen:
- Voorpanden 2x
- Voor- zijpanden 2x
- Achterpand aan de vouw
- Achter- zijpanden 2x
- Voor- rokpand aan de vouw
- Achter- rokpand aan de vouw
- Mouwen 2x
- Voor- belegdelen 2x
- Achter- belegdeel aan vouw
- Kraagdelen aan de vouw 2x
- Zakdelen 2x
- Riemlussen 2x
- Knoop ceintuur knip op maat:
34-38 150cm breed x 10 cm hoog
40-44 170cm breed x 10 cm hoog
46-50 190cm breed x 10 cm hoog
- Gesp ceintuur knip op maat: taillewijdte plus 30cm breed x 10 cm hoog

Delen knippen voering en fournituren.
- Zakdelen rekbare voeringstof of dunne tricot 2x
- Riemlussen rekbare voeringstof of dunne tricot  2x
- Zakdelen rekbare plakvlieseline 2x
- Riemlussen rekbare plakvlieseline 
- Kraag rekbare plakvlieseline 1x
- Belegdelen voor rekbare plakvlieseline 2x
- Belegdeel achter rekbare plakvlieseline aan de vouw
- Ceintuur rekbare plakvlieseline knip de halve hoogte x de hele breedte
- Mouwboorden boordstof (je kunt deze ook in de hoofd stof knippen, gebruik dan het wat bredere patroondeel) 2x.
- Strookjes vlieseline versteviging 1 cm breed 2x
Material needed for pocket dress

Suitable fabrics:
For the pocketdress the best results you’ll get by using firm medium heavy/heavy knits like a French terry/jogging, punta di Milano (heavy, firm jersey), punta di Roma (lighter but still firm jersey), jaquard punta jersey or with a print, cotton jaquard jersey.

Fabric amount needed:
Size 34 t/m 40: 150cm (width 150cm)
Size 42 t/m 50: 180-200cm (width 150cm)


Stretch lining or single jersey:
0,3m. This is an estimate. It is best to print out the pattern parts and place them on a width of 75cm (150cm folded in half). Then measure how much you need and order the fabric.

Haberdashery:
- Stretch fusible interlining: 0,5m
- Cuff material (when the sleeve is finished with a cuff): 10cm
- Non stretch fusible interlining: 2 strips 1cm x 50cm
- Non separating zipper 50 cm
- Optionally a woven label
- Optionally a buckle 4cm


Cut out parts:
- Front parts 2x
- Front-side parts 2x
- Backpart on fold
- Back-side parts 2x
- Front skirtpart on fold
- Back skirtpart on fold
- Sleeves 2x
- Front facingparts 2x
- Back facingpart on fold
- Collarparts on fold 2x
- Pocketparts 2x
- Beltloops 2x
- Tie belt cut to size:
34-38 150cm wide x 10 cm high
40-44 170cm wide x 10 cm high
46-50 190cm wide x 10 cm high
- Buckle belt cut to size: waist plus 30cm wide x 10cm high.


Cut out lining and haberdasheries:
- Pocketparts in stretch lining fabric or lightweight single jersey 2x
- Pocketparts in stretch lining fabric or lightweight jersey 2x
- Pocketparts stretch fusible interlining 2x
- Beltloops  
- Collar stretch fusible interlining 1x
- Facingparts front stretch fusible interlining 2x
- Facingparts front stretch fusible interlining on fold
- Belt stretch fusible interlining cut half the height and the whole width.
- Cuffs ribbing material (they can also be cut in the main fabric, use the wider patternpiece) 2x.
- Strips non stretch interlining 1cm wide 2x


2.
​
Opmerkingen en algemene Aanpassingen
Remarks and common Adjustments  

Tips
Ik adviseer om eerst een proefmodel te maken voor je in een dure stof knipt. Ga bij een jurk uit van je bovenwijdte, de taille en heupwijdte zijn eenvoudig aan te passen door in de zijnaden iets weg te nemen of toe te voegen. De taille is het smalste deel van het rokpand. De heup is ongeveer 25cm onder de taille.
I recommend making a test model before cutting in expensive fabric. With a dress, start from your bust, the waist and hip width are easy to adjust by removing or adding something in the side seams. The waist is the narrowest part of the skirt. The hip is approximately 25cm below the waist. 

2a.
Het aanpassen van taille en heup

Adjusting waist and hip 

Picture
2a-1
Lichaamsmaten in onze maattabel verspringen met 4 cm per maat met uitzondering van maat 48-50 die met 6cm verspringt. 4cm per maat betekent 1cm per patroondeel (2x 1cm voor, 2x1cm achter = 4cm). Heb je een maatverschil tussen bovenwijdte/taille/heup dan zou je maten kunnen combineren.
Voor bovenstukken en jurken kies je over het algemeen voor de maat die het dichtst bij jouw bovenwijdte ligt. Vervolgens pas je de taille en eventueel heup aan. Voor onderstukken kies je over het algemeen voor de maat die het dichtst bij jouw heupwijdte ligt. Vervolgens pas je de taille aan.
Body measurements on our size charts jump 4cm per size apart from size 48 to 50 which jumps 6cm. 4cm per size means 1cm per patternpiece (2x 1cm front, 2x1 cm back = 4cm). If there is a diffence in size between chest/waist/hip, you might want to combine sizes. 
For tops/dresses choose the size with a chest measurement closest to yours. Then adjust the waist en in case of dresses, the hip. For bottoms choose the size with a hip width closest to yours and adjust the waist. 

Picture
2a-2
Om de taille in een jurk te versmallen kun je 1maat (=1cm) wegnemen uit de zijnaad. Als de taille 2 maten (of meer) verschilt van de bovenwijdte neem dan 1cm weg uit de zijnaad en 0,5cm uit het voor/achter pand en de zijpandjes
For narrowing the waist in a dress: take one size (=1cm) from the side seam. When the waist differs 2 (or more) sizes from the chest, take 1cm from the side and 0,5cm out of both front/back and side parts.
Picture
2a-3
Om de taille te verbreden: voeg een maat toe door aan de voor/achter en zijpandjes 0,5cm aan te tekenen. Twee maten verschil? Voeg dan nog 1 cm toe aan de taille in de zijnaad.
For making the waist wider: add one size by  drawing 0,5cm extra at the front/back and side pieces.Two sizes difference? Add 1cm to the waist at the sideseam.
Picture
2a-4
Om de heup aan te passen: leg eerst het bovenstuk aan de rok. Geef dan op je patroon de heup aan, deze zit ongeveer 25cm onder de taille.
For altering the hip: first place the top part on the skirtpart. Indicate the hip hight on your pattern, which is approx. 25cm under the waist. 
Picture
2a-5
Vergroot of verklein 1 maat op deze hoogte in de zijnaad. In dit voorbeeld vergroot ik met 1 maat.
Teken de zijnaad opnieuw door het nieuwe heuppunt te verbinden met de taille en onderkant. Bij verbreden laat je de rok ook wijder uitlopen. Bij versmallen wordt de rok ook smaller.
Add or take out a size along this line in the sideseam, in this example I add one size. Redraw the sideseam by connecting to the waist and bottom. Note that the skirt will be smaller at the bottom in case of narrowing the hip. 
Picture
2a-6
Je kunt ook heupwijdte toevoegen door het rokdeel open te knippen. Op heuphoogte voeg je wijdte toe. De rok wordt dan wel aanzienlijk wijder aan de onderkant.
It is also an option to draw a vertical line through the middle of the patternpiece, cut it open and add some width on the hip line. This method will add some more bottom width. 

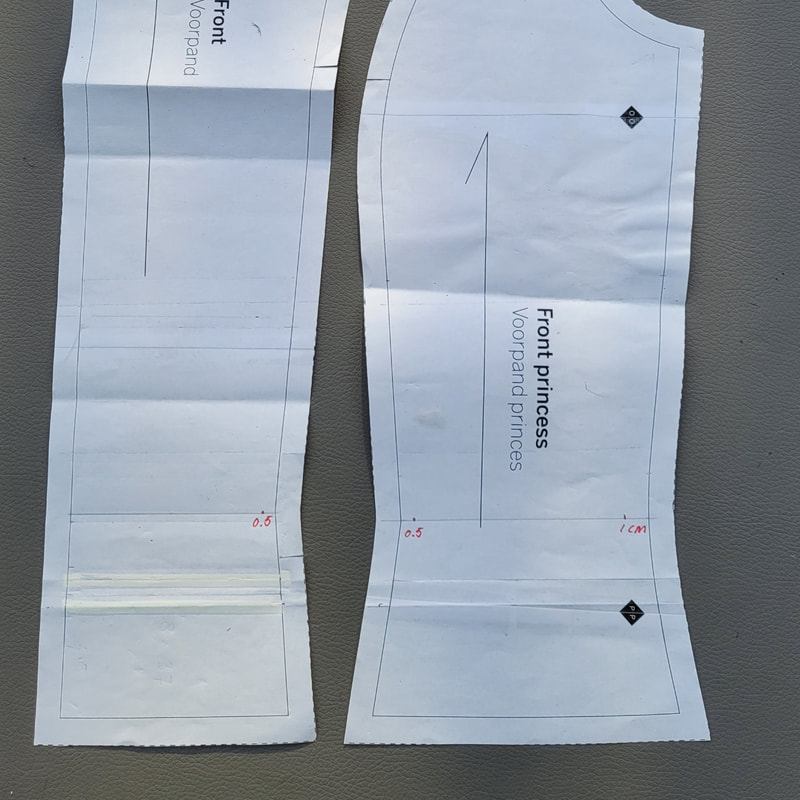
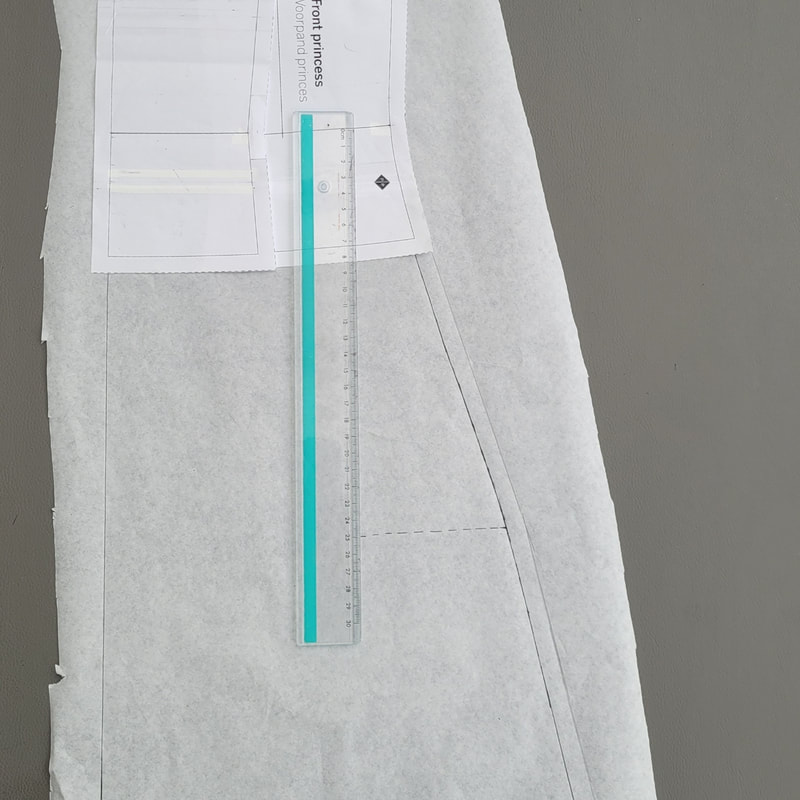
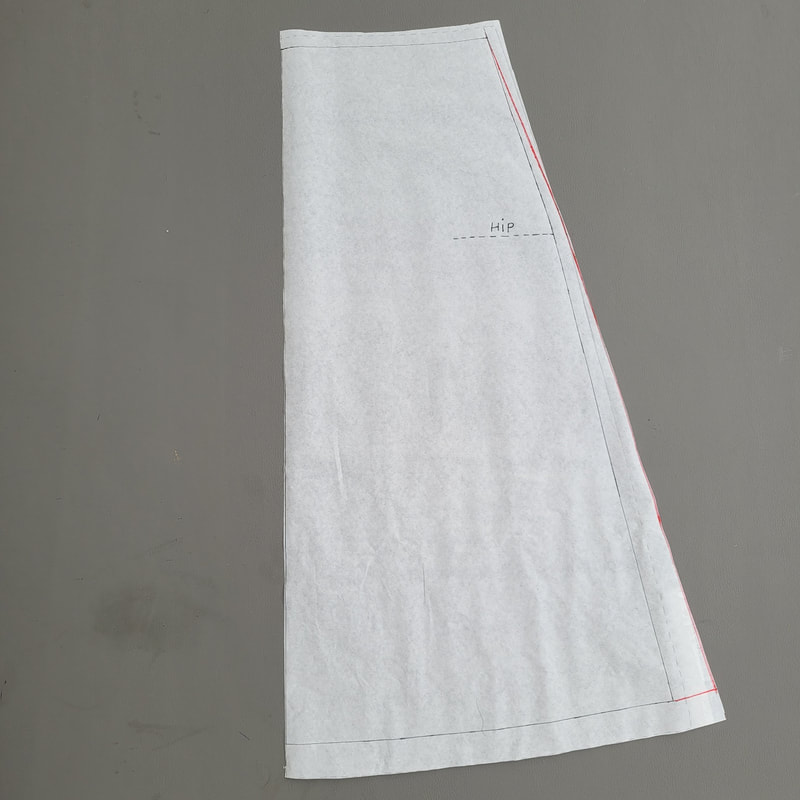
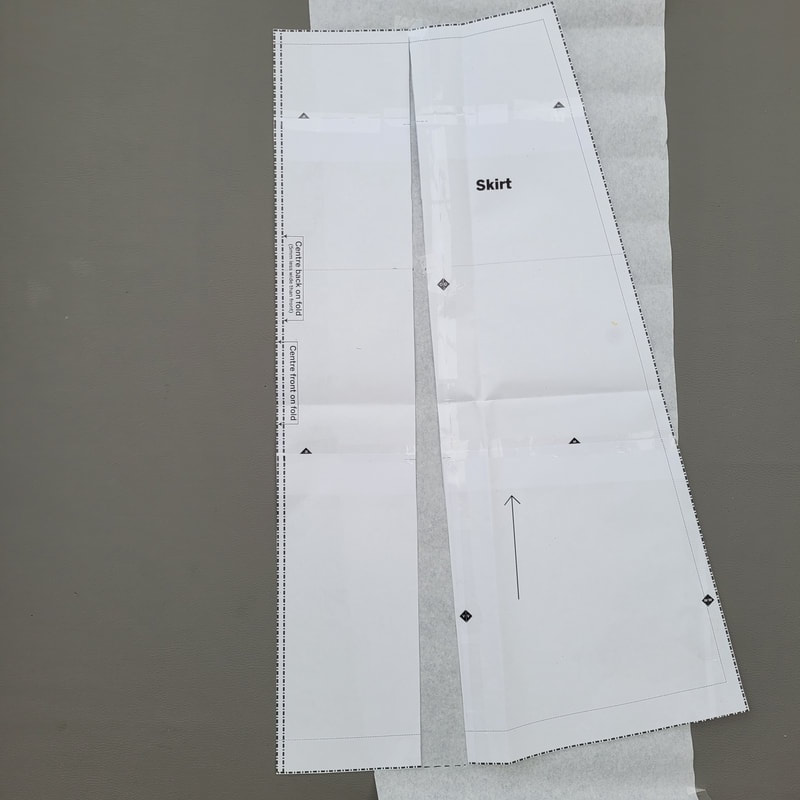
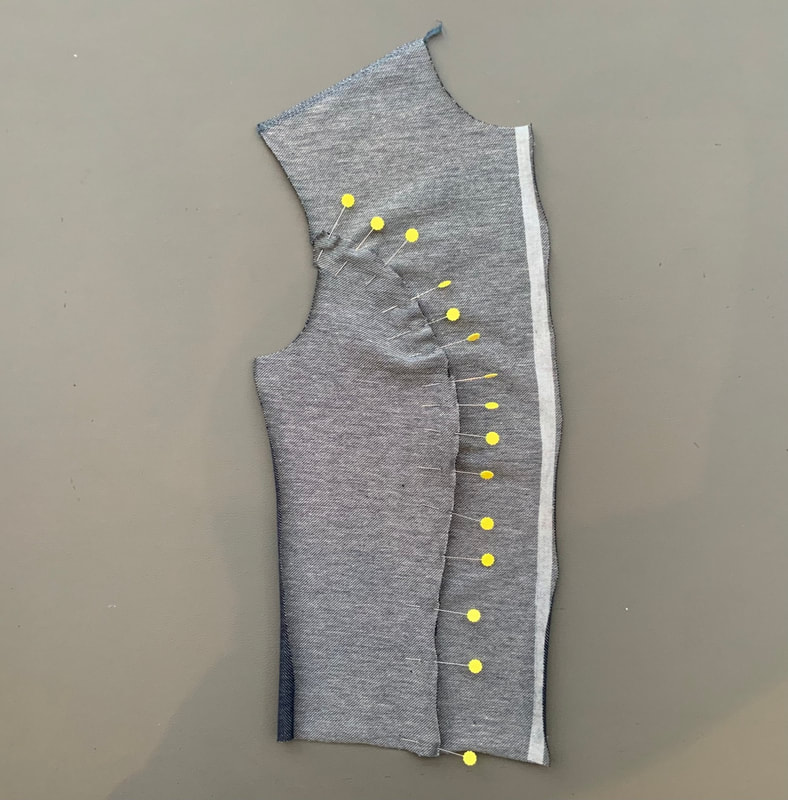
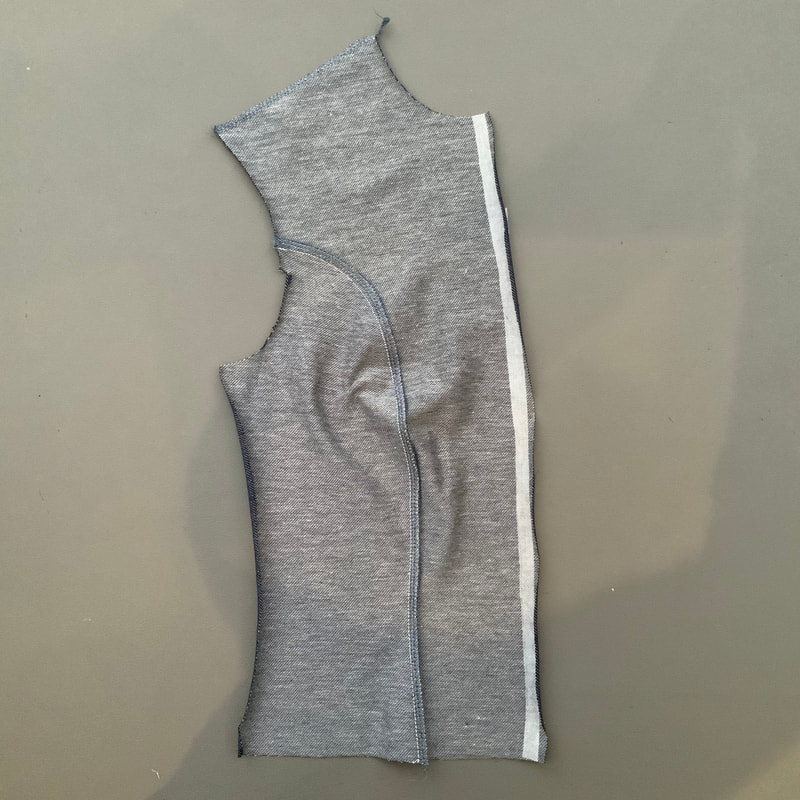
2b
Het verlengen en verkorten van de jurk
Lengthening and shortening the dress

Picture
2b-1
Om de lengte van de jurk aan te passen knip je het voor-en achterpand door op ongeveer 25cm vanaf de onderkant.
To adjust the length of the dress, cut the front and back pieces about 25cm from the bottom.
Picture
2b-2
Om te verlengen plak je hier een stuk (patroon)papier tussen. Teken de zijnaden opnieuw volgens de afbeelding.
To extend, stick a piece of (pattern)paper in between. Draw the side seams again according to the image.
Picture
2b-3
Om te verkorten verdeel je de te verkorten afstand over de delen en plak je ze over elkaar. Teken de zijnaden opnieuw in volgens de afbeelding.
To shorten, divide the distance to be shortened over the two parts and stick them over each other. Draw the side seams again according to the image.

2c.
De aanpassing voor een volle buste, aanbevolen vanaf een cup E
Adjustments for a fuller bust for an E-cup or higher

Alle Elizabeth Sweetwater-patronen zijn gemaakt voor jerseystoffen.Het mooie van jersey is dat patroon aanpassingen vaak niet nodig zijn, maar door de buste ruimer te maken, trekt de stof niet bij de buste, wat een meer flatterende beeld geeft. In sommige gevallen zou je kunnen besluiten om een ​​kleinere patroon maat te kiezen als je een grote maat hebt gekozen vanwege je borstomvang, zodat je een betere pasvorm hebt rond de schouder en rug.
All Elizabeth Sweetwater patterns are made for jersey fabrics. The great thing about jersey is that often bust adjustments are not needed but by making the bust more roomy, the fabric will not stretch tightly at the bust giving a more flattering look. In some cases you might decide to choose a smaller size if you have chosen a large size due to your chest size, so you will have a better fit around the shoulder and back.
Picture
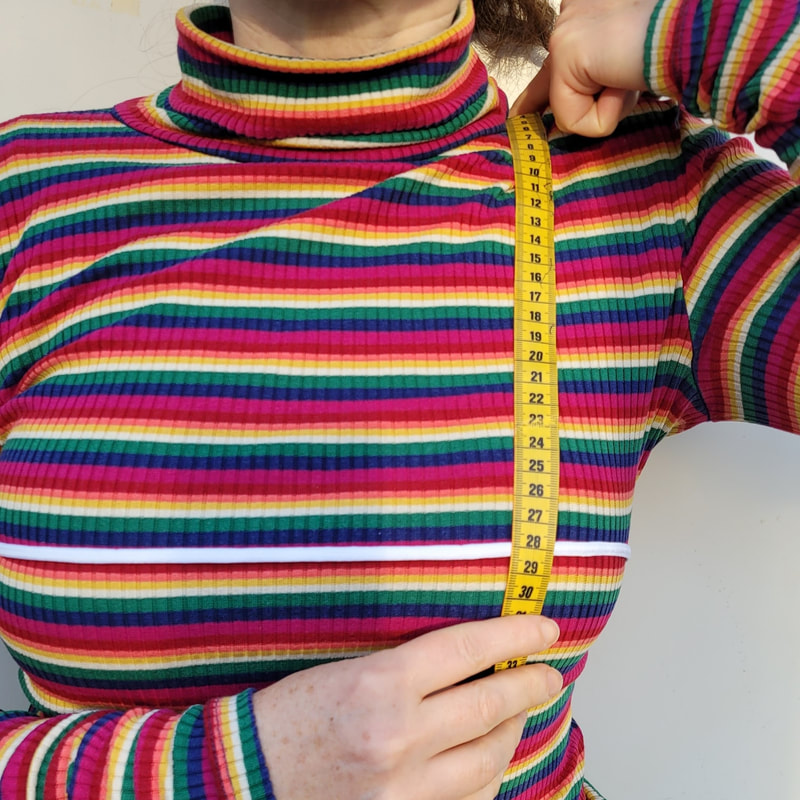
2c-1
Doe een elastisch bandje om het volste deel van de buste. Meet vanaf de schouder naar het bandje.
Put an elastic band around the fullest part of the bust. Measure from shoulder to the band.
Picture
2c-2
Geef deze afmeting aan op het voorpand en trek een horizontale lijn.
Indicate this measurement on the front pattern part and draw a horizontal line.
Picture
2c-3
Meet de ronde naad van het voorpand tot de lijn. Meet dezelfde afstand af in de ronde naad van het zijpandje.
Measure the curved seam of the front piece up to the line. Measure the same distance in the curved seam of the side part.
Picture
2c-4
Trek vanaf dit punt ook een horizontale lijn op het zijpandje.
Draw from this point also a horizontal line onto the sidepiece.
Picture
2c-5
Knip beide horizontale lijnen open, laat een klein stukje dicht aan de zijnaad van het zijpandje. Plaats en stukje patroonpapier tussen de pandjes. Voeg per cupmaat groter dan een D 1cm toe aan de pandjes. Het voorpand wordt dus langer, van het zijpand wordt alleen de ronde naad verlengd, de zijnaad blijft gelijk.
Cut both horizontal lines open, leave the sideseam point connected. Place a piece if pattern paper underneath the pattern pieces. Add per cupsize bigger than cup D 1cm to the front and side patternpiece. The front will be longer, the side piece will only have a longer buste seam, the sideseam will stay the same.

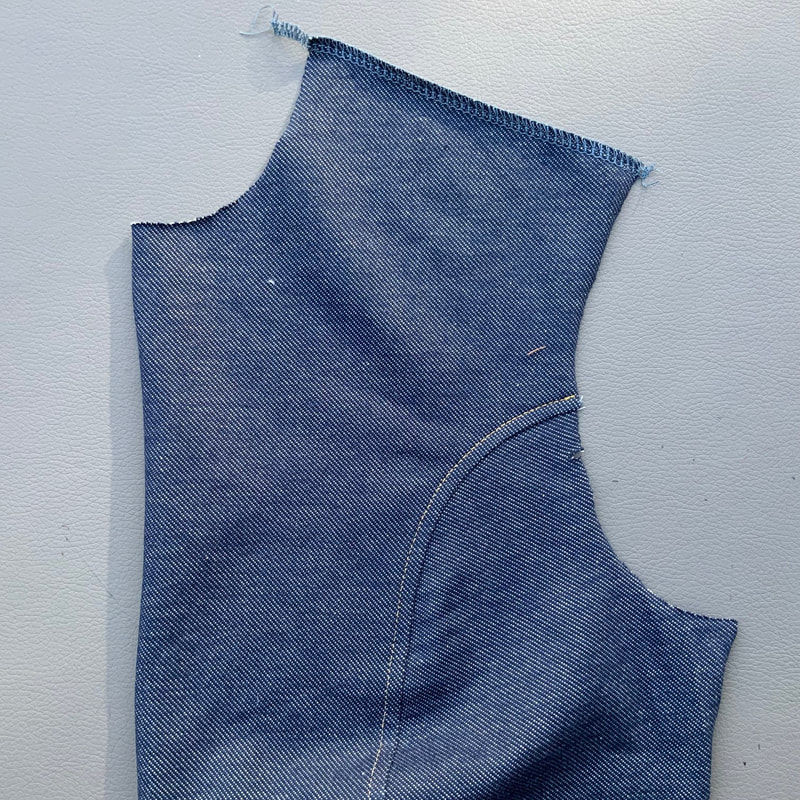
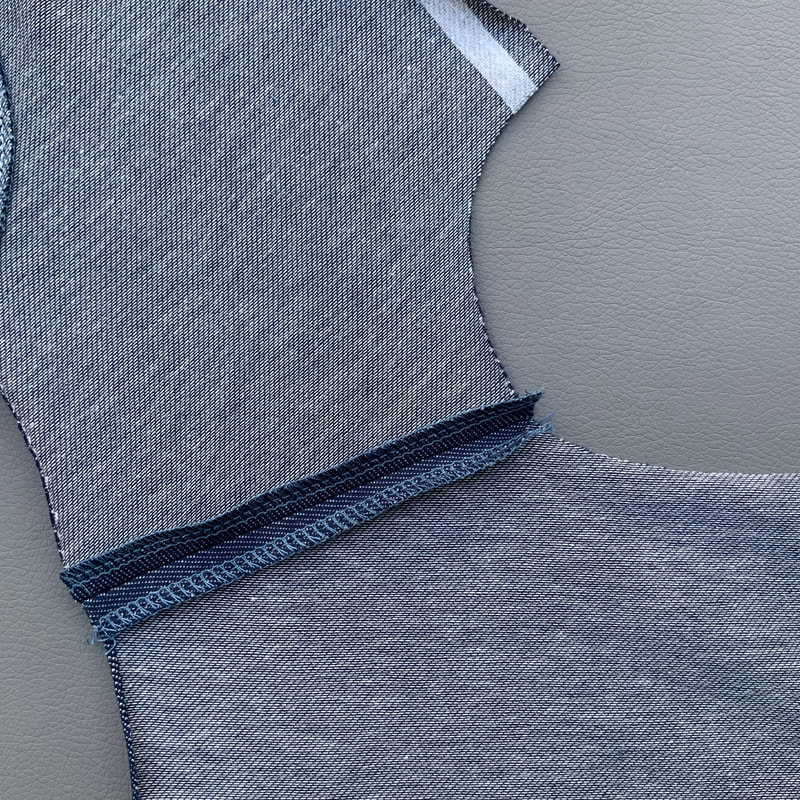
Goed om te weten
Ik ga in deze werkbeschrijving uit van het gebruik van een overlock machine. Mocht je daar niet over beschikken dan kun je een zig-zag steek gebruiken op een gewone naaimachine. Ik raad dan wel aan om er altijd een stretch stiksel naast te plaatsen. De naadtoeslag van de patronen is 1cm. Check wat de breedte instelling van je naad is op je lockmachine is. Is het 0,7cm dan kun je tijdens het stikken 3mm wegsnijden. De stretchnaden stik je met een stretchsteek instelling op de gewone naaimachine.


​Good to know
For this tutorial an overlock machine was being used for sewing most of the garment. However, it is possible to use a regular sewing machine and sew with a zigzag stitch. I do recommend sewing an extra stretch stitch next to it to create clean lines. The seam allowance of the patterns is 1/3”. Check the seam width setting of your overlock machine. Is it less than 1/3"? Then you can cut away a little while sewing. The stretch seams can be sewn using the stretch setting on a regular sewing machine.


3. 
Markering, verstevigen en coupenaden
Marking pieces, ironing on facing and seams

Picture
3a.
Geef een knipje op je papieren patroon delen waar de kniptekens staan zodat je ze makkelijk kunt overnemen.
Cut the marks on the paper pattern parts so you can copy them easily on the fabric.
Picture
4b.
Neem alle kniptekens over op de stof.
Copy all the marks on the fabric.
Picture
3c.
Delen verstevigen:
- 2 zakdelen
- 1 kraagdeel
- Achterhalsbeleg
- Voor-belegdelen
- 2 riemlussen
- Ceintuur
- Het 1cm brede strookje strijk je op 0,5cm van de randen van de voorpanden.
Reinforce parts:
- 2 pocketparts
- 1collarpart
- Backneck facing
- Front facing parts
- 2 beltloops
- Belt
- Iron on the 1cm wide strip on 0,5cm from the edge of the frontparts.

Picture
3d.
Werk de randen af van de schouders met een overlocksteek. Speld en stik de schoudernaden van de belegdelen met de goede kanten tegen elkaar. Strijk alle naden open en werk de beleg randen af met een overlocksteek. Naai eventueel een label op het achterhals beleg.
Finish the edges of the shoulders with an overlock stitch. Pin and sew the shoulder seams of the facing pieces right sides together. Press all seams open and finish the edges with an overlock stitch. Optionally sew a label onto the back neck facing.
Picture
3e.
Speld het zijpandje tegen het voorpandje en het achter zijpandje tegen het achterpand.
Pin the side piece to the front piece and the back side piece to the back piece.
Picture
3f.
Naai eerst de naden met de naaimachine en werk deze daarna af met de overlockmachine.
First sew the seams with the sewingmachine then finish the seams with the overlockmachine.
Picture
3g.
Een close up van de naad. Wit is het stiksel, blauw de afwerking.
A close up of the seam. White is the sewing line, blue the finished edge.
Picture
3h.
Stik de naden door op 0,5cm van de rand.
Topstitch the seams on 0,5cm from the edge.

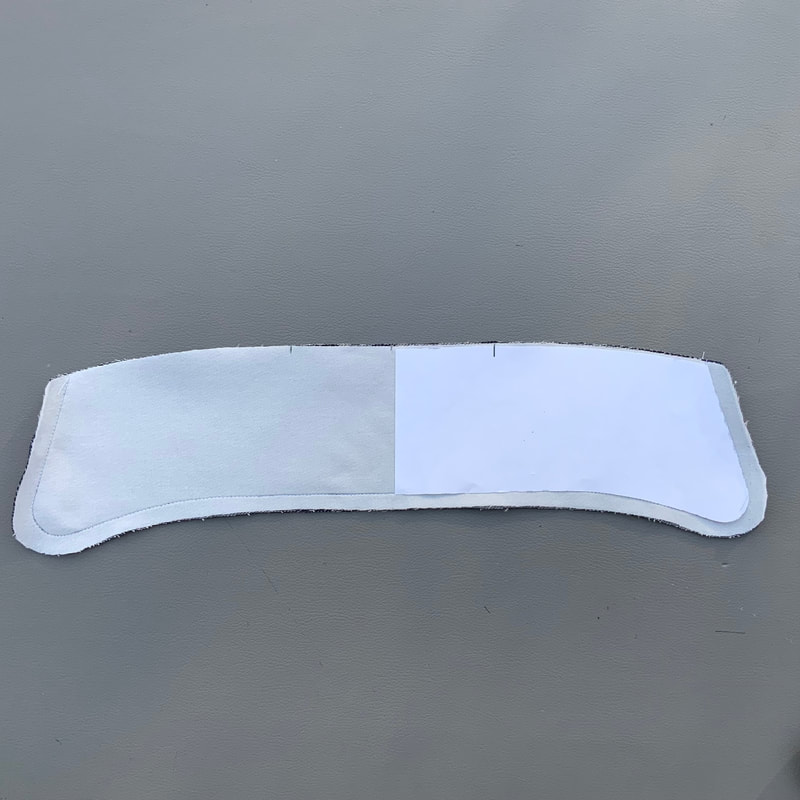
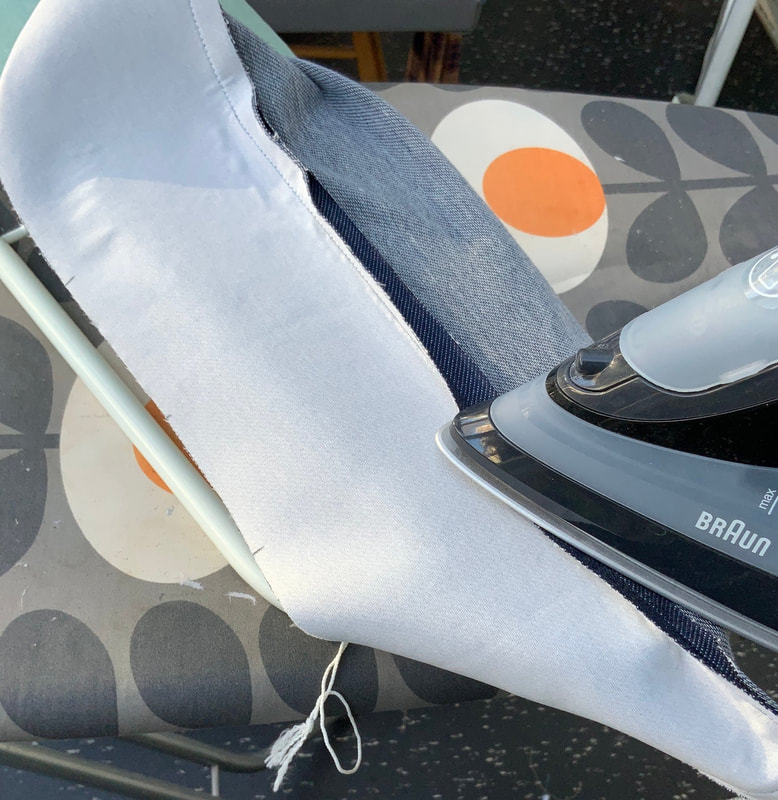
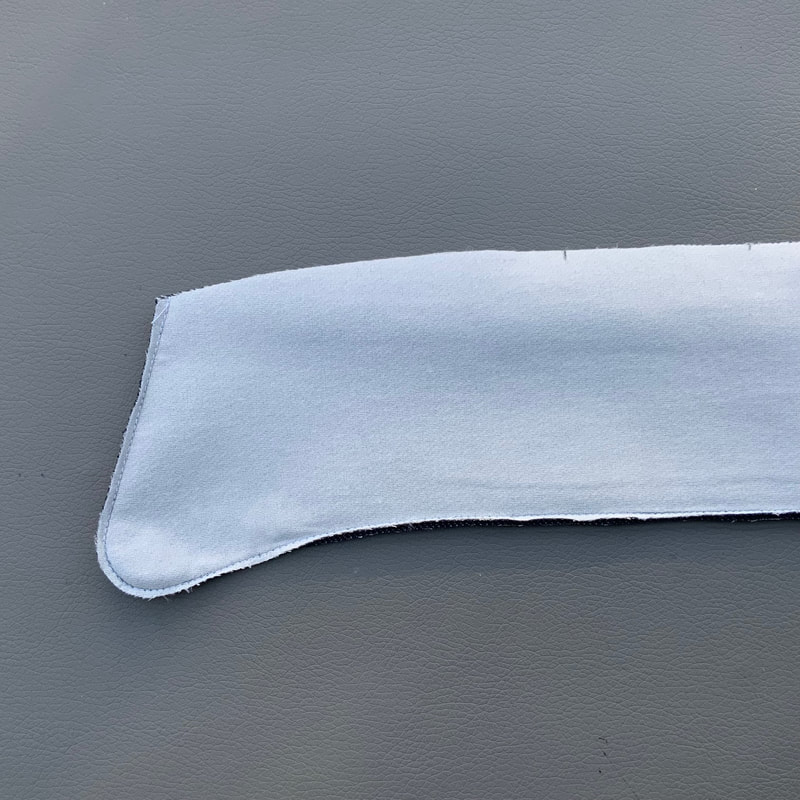
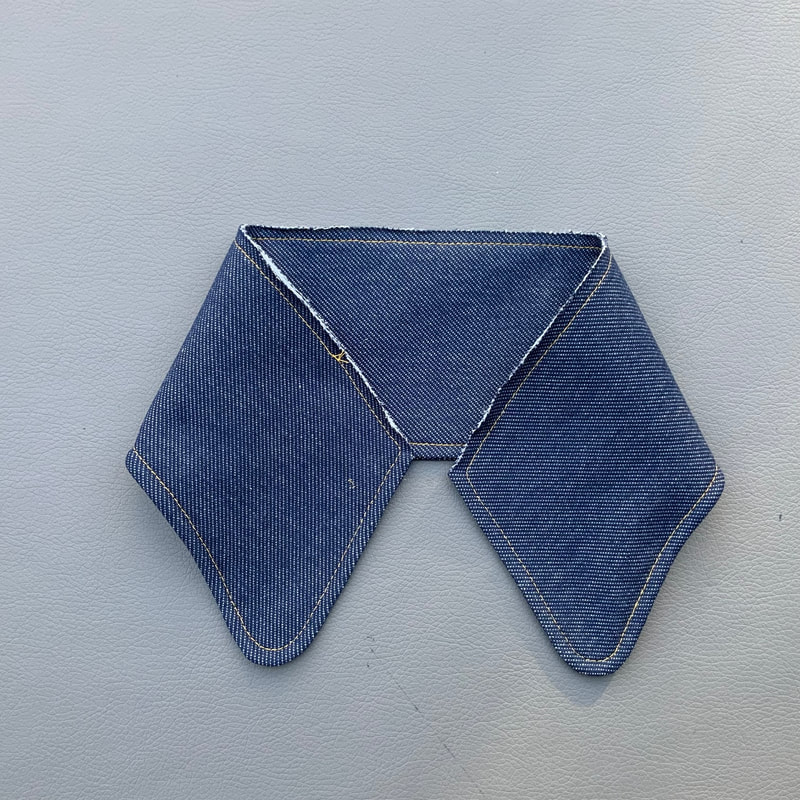
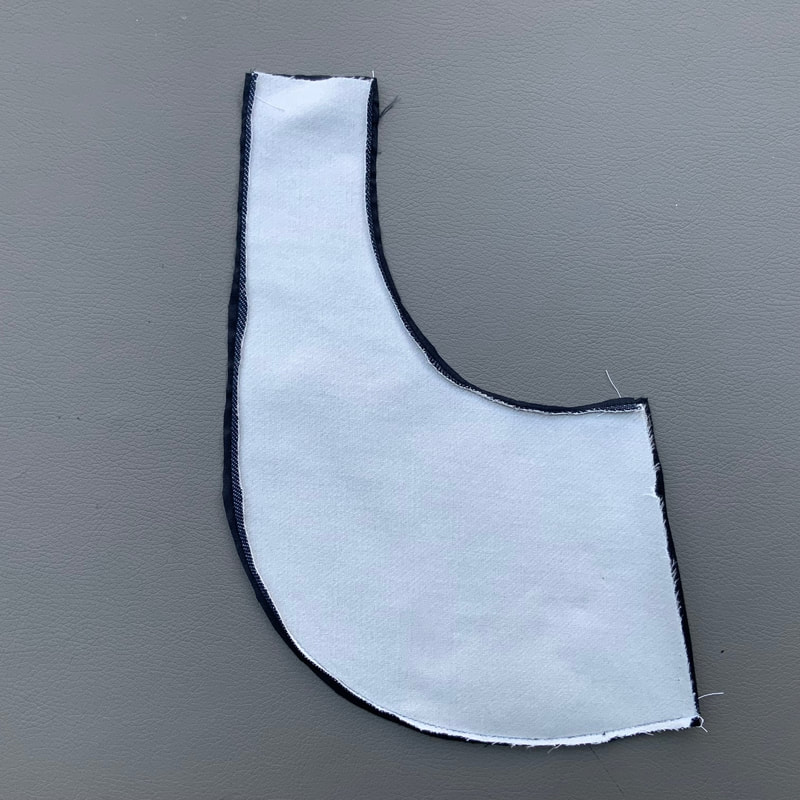
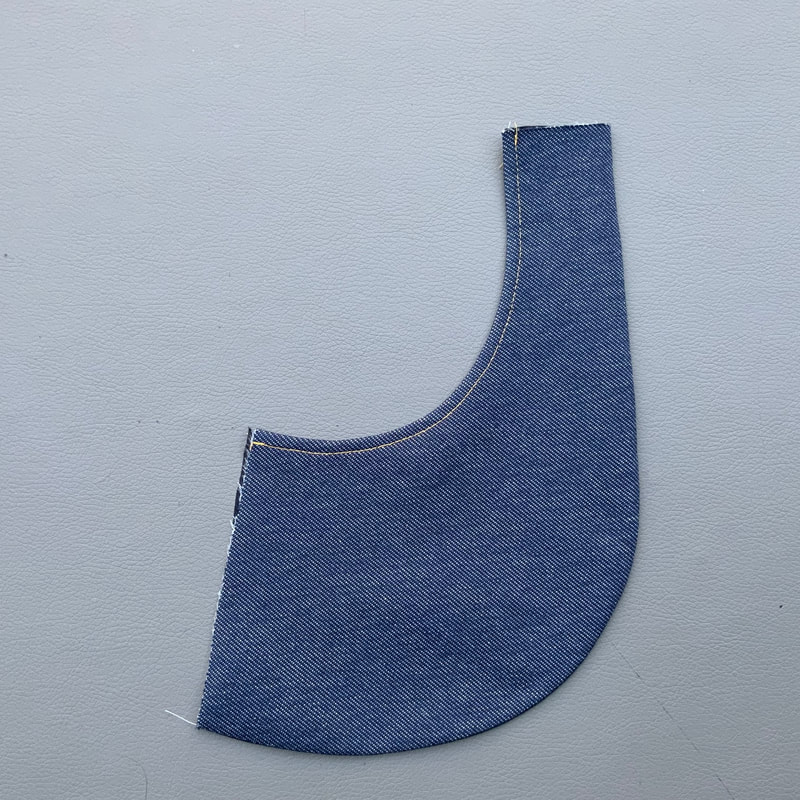
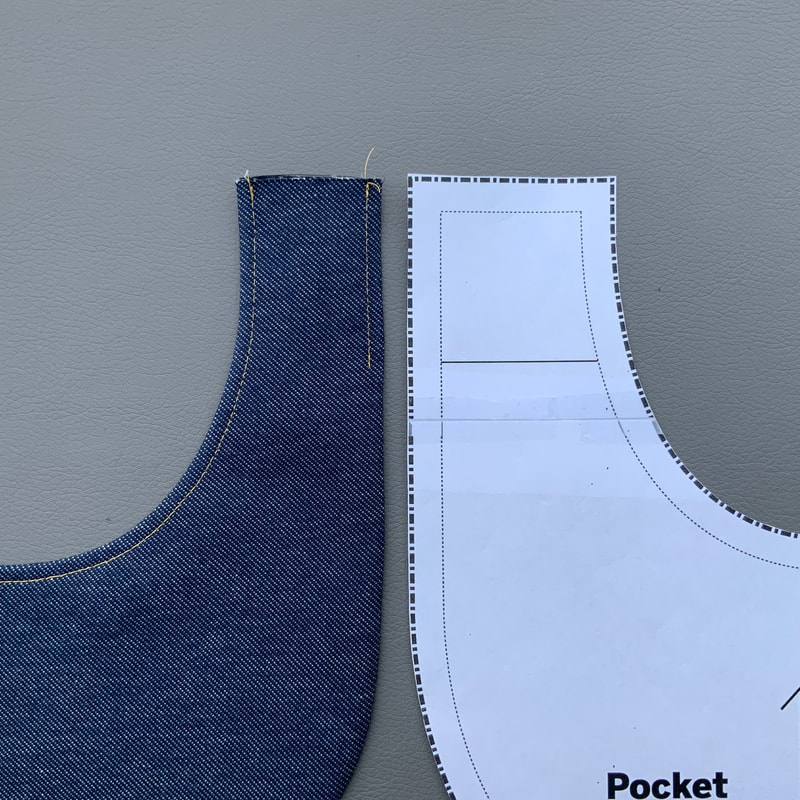
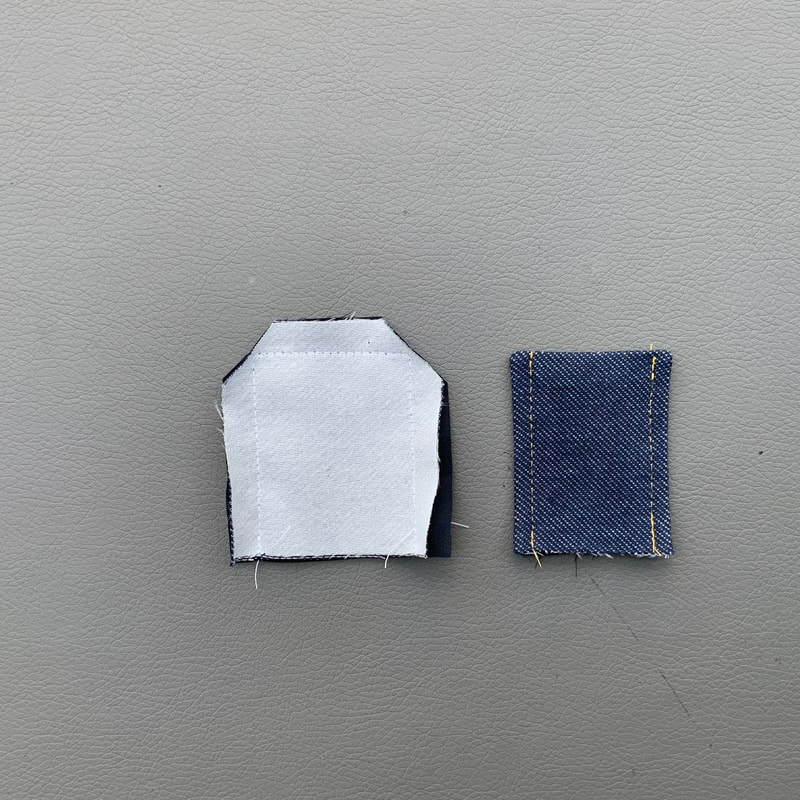
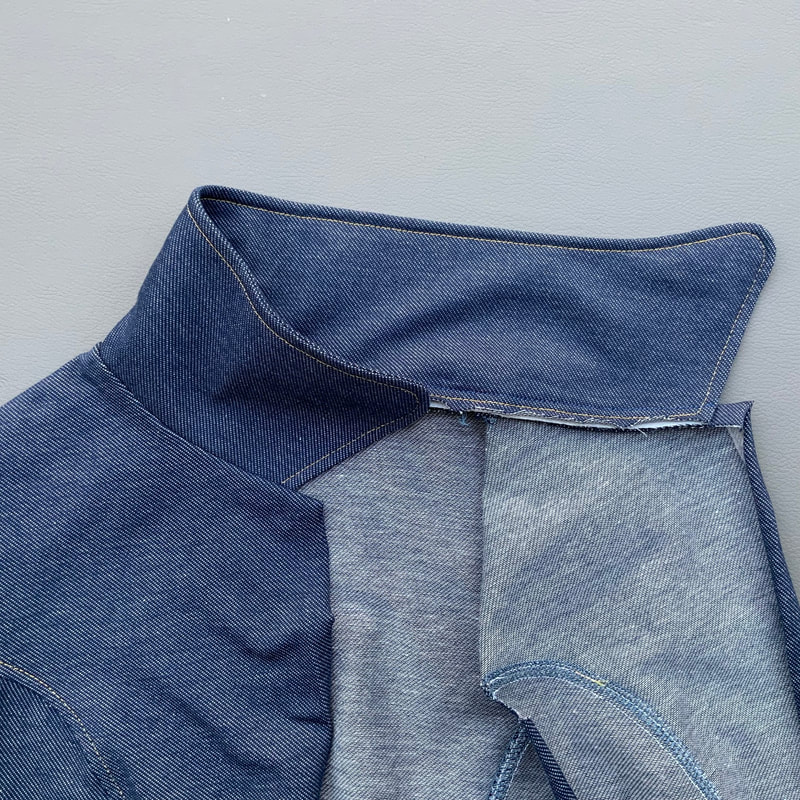
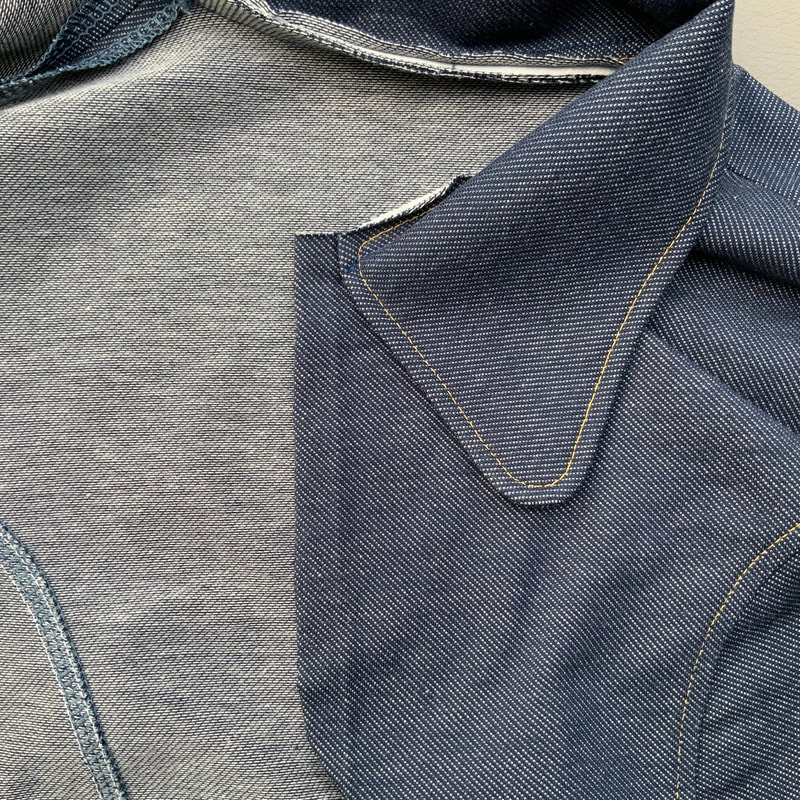
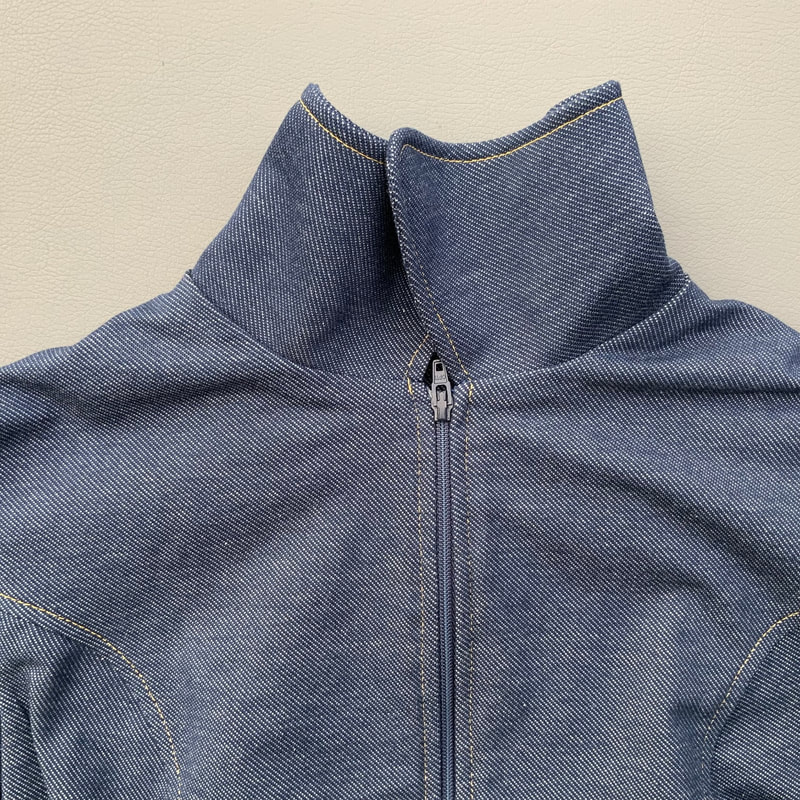
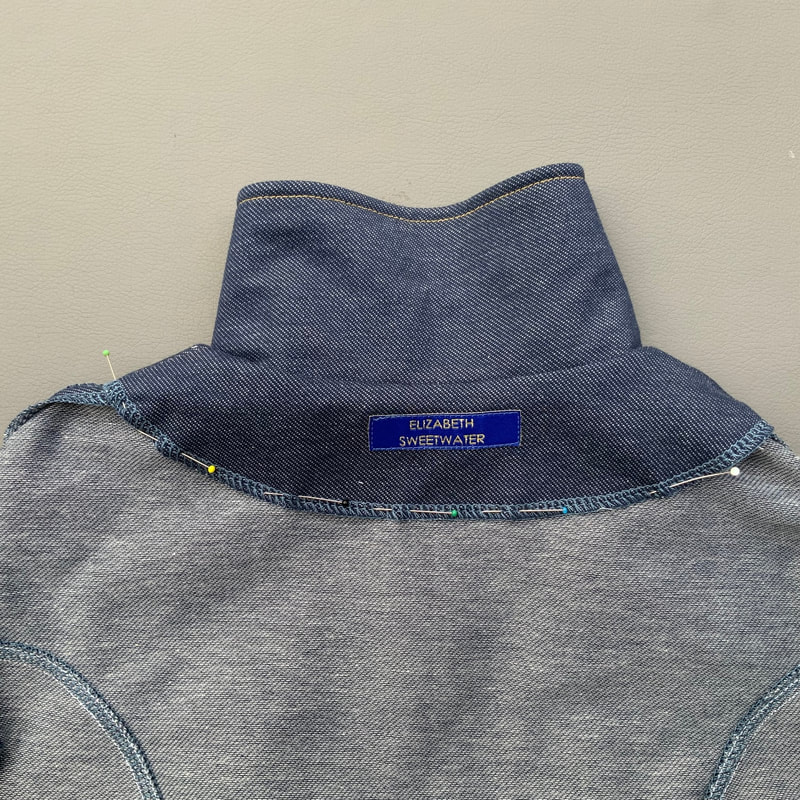
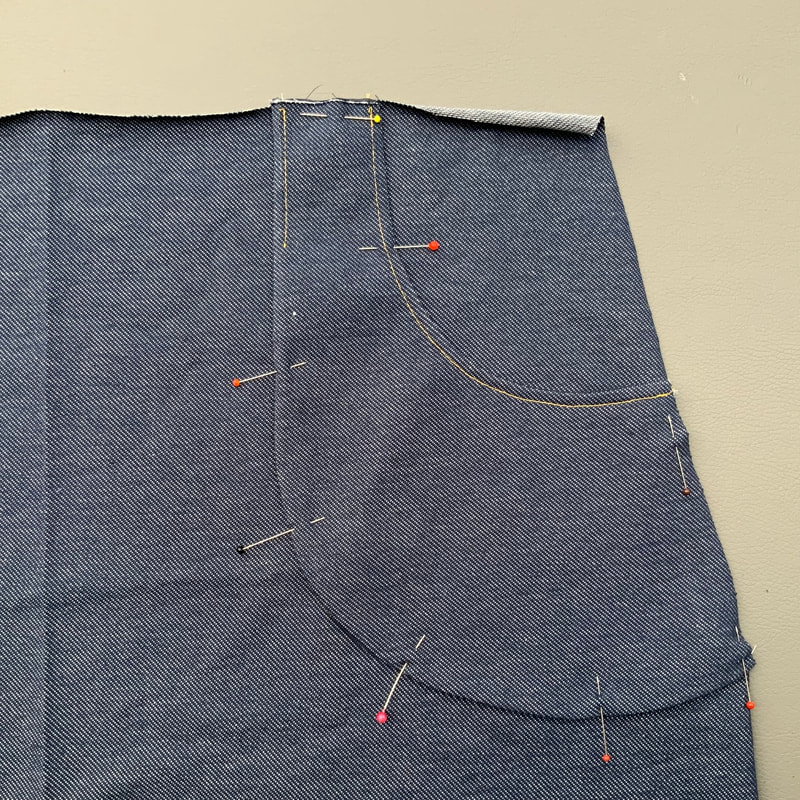
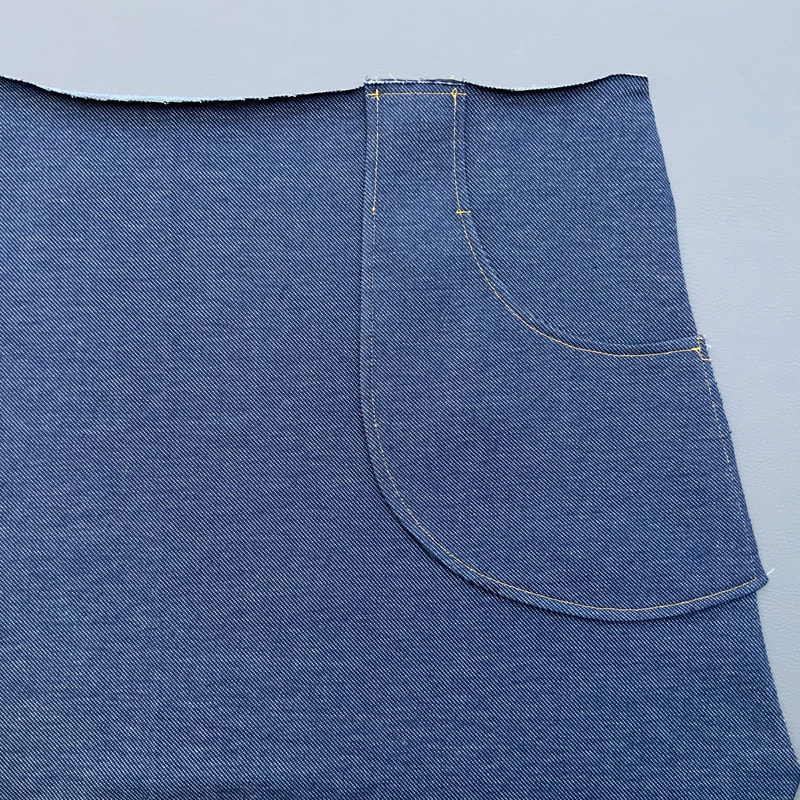
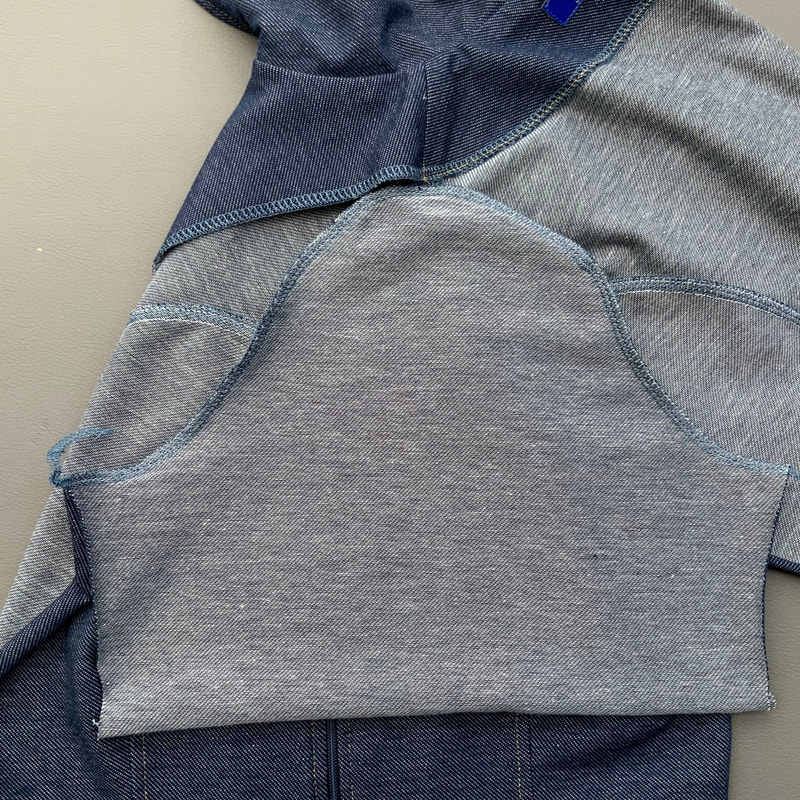
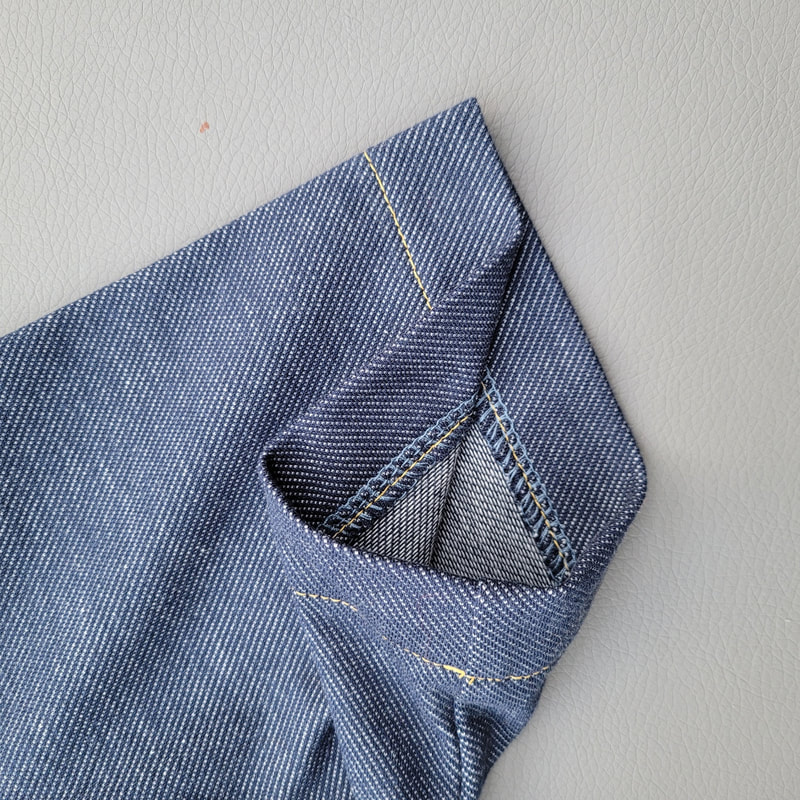
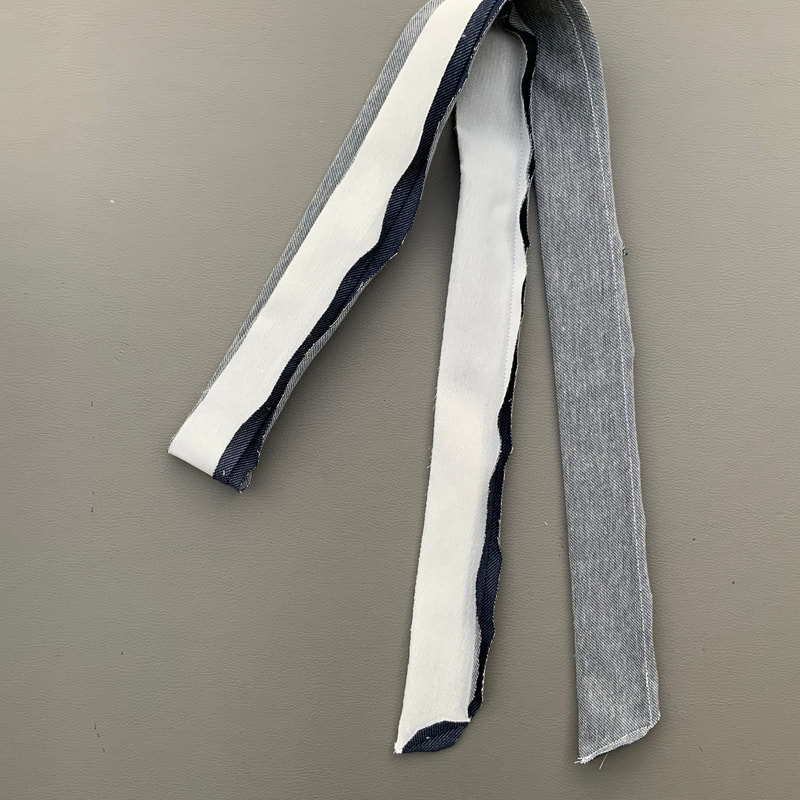
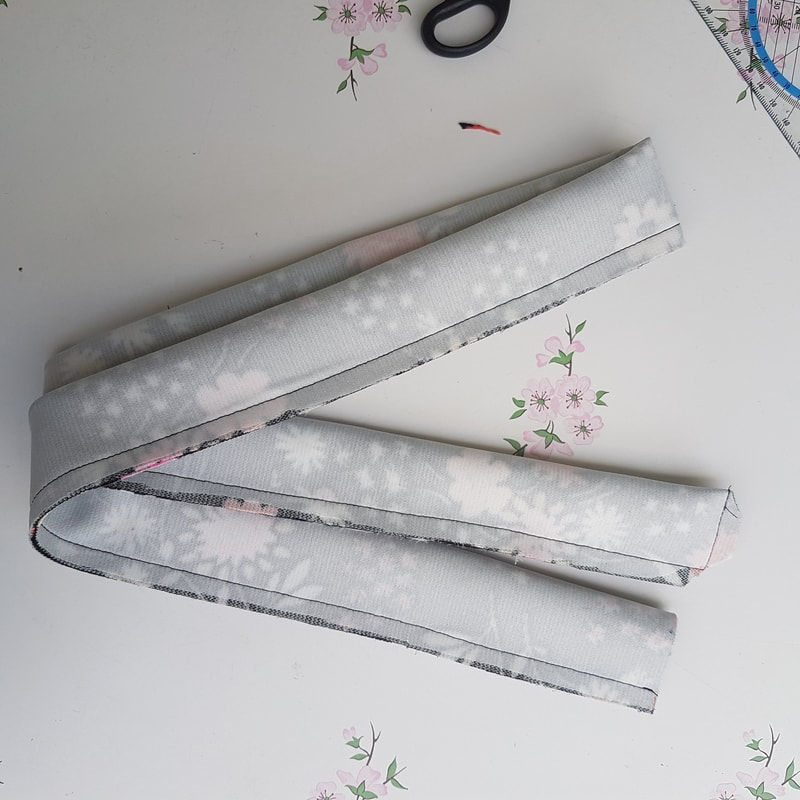
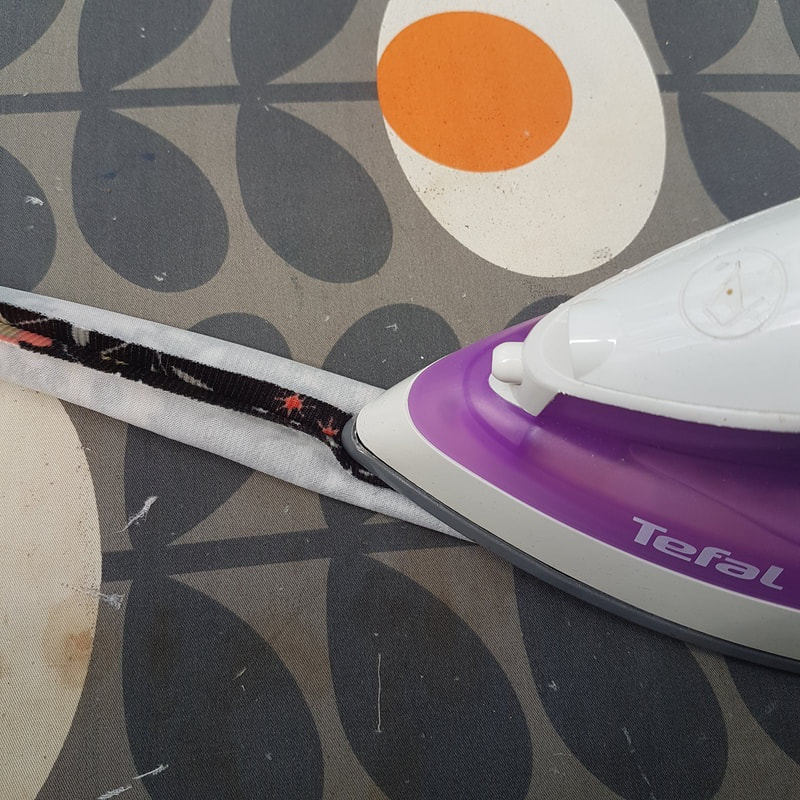
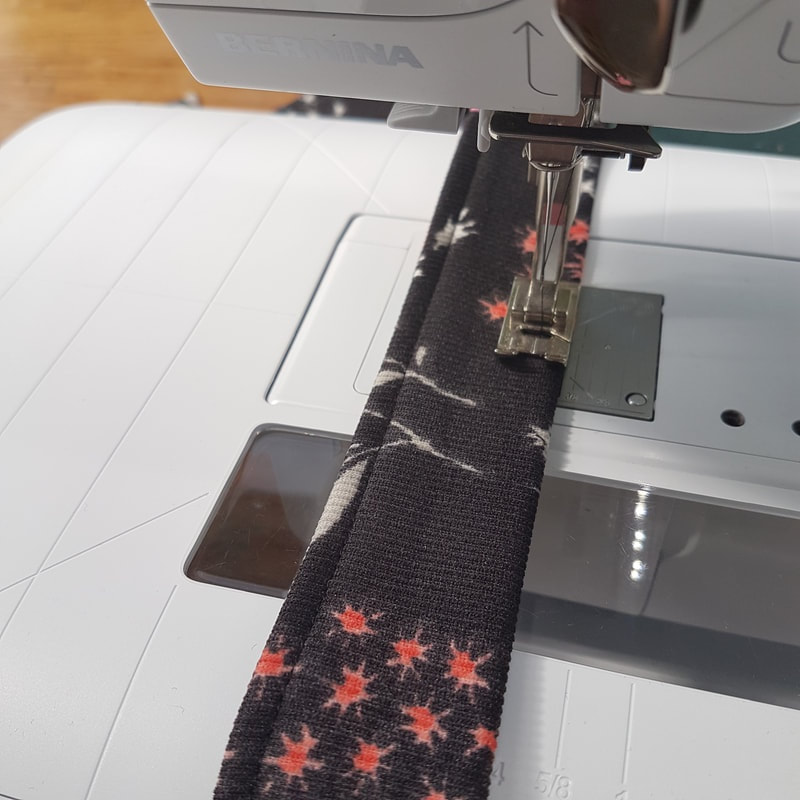
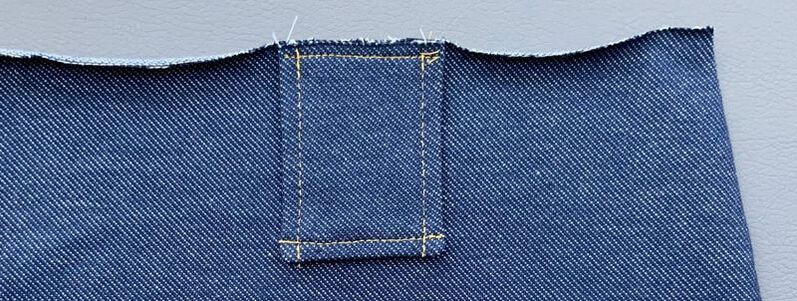
4.
Kraag, zakken en riemlussen
Collar, pocket and beltloops

Picture
4a.
Maak een kopie van het kraag patroon deel zonder de naadwaarde. Dit is een handig sjabloon om de kraagvorm over te trekken op de vlieseline. Zo kun je heel precies de vorm stikken.
Copy the patternpiece without the seam allowance. This makes a handy template to trace on the interlining part of the collar. This way you can sew the shape of the collar very precisely.
Picture
4b.
Speld de kraagdelen met de goede kanten op elkaar en stik over de lijnen.
Pin the collar parts right sides together together and sew over the lines.
Picture
4c.
Strijk de naad open op een mouwplankje.
Press open the seam on a sleeve board.
Picture
4d.
Knip de naad kort tot een paar mm.
Cut the seam short to a few mm.
Picture
4e.
Keer de kraag en pers deze plat. Stik door op 0,5cm van de rand.
Turn the collar and press flat. Topstitch on 0,5cm from the edge.
Picture
4f.
Speld en stik de voeringzakdelen en de zakdelen met de goede kanten tegen elkaar.
Pin and sew the pocketliningparts  and the pocketparts right sides together.
Picture
4g.
Stik de zakingang en de buitenrand van de zak.
Ook hier kun je het zak patroondeel zonder naadtoeslag gebruiken als sjabloon.
Sew the pocket entrance and the outside edge of the pocket. Again you can use the pocket pattern part without seam allowance as a stitch guide.
Picture
4h.
Pers de naad open en keer de zak.
Press the seam open en turn the pocket.
Picture
4i.
Knip de naden kort tot een paar mm.
Cut the seams short to a few mm.
Picture
4j.
Pers de zak plat en stik de zakingang op 0,5cm from the edge.
Press the pocket flat and topstitch the pocket entrance on 0,5cm from the edge.
Picture
4k.
Stik het lusdeel van de zak tot het aangegeven punt op je patroondeel door op 0,5 cm van de kant.
Topstitch the loop part of the pocket up to the indicated point on the pattern on 0,5cm from the edge.
Picture
4l.
Speld en stik de voeringlusdelen en de lusdelen met de goede kanten tegen elkaar. Knip de hoekjes weg op op 45 graden. Pers de naden open. Keer de lussen en pers plat. Stik de zijkanten van de lussen door op 0,5cm van de rand.
Pin and sew the lining parts and the loopparts right sides together. Cut away the corners on 45 degrees. Press open the seams. Turn the loops and press flat. Toptitch the sides of the loops on 0,5cm from the edge.

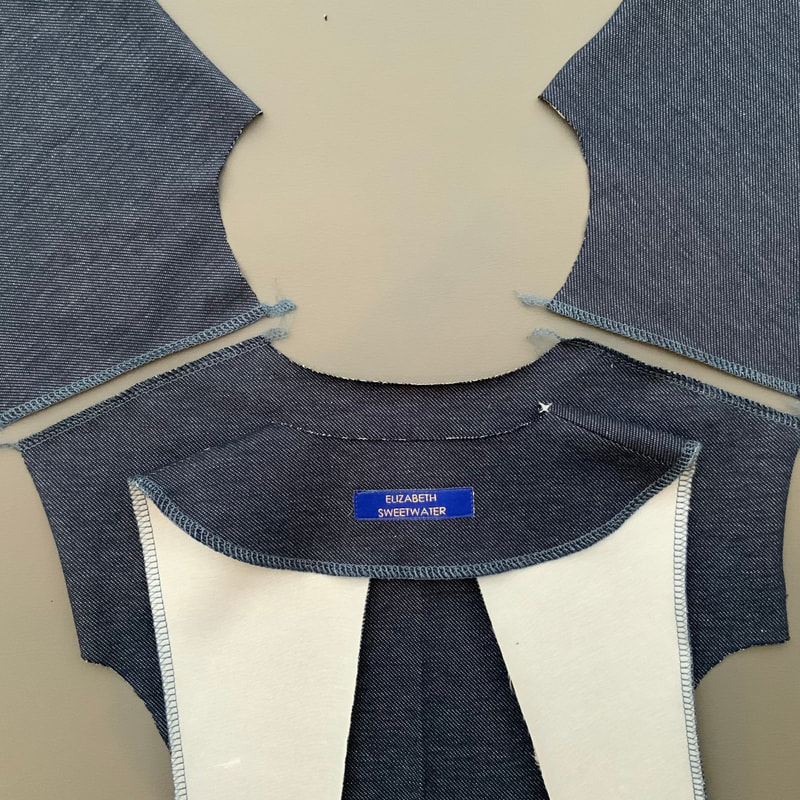
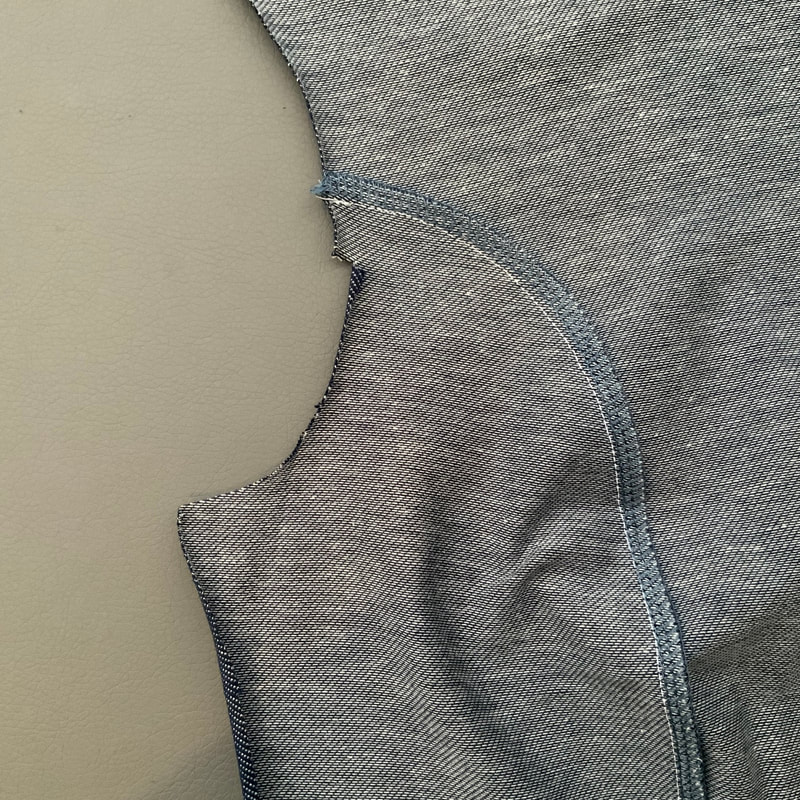
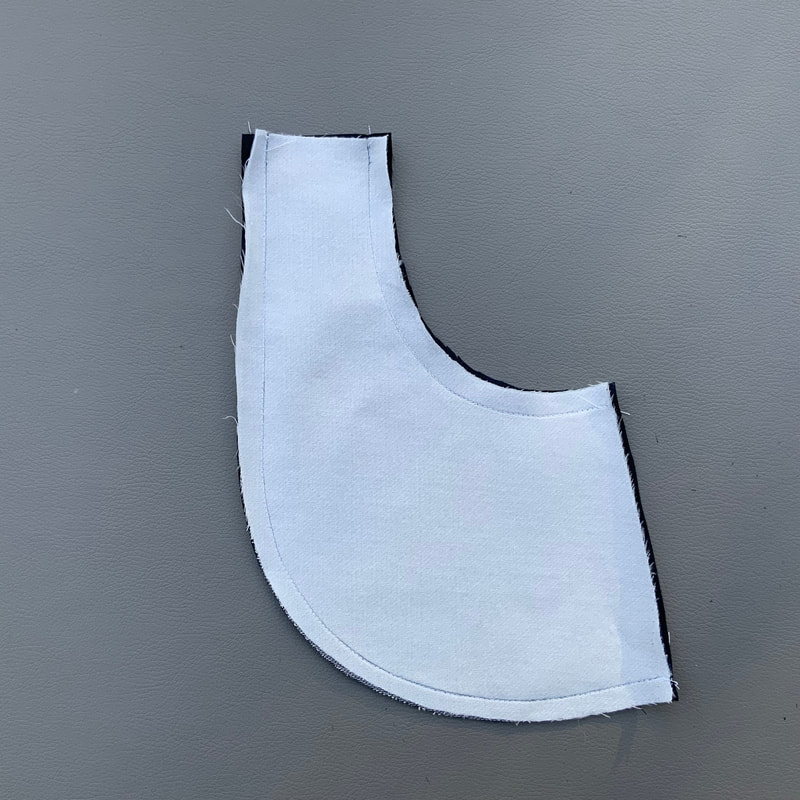
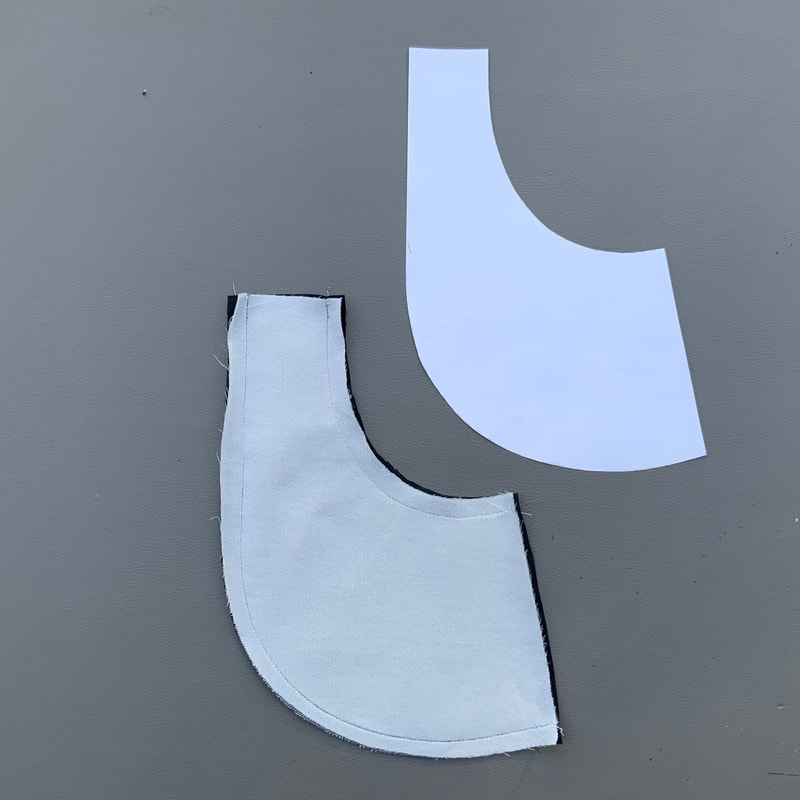
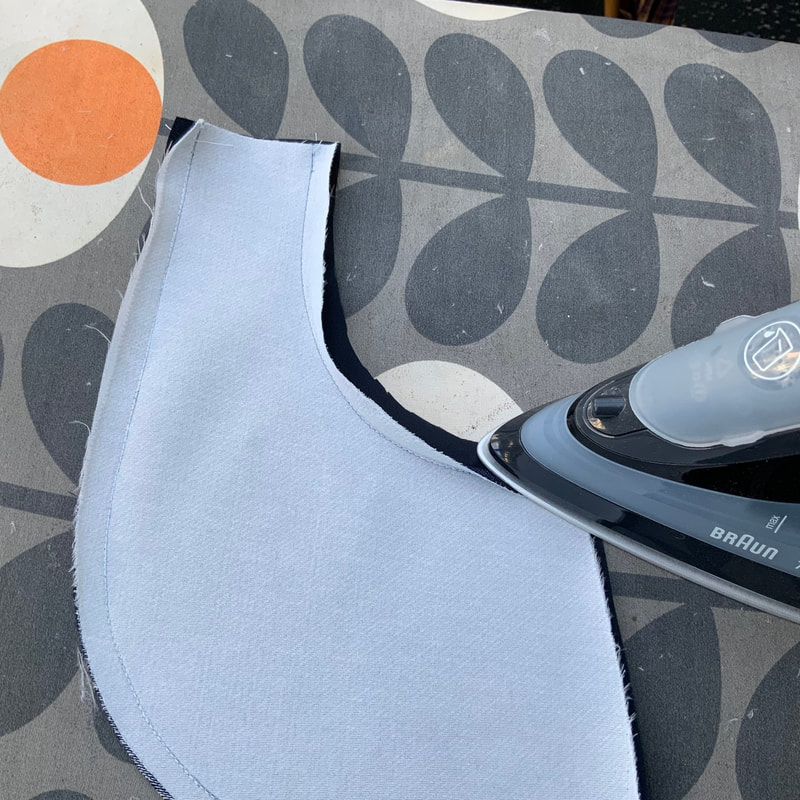
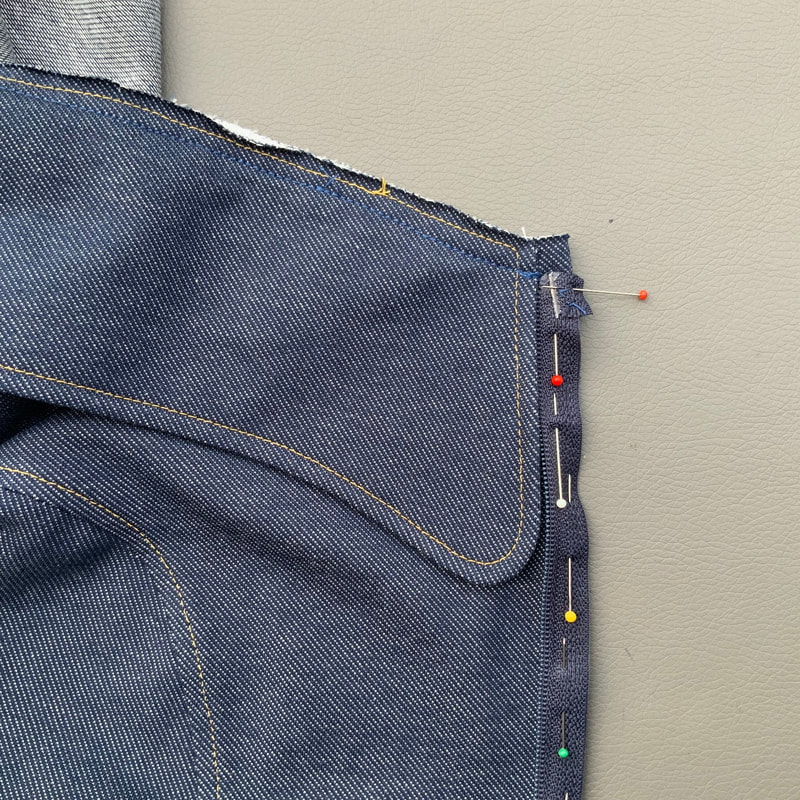
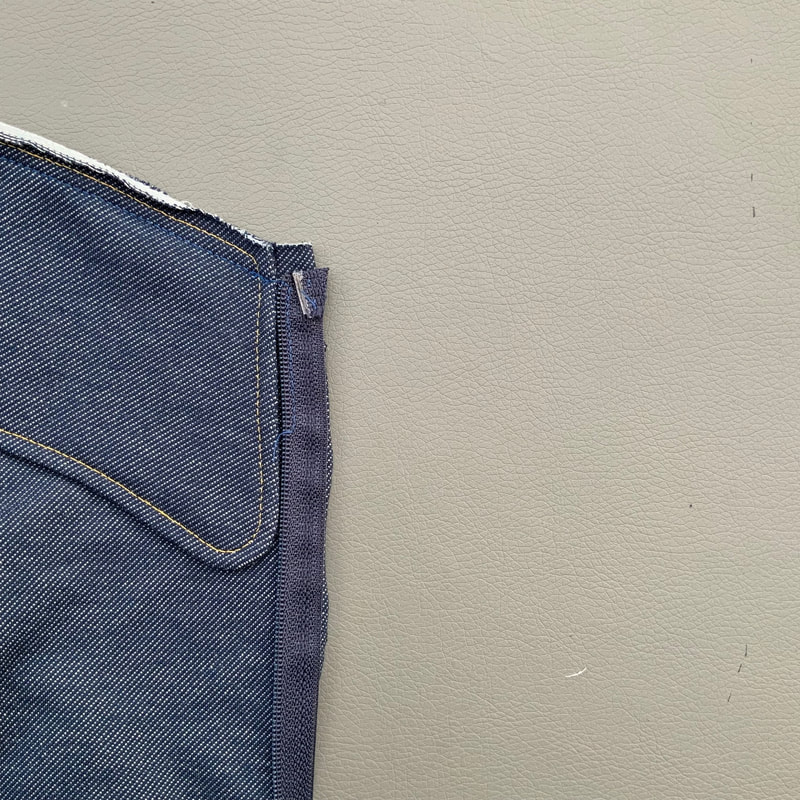
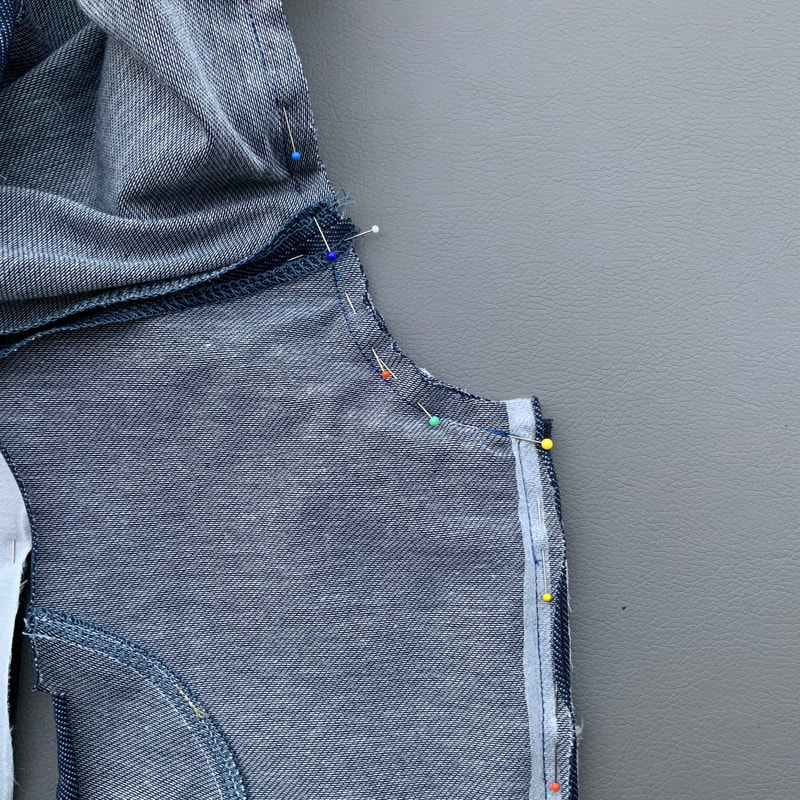
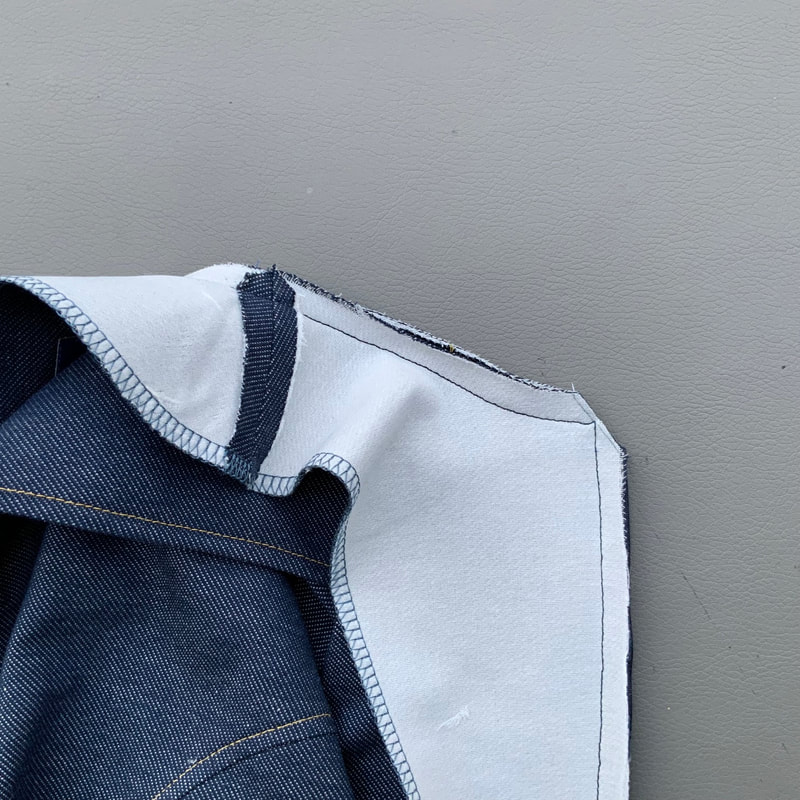
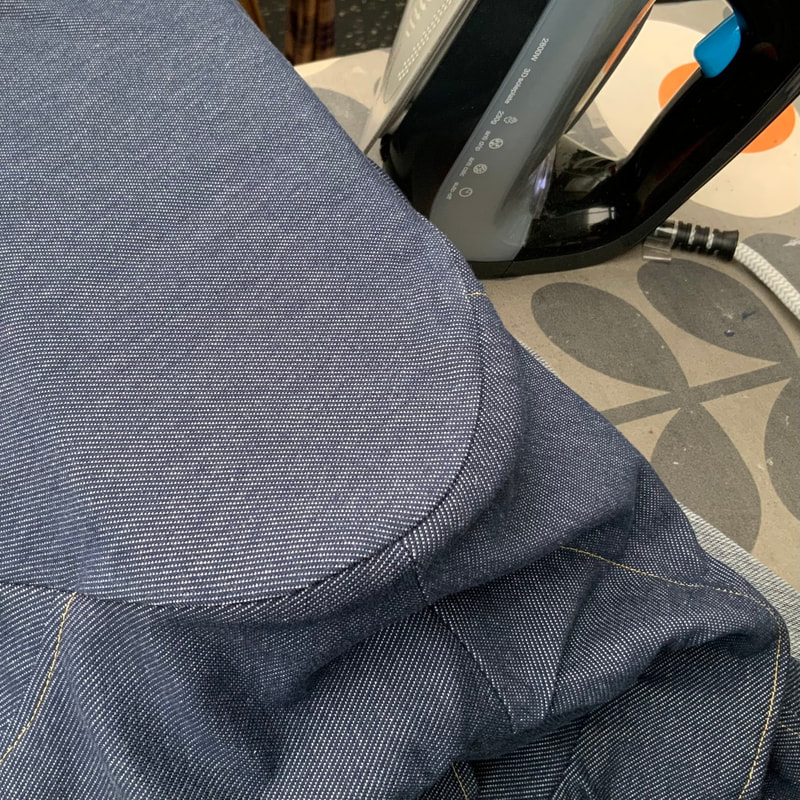
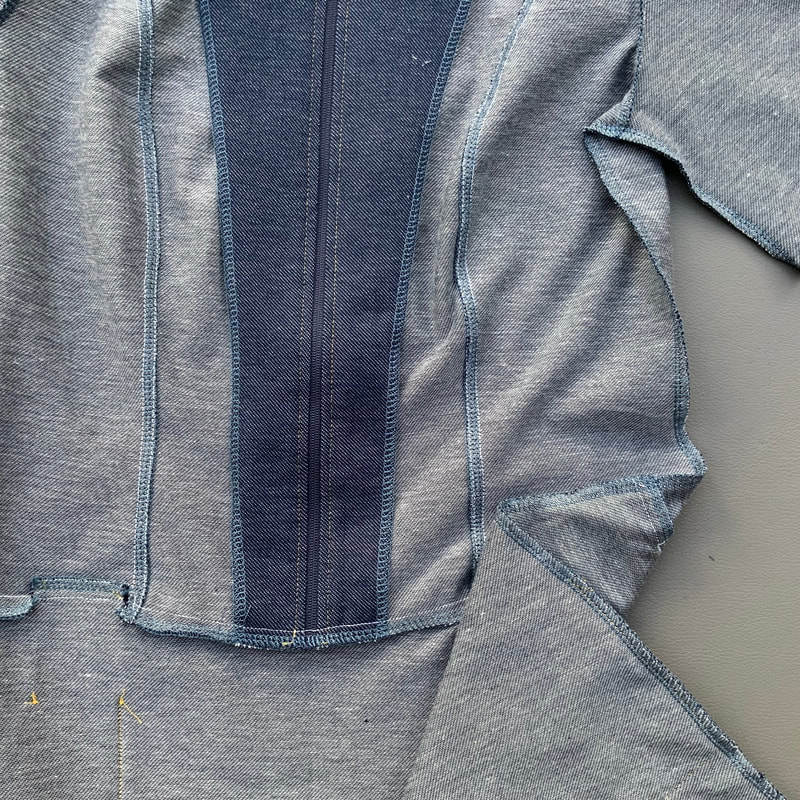
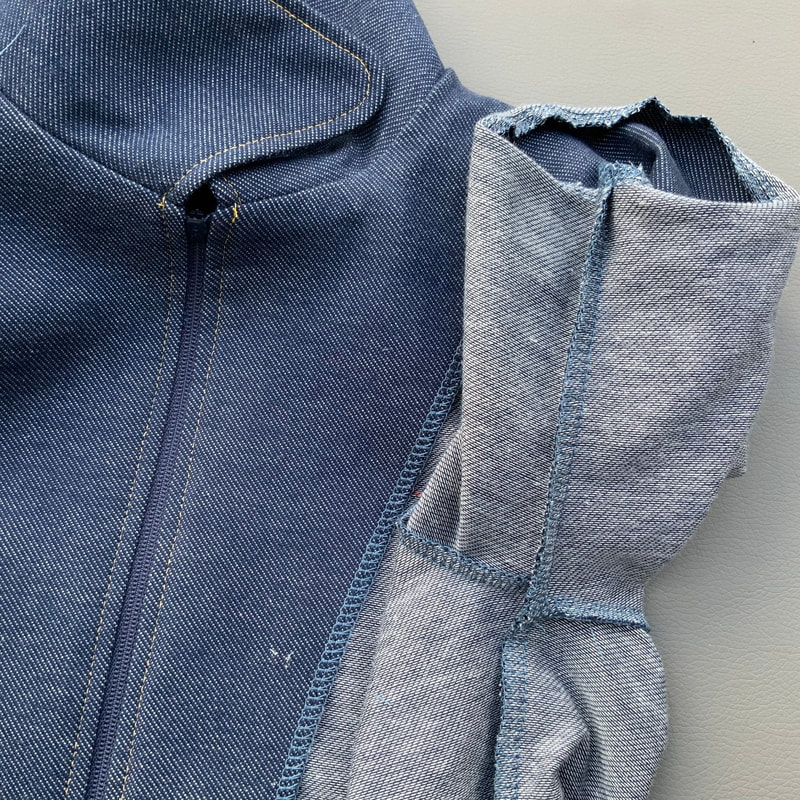
5.
Kraag aanzetten, rits en beleg
Attach collar, zipper and facing

Picture
5a.
Speld en stik de schoudernaden met de goede kanten tegen elkaar.
Pin and sew the shoulderseams right sides together.
Picture
5b.
Speld en stik de kraag langs de hals. Gebruik hierbij de kniptekens.
Pin and sew the collar to the neck. Use the markings on the pattern.
Picture
5c.
Laat 1cm naadwaarde  over middenvoor voor de rits.
Leave 1cm seam allowance midfront for the zipper.
Picture
5d.
Verwissel het gewone voetje voor het ritsvoetje en zet de naald in de meest linker stand.
Change the regular foot for the zipperfoot and place the needle in the most left position.
Picture
5e.
Vouw het stukje band aan bovenrand van de rits om tot het metalen "stoppertje". Zet dit eventueel met een steekje vast. Leg de rits met de goede kant tegen goede kant van de stof, het metalen stoppertje 1cm onder de rand. Speld de rits vast en stik met een gewone stiksteek op de naaimachine.
Fold over the piece of tape at the top of the zipper up to the metal stopper. Optionally secure with a handstitch. Pin the zipper right side on top of the right side of the fabric. The metal stopper of the zip goes on 1cm  under the top edge. Pin and stitch with a regular stitch on the sewing machine.
Picture
5f.
Begin met naaien als de rits open is. Als de rits wat langer is kun je de rits openen en kun je de rits in een keer aanzetten zonder halverwege de rits te moeten sluiten. Speld en stik vervolgens ook de andere ritshelft. Stik eerst een klein stukje (zie foto), kijk dan of beide kanten even hoog zijn en stik dan de rest van de ritshelft.
Sew one half of the zipper, regular stitch. Start sewing when the zipper is open.When the zipper is longer than the front piece, you can open the zipper all the way and sew in the zipper without having to close it half way. Pin and sew the other half of the zipper. First sew a few cm (see image), check if both sides line up and then continue sewing the other zipperhalf.
Picture
5g.
Nu moet het beleg tegen de rits aangezet worden. Leg je de goede kanten van het hals/voor beleg tegen de goede kanten van de halsopening en voorkanten van het bovenstuk. Speld het beleg vast aan de voorpand zijde, niet aan de beleg zijde. Stik de hals en de voorkanten van het bovenstuk en beleg aan elkaar door over het zichtbare stiksel heen te stikken.
Now the facing needs to be attached to the zipper. Lay the right side of the neck/front facing on the right side of the neckopening and front part. Pin the facing on the front side, not the facing side. Sew the neck and front of the top to the facing by following the visible stitchline.
Picture
5h.
Knip middenvoor het hoekje weg aan de bovenkant op 45 graden. Strijk de naden open en keer het beleg.
Cut away the access fabric top midfront at 45 degrees. Iron open the seams and turn the facing.
Picture
5i.
Stik de randen langs de rits door op 0,5cm.
Topstitch the edges along the zipper on 0,5cm.
Picture
5j.
Speld en stik het achterhals beleg door.
Pin and sew the back neck facing.
Picture
5k.
Speld de zak op het voor-rokdeel zoals aangegeven op het patroon.
Pin the pocket on the front- pocketpart as indicated on the pattern.
Picture
5l.
Stik de zak door vanaf het punt waar de lus open is op 0,5 cm van de kant. Zet ook een stiksel daar waar de zakingang stopt en de riemlus begint.
Topstitch the pocket from the point where the opening of the loop is at 0,5 cm from the edge. Also fasten the point where the pocket entrance ends and the beltloop starts with a few stitches.
Picture
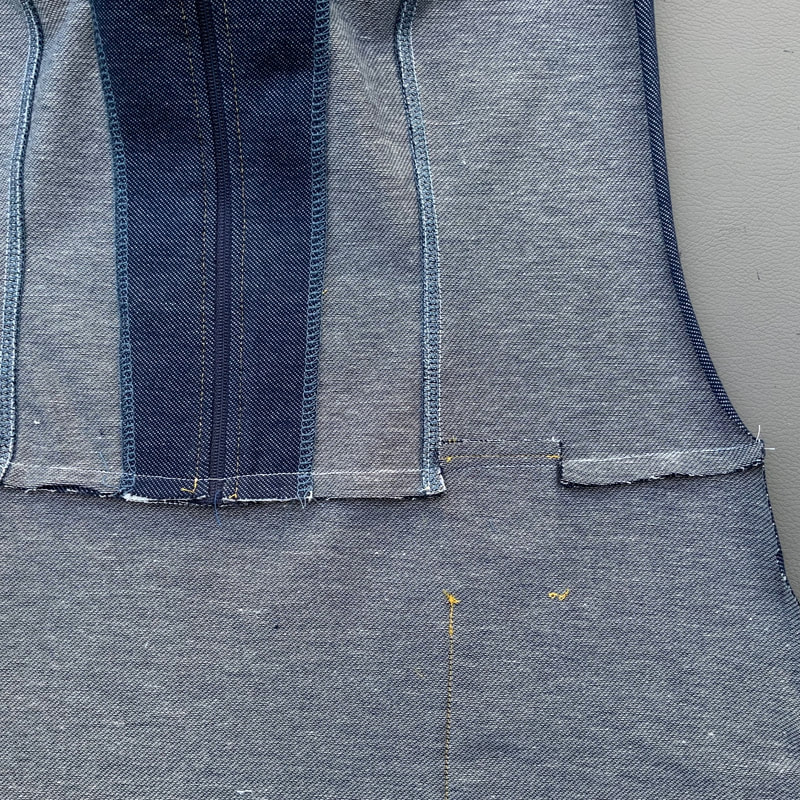
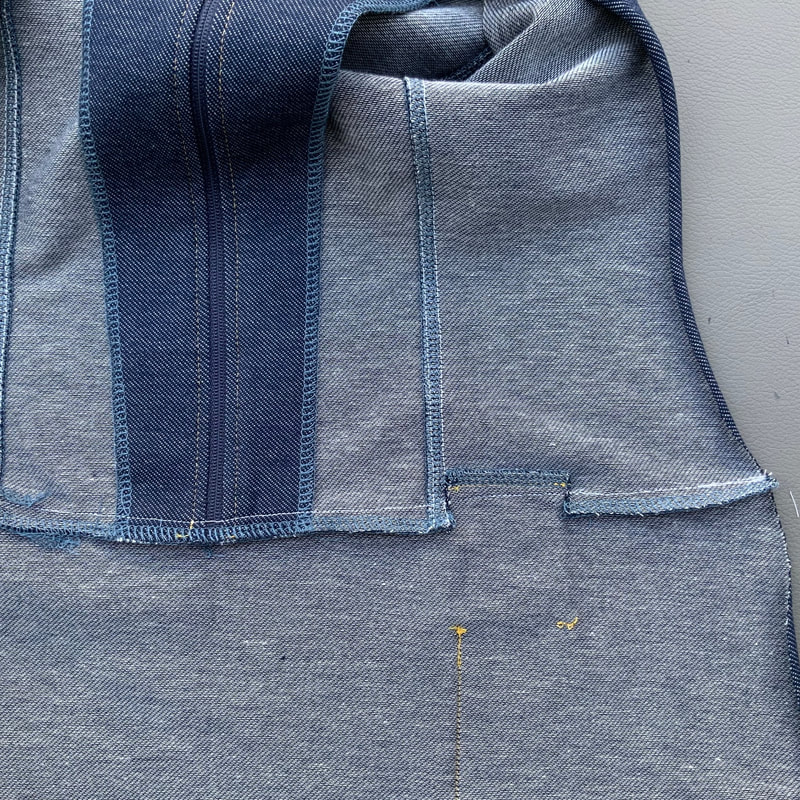
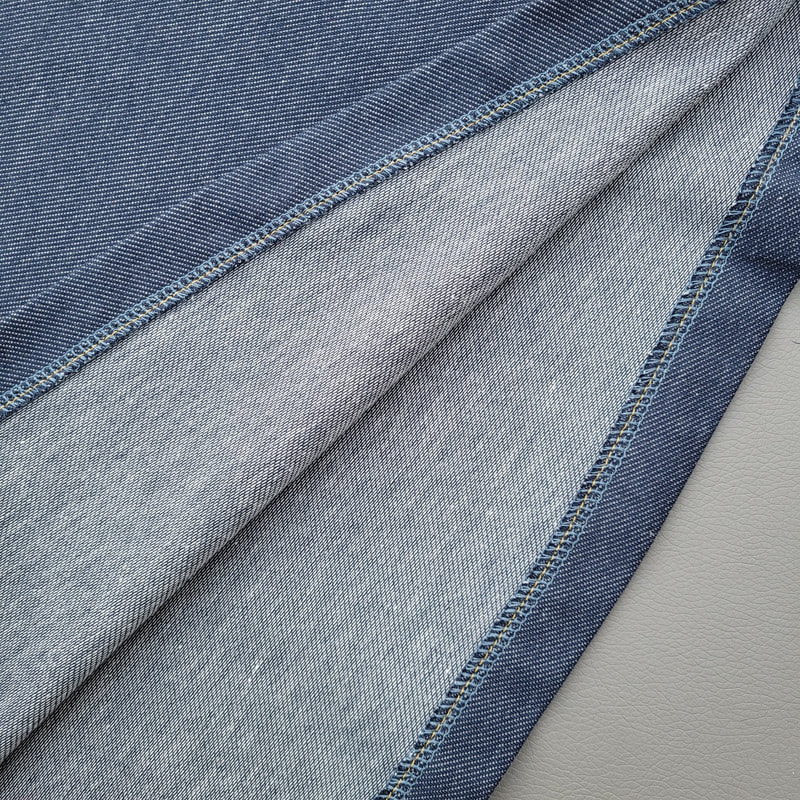
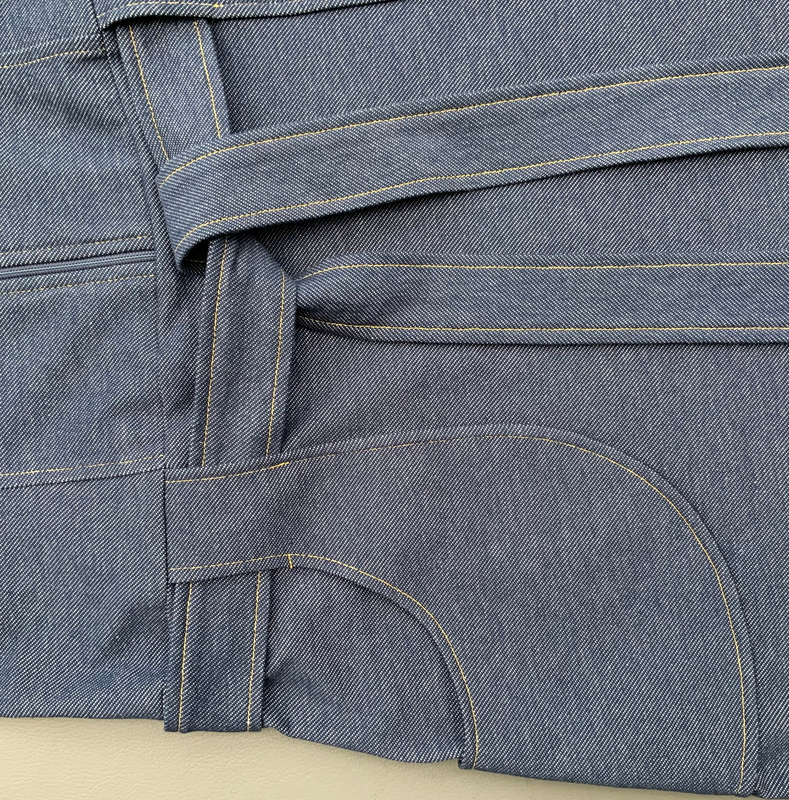
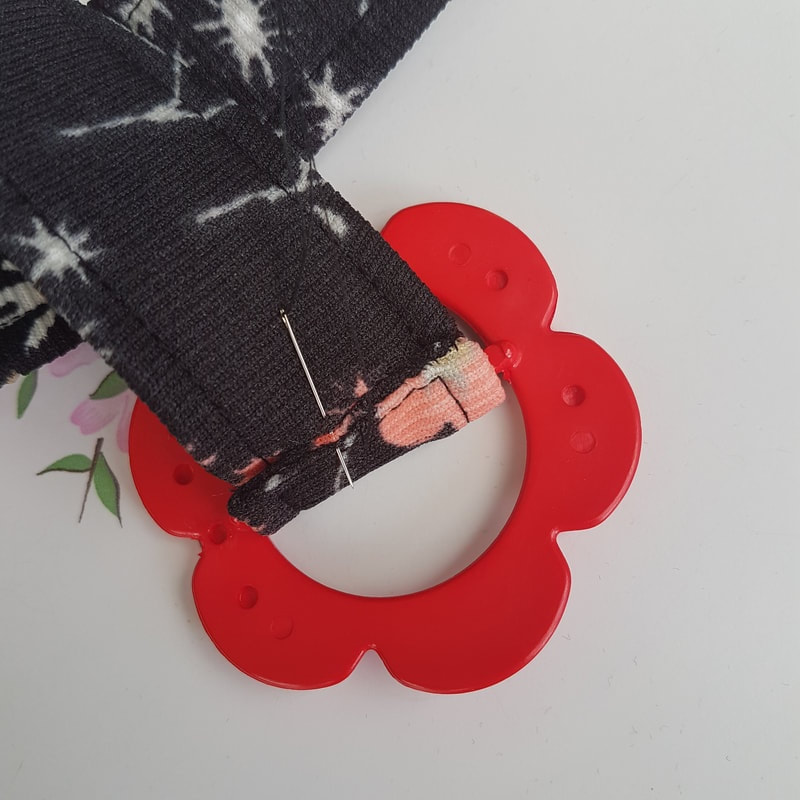
5m.
Stik de riemlussen vast op het achterpand.
Sew the beltloops to the back skirt part.

6.
Mouwen, zijnaden en zoom
Sleeves, sideseams and hem

Picture
6a.
Speld en stik met een overlock steek de mouw in het armsgat. Gebruik hiervoor de kniptekens. Voor het inzetten van de mouwen is het raadzaam de steekbreedte aan te passen naar 0,5cm. Snijd dan wel 0,5 cm naadwaarde weg.
Pin and sew with an overlock stitch the sleeve into the sleeve opening. Use the markings on your pattern. For sewing in the sleeves it is advisable to adjust the stitch width to 0,5cm. Make sure you cut away 0,5cm seam allowance.
Picture
6b.
Gebruik een mouwplank om de mouw te persen. Pers de naad richting mouw.
Use a sleeve board to press the sleeve. Press the seam in the sleeve direction.
Picture
6c.
Speld bovenstuk en rokdelen met de goede kanten tegen elkaar. Stik met een machine steek de delen tegen elkaar. Geef (alleen in het voorpand) knipjes in de naad links en rechts van de riemlussen.
Pin top and skirt pieces right sides together. Stitch with a machine stitch the parts together. Make (only in the front piece) snips in the seam to the left and right of the belt loops.
Picture
6d.
Werk de naden af in delen met de overlockmachine. Stop bij het knipje, knip de draden af en begin weer bij het knipje tot de volgende. Strijk het korte stukje omhoog, de rest omlaag. De taillenaad van het achterpand werk je ook af met de overlockmachine, deze naad strijk je omhoog.
Finish the seams in sections with the overlock machine. Stop at the snip, cut the threads and start again at the snip until the next one. Iron the short piece up, the rest down. You also finish the waist seam of the back piece with the overlock machine, ironing this seam upwards.
Picture
6e.
Speld de zijnaad en stik met de overlock machine, in één lijn van mouw tot onderkant.
Pin and sew the sideseams with the overlock machine in one line from sleeve to hem.
Picture
6f.
Vouw hierbij de mouwnaad naar boven bij het voorpand en naar beneden bij het achterpand.
Fold while sewing the armhole seam up for the front and down for the back.
Picture
6g.
Werk de onderkant van de mouw af met overlock. Naai de zoom vast met een gewone steek. Voor de beschijving van de mouwboorden: ga naar stap 11 van de zipper dress werkbeschrijving.
Finish the bottom of the sleeves with an overlock stitch. Sew the hem with a regular stitch. For the description of the rib cuffs: go to step 11 of the zipperdress.

Picture
6h.
Werk de onderkant van de rok af met overlock. Naai de zoom vast met een gewone steek.
Finish the edge of the skirt with an overlock stitch. Sew the hem with a regular stitch.
Picture
6i.
Vouw de strook stof voor de ceintuur dubbel in de breedte. Spelt en stik de strook. Je kunt de uiteinden recht laten of schuin.Laat een stukje in het midden open. Strijk de naad open en keer de ceintuur.
Fold the strip of fabric for the belt in half widthwise. Pin and sew the strip. The ends can be left straight or cut at an angle. Leave a little opening in the middle to turn the belt. Press open the seam and turn the belt.
Picture
6j.
Stik de ceintuur door op 0,5cm van de rand en sluit meteen de opening.
Topstitch the belt on 0,5cm from the edge and close the opening.

Picture
6k.
Voor de ceintuur met gesp: Vouw de strook stof voor de ceintuur dubbel in de breedte. Spelt en stik de strook. Laat één kant open. Knip de hoek schuin af.
Fold the strip of fabric for the belt in half widthwise. Pin and sew. Leave one side open. Cut the corner.
Picture
6l.
Pers de naad open.
Press open the seam.
Picture
6m.
Keer de riem, pers plat en stik door op 0,5 cm van de kant.
Turn the belt, press flat and topstitch on 0,5 cm from the edge.
Picture
6n.
Vouw de open kant om het middenstaafje van de gesp en zet met de hand vast.
Fold the open end around the bar of the buckle and handstitch.
Picture
Picture
Nu de jurk netjes strijken en ze is klaar!
Give your dress a final press and she's finished!


Comments are closed.
    Picture

    Author

    For all the latest patterns to buy visit my Etsy shop today.

Powered by Create your own unique website with customizable templates.
  • Tutorials
  • Movies
  • Happy Sewers
  • About